Cap for the game channel. Designing a public VKontakte: how to make a menu and a header
In this article I will tell you about new feature social network In contact with.
More recently, it became possible to make a hat in a group or community. This allows a little change. appearance Your group and stand out from the rest.
The new hat looks fresh and more beautiful than the old avatar.
You can also place in the header more information, add a phone, an official website and a logo without overloading the image. That is why it is worth making a hat in a group.
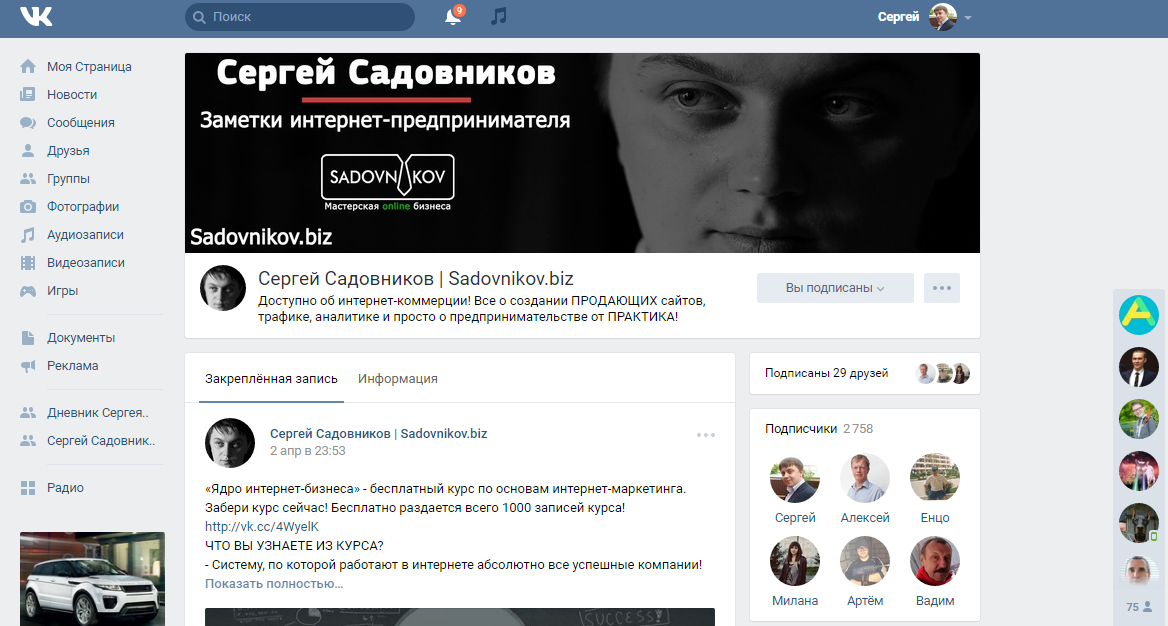
What does a hat look like in a group or community on VK:
Today in my community I changed the heading, by the way, join the community, new articles appear there immediately after publishing them on the blog. My community today looks like this:
How to make a hat in a group or community VKontakte:
Let's get to practice, first you need to create this header in any of your image editor.
Hat sizes for VKontakte group: 1590x400 pixels.
Prepare an image of the desired size in advance, after which only a few clicks will remain and your group or community will have a large vertical header.
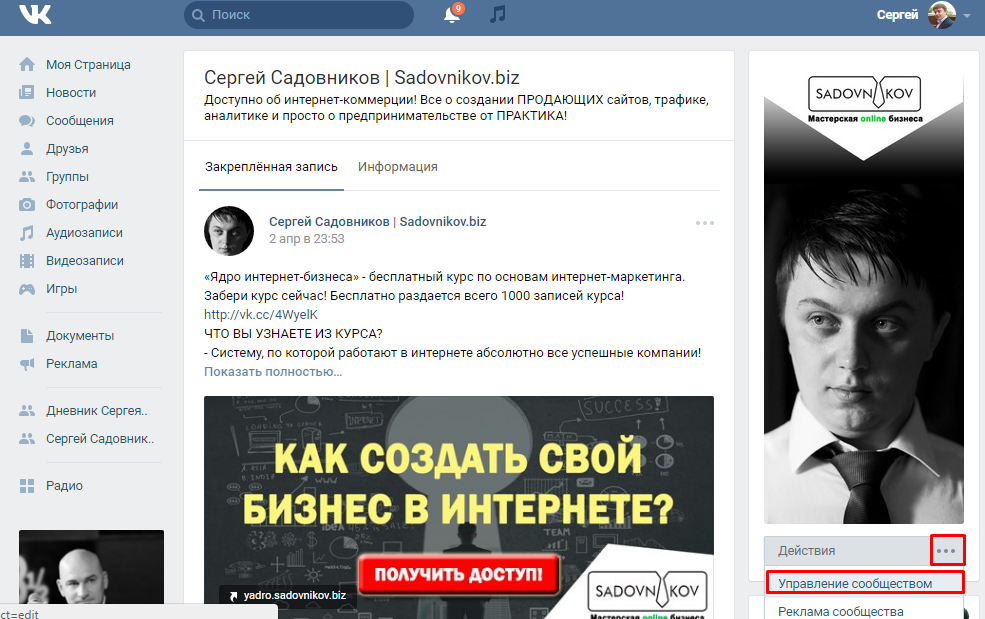
After preparing the image, go to the community page and go to the "Community Management" page:
Once on the community management page, you just have to find the “Community Cover” line and click the download button:

By clicking download, select your pre-prepared header for the group (1590x400 pixels in size) and click save and continue:

All! A hat is installed in your community!
How to do PICTURE for the VKontakte header and generally for anything:

If you were looking for instructions on how to do beautiful picture on the VKontakte header, and not how to install it on the site itself.
Then the course will help you with this.
it best course Photoshop, for beginners.
I suggest you familiarize yourself with the training option that offers
Zinaida Lukyanova - creator of the project "Photoshop-master" - the largest portal for Adobe Photoshop in the Russian-speaking space. The quality of training, this method is practically not inferior to a personal mentor, but it costs hundreds of times cheaper and is available to everyone.
I hope the article was useful to you, and you learned how to make a header in the group or community of VKontakte.
This social network does not stop updating its site. Behind last year a lot of updates affected given network. For the better or not, time will tell.
To me new design social networks like more, and the ability to add products to groups is also very  useful. It seems to me VKontakte, goes towards business, but whether it will suffer regular user? This question will only show time.
, comment, share this article on social networks.
I wish you good luck and new subscribers.
Sincerely, Sergey Sadovnikov.
Sp-force-hide (display: none;). Sp-form (display: block; background: rgba (250, 108, 108, 1); padding: 15px; width: 100%; max-width: 100%; border -radius: 0px; -moz-border-radius: 0px; -webkit-border-radius: 0px; border-color: #dddddd; border-style: solid; border-width: 1px; font-family: Tahoma, Geneva, sans-serif;). sp-form .sp-form-fields-wrapper (margin: 0 auto; width: 710px;). sp-form .sp-form-control (background: #ffffff; border-color: #cccccc ; border-style: solid; border-width: 1px; font-size: 15px; padding-left: 8.75px; padding-right: 8.75px; border-radius: 4px; -moz-border-radius: 4px; -webkit -border-radius: 4px; height: 35px; width: 100%;). sp-form .sp-field label (color: rgba (255, 255, 255, 1); font-size: 13px; font-style: normal; font-weight: bold;). sp-form .sp-button (border-radius: 4px; -moz-border-radius: 4px; -webkit-border-radius: 4px; background-color: # f5ff2e; color : # 171717; width: auto; font-weight: bold; font-style: normal; font-family: Arial, sans-serif; box-shado w: inset 0 -2px 0 0 # e4f000; -moz-box-shadow: inset 0 -2px 0 0 # e4f000; -webkit-box-shadow: inset 0 -2px 0 0 # e4f000;). sp-form .sp-button-container (text-align: right;)
Subscribe
Graphic elements in the design of the VKontakte community capture the visitor’s attention, hold him, and also increase the recognition of a group or public among thousands of similar communities. In addition, the graphical menu facilitates navigation through sections of the group, helping members and other users of the social network to navigate the structure of a large community.
A search in VK or viewing a portfolio of designers will show a lot good examples design of Vkontakte groups, from which you can build on the selection of cover menus for your community.
The following design dimensions of the VKontakte group are used:
- The cover of the page is shown at the top, the entire width of the public, size 1590 x 400 pixels;
- Large avatar - a vertical banner 200x500 px (aspect ratio 2: 5), shown at the top right;
- A small avatar, a round picture, is shown in each message of the group, the size is 200x200 pixels.
- Image of the menu for the VKontakte group, width 510 pixels, height - 307 (so that the bottom edge of the menu beautifully matches the bottom big avatars on the right).
If the cover image is loaded in the community settings, the large avatar on the right is not shown.
How to make a hat for the VKontakte group yourself
To make the community header look beautiful, all its graphic components must be decorated in the same style (a set of colors, logos, fonts) or be part of one picture. When you design a Vkontakte group yourself, the first step is to prepare background image. It can be a thematic picture from free photobanks (for example, pixabay.com).
Open the picture in a graphical editor. Crop or scale to size: length 1590 px, height 400 px. 
Then you can put the necessary inscriptions (group name, slogan, call to join the community). Now you need to upload the cover to the community, for this go to the menu item "Community Management": 
Click on the “Download” caption in the “Community Cover” box. 
In the next window, select the cover file previously prepared on the computer, and click on “Save and continue.” 
Now in your group will be new cover. Keep in mind that in this case the vertical picture of a large avatar on the right will no longer be shown.
- The picture or photo should be relevant to the community.
- Use high quality images.
- Do not violate other people's copyrights to images (currently free stocks offer a large number of and photos and illustrations).
- Do not overload the cover with details.
- If you put a person’s photo on the header, it’s better that he doesn’t look at the visitor, but at the most important element on the page (menu, website address, campaign message, call).
- Use high-quality fonts and make sure labels are legible at any scale.
The sizes of the caps in the public VKontakte in the new design
After the redesign of this social network, new item design - cover. This is a large horizontal image of 1590 by 400 pixels. The hat for the VKontakte group is a static picture. Large enough to place on it a bright, memorable photo or picture and the name of the public, the company's slogan, site name, work schedule and other inscriptions. 
How to make a menu for a VK group in a new design
The menu design process for the VKontakte group consists of the following steps:
- Preparation of a list of menu links (these can be pages, community sections or external sites).
- Background image preparation.
- Drawing on the background image of inscriptions and "buttons" of the menu.
- Slicing the image into pieces.
- Enabling a wiki page.
- Loading a graphical menu and formatting it with wiki markup.
The background image should be 510 pixels wide, and the height depends on the number and placement of menu items. To work with images you need a raster graphics editor, below are examples using the free and light Paint.Net.
Immediately you should plan the placement of menu items so that the picture can be cut into fragments of the same size. This is important for the menu to scale normally on the screen of smartphones or tablets.
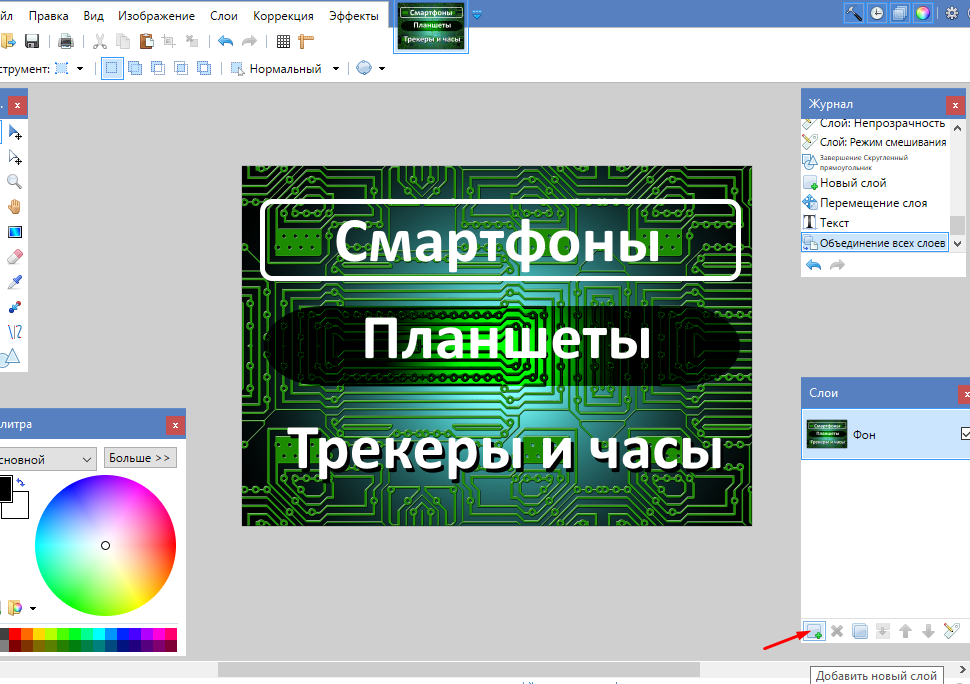
VC community vertical menu with items in one column
Open the picture in the editor. Using the Text editor tool, write menu items on top of the background. To make menu labels noticeable, they can be distinguished in several ways:
- Outline;
- Change the background color under the letters;
- Add shadow to letters.
Below in the screenshot, each item is highlighted in one of the ways. 
The next step is slicing the image into pieces:
The image slicing process can also be performed using the convenient online tool www.imgonline.com.ua/cut-photo-into-pieces.php.
Next, in the "Community Management" menu, go to the "Sections" item and in the "Materials" section, select "Limited" (this means that only the group administrator can create and edit pages). 
Click save and go to home group. Near the section with information about the group appeared the item "Latest News". 
Go to this section and click edit. Change the title to “Menu” and then click on the camera icon to add an image. 
Click on the added picture and in the properties window specify a link to the desired section. 
Vkontakte automatically reduces images to 400 pixels and inserts extra tags. To fix this, you need to switch to markup editing mode. 
Each image tag begins with “[[” and ends with “]]”, consists of three parts, separated by the symbol “|”: image ID, properties and link. You need to adjust the size of the pictures and insert the tag "nopadding" in their properties. Image properties are listed through ";". 
After saving the changes, the creation of the menu is completed. 
Menu with horizontal or multi-line arrangement of items
In this case, the preparation of images is also performed, but with the source being cut vertically. Sliced \u200b\u200bfragments are loaded via the page editing interface. The relative position of the rectangular fragments is set using the table wiki markup in VK. Each image tag with a link described in the previous section is placed inside the table cell.
Table design rules:
- The beginning is indicated by the symbol "(|", the end of the table is "|)".
- Additional properties are specified after "| ~"
- New line starts with "| -".
- Each cell is separated by a “|”.
To exclude extra spaces you need to specify the parameters of the "fixed nopadding noborder" table. The layout of the graphical menu of 2 columns and 2 rows looks like this: 
And the menu itself in the group: 
The size of the group avatar in the new design for the design of the public VK
There are two options for avatars in VKontakte communities:
- A large rectangular banner of 200 by 500 dots is shown at the top right if the cover is not loaded.
- Thumbnail 200x200 pixels, shown in posts and discussions as a circle.
Want to decorate your group in VK (Vkontakte) and create a unique header (cover) for it? In this article I will talk about what size and format it should be, how to add a header to VK, and also lay out the source PSD (photoshop format) of the template of the desired size.
How to make a hat (cover) for a group in VK?
What is a hat in a group in VK? This is just a picture, size 1590 × 400 and format - JPG, GIF or PNG. It is located above in the VK group, it looks like this:

Step 1. Create an image of the desired size.
First we need to create the picture itself, for this I used Photoshop (Download finished template at pSD format can ). Open Photoshop, select in the menu “File” -\u003e “Create” (“File” -\u003e “Create”).

A window will appear where you need to specify the image size, we will have a width of 1590 px, a height of 400. Color modes can be left by default. Click OK

I want to note that the image may be of a larger size, when adding a VK image, I myself suggest that it be cropped to the size it needs. Above the width of 400 px I do not advise adding anything, VK will cut off part of the picture.
As a result, we get a blank sheet, the size we need. Next, draw what we want to see in the header and save our creation. My template looks like this:

Step 2. Change the header in the VK group.
Next, we need to upload our image to the VK group. To do this, go to our group, in the right top corner (under the group’s avatar) click “three dots” (...), select “Community Management” from the drop-down menu.


A window appears asking you to upload an image, click "Select File"

Select our image and a window appears with the ability to crop the image, since we have everything required sizes click "Save and continue"

As a result, we will see a message stating that the cover was successfully downloaded, then just go to our group and enjoy the effect.

You can change the cap (cover) as many times as you like.
So we created our hat for the group in VK.
You can also take one of the suggested templates in this article: