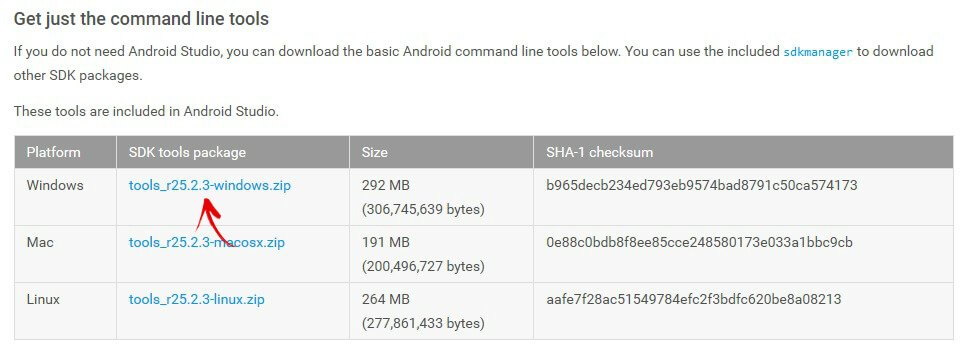
cwm recovery cannot be installed via odin. Installing CWM Recovery on Android: methods for every taste
Since the theme of the firmware Android devices is very relevant, I decided to write about installing CWM Recovery on an Android smartphone or tablet. There are several ways to do this: for some, all actions are performed on the device itself, but this requires root rights, while for others, a computer is used to install custom recovery. Whatever seems easier or more convenient to you, use it.
Method 1. Installing CWM Recovery via ROM Manager
The first way to flash Recovery firmware is to use the ROM Manager program, which we already talked about in the article:. This application has a separate item that allows you to install in a couple of minutes ClockWorkMod Recovery.
I would like to point out right away that for work ROM Manager required root rights. You can read how to get them and.
After that go to official page https://clockworkmod.com/rommanager and see if your device is on the list of supported ones.
1. Now open the ROM Manager and select the first item “Recovery Setup”.

2. In the next window, in the “Install or update Recovery” section, select “ClockworkMod Recovery”.


4. At the bottom, click on “Install ClockworkMod”.

5. The download process will begin. At good internet connection it lasts a couple of seconds.

6. At the end of the download, you will be asked to grant root access to the application. Select Grant.

7. That's it! You will see a notification “Successfully flashed ClockworkMod recovery!” Just click "OK".

This is how easy it is to flash CWM Recovery via ROM Manager. Now you can open it and you will find new items in it that were not in the standard one.
Method 2. Install custom Recovery on Android using the FastBoot utility
All the steps described below are the same as installing TWRP Recovery:.
Unzip the folder to the “C:” drive – there will be “tools” inside, and the “android” file in it. Launch it.

Select " Android SDK Platform-tools" and click "Install package".
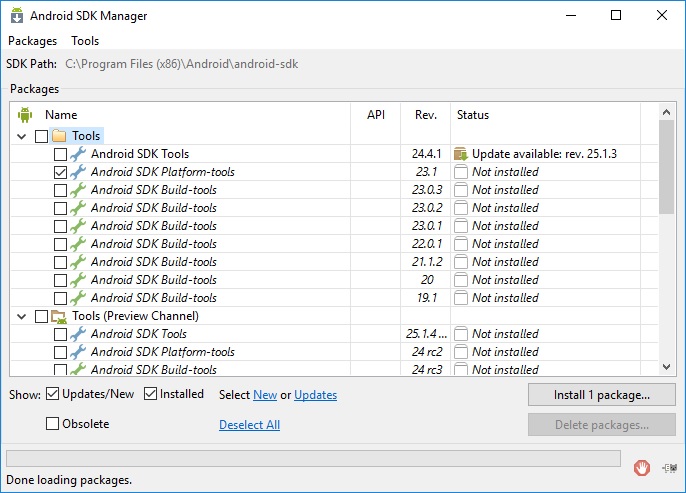
Check the “Accept License” checkbox and then click “Install”.

After installation is complete, in the “tools_” folder version-windows" "platform-tools" will appear, and it contains "fastboot" and "adb". They will be useful to us later.
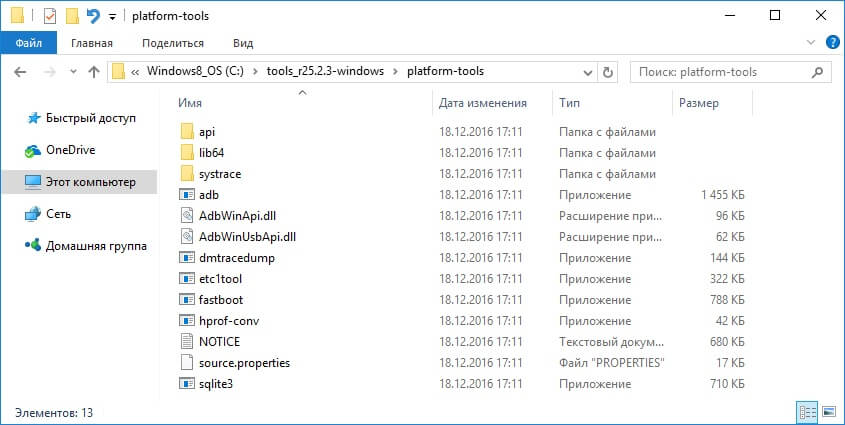
UPD: The “platform-tools” folder on my computer is in a different directory than yours. The fact is that this article was written back when there was an installer for the Android SDK. Starting from version 25, installation is carried out only from a ZIP archive: because of this, part of the instructions had to be edited. Therefore, the path to ADB and Fastboot is different from mine, everything else remains unchanged.
If you have Sony device, HTC, Nexus, Huawei or LG (some models), then Bootloader is blocked. How to unlock it is described on our website:
- For HTC: ,
Let's start flashing the Recovery firmware:
1. First of all, go to this page and download the version of the “recovery-clockwork.img” file for your device. Please note that most devices have both touch and classic version. Download the one you like best.
2. Now place the CWM recovery file in the “platform-tools” folder. I also renamed it to “recovery.img” (later you will understand why). I recommend that you do the same.

3. Connect your tablet or smartphone to your computer using USB.
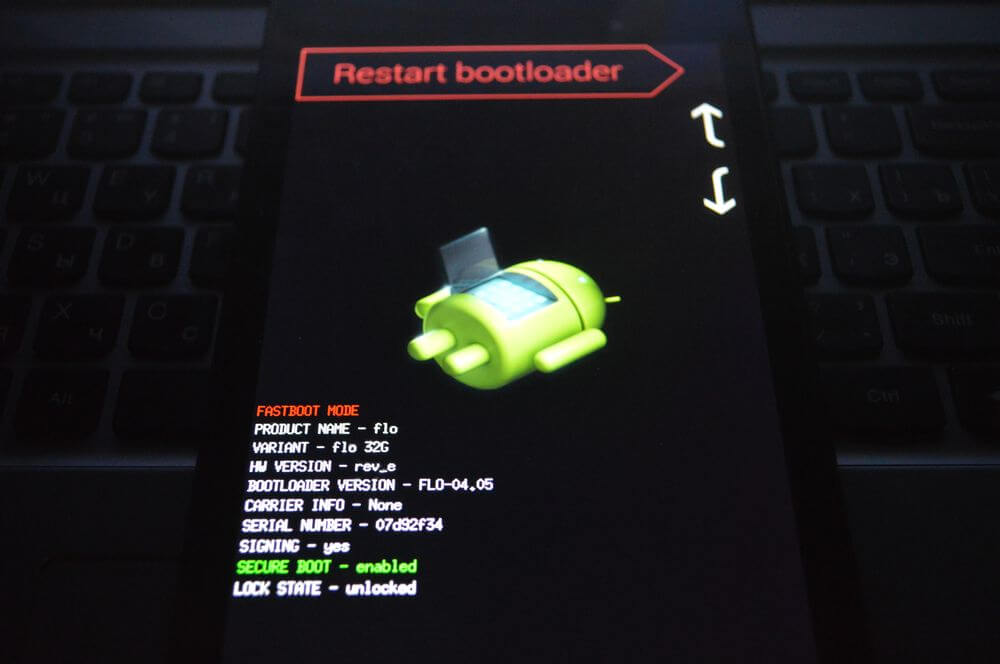
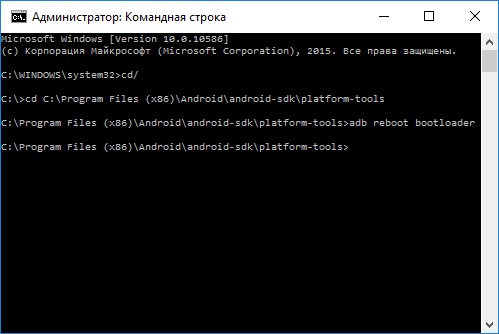
In this case, the device must be loaded into fastboot mode. Typically, to do this, with the device turned off, you need to hold down the key combination: Power + Volume Down. But this combination may differ depending on the device manufacturer.
UPD: it’s much easier to switch to fastboot mode as follows: turn on the device, go to command line(point 4 below tells you how to get into it) and enter the commands sequentially, and after each press “Enter”.
CD path to "platform-tools"
I got it like this:
Your path will look different. If you acted exactly according to the instructions, it will come out (in any case, look at the path in the corresponding line of Explorer):
cd\tools_r25.2.3-windows\platform-tools
In the screenshot you can see how I entered the same commands. As a result, the device will boot into fastboot mode.
4. Now open the command line (or skip this item and continue working with it if you just switched Android to fastboot mode through it). The easiest way to get there is to press the key combination “Win” + “R” and enter:
After that, click "OK".

5. You will be taken to the command line.

6. Now you need to specify the path to the folder with the firmware. Enter next command to go back to the folder.
Press "Enter".

7. My path to the recovery folder is: “C:\Program Files (x86)\Android\android-sdk\platform-tools”. So I enter (you enter yours):
cd Program Files (x86)\Android\android-sdk\platform-tools
And press “Enter” again.

8. All that remains is to enter:
recovery.img“recovery.img” is the name of the file being flashed. Remember I advised you to rename the recovery file? We did this for convenience so as not to enter something like “recovery-clockwork-6.0.4.7-flo.img”.
After entering this command, press “Enter” again.
9. As a result, we receive the following message.
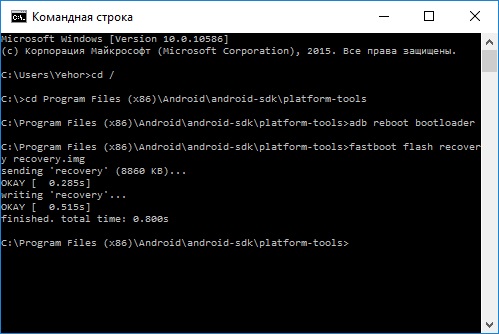
Congratulations! You have successfully installed custom recovery (CWM) using the Fastboot utility!
Method 3. Flash Recovery via the Rashr application
This method is also incredibly simple and convenient, but requires root rights. How to obtain them is written at the beginning of the article in “Method 1”.
1. Install the Rashr - Flash Tool application from Google Play, open it and grant Root rights.

2. In the list of options, select “CWM Recovery”.

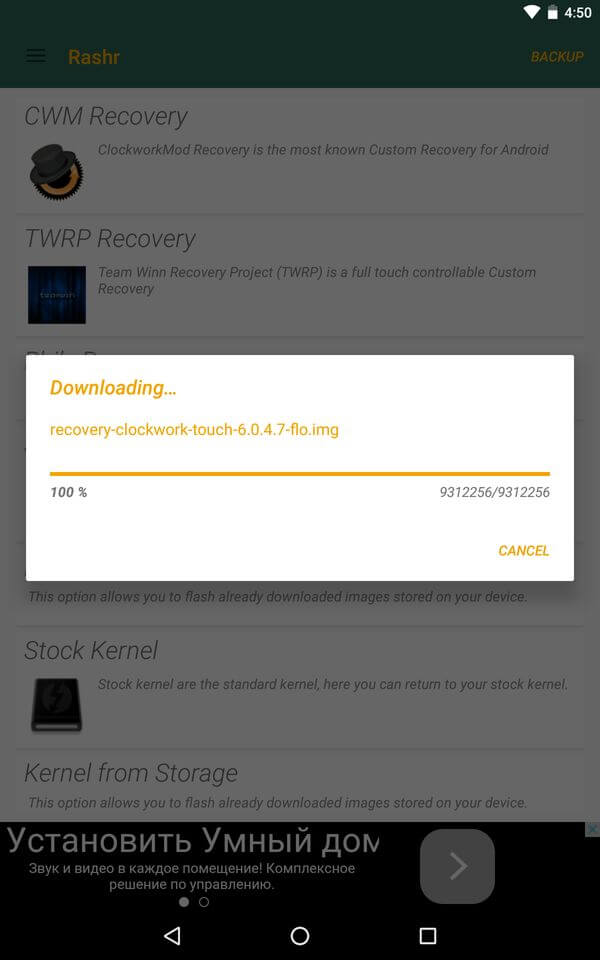
3. Then the program will display a list of available Recovery for your device. In my case, Rashr showed 2 options: ClockworkMod with support for taps on the screen and the classic option (controlled by the volume and power buttons).

4. When you see the download prompt, click Yes.

5. Then the download of CWM Recovery for your Android smartphone or tablet.
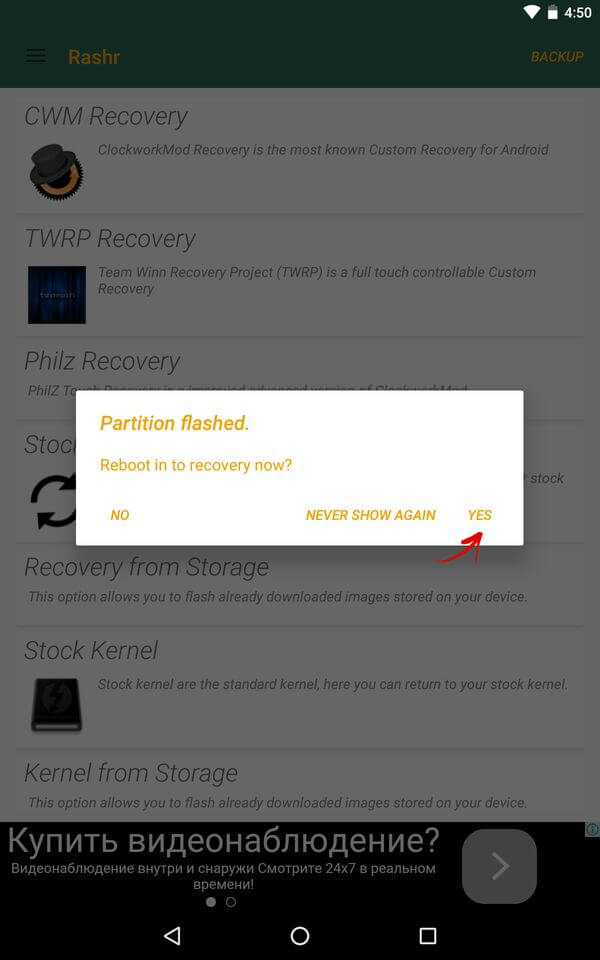
6. At the end, a notification will appear that the firmware was successful and you now have a modified recovery installed. You can reboot into it and try it out. To do this, click “Yes”.
Perhaps this installation method can be called the simplest. The only thing it needs is root rights.
Method 4. Install Recovery on Samsung in Odin
If you have a Samsung device, you can install ClockWorkMod Recovery on Android using the proprietary Odin utility. Here I will briefly tell you what to do. I recommend reading our article: . In it detailed information about using Odin.
Today we will talk about how to install custom recovery to your device Samsung lines Galaxy. I will only talk about TWRP recovery, since it has a huge amount advantages over their analogues. Also, the developers of this project offer a simple and convenient way installation, which involves using the Odin utility. You don't even need superuser rights (Root). This instruction Suitable for all smartphones and tablets from Samsung: Galaxy S5, S6, Note 4, Note 5 and any other models.
It is worth noting that after installing custom recovery you will not be able to install official updates Samsung downloaded over the air. Back up your data on your mobile device so that if problems arise, you won't lose it forever. I recommend saving your contacts in the cloud of your Google account, and photos, videos and documents on your computer.
What you need to do before installing TWRP recovery via Odin:

Check before starting installation to make sure you haven't forgotten anything. Each of the above steps is very important.
How to install TWRP recovery on any Samsung Galaxy smartphone or tablet:

Ready! To enter TWRP recovery, you need to hold down the “Volume Up”, “Home” and “Power” buttons while the device is turned off, and release the buttons after the logo appears.

Now you can use the new recovery to install custom firmware, backup and restore installed firmware and much more. Through TWRP you can also clear cache memory, do a factory reset, or even wipe internal memory devices.
Despite high level reliability of Android devices produced by one of the leaders in the global smartphone market and tablet computers – Samsung— users are often puzzled by the possibility or necessity of flashing the device’s firmware. For Android devices manufactured by Samsung, the best solution for manipulating and restoring software is the program.
It does not matter for what purpose the procedure is performed Android firmware-Samsung device. Having resorted to using the powerful and functional Odin software, it turns out that working with a smartphone or tablet is not as difficult as it might seem at first glance. Let's go through the installation procedure step by step various types firmware and their components.
Important! The Odin application can damage the device if the user performs incorrect actions! The user performs all actions in the program at his own peril and risk. The site administration and the author of the article for possible Negative consequences following the instructions below does not bear any responsibility!
To ensure interaction between Odin and the device, you will need to install drivers. Fortunately, Samsung has taken care of its users and the installation process usually does not cause any problems. The only inconvenience is the fact that the drivers are included in the delivery package of Samsung proprietary software for maintenance mobile devices– Kies (for older models) or Smart Switch (for new models). It should be noted that when flashing firmware via Odin with Kies simultaneously installed on the system, various failures and critical errors may occur. Therefore, after installing the Kies drivers, you must remove them.


Step 2: Put your device into download mode
The Odin program is able to interact with a Samsung device only if the latter is in a special Download mode.


Step 3: Firmware
Using the Odin program, you can install single- and multi-file firmware (service), as well as individual components software.
Installing single-file firmware
- Loading ODIN program and firmware. Let's unpack everything into separate folder on drive C.
- Launch Odin as Administrator. The program does not require installation, so to run it you need right click mouse click on file Odin3.exe in the folder containing the application. Then select the item from the drop-down menu "Run as Administrator".
- We charge the device’s battery to at least 60% and switch it to "Download" and connect to the USB port located on the back panel of the PC, i.e. directly to motherboard. When connected, Odin must identify the device, as evidenced by filling blue fields "ID:COM", displaying the port number in the same field, as well as the inscription "Added!!" in the log field (tab "Log").
- To add a single-file firmware image to Odin, click the button "AP"(in versions One up to 3.09 – button "PDA")
- We indicate to the program the path to the file.
- After pressing the button "Open" in the Explorer window, Odin will begin reconciling the MD5 amount of the proposed file. Upon completion of the hash check, the name of the image file is displayed in the field "AP (PDA)". Go to the tab "Options".
- When using single-file firmware in the tab "Options" All checkboxes must be unchecked except "F. Reset Time" And "Auto Reboot".
- Having determined the necessary parameters, press the button "Start".
- The process of writing information to the device memory sections will begin, accompanied by the display of the names of the device memory sections being written in the upper right corner of the window and the completion of the progress bar located above the field "ID:COM". Also in the process, the log field is filled with inscriptions about the ongoing procedures.
- Upon completion of the process, the inscription is displayed in a square in the upper left corner of the program on a green background "PASS". This indicates the successful completion of the firmware. You can disconnect the device from the computer's USB port and start it by long pressing the power button. When installing a single-file firmware, user data, unless explicitly specified in the Odin settings, is in most cases not affected.

Necessarily! If installed, delete Samsung Kies! We follow the path: "Control Panel" — "Programs and Features" — "Delete".


Installing multi-file (service) firmware
When restoring a Samsung device after serious failures, installing modified software, and in some other cases, the so-called multi-file firmware will be required. In reality, this is a service solution, but the described method is widely used by ordinary users.
Multi-file firmware is called because it is a collection of several image files, and, in some cases, a PIT file.

Firmware with PIT file
The PIT file and its addition to ODIN are tools used to re-partition the device's memory into sections. This method carrying out the device recovery process can be used in conjunction with both single-file and multi-file firmware.
Using a PIT file when flashing is permissible only in extreme cases, for example, if there are serious problems with the performance of the device.


Installation of individual software components
In addition to installing the entire firmware, Odin makes it possible to write individual components to the device software platform– kernel, modem, recovery, etc.
For example, let's look at installing custom recovery via ODIN.

It should be noted that the above methods of working with Odin are applicable for most Samsung devices. At the same time, apply for the role absolutely universal instructions they cannot due to the presence of a wide variety of firmware, large model range devices and slight differences in the list of options used in specific application cases.
It is initially installed in any smartphone stock recovery, which allows you to resuscitate your phone in case of failures, virus attacks and other reasons causing loss of performance. It also makes it possible to reset the system and some components. However, there is a custom Recovery that has much more functionality. One of the most famous projects is TWRP. But how to install TWRP Recovery? It's easier than you think. The procedure will take time, but don’t worry, we will describe everything as clearly as possible. The main thing is to strictly follow the instructions.
Why do you need TWRP?
TWRP stands for TeamWin Recovery Project. This is a custom recovery for Android. It allows you to do the following:
- install firmware from third-party developers;
- root your phone;
- create and restore backups;
- do reset android and its components;
- manage system files;
- install patches and do even more complex operations.
The reason why TWRP Recovery is The best decision, is that it is updated frequently and officially supports a large number of devices. There are also many unofficial builds for other smartphones.
Pre-installation requirements
Be sure to comply with the requirements below before following these instructions.
- We strongly recommend that you create a backup copy of your device data before installing Recovery.
- Charge your phone at least 50-60% to avoid sudden outages during installation.
- To flash TWRP, you must first unlock your device's bootloader. Read about how to do this in the relevant topics for your device.
- Download and install USB drivers on your PC.
- Download and install the SDK Platform Tools on your computer (link below).

Now you can proceed to installing custom recovery using one of the proposed methods.
Using ADB Fastboot (without Root)
Firmware method via ADB Fastboot relevant for those who have not rooted the device.

You have successfully installed Recovery via Fastboot. Then you will only need to update it if necessary. Read about this at the very end.
Using the official application (Root required)
If you have a mobile phone with Root rights, installation of recovery will be even easier.

As you can see, with this method you were able to roll up TVRP even faster, and you didn’t have to do it through a computer.
Using the Odin tool
Odin is a Samsung Corporation tool for flashing firmware and performing other similar manipulations with the company's smartphones. Using it, you can install custom recovery without any problems.

- turn off your phone;
- press the buttons together "Home" + "Volume UP" + "Power";
- when you see warning signs, throw the buttons;
- tap the key "Volume Up", to choose "Download Mode" ("Download Mode").

Here's how to install recovery using Odin. This is even easier than some other methods, so we recommend this method for owners of Samsung smartphones.
Using SP Flash Tool
Another available method TVRP installations - through Flash Tool.

Now the device has a fully functional Recovery, from which you can flash and obtain Root rights.
How to update TWRP?
Sooner or later you will need to update your recovery to get new features or improve compatibility. This is not difficult to do, the main thing is not to mess anything up.
- Download the current assembly of TVRP (you can do this directly from your smartphone to bypass the second and third steps of the instructions).
- Connect your mobile phone to your computer using a USB cable.
- Copy the newly downloaded document to your internal storage or SD card.
- Turn off your device.
- Start Android in recovery mode.
- Go to menu "Install" ("Install") and tap the button "Install.img"("Install.img") at the bottom.
- Select the recovery image.
- Then tap "Recovery" ("Recovery") in the list of sections.
- Finally, swipe the slider on the screen to update to the latest version.
- After that, click the button ( "Reboot System").
So we looked at the simplest but most universal ways to install TWRP. Now you can do whatever you want, for example, install custom ROMs (LineageOS, Pixel Experience, Resurrection Remix, etc.), create backups or root your devices.
But once again, this is important: whenever you are going to use TWRP, make a backup of your files first. Performing tasks such as flashing a new operating system or rooting can lead to your phone being bricked or bricked.
Anyone who takes the first steps in learning the procedure for flashing Android devices initially pays attention to the most common way to carry out the process - flashing firmware through recovery. Android Recovery– a recovery environment that almost all users of Android devices have access to, regardless of the type and model of the latter. Therefore, the method of flashing firmware through recovery can be considered as the most simple way update, change, restore or completely replace software device
How to flash an Android device using factory recovery
Almost every device running Android OS is equipped by the manufacturer with a special recovery environment that provides, to some extent, ordinary users, the ability to manipulate the internal memory of the device, or more precisely, its sections.
It should be noted that the list of operations that are available through the “native” recovery installed in devices by the manufacturer is very limited. As for the firmware, only official firmware and/or updates are available for installation.

In some cases, through factory recovery, you can install a modified recovery environment (custom recovery), which in turn will expand the capabilities of working with firmware.
At the same time, it is quite possible to carry out the main actions for restoring functionality and updating the software through factory recovery. For installation official firmware or updates distributed in the format *.zip, perform the following steps.
1. To install the firmware, you will need an installation zip package. Download the required file and copy it to the device’s memory card, preferably to the root. You may also need to rename the file before manipulation. In almost all cases, the appropriate name isupdate.zip
2. Boot into the factory recovery environment. Methods to access recovery vary for different models devices, but they all require the use of hardware key combinations on the device. In most cases desired combination - « Volume-» + « Nutrition» .

Press the "" button on the device that is turned off. Volume-" and, holding it, press the " Nutrition" After the device screen turns on, the “ Nutrition"you need to let go, and " Volume-» Continue holding until the recovery environment screen appears.
3. To install the software or its individual components into memory partitions, you will need the recovery main menu item –« apply update from external SD card» , select it.

4. In the list of files and folders that opens, we find the package previously copied to the memory cardupdate.zipand press the selection confirmation key. The installation will begin automatically.

5. Upon completion of copying the files, reboot into Android by selecting the item in recovery« reboot system now» .

How to flash a device through a modified recovery
Modified (custom) recovery environments have a much wider range of capabilities for working with Android devices. One of the first to appear, and today a very common solution, is the recovery from the ClockworkMod team.
Installing CWM Recovery
Since CWM recovery is an unofficial solution, you will need to install a custom recovery environment on your device before use.
1. Official way recovery installations from the developers of ClockworkMod is an Android ROM Manager application. Using the program requires root rights on the device.

Load ROM Manager into Play Store or from our website
- Download, install, launch.

- On the main screen, tap " Recovery Setup» , then under the inscription« Install or update recovery» - paragraph « ClockworkMod Recovery» . Scroll through the list of device models that opens and find your device.

- The next screen after selecting a model is the screen with the button « Install ClockworkMod»

- After a short time, the required file will be downloaded completely and the installation process of CWM Recovery will begin. Before you start copying data to the device’s memory section, the program will ask you to grant it root rights. After receiving permission, the process of recording the recovery will continue, and upon completion a message will appear confirming the success of the procedure « Successfully flashed ClockworkMod recovery» .

- The installation process of the modified recovery is completed, press the button " OK» and exit the program.
2. If the device is not supported ROM application Manager or the installation does not proceed correctly, you must use other methods for installing CWM Recovery. Methods applicable to various devices are described in the articles listed below.
- For Samsung devices, in most cases the application is used Odin. More details here - ( Flashing Samsung Android devices using the Odin program)
- For devices built on the MTK hardware platform, the application is used Firmware for Android devices based on MTK via SP FlashTool)
- Most universal method, but at the same time the most dangerous and difficult is flashing recovery via Fastboot . The steps taken to install recovery using this method are described in detail at the link:
Firmware via CWM
Using a modified recovery environment, you can flash not only official updates, but also custom firmware, as well as various components systems represented by crackers, add-ons, improvements, kernels, radio, etc.
It is worth noting the presence large quantity versions of CWM Recovery, so after logging into various devices you can see a slightly different interface - background, design, may be present touch control and so on. In addition, some menu items may or may not be present.

The examples below use the most standard version modified CWM recovery.
At the same time, in other modifications of the environment, when flashing the firmware, items are selected that have the same names as in the instructions below, i.e. A slightly different design should not cause concern to the user.
In addition to design, the management of CWM actions differs in different devices. Most devices use the following scheme:

- Hardware key " Volume+» - move one point up;
- Hardware key " Volume-» - move one point down;
- Hardware key " Nutrition" and/or " Home"- confirmation of choice.
So, the firmware.
1. Prepare the zip packages necessary for installation into the device. We download them from Global Network and copy it to the memory card. Some versions of CWM can also use the device's internal memory. Ideally, the files are placed in the root of the memory card and renamed using short, clear names.

2. Enter CWM Recovery. In most cases, the same scheme is used as for entering the factory recovery - pressing a combination of hardware buttons on the switched off device. You can also reboot into the recovery environment from ROM Manager.

3. Before us main screen recovery. Before you start installing packages, in most cases, you need to do " wipe» sections « Cache" And " Data“, - this allows you to avoid many mistakes and problems in the future.
- If you plan to clean only the “ Cache", select the item " wipe cache partition ", confirm the deletion of data - item " Yes – Wipe Cache " We wait for the process to complete – the following message will appear at the bottom of the screen: “ Сache wipe complete».

- The section “ Data" Select the item “ wipe data/factory reset", then confirmation " Yes – Wipe all user data" Next, the process of cleaning the partitions will follow and a confirmation message will appear at the bottom of the screen: “ Data wipe complete».

4. Let's move on to the firmware. To install the zip package, select “install zip from sdcard» and confirm your choice by pressing the corresponding hardware key. Then select the item “choose zip from sdcard».

5. A list of folders and files available on the memory card opens. We find the package we need and select it. If the installation files were copied to the root of the memory card, you will have to scroll to the bottom of the list to display them.

6. Before starting the firmware procedure, recovery again requires confirmation of awareness of your own actions and understanding of the irreversibility of the procedure. Select the item “ Yes – Install *** .zip", where *** is the name of the package being flashed.

7. The firmware procedure will begin, accompanied by the appearance of log lines at the bottom of the screen and the filling of the progress bar.

8. After the inscription “ Install from sdcard complete"The firmware can be considered complete. Reboot into Android by selecting “ reboot system now" on the main screen.

Firmware via TWRP Recovery
In addition to the solution from the ClockworkMod developers, there are other modified recovery environments. One of the most functional solutions of this kind is TeamWin Recovery (TWRP). About how to flash devices with using TWRP described in the article:
This is how Android devices are flashed through recovery environments. It is necessary to take a balanced approach to the choice of recovery and the method of installing them, and also flash only the appropriate packages obtained from reliable sources into the device. In this case, the process proceeds very quickly and does not cause any problems later.