When changing the motherboard, the computer data remains. Preparing Windows before replacing the motherboard
Using the operating system on own computer may vary greatly from user to user. Some, having bought a new PC, mainly use the built-in Windows programs and tools, as well as default OS settings. Others work with many third-party applications and utilities, while customizing the system interface to their own taste.
And if in the first case, reinstalling the system and several applications is not a difficult task, then in the second, in addition to installing the OS, you will have to reinstall all necessary programs, Windows personalization and other settings. That is why many users are not eager to do this again. Moreover, it may not be at hand required applications or their settings were performed by a specialist, who will now have to be called again.
In general, there can be a lot of reasons not to touch a normally working operating system, but the time comes when internal components your computer is starting to become hopelessly outdated and replacing it with more productive hardware becomes an urgent need. And if installing a new power supply, random access memory, a separate processor or video card can be produced relatively painlessly, that is, without reinstalling the operating system, then when replacing hard drive or motherboard It is not that simple.
As you understand, everything Windows files are stored on the computer's hard drive, so replacing it leads to inevitable reinstallation systems. Although, this can be avoided by first making a complete backup copy current OS into an image and saving it on an old HDD or some other storage medium. Then all you have to do is unpack the received system backup on new disk, and you can continue working in old Windows using all previously installed programs.
If you replace the motherboard on a PC with Windows result may depend on many different factors, but the main thing is the choice of the future hardware platform (for example, when changing Intel to AMD or vice versa, problems are almost inevitable) and the set system logic(chipset). In short, the more differences the new motherboard has from the previously installed one, the less chance it will have to boot. previous system after replacing it.
Despite the fact that Windows 7 has an impressive database of drivers in its arsenal, just change the motherboard and run it earlier installed system often it doesn't work out. This is especially true for those boards that were released much later than the release of the system itself. But they are now the majority, since more than three years have passed since that moment. So the question is how to replace system board on personal computer with Windows without reinstalling it, is still relevant.
Why does replacing a motherboard so often result in reinstalling Windows? As a rule, the most common reason is the incompatibility of ATA/SATA controller drivers already installed in the system. hard drives with the one equipped with the new motherboard. In this case, after replacing the hardware, when loading the OS you will receive blue screen death (BSOD) with STOP error: 0x0000007B.

The fact is that when loading, Windows simply does not have the ability to change the hard drive controller driver on its own. As a result, a hard drive with the installed OS connected to the new controller is simply not seen by the system, and its further launch becomes impossible.
To avoid this situation, there is a fairly simple solution. Even before replacing the motherboard, start Windows, go to device Manager, there, by clicking on the arrow, expand the item IDE ATA/ATAPI controllers and remove all installed devices from it.

To do this, click right click mouse alternately on all controllers and in the opened context menu select Delete. If after this a window appears Device removal confirmation, check the box Remove driver programs for this device and click OK.
In some cases, to complete the controller removal operation, the system will require a reboot. You shouldn't do this until you've gone through the entire list. Then simply turn off your computer and proceed to replace the motherboard. If you do restart your PC, you will have to do the entire procedure again, since Windows will restore all previously deleted devices at startup.
And yet, it is not uncommon for this method won't help you. For example, if the system logic set (chipset) on the new motherboard will be very technologically different from the previous one. In this case, in order to avoid problems with loading the system, you need to completely get rid of all drivers that can cause them. But how to do that?
IN Windows system there is one very useful utility, which not everyone knows about, even advanced users. It's called Sysprep and allows you to delete system data from the operating system, including information about installed equipment, as well as drivers installed by the user.
Thus, in order to ensure successful loading of Windows on new equipment, it is necessary to clean the OS from the old one system information using this utility even before replacing components! Also, before running Sysprep, it is better to remove all installed antivirus programs or disable self-defense in them. This is especially true for Kaspersky Lab products. Otherwise, when you start the OS with new hardware, you risk receiving the message: “Windows was unable to complete system setup. To resume setup, please reboot." But no reboot will help you. You will have to return the old equipment to its place and do everything again.
So, to launch the Sysprep utility, press the key combination Win + R and in the window that opens Execute enter the full path to executable file: "%windir%\System32\sysprep\sysprep". For those who don't know, "%windir%" is a variable containing the path to the folder where the system is installed, most often "C:\Windows". And we use it because the location of the system folder and its name are on various computers may be different.

In the system preparation program window that opens, in the option System cleaning action paragraph Go to the system welcome window (OOBE) we leave it unchanged. Next, put a checkmark next to the parameter Preparation for use.
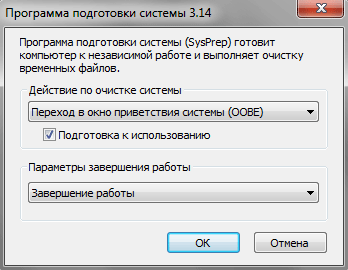
In the drop down menu Shutdown Options select a team Shutdown. This is done so that immediately after cleaning the system the computer does not reboot, because if it is not stopped in time, the primary process will start Windows settings and you'll have to do it all over again!
Having completed all these simple settings, press the OK button to start the system cleaning procedure. This process is completely automatic and after it is completed, the computer should turn off on its own. Now you can start replacing the system board.
During the first Windows startup With the new equipment, the necessary device drivers will be installed and the corresponding entries will be made in the operating system registry. You will also have to re-enter your regional settings and account settings.
Please note that when the OS asks for a username, you cannot enter the old account name because it already exists. There is no need to be particularly upset about this. Enter any name, and after logging in for the first time, new account you can remove and use the old one.
The only inconvenience that can await you after booting the system with new components is repeated Windows activation. The fact is that a number of versions of this OS are tied to installed equipment. In particular, the most common legal Windows version 7 OEM, which is installed on new desktop computers and laptops. In this case, activation will most likely have to be carried out over the phone, since this will no longer be possible to do via the Internet due to the fact that the system will mistake your operation for installing Windows on another computer, which in this version is prohibited by the terms of the license agreement.
Strictly speaking, it was initially designed to create a customized Windows image with the purpose of reuse. That is, simply put, Sysprep is a utility for cloning a prepared OS onto other computers. Most often, installing Windows from a pre-generated image is carried out in organizations where the set of basic work applications among employees, for the most part, may be the same.
True, in our time there are often situations when there is not one computer at home, but several at once. For example, one desktop PC is used as multimedia center, the other is in the child’s room for studying, and the laptop is the parents’ business tool. Despite the different purposes of each device, they may well have something in common software: operating system, office suite, web browser, archiving tool, optical disc burning program, all kinds auxiliary utilities and much more.
In such a situation, it is convenient to have a “standby” OS image, from which, if necessary, you can always install the system with all the main applications. To create it, you just need to install Windows and all the necessary programs once on any computer, then use the Sysprep utility to delete system data using the method described above. Next, you will need to burn the image of the prepared system to separate media: Blu-ray disc(there's simply not enough space on the DVD) external hard disk or flash drive.
The key point here is the fact that booting the computer to remove the image must be done with optical disk or a USB drive, but in no case from the hard drive on which it is installed. If this happens, the process will start initial setup The OS and the entire procedure will have to be repeated again.
Prepare boot disk and save Windows image in the right place you can use special applications, for example Acronis True Image Home, a paid program, but it has a visual GUI and that's all necessary tools. There are also free alternatives, for example, ImageX included Windows shell P.E. However, in this case, get ready to work with the command line.
Unpacking the image to the desired (target) computer is similar to removing it using the same programs.
With these tips you can avoid trouble.
Replacing a PC motherboard takes a little time and a lot of effort, especially if you've never done it before. You may encounter many small obstacles during the motherboard replacement process. But don't worry! But you can avoid all this by entrusting the motherboard replacement to experienced professionals.
Let's start with why you want or need to replace your motherboard. (If you're just looking for instructions on how to install a motherboard in a new PC, scroll down a bit.)
Sometimes components fail. Motherboards are no exception. Many motherboards "burn" due to bad BIOS firmware and low-quality batteries. Mistakes happen, and sometimes these mistakes can cause irreparable damage to your motherboard.
But replacing the motherboard will be a lot of hassle. If you do not have the desire or opportunity, the service “Assembling a computer to order” is especially for you.

What to look for in a new motherboard
There are many motherboard manufacturers, but only two CPU manufacturers. The processor is the core of the PC, you should choose a motherboard that is compatible with your processor, be it Intel or AMD.
Next, make sure you choose a board that is compatible with your current (or new) processor. Both companies have slightly different processor sockets for their chips. For example, if you have one of the recent AMD CPUs, you want to buy a Socket FM2 + motherboard. Find in Google type your processor socket and then look at the motherboards you are planning to purchase.

Motherboard socket compatibility with processor is key.
Now you have a list of compatible motherboards with CPU. Most motherboards are in the ATX form factor, but some may fit a smaller size mATX boards, and even smaller ones - ITX boards. You should limit your motherboard search to only motherboards that can fit in your case.
The next step is to choose the motherboard brand. Today, motherboards have more similarities than differences. Key differences in performance, power consumption and overclocking between similarly priced boards from different manufacturers. Still different color scheme and expansion slots.

You need to make sure that the motherboard you choose has enough USB, Ethernet and other ports for your use.
Motherboards start at around $80, but you won't get a better performance motherboard even if you buy one for $250. Motherboards with similar feature sets various manufacturers, usually differ within $10 of each other.
How to install a new motherboard on a computer
Start by unplugging the cables connected to your computer.
Large items such as video cards and Wi-Fi cards be pulled out of your motherboard first. Then go to SATA or other interface cables that connect the SSD, HDD, optical drive or media to your motherboard.

SATA cables connected to the motherboard.
Finally, it's time to disconnect all power cables connected to the motherboard. Most motherboards will have an 8-pin CPU power connector on the top of the motherboard, a 24-pin connector ATX power supply near the middle of the left side of the motherboard. Unplug both of these connectors.

8-pin motherboard power connector.
Remove the screws securing the old motherboard. Save the screws, you will need them later.
You will need to remove the cooler, processor and RAM from the old motherboard; you will need to install them in the new motherboard.

Removing the cooler from the processor.
Once this is done, it is time to install the new motherboard. You pretty much just have to replace whatever you just pulled out of your old board.

Install the processor, cooler, and RAM into the new motherboard, and then place it in the case.

We connect two power connectors (24-pin and 8-pin) that you removed earlier. Now plug the SATA cables and expansion card slot back into place. Double check that all internal cables in the computer are connected correctly and that everything is securely in place.

This is the moment of truth. Your computer will probably reboot a couple of times as the motherboard gets ready for a new life.
If you encounter problems, your computer does not boot correctly after you replaced the motherboard, contact us with the service " Computer assembly" We will be happy to help.
Replacing the motherboard, is it difficult?
Replacing the motherboard may be required at any time of the day, regardless of your mood and the position of Jupiter. Replacing a motherboard is different in many ways. simple procedures, how , and even . Even experienced users may have difficulties here. In cases where you require easy replacement MP, there shouldn't be any problems. But don’t relax, one careless move and the new motherboard will no longer be as valuable as it was after purchase. I recommend paying attention to a couple important factors, which I will talk about now.
Replacing the motherboard taking into account the form factor
The motherboard is replaced taking into account the form factor. In any store you can come across hundreds of different models with different dimensions. For example, the most popular brand “ATX” has a lot of such modifications - from the “mini” class to the “micro” class. Carefully study the characteristics of the selected motherboard before purchasing, in particular, pay attention to the dimensions. It will be very disappointing if the new MP does not fit under the iron box, and you have to go back to the store and ask for a refund. A “blind” replacement of the motherboard can expose you to a number of other problems, for example, the purchased platform fits perfectly into the size of the iron box, but there is not enough space for the rest of the components. What to do with a large power supply and video card? Some motherboards have a water cooling system, like the MobileRack. Let me explain, if you have never seen such devices, there are several tubes and other minor elements installed on the motherboard. So, if everything does not fit under the iron box, then you can think about purchasing a new case. And remember that some MPs may not have enough PCI slots. Typically, such boards have their own audio and video adapters, but they are far from analog devices.
If this is not the first time you are familiar with the “replacing the motherboard” section, then you have probably managed to carefully study the structure of your system unit. If you remember that the interfaces for analog devices are located exactly on the back of the system unit. This technique is used on MPs that do not have built-in modules; instead, manufacturers provide separate ports for full functionality. Individual ports have a couple of advantages over their built-in counterparts. For example, less heat will be generated inside an iron box, but this does not mean that I recommend saving on cooling.
Specifications
Remember that replacing the motherboard may be a pointless exercise if the rest of the hardware is not compatible with it. The drive and hard drive are usually suitable for any model. Other components may work intermittently or not work at all. Before purchasing, you should familiarize yourself with the characteristics, and do not forget about the processor. In addition to hardware compatibility, the new hardware must be compatible on program level. It is not uncommon for users to encounter non-standard connectors on the board, so be careful.
After you have read the first part of the post on the topic “Replacing the motherboard,” you can resort to the first stage of repair. Of course, you have already made sure that the new MP is in perfect contact with the equipment you are already using. And remember that it is best to start the motherboard installation process by fixing it inside the system unit. After this, you can connect a RAM, a video card to the MP, and all Motherboards with remote connectors will make it much easier to replace the hardware of your PC. By the way, for maximum comfort, I recommend using magnetic screwdrivers.
The next stage of replacement requires the front side of the system unit. And don't forget about the power and reset buttons. At this stage, you should not neglect the instructions, since jumpers on the MP can be located in the most unpredictable places. If the software allows you to configure the functionality of the motherboard in the BIOS, then take advantage of this opportunity the first time you start it.
Motherboard replacement: software
At the first stage, there is no need to connect all the peripherals at once. For primary purposes, it is enough to connect the processor, RAM, video card and MP battery. This completes the physical replacement of the motherboard, let's move on to working in the BIOS. We launch the BIOS immediately after turning on the computer for the first time. First of all, you need to configure the mode safe start. To do this, you will need to find the “LoadStandard” option. In some BIOS versions, this option may have another name, it is not difficult to detect. As soon as the user sets the necessary parameters, exit the BIOS, save the changes and reboot. If you stumble upon the voltage settings and clock frequency, you can immediately set the optimal parameters. At this stage of replacement, under no circumstances should you resort to overclocking.
Replacing standard settings in the BIOS on your own, you can install a hard drive, optical drive, and also a speaker. We'll connect the rest of the peripherals a little later.
Finding drivers for a new motherboard
This does not complete the replacement of the motherboard; the user still has to work with firmware. The main organ of the MP is a small chipset; around it there are dozens of tiny parts that play the role of a kind of “shell”. To avoid unpleasant consequences, it is best to replace drivers for connected devices separately.
After this, you can proceed to By the way, it doesn’t matter what OS you prefer, standard drivers are already included in the software core. New operating systems are equipped with the most advanced drivers, so there will be no problems here. Installing new software will be required unless you want to switch to a new OS. In this case, the performance will probably differ slightly from the maximum possible. Additional programs will allow you to use the full potential of the motherboard, then your PC will accelerate to the desired level.
Where to find required driver?
Remember that replacing the motherboard will not bring any results if the drivers are not installed correctly. At the same time, drivers from the old MP will not allow you to launch the operating system in normal mode. In order not to add headaches to yourself, I recommend installing a new OS immediately after replacing the motherboard. This is ideal.
As soon as you stand at the checkout in the store, check the contents of the MP box. There must be a disk with basic drivers inside. Replacing the motherboard with original drivers runs without any errors. After starting the disc, a simple menu will pop up on the display, where the developers also offer a good selection additional utilities. It is advisable to use free time and install a couple of programs and test them in action. Then the replacement will go off with a bang.
Well, if the kit does not include a disk with native drivers, do not despair. You can replace them with others software products, the Internet is full of useful software that will help solve this problem. You will need to enter the chipset number on the manufacturer's official website. As a rule, such portals have drivers for all occasions. It also happens that drivers are supplied in one set for an entire line of MPs at once. However, the new models will have slightly limited functionality. If you don't know how to install drivers, you can read about it
Finding out the chipset number is not difficult. In this case, you do not need to delve into the MP settings; just run any of the test programs, which is recommended by the manufacturer. There is an alternative. You need to log into the system in safe mode, then run command line“mmc devmgmt.msc” and find the section system devices. If you find a couple of mentions of Intel, then your motherboard is built on an analog platform. Guarantee – 99%.
Below you can watch a video on how to properly replace the motherboard:
In most cases after replacing the motherboard Windows stops loading. When loading windows, a blue screen (BSOD) appears with an error STOP 0x0000007B. This is due to changing the ATA/SATA bus controller.
The fact is that Windows cannot independently change the controller driver when loading. As a result, when booting, the operating system simply loses the hard drive and cannot continue booting.
The question arises: how to produce motherboard replacement without re Windows installations ? After all, reinstalling Windows is not difficult, but all programs and settings will be lost. And this is often unacceptable!
Method replace motherboard without reinstallation OS three. If you have Windows 7, go straight to option 3
Option 1 - the old motherboard is working (Windows XP)
If with the old one motherboard If it is possible to boot into Windows XP, then you need to replace the IDE and SATA controller drivers with standard ones.
For this purpose in device manager open the properties of the controller (the name depends on the motherboard model). On the tab Driver press the button Update.

We answer the question about connecting to the Internet to search for a driver No, not this time and press Further. In the next window select Installation from a specified location and click Further. In the driver search options window that appears, select Don't search. I will choose the right driver myself and press Further.
In the window that appears, select from the list Standard two channel PCI controller IDE and press Further.

After the driver installation is complete, click Ready and restart the computer.
After loading, check in Device Manager what is installed standard IDE controller driver and turn off the computer.
If there is no driver in the selection list Standard IDE Controller Driver(for example in the case of a SATA controller), you can simply remove installed driver controller of an old motherboard. To do this, in Device Manager, right-click on the device and select from the context menu Delete. After uninstalling, turn off your computer.
Now produce motherboard replacement to a new one. Windows XP should boot without any problems. After that, all that remains is to install all the drivers on the new motherboard from the disk and that’s it!
Option 2 - booting with old motherboard is not possible (Windows XP)
Second option replacing the motherboard without reinstalling Windows XP longer than the first and should be used if a computer with an old motherboard does not turn on or booting is impossible. We will need a Windows XP installation disk. If there is no disk, you can download a disk image (WinXP Professional SP3 with an integrated package of hard disk controller drivers) and burn it to a CD-R, for example, using the DeepBurner 1.9 program (the distribution kit can be downloaded for free).
For Windows recovery XP after replacing motherboard you need to do the following:
Install the new motherboard and connect all devices.
Start downloading from installation disk Windows XP. On the first installation screen (image below), press ENTER to begin installing Windows XP.

On the next screen, press F8 to accept the license agreement.
The installer will then search for installed operating systems and display a list of them.

Select the operating system to restore and click the button R . Further process not much different from normal installation Windows XP. The differences are that the installer won't ask which one hard section disk install OS and will not prompt you to enter your computer name and username. Be ready to enter your license Windows code XP and activate it after installation via the Internet.
After the installation is complete, you need to install all the drivers on the new motherboard. All programs, user files and operating system settings will remain the same.
Option 3 - Fixing the IDE Controller Driver in the Registry (Windows 7)
If you replace the motherboard without reinstalling Windows 7, things are a little more complicated. The previous 2 options do not work. It will also not be possible to restore Windows 7 by updating it from the installation disk, since this function can only be launched from an already loaded OS.
But don't be upset! ERD Commander will help us (download a CD image, or make a bootable USB flash drive ERD Commander). With its help we will make adjustments to Windows registry 7 required to boot on the new controller.
Let's get started! We boot from a burned disk or flash drive. In the boot menu select version ERD Commander 6.5 for Windows 7.

Selecting the ERD Commander version to download
To the question "Initialize a network connection in the background?" we answer No.
We answer the question “Reassign drive letters...” Yes.
Select the keyboard layout and press the button Further. Then select our operating system from the list and click Further.

Selecting the operating system to which ERD Commander will be connected
failed, the search for boot problems will begin.
Finding problems booting Windows 7
Click Cancel, so as not to waste time, since this startup recovery tool will not help if the motherboard is changed. To the question "Stop troubleshooting?" we answer Yes. The next message that the problem could not be resolved, do not be alarmed and press the button Ready.
In the window that appears, select the item Microsoft Diagnostics and Recovery Toolset.

Now launch the registry editor.
First of all, you need to delete the registry branch HKLM\SYSTEM\MountedDevices

Now you need to enable the launch of services that load standard drivers IDE controllers and SATA.

Opening a thread HKLM\SYSTEM\CurrentControlSet\services on the left side of the Registry Editor. Now check the following sections in this thread: amdide, amdsata, amdxata, atapi, intelide, msahci, pciide. Parameter Start everyone should have equal 0x00000000 (0). The value Start=0 - starts the service when Windows boots. If it is equal to 0x00000003 (3) double-click on the parameter name (Start) and change the value to 0 (picture below) and click OK.

After start will be set to 0 for all of the above registry keys, close the registry editor and restart the computer in normal mode. In most cases this is enough for successful download Windows 7. Now you need to install drivers on the new motherboard.
If it doesn't help
If the steps taken did not help and Windows 7 still does not boot and displays the error STOP 0x0000007b, then required driver controller does not load. Let's try to enable downloading of all known operating system drivers.
To do this, set the parameter value Start equal to 0 in the following services: adp94xx, adpahci, adpu320, aic78xx, amdsbs, arc, arcsas, elxstor, HpSAMD, iaStorV, iirsp, LSI_FC, LSI_SAS, LSI_SAS2, LSI_SCSI, megasas, MegaSR, nfrd960, nvraid, nvstor, ql2300, ql40xx, SiSRaid2, SiSRaid4, vhdmp, vsmraid, alide, cmdide, nvraid, viaide .
Reboot the computer in normal mode. The OS should boot.
Booting Windows XP can also be restored in a similar way, but everything is more complicated there and I will not describe it in this article. Those who are interested can read it.
The question of replacing the motherboard without reinstalling Windows 7 is not an easy one. Pitfalls will stand in the way of ordinary users. Therefore, do not cut from the shoulder. It’s unpleasant to download everything yourself, and then sit in front of the “screen of death” and think about what to do next. It is better to study this issue carefully. It is necessary to understand what steps need to be taken, what problems may arise and what ways to solve them.
Prerequisites
The matter is important and serious. Perhaps you are not satisfied with one of the components. Technology moves forward, but your processor can no longer cope with the tasks. Naturally, you need to buy a new chip. But it is often incompatible with specific model motherboard. Then you will have to change the motherboard along with it.
Or maybe you decide to buy new RAM modules. Your old ones, based on DDR2, have long ceased to cope and are outdated. Even if you only want to expand the amount of RAM, finding modules of this type will be extremely difficult and even impractical. Therefore, it is better to take a closer look at DDR4. This is newer and higher-speed memory. But it requires special slots on the motherboard. Why not buy a new motherboard?
The same problems can arise with other components. New video card models require advanced slots - faster and higher quality. The hard drive is improving and has long switched to the third revision of Serial ATA. To upgrade your system, you need to study the aspects carefully because replacing the motherboard without reinstalling Windows 7 will be your main problem.
Demolish or keep?
Why is it necessary to save the operating system? After all, it’s much easier to just tear it down and install another one after assembling the PC. Of course, for many users this will be the most profitable option. But there are also users who customize the system for themselves down to the smallest detail. All personal parameters and necessary applications are important to them.
When you reinstall the OS, everything will naturally be deleted. And if for some this will be the beginning of something new, then for others it can turn into a great tragedy. It is necessary to eliminate all problems and preserve personal data.
Tools
In order not to lose the operating system and information, it is better to use a couple of tools. To replace the motherboard without reinstalling Windows 7, two utilities will be useful to us.

Sysprep is a built-in OS tool. It is used to clean hardware parts, reset OS activation, etc. In general, the software will allow you to create an image of an operating system that does not require hardware.
ERD Commander is a tool that you will have to download in advance. It helps even if it is damaged and loading is impossible. This is his main task. There are also additional features. In general, ERD Commander - useful software for programmers. It helps restore the system if it is blocked by ransomware viruses, selectively resume the operation of files from the registry, etc.
the main problem
Why is it even desirable to have a copy? The fact is that replacing the motherboard usually leads to a huge number driver incompatibility. And if this problem can still be corrected with some devices, then the main errors come from the ATA/SATA interface - ports for the hard drive. That’s why the “screen of death” appears so often, which brings an endless reboot.
Preparation
Start the whole process by working with Sysprep. To replace the motherboard without reinstalling Windows 7, you need this tool. It cleans all unique files and drivers. Therefore, this must be done before the new component takes up space on the motherboard.
To start working with the utility, you need to find it through the command line Win+R. A small window will open in which we enter the path to Sysprep: “C:\windows\system32\sysprep\sysprep.exe”. In the new window you should configure the software parameters.

First, go to the “Actions to clean the system” section and here you should select the line that goes to the system welcome window. Here you need to check the box next to “Preparation for use”. Now look for the section with “Shutdown Options” and click “Shutdown”. Don't forget to finish everything with the OK button.
After a few seconds of operation, when the tool has done everything necessary, the system will turn off. Then we move on to assembling the motherboard, installation and other similar matters.
Alternative
If you are replacing the motherboard without reinstalling Windows 7, you will also need the registry. To ensure that the installation does not lead to compatibility errors, whether it is changing the motherboard or changing the controller mode, you need to dig into the system while it is working correctly.

Open the command line Win+R and enter regedit. So you will launch that same registry and start working with it. Now you need to go through HKEY_LOCAL_MACHINE\SYSTEM\CurrentControlSet\services\msahci. Open the last folder and look for the Start line on the right. You need to change the value to zero. We return to the column on the left and look for the final pciide folder along the same path. Here again we set the value to zero. For users who use RAID arrays (multiple disks), we repeat the entire process in iaStorV.
Now you can replace the motherboard without reinstalling Windows 7 (64). Turn off the computer, install the updated motherboard in the case and turn on the computer. At correct actions the process will be correct. The operating system will load the drivers onto the controller on its own, and you will have to do all the necessary settings yourself.
Recovery
During all these operations, errors may occur. Incorrect input of values or erroneous actions cannot be ruled out. All this leads to the fact that it is impossible to launch the operating system. Let's try to download and load ERD Commander onto a flash drive. Replacing the motherboard without reinstalling Windows 7 should be easy. As we have already learned, this tool helps restore the system in difficult situations.
To use this program, you need to download it from the Internet and put it on a CD or flash drive if you don’t have a drive. Now when you turn on your PC, boot drive will see this software and start downloading from it necessary information. In the window, select ERD Commander 6.5 for the seventh OS, or for the version that you previously installed.
A notification about “renaming” the drives will now appear. We agree with this process. We don’t touch the network settings yet, don’t forget about the keyboard layout. If several operating systems were installed on the disk, you need to select the one previously used in the next window. If there is only one, then only one line will appear in the tablet. Click “Next” and watch what happens. It usually takes a few seconds until the system copes with problems, etc.

Now a window with “System Recovery Options” will open. Here you need to select the last item with MSDaRT recovery. Next, click on the registry. Now we don't need commands. Replacing the motherboard without reinstalling Windows 7 takes place in the registry window that is already familiar to us.
On the path HKEY_LOCAL_MACHINE\SYSTEM you will see the MountedDevises folder - you need to delete it. Above there will be a CurrentControlSet folder, in it you need to find the atapi folder, changing the Start line there to zero, and repeat this setting in the remaining archives.
The last step is to work with the Msahci folder. Here we change the value to zero again. The system should boot correctly. If nothing works, most likely the problem is much more complex. Here, among others software errors, we're talking about and about conflicts with the built-in video adapter.

Safe mode
Still can't replace the motherboard without reinstalling Windows 7? You can go to " Safe mode" When starting the PC, press F8. When the OS boots, go to “Device Manager” and remove the device that is failing. If you cannot identify it, then it is recommended to simply delete it PCI bus and download all the necessary drivers.
All these operations are designed for people who have at least some knowledge of PCs. Regular user He will definitely get confused somewhere and choose the wrong thing. After this, the system will become a “brick” and programmers will save it. If you are not sure what you are doing, either find friends who understand all this, or ask for help at a service center.