Is it possible to reinstall the BIOS? How to reinstall BIOS from Windows
Hello dear readers.
Any computer is a complex system. Sometimes during operation of the device, some problems may appear related to the correct performance of its functions in an area such as the BIOS. There are several ways to solve this problem – it all depends on the type of error. Later in the article I will tell you how to restore the BIOS on a laptop, depending on the type of problem.
Restore to factory settings
If suddenly the device stops functioning normally, and you suspect that the reason for this is incorrect settings in the area mentioned above, you can try to return them to factory settings:
In most cases, this procedure helps. True, sometimes you can encounter a simple error that does not allow the OS to start normally. The fix is simple:

If you have a password
Sometimes users may encounter a situation where someone or they themselves previously set a password for the area we need, and conveniently forgot it. As a result of several wrong attempts the device will simply stop functioning.

Then you need to open it yourself mobile computer. By the way, this method will help if it does not turn on:

Important! Before we go any further, there are a few basic points to clarify. So, some laptops, for example, Acer Aspire, have not two, but three contacts. In this case, you need to set the jumper to a different position and wait a few minutes.
In addition, sometimes you can find a special small button that performs the same functions. You just need to press it with a pencil for a few seconds.
Another solution is to remove the battery that maintains all important data in memory. If you remove it, everything will be reset.
Recovery after flashing
If problems arise as a result of unsuccessful installation of a new software version for the corresponding component, you need to perform a series of steps.
After purchasing a new laptop, the first thing you need to do is configure it correctly. It is better to start the setup by installing the BIOS. In order to change the BIOS, there are many additional programs. But there are cases when it is not possible to use these programs. In this situation, you will have to work hard and apply some knowledge about working in DOS system.
To reinstall the BIOS, you need to connect to the Internet and take external media. At the first stage when reinstalling the BIOS, find out who the laptop manufacturer is. This can be done by looking at the instructions supplied with the laptop; that’s where the manufacturer will be indicated. If for some reason there are no instructions, you can find out by removing the cover and finding the chip on the motherboard; it is usually highlighted with a bright sticker. This chip contains all the data about your laptop.
Before reinstalling the BIOS, you need to download the new version of the software update from the official website. Many manufacturers have made the installation process easier; they post on their websites a complete software package for setting up and reinstalling the BIOS. Also on the manufacturers' websites you can download the drivers and programs required for updating, for example, to update video card drivers. Remember: wherever you download the BIOS installation program, you need it to be compatible with your laptop model.

The process of reinstalling the BIOS is quite simple and quick. To do this, you will need to run the BIOS installation program in the operating system and wait for this package to be installed. Then your laptop will be reinstalled with the new BIOS version.
SovetClub.ru
How to reset BIOS
BIOS - comprehensive program, connecting and also powering the computer components with the operating system. And the rest of the work depends on the quality of its functioning. computer equipment. Therefore, even if other components are working properly, but the BIOS is not, the PC will not work correctly or will not boot at all. Reinstalling or updating the entire BIOS system will help save the situation; you just need to take certain actions.
The first thing you need to do is find out what version of BIOS you had originally, as well as what model of motherboard you are using. There are several ways to do this. One of them is through the SETUP menu. After entering it by pressing the Del button in the first minutes of booting the computer, look for the BIOS Version line. The combination of letters and numbers in this line will be the information you are looking for. The second way is to extract data from the information running on the screen before loading. To have time to remember the necessary elements, use the PauseBreak button. The third method is the most convenient. Open the Start menu, open the command line by clicking “Run” and enter the command “msinfo32” there. In the window that opens, you can easily find everything you need.

The next step is preparing the software. If you don't have backup copy your BIOS, or you want to reinstall a more recent version, then go to the official website of the company that owns your motherboard model and download the BIOS boot files from there. They are usually delivered archived.

Unpack the archive and copy the resulting files to a pre-formatted USB flash drive. You can do this without the formatting step, but reinstallation of this kind is a very scrupulous procedure, the slightest failure threatens to render your computer completely unusable. A flash drive with traces of past recordings may well cause such a failure. You can copy the new BIOS files to both a CD and a floppy disk, if you still use such rarities.

Next, without removing the digital media with the update files, we reboot and open setup again. This software has many modifications, so it has very different interfaces. Your task is to find the TOOLS section among the options, and in it the item responsible for updating the BIOS. For example, it may look like this - ASUS EZ Flash 2. You can find the name of such a utility specifically for your system in the user manual or on the Internet. Launch this option and go to the flashing program window. It contains the path to the data disk. Once you find it, run the installation files.

The BIOS menu does not always contain a built-in update function from step 4. In this case, the reinstallation will have to be done using MS-DOS mode. How to create boot disk this mode, you can find out from additional instructions online. Having received such a disk, transfer the BIOS reinstallation files to it, and then start the computer, having previously set the boot priority from the digital media being used. In MS-DOS mode, using the manually typed DIR (look at files in the root folder) and CD (change folder) commands, find your distribution. By typing its name into the command line, press ENTER, after which your BIOS will be reinstalled.

Flashing the BIOS input/output system on your own, especially for the first time, is advisable only in extreme cases when there are no other outputs. Otherwise, it is better to entrust it to a specialist. But if you have already taken on this yourself, then remember - throughout the entire reinstallation process, your computer must be reliably supplied with power. With the slightest power surge, failure or interruption, the motherboard will inevitably be damaged and fail.
SovetClub.ru
Reinstalling the BIOS

In certain circumstances for normal startup and/or computer operation requires reinstalling the BIOS. Most often, this needs to be done when methods such as resetting settings no longer help.
Lesson: How to reset BIOS settings
Technical features of BIOS flashing
To reinstall, you will need to download from the official website of the BIOS developer or the manufacturer of your motherboard the version that is currently installed on you. The flashing procedure is similar to the update procedure, only here you will need to remove the current version and install it again.
On our website you can find out how to update the BIOS on laptops and motherboards from ASUS, Gigabyte, MSI, HP.
Step 1: Preparation
On at this stage you need to find out as much as possible more information about your system, download the required version and prepare your PC for flashing. To do this, you can use both third-party software and Windows capabilities. For those who do not want to worry too much about this issue, it is recommended to use third-party software, since in this case, in addition to information about the system and BIOS, you will be able to receive a link to the official website of the developer, where you can download current version.
The preparatory stage will be considered using the example of the AIDA64 program. This software is paid, but has a trial period. There is a Russian version, the program interface is also very friendly to ordinary users. Follow this guide:

If for some reason you cannot download anything in step 5, then most likely this version is no longer supported by the official developer. In this case, use the information from point 4.
Now all that remains is to prepare a flash drive or other media so that you can install the firmware from it. It is recommended to format it in advance, since extra files may damage the installation and, therefore, damage the computer. After formatting, unzip the entire contents of the archive that you downloaded earlier onto a USB flash drive. Be sure to check that there is a file with the ROM extension. The file system on the flash drive must be in FAT32 format.
Read more: How to change the file system on a flash drive How to format a flash drive
Stage 2: Flashing
Now, without removing the flash drive, you need to proceed directly to flashing the BIOS.
Lesson: How to set boot from a flash drive in BIOS

It is worth remembering that depending on the BIOS version currently installed on the computer, the process may look slightly different. Sometimes, instead of a selection menu, a DOS terminal opens, where you will need to type next command:
IFLASH/PF _____.BIO
Here, instead of the underscore, you need to write the name of the file on the flash drive with the BIO extension. Just for such a case, it is recommended to remember the names of the files that you transferred to the media.
Also, in rare cases, it is possible to perform the flashing procedure directly from Windows interface. But since this method is only suitable for certain motherboard manufacturers and is not particularly reliable, there is no point in considering it.
It is advisable to flash the BIOS only through the DOS interface or installation media, as this is the safest way. We do not recommend downloading files from unverified sources - this is unsafe for your PC.
Read also: How to set up BIOS on a computer
We are glad that we were able to help you solve the problem.
Poll: did this article help you?
Not reallylumpics.ru
How to update BIOS on a laptop correctly: step-by-step instructions
Leisure and work of a modern person can no longer be imagined without the use of a laptop. The need for repairs, changes in usual settings and updates often arises among users. Sometimes it is important to know how to update the BIOS on a laptop. BIOS is a key information input/output system that ensures loading operating systems (Windows, Linux, IOS). Flashing the BIOS on a laptop removes errors or enables additional support for memory and processors.
Why do you need a BIOS update?
Before you update the BIOS on your laptop, you need to find out why the program update is required. There are several factors:
- No support for new software. The old settings do not suit the new tools, so the laptop needs to change the BIOS version.
- When you install new programs, the old software “conflicts” with them.
- The installed settings are damaged by viruses.
- Information on how to flash the BIOS will be needed when the flash drive is not read as a boot device.
- The laptop freezes when you turn on some programs or their options and reboots itself.
- Motherboard does not detect hard drive large capacity, video adapter (video card) with a high number of gigabytes.
- The stability of the laptop is unstable, the computer works poorly due to minor software errors.
- The manufacturer installed only basic set functions that are not sufficient for the computer’s operating power.

The BIOS launches immediately when you turn on the laptop. If the laptop model is older, then letters will be visible in the upper left corner of the display in the first seconds of loading. Next, the operating system starts and control of the laptop passes to it. To find out how to open the BIOS on a laptop, first of all, find out the manufacturer and model of the laptop. To enter the BIOS of the most popular brands of laptops, you need to turn on or restart the laptop, then follow to:
- HP (HP) – hold down the F2 or Escape key when starting the laptop.
- ASUS (Asus) – press the F2 key when turning on.
- ACER (Acer) - press the combination F2-Del or Ctrl-Alt-Esc. You can also turn it on using the F1 key.
- DELL (Dell) – Del, F2, rarely Ctrl-Alt-Enter.
- SAMSUNG (Samsung) – at the moment of turning on, press the Pause button. A text will appear, in it you need to find “Press F2 to enter setup”. The F2 key is replaced by F1, F8, F10, F11, F12, Esc by selecting the desired one. To exit, press Enter. The next step is to search for the markings of the laptop motherboard. To find it out, follow “Start – Hardware – Device Manager – Configurations”. We copy the markings onto a sheet of paper and enter them in the browser. If desired, add additional “to enter setup/BIOS”.
- LENOVO (Lenovo) - classic Del or F2 keys.
- TOSHIBA (Toshiba) - it is worth considering the device model. For older Toshiba models, with the laptop turned off, hold down the F2 button, then, while holding the key, turn on the laptop. New devices are turned on according to the instructions “Login to Windows - Start - Preinstalled programs - Bios System” (sometimes the name is different, but it always contains the word BIOS).

Ways to update the motherboard BIOS on a laptop
Installation software update BIOS differs in ways depending on the type of motherboard. Before installing the firmware, you need to study the instructions for the board to take into account all the details specified by the manufacturer. Upgrade options:
- Windows proprietary utility. The advantageous way to avoid errors if it is not clear how to reinstall the BIOS. Modern motherboards (Asus, MSI, Gygabyte) preferably accept this utility.
- Built-in BIOS settings. An option is considered suitable when the user is confident that the installed version BIOS. The program for updating the BIOS (Q-Flash, EZ Flash, Utility) is written to a flash drive and launched.
- DOS mode. This firmware option is for experienced users; for beginners it will be difficult to update the I/O program using this method. The mode requires creating a bootable flash drive with DOS and a new version of the BIOS program. Serious errors may appear during installation.
How to update the BIOS on an Asus or any other motherboard? Using proprietary MSI utility Live Update 5 algorithm of actions is as follows:
- Let's launch MSI program Live Update 5, click the Scan icon.
- In the report list, look for the MB BIOS line. If there is one, then there is an update for your laptop. Click the arrow to download.
- Run the file you saved earlier and click Next.
- Choose In Windows Mode to start installation.
- Active programs close, click Next.
- Waiting for the program update to complete.
- Press any key appears - press any button to restart the computer.
- The update reinstallation process is complete.

Update directly in BIOS
The Windows upgrade option is not very safe for the motherboard. The main danger is the computer freezing or unexpected shutdown. If the installation process is interrupted, the motherboard will be damaged. Updating directly into the BIOS will help you configure the necessary programs and avoid problematic installations using built-in tools. Step-by-step instruction:
- Download the update file to your computer.
- Write it to a clean, well-functioning flash drive - you need one that has been previously scanned for viruses.
- We do not remove the flash drive from the port and reboot the computer. The next step is to enter the BIOS.
- In the Tools section, open the update utility (we find out the name from the instructions for the motherboard).
- In the main menu, go to the left column (Tab key). This is where all the media that is detected by the device is located.
- Select the flash drive, click update and click Enter button.
- Sometimes the motherboard triggers an error check, the end of which you need to wait for without canceling anything.

In DOS mode using a USB flash drive
- Download the program from the official website. No installation required, so let's launch right away.
- In the Device section, select a flash drive to load the file onto. Important: save everything you need from the flash drive first, otherwise when loading, all files from the flash drive will be deleted and recovery will not be possible.
- In line File System specify FAT32.
- Opposite Create a bootable disk using we put MS-DOS version or FreeDOS. How to find out the BIOS version for your laptop? There is no fundamental difference between these options, choose any one.
- Click Start: the process will complete within a few seconds.

Video instructions: how to reflash the BIOS
If you are interested in how to properly update the BIOS on a laptop, you should listen to the instructions of professional firmware specialists. A program update is required to speed up the laptop and eliminate some errors installed programs to restore the functionality of the utilities. It is easy to reflash the I/O program - you will need to follow a simple algorithm in accordance with the model and manufacturer of your laptop. Do not damage the motherboard, please read the detailed installation information. Find out how to increase the performance of your Windows 7 laptop.
sovets.net
How to flash laptop BIOS
Updating the BIOS is very useful, but at the same time extremely dangerous procedure. Useful topics that after releasing their products, manufacturers continue to improve them based on feedback from service centers and their research. Over time, data about errors and their corrections appears. So these are the solutions to hardware level problems, additional options appear in the settings in new versions of the BIOS management firmware. The danger of this procedure lies in its complete inoperability after an unsuccessful BIOS flashing. In most of these cases, the operation of the motherboard or laptop can only be restored at a service center. And sometimes such a recovery procedure is impossible or involves removing the chip from the motherboard and then flashing it in a special programmer. And all this costs money.Attention! Flashing the BIOS involves the risk of losing the functionality of the equipment. Reflash it only as a last resort, and with sufficient experience for this! If you decide to flash your BIOS to follow a buzzword, don't do it!
So, you have decided to flash the BIOS on your laptop. In this article we will try to help you. The safest and most reliable way is to flash the firmware from DOS using USB flash drives The general principle of flashing the BIOS from DOS is as follows. It is necessary to copy the file of the new BIOS version, as well as a special flashing utility (flasher) to a bootable USB device. Reboot the laptop, boot from the flash drive. Using the command line, run the flash program and follow further instructions. What you need to know before flashing the BIOS of a laptop:
1. Download the latest BIOS version only from the official website of the laptop manufacturer. Don't download the beta version. You should download the latest tested and working version.
2. The laptop must be turned on via the power supply and not run on battery power. The best option the laptop will be turned on to the mains via the Source uninterruptible power supply(UPS).
3. The USB flash drive used must be reliable and proven to work. If you noticed in USB operation media, any errors associated with data loss, then do not use it under any circumstances.
4. Never disconnect power from your laptop during the BIOS update process. Also, never press any keys or buttons on the laptop during this time.
Let's look at the BIOS update process using an example Dell laptop Inspiration 1525.
1. Create bootable usb flash drive. Read the guide on how to do this quickly and reliably. If you don’t have a standard USB flash drive at hand, but your laptop supports booting from the built-in card reader, then use it. To do this, you need to make a bootable memory card from a camera or phone, having previously saved the data from it.
2. Download the latest BIOS version from the official website of the laptop. It is best to use the serial number from the sticker on the underside of the laptop case for this. Many manufacturers provide a search service on their website necessary files to download by serial number. On our laptop this is the Service Tag. By entering it on the manufacturer's website we find the BIOS file. At the time of writing this article, this is version A17 dated December 2, 2009. Moreover, everything we need is already contained in one file with the *.exe extension. So, from the official Dell website, download the file 1525_A17.EXE and copy it to our bootable USB flash drive. Be sure to remember or better write down the name of the downloaded file!
3. Boot from a USB flash drive. To do this, set the download from USB devices in the laptop BIOS itself. Or we use special keys when turning on the laptop to call up the menu for selecting boot devices. On Dell laptops this is the F12 function key. After loading we will see the DOS command line
4. Enter the command to run the BIOS flashing program (file name):
5. The programmer shell from DELL will start

The program itself will check the BIOS file for errors and for compliance with its laptop model. If the verification procedure was successful, press any button on the keyboard to continue.
When you are ready to start the BIOS flashing process, press the "Y" key

The laptop BIOS update process will begin.

and checking the result of the BIOS update

Wait until the update process finishes! Do not turn off the laptop or press any keys during this time! After the BIOS flashing is completed and it is successfully checked, the laptop will be rebooted

When the laptop goes into reboot, it may turn off and not turn on for several seconds. This is fine! Just wait until the laptop turns on automatically.6. After flashing the new BIOS version, go into it and set all the settings you need. Flashing to different models laptops and other manufacturers, of course, may differ. Usually, along with the BIOS files, instructions for flashing it are also supplied. Be sure to read it. But in general, all actions are very similar to each other. The main thing is to take your time and do everything thoughtfully! If after updating the BIOS your laptop stops turning on or displays an error, do not panic. Save the flash drive with the BIOS file that was used for flashing. On many modern laptops There is an emergency system for restoring the original BIOS version. This is just for such cases. Just run this firmware rollback process. If you don’t know what to do in this case, contact your nearest service center. Bring the BIOS file you used. It's paid, but they will help you there. The fact of flashing the firmware itself is not considered a violation of the manufacturer's warranty. But if the result is unsuccessful, you may lose your warranty! The administration of our resource and the author of the article himself are in no way responsible for any damage resulting from an unsuccessful BIOS update performed by you yourself! This is only a description of the update process, and not a clear guide to action!
Any computer equipment and software is known to become outdated over time and no longer meet current requirements. This equally applies to primary BIOS/UEFI systems, the software of which is integrated into a special chip on the motherboard. When installing new equipment (“hardware”), it may sometimes be necessary to flash the BIOS. This procedure will be performed on a laptop or a stationary computer terminal, it doesn’t matter. The technology is almost always the same. Some users, unfamiliar with the basics of such techniques, believe (and not without reason) that this process is unsafe and difficult. If you can agree with the first statement, then you can argue about the second. In fact, flashing the motherboard BIOS is not such a troublesome task. But to carry out this procedure correctly, you should pay attention Special attention some important details and nuances, which depend on the manufacturer motherboard and programs and techniques used for flashing.
Why do you need to flash the BIOS?
In general, if it is not planned, and the entire system is working stably, there is fundamentally no point in updating the BIOS version.
But when new equipment is installed on a computer, which may not be supported by the primary system only due to its obsolescence ( Device BIOS it just doesn’t recognize it), flashing the BIOS becomes a pressing problem. Although many users find this process difficult, anyone who works with a computer can perform these steps on their own. It will take no more than 10 minutes.
Flashing the motherboard BIOS: prerequisites
First, pay attention to a few mandatory conditions, non-compliance with which can lead to catastrophic consequences.
Download files and programs to update primary systems only from official resources of motherboard manufacturers. If you install unofficial firmware, no one can guarantee that the process will be successful and the system will work as expected.
The second thing to pay attention to is during the update. You need to take care in advance to ensure that there are no power surges or spontaneous disconnection of your computer or laptop from the power supply.
General rules for updating all firmware
Flashing the BIOS for almost all motherboard models involves using the same scheme:
For standard systems BIOS in most cases uses DOS mode. However, for some BIOS versions, as well as for more modern UEFI systems, a special program for flashing the BIOS can be used, created by the motherboard manufacturer, which can run even under Windows operating systems without necessarily creating bootable media.
How to find out the modification of the motherboard and the current BIOS version?
The very first thing you need to do is determine which model of motherboard is installed in computer system, and also find out the version of the primary BIOS systems(perhaps it is currently relevant and does not need updating).

You can view information about the board and BIOS version in the section that is called from the Run console using the msinfo32 command.

For the motherboard, you can also use specialized utilities like CPU-Z (formerly Everest). For a device identified in this way, you need to find the latest firmware on the manufacturer’s website and save the files on your hard drive.
Preparing bootable media (general procedure)
If you use bootable media, when an update from Windows is not provided, the first step is to create one. Regular recording of downloaded files will not work.

To simplify the work, you can use the Rufus utility, which is very easy to learn and creates a bootable USB flash drive within a couple of minutes. There is practically no need to change anything in the parameters. Only in the file system should you specify FAT32, and in the recording method use MS-DOS mode, making sure to check the box next to the line for creating bootable media. If this is not done, then when you reboot the device will not be recognized as bootable. Then, to install the update, in some cases you will need to additionally copy it to media control program and the firmware file.
Next, the process of updating the BIOS will be discussed with examples for motherboards from several well-known manufacturers. Although in general they are very similar to each other, nevertheless, each of them has its own nuances. We assume that the priority is already set in the BIOS settings.
ASUS
Flashing the Asus BIOS can be done in several ways. Among the preferred utilities, two programs worth highlighting are AFUDOS and ASUSTeK EZ Flash 2.
When using the first utility, you should create bootable media and make sure that it contains the afudos.exe program file and the firmware itself (for example, p4c800b.rom).

Flashing the ASUS BIOS looks like this. Booting from a flash drive. Since the media was recorded for DOS mode, the initial line C:\> will appear on a black screen, in which you need to enter the command /i p4c800b.rom and press the enter key. Upon completion of the update, a reboot will occur, during which you just need to remove the media from the USB port so that the system starts with hard drive.
Flashing the motherboard BIOS ASUS boards when using the second utility it is slightly different from the previous option.
Despite the fact that most firmware on the official ASUS website have the .rom extension, CAB files can sometimes be found. There is nothing wrong with this, since they are used for UEFI systems.

To install the firmware you need to log in UEFI settings When rebooting, go to Advanced Mode ( additional settings) and in the service (tools) section of the Tool, select the line ASUSTeK EZ Flash 2. Next, from the list, again select the media with the program (line of the same name), after which the required firmware file will be shown on the right. We select it and agree to the warning twice (first to check the file, then to start the firmware process).
At the end of the process, a reboot notification will appear, and at the beginning of the restart, a proposal to carry out initial setup. Press F1 and set the required parameters. Otherwise, we simply exit the settings without saving the changes.
Gigabyte
Flashing the BIOS of Gigabyte systems is quite different from other processes. First of all, this is due to the fact that you can use online update to install the firmware. But first, let's look at using the Q-Flash utility, which is believed to be best suited for updating firmware.

First, you should enter the BIOS settings and use the option to reset all Load Optimized default settings. After this, you need to save the changes, restart the computer and enter the BIOS settings again. Next, to launch the Q-Flash utility, press the F8 key, and the start is confirmed by pressing the Y and Enter keys. To begin with, it is recommended to save the current version using the Save Bios option, after which you need to use Update Bios. Next, you will be asked to indicate the source from which you want to update. You should select HDD 2.0 as the media (this is how the flash drive is displayed in the settings). Then everything is as usual: select the firmware file present on the media and agree with all the warnings.
For an Internet update, you can use the @BIOS utility specially developed by Gigabyte specialists, which runs in Windows environment. In this case, it is strongly recommended to disable Hyper-Threading mode in the settings of the primary system, as well as deactivate anti-virus and other resident applications to avoid errors or failures during the update process.
After starting the program, you can immediately save the current BIOS version by clicking on the Save Current BIOS button, and then select the Internet Update online update mode, click Update New BIOS and specify one of the servers present in the list. After this, you will be asked to indicate the model of the installed motherboard, and the program will automatically download all necessary components and activates the update process.
MSI
Flashing the MSI BIOS, as in the case of ASUS, can be done either from Windows or from DOS. For DOS mode, a tool built into the BIOS called BIOS-MFLASH is used. But as a starting point management utility The MSI Live Update 5 or 6 application can also be used. It is notable in that it can also be used to update all installed drivers MSI, as well as reflash the BIOS of the corresponding graphics accelerators. Let's start with it.

In the main window you just need to check the boxes necessary elements. Select the MB BIOS component and click the scan button at the bottom (Scan). If a new firmware version is detected, use the Download and Install button, after which the update process will start.

First you will need to select an update environment. To simplify matters, check the In Windows mode item, in the next window click the button to close all programs that appear in the list (Close all listed programs), click the Continue button (Next) and in the next window click the start process button.
For DOS mode, select it from the window running process update, after which we indicate the media and agree to the destruction of all data present on it (the process will take no more than a minute, after which a message about successful creation boot drive). When rebooting, all you have to do is follow the instructions of a kind of “Master”.
In case of updating using the built-in MFLASH mechanism, you will have to download the firmware manually, create bootable media and perform the same actions in the BIOS as described above (select the media and firmware file in the tools menu).
Acer
Flashing the BIOS of Acer systems is surprisingly much easier. You don't even need to create bootable media, although you will still have to format it in FAT32.

To install the update, a special utility called Insyde Flash is used, which is copied to removable media. At the same time, you need to copy the firmware file downloaded from the official website, which has the extension .fd and corresponds not only to the motherboard, but also to the laptop model, to the main directory of the program on the flash drive. Please note that the device must contain only one firmware file, otherwise the application will prompt you to flash only one of several. After running the utility while the power is on, you will be prompted to install the update immediately.
The second method is just as simple. First you need to completely turn off the laptop, unplug the cord from the outlet and wait until the power indicator stops blinking. Next, plug the cord into the outlet, insert the flash drive into the appropriate port, hold down the Fn and Esc keys and press the power button. As soon as the indicator starts flashing, release the pressed keys. After this, reading information from the drive will begin (this can be seen by the blinking LED on the device itself). Once the update process is complete, the laptop will reboot on its own.
Video cards
Since GeForce and Radeon are dominant in the video card market, flashing the BIOS will be considered using their example.

At the initial stage, you need to download new firmware and control programs for your card on the manufacturer’s website. If the system has several video cards, you need to leave only one during the update, inserting it into the PCI-Express slot.
For GeForce cards, the NVFlash program (from two files) is used, for Radeon - the ATIFlash utility (one file). Next, you need to create a bootable USB drive for DOS mode, and then copy program and firmware files to it.
When starting from a flash drive, you should make sure that the card is single-processor, otherwise the proposed method will not work. For NVIDIA use the command nvflash --list, for ATI - atiflash -i. If information is displayed for two cards, then the adapter has two processors, and the proposed firmware method cannot be used (it is better to go to the manufacturer’s website and find instructions there).
The next step is flashing the BIOS GeForce video cards involves disabling protection. This is done with the line nvflash -protectoff.
Next, to start the BIOS update process for GeForce cards, use the command nvflash -4 -5 -6 newbios.rom (the name of the ROM file must match the name of the downloaded firmware), for Radeon cards - atiflash -p -f 0 newbios.rom. After this, we wait for the process to complete and reboot the system in normal mode.
Brief summary
That's all for flashing the primary I/O systems. Based on all of the above, we can conclude that the best option is to install the update exclusively in DOS mode, although you can use special utilities. But they only work if there are UEFI systems, and for standard versions BIOSes are no good. You need to be extremely careful with video cards, because incorrect installation update or the slightest violations during the flashing process can lead to the graphics adapter failing.
Hello, my dear readers!
If you've ever installed a new operating system, chances are you've simply updated it. For example, from “seven” to “eight” and so on. Yesterday I tried to install the OS from scratch, and I had to do it through the BIOS settings. The matter requires care, but everyone should know these aspects. Today I will tell you how to reinstall Windows via BIOS, and different ways and from various media.
What is BIOS and what does it have to do with it?
To explain it in simple words, BIOS is a set of small programs that control the operation of your computer hardware. It is available on any PC, whether desktop or laptop. Without knowing the purpose of this or that section in it, I strongly do not recommend changing anything in it yourself. In the worst case scenario, you can simply burn the iron in your car.
For example, turn off the fan on the video card and that's it. The service will no longer help you here. But you still have to interact with the BIOS. Especially with the section that is responsible for the boot order from an optical drive, hard drive, flash drive or other device. This is necessary when installing the OS from scratch.
How to enter BIOS
Everything is very simple. This is done without a disk or flash drive. First, you need to restart your laptop. Or your desktop PC. As soon as the motherboard loading screen appears, you will see a picture like this.

Pay attention to the line that I indicated with an arrow. The default key is there DEL, and if it is pressed when such a screen appears, then you will immediately be taken to the BIOS. However, there may be other keys, for example: DELETE,F10, F11, F12, F1, F2, F3, Esc. Moreover, on some motherboards, these settings can be called up not with one key, but with a combination of them. Here are the most common ones: Ctrl+Alt+Esc, Ctrl+Alt+Ins, Ctrl+Alt+S, Ctrl+Alt+Del, Ctrl+Alt, Fn+F1, Ctrl+Ins, Ctrl+Alt+Enter. You should see a window like this.

If this doesn't happen, it means you did something wrong. Try again.
Preparing for installation

Before installing the OS, you first need to download and burn it. Which version of Windows you prefer is up to you. I will only give links to distribution kits on:
- Windows 7.
- Windows 8.
- Windows 10.
To download images you will need program for downloading torrents. Just install it and download the distribution online. If this download method is not convenient for you, I suggest Alternative option. This page has software that will help you download Windows and burn it to disk, just scroll to the bottom of the page and click here.

If you still decide to use torrents, then ISO recording you will need one more software. UltraISO. It will help you create a bootable disc or flash drive. Install it and open it.
Important: After downloading the distribution, be sure to check it for viruses, for example using Comodo Internet Security.
Let's imagine that you decide to install the operating system from a disk (don't forget to prepare it in advance). Open UltraISO and select the image of the downloaded system.

You can also do this through the menu " File».

Everything that is on the OS image should be displayed in the program window.

Next, insert a clean blank into your optical drive. Make sure that there is not a single scratch on it, otherwise it simply will not be readable. Then in the menu " tools"Click on this line.
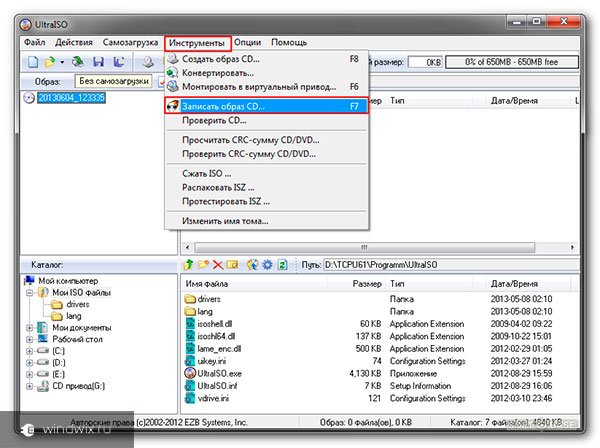
You will see a window with a choice of drive, burning speed and the OS file itself.

Then simply press the button Write down" and wait for completion. That's it, you've just created a boot disk yourself.
Don't want to install the operating system from the DVD? I'll tell you how to do this with via USB flash drives!
Immediately insert it into the USB port and scan for viruses using AVG AntiVirus Free. Next, do the same with the UltraISO program until you select the “ tools" Now you select the “” partition and there click burn hard disk image.


In the sign that appears, select “ Yes"and wait for the end. But now you can start recording. Once the process is complete, you can remove the flash drive and proceed to installation.
Setting up BIOS for booting from media
Now let's set up the system. We go into the BIOS. You have already read above how to do this. The fact is, my dear readers, that the BIOS itself can be of two types. Award and AMI. And in each of them the setting will be different. I have written instructions for you so that you do not get confused.
Award BIOS – setup for booting from disk
As soon as the blue settings screen appears, click the second line where it says - Advanced BIOS Features.

Then in the second line (First Boot Device) click Enter and select your optical drive.
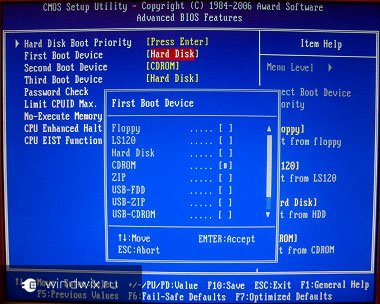
In the second line (Second Boot Device) do the same, but select the hard drive (Hard Disk).

AMI BIOS – setting for booting from disk
Here the principle is the same, but the course of action is slightly different and the interface is nicer.


In the first line we set our drive, and in the second line the hard drive. That's it, press F10.
If you decide to install Windows from a flash drive, then the algorithms are the same, but instead of the drive you select the USB-HDD line.
Everything else is the same. Reboot your PC. But don't forget to insert bootable media.
Installation process
Here is the final stage. Now that your bootable media has booted, you will see the operating system installer dialog box with a choice of language. Next you will have a window like this with a choice of installation type. Choose the full installation.

Then select the hard drive partition, format it and click “next”.

The system will do the rest itself, all you have to do is enter your username, select a region, configure the Internet and download the Dr Web Cureit antivirus. And that’s it, now you can install the operating system yourself via BIOS. Congratulations!
Conclusion
Setting up BIOS to boot from disk:
Setting up BIOS to boot from a flash drive:
Windows installation:
I want to warn you right away, do it without a disk or flash drive full installation system is impossible! The carrier is needed in any case, so take care of this in advance.
With this I will say goodbye to you. Subscribe to my blog updates to stay up to date with the latest useful articles. Share information with your friends on in social networks, because this information will be useful to absolutely everyone who has a computer! All the best to you and see you again!
Modern computer devices, including laptops, are necessarily equipped with special primary memory chips, called BIOS, which contain pre-installed software in the form of firmware that allows you to recognize and save information about the “hardware” components present in the device, ensure correct loading of the operating system, and configure some important parameters, etc. But quite often such firmware needs to be updated or, if you like, reflashed. Why this may be required, and how to reinstall the BIOS on a laptop, read on. Let's look at a few basic techniques that can be applied to both modern UEFI systems and legacy BIOS modifications.
What might you need?
First of all, let's find out why it may be necessary to replace the firmware of the primary system. Is the pre-installed software really not enough for the correct functioning of all the main components of the laptop? As it turns out, reinstalling the BIOS on a laptop may be needed more often than it seems. Among the most important reasons why it is worth updating the firmware, the following can be highlighted:
- the outdated primary system does not recognize or does not have support for new (more modern) equipment;
- the installed software conflicts with the primary system or hardware;
- the laptop reboots spontaneously or does not work with supported software;
- the laptop manufacturer has added new functions to the software that are not supported by outdated firmware;
- the settings of the primary system are damaged (including due to viruses);
- The system is extremely unstable.
Where can I find the latest firmware?
As you can see, almost all of the above situations are not particularly catastrophic, and in general, how expedient it is to update the firmware is a personal matter for each user. However, when installing new equipment or if the firmware itself is damaged, it must be updated. And reinstalling the BIOS on an HP laptop or a model from any other manufacturer must begin by searching for the most suitable latest firmware. Where can I find it?
The best option would be to visit the manufacturer’s website, where you can find and download the required installation file or package using the nomenclature designation of the laptop model. Any self-respecting manufacturer usually publishes such firmware on their products in a timely manner. official resources in the Download section. Some go even further by asking users to test their laptop online, after which they will be prompted to download important or additional updates. But there is one caveat. Never download any beta versions that are in the testing stage. This can cause irreparable damage to your laptop. In addition, do not under any circumstances download firmware from third-party Internet resources, if you are not completely sure of their reliability.
How to determine the current BIOS version?
However, sometimes installing an update may not be necessary, since the laptop already has an updated BIOS version. Thus, you first need to find out which modification is already installed and compare it with the version offered by the manufacturer.

Easiest to find necessary information can be found in the system information section (msinfo32), where the current modification will be indicated, usually containing a set of letters and numbers in the designation. If it is truly outdated, it is worth updating. However, quite often it will not be possible to “jump” over one or more intermediate versions, so the update will have to be done in stages, installing several versions one at a time.
How to enter BIOS on a laptop?
Now let's look at ways to access the primary system settings. What is it for? Yes, only for the fact that in some systems you can find a pre-installed update tool right in their parameters, and after launching it, use the firmware recorded on a flash drive in the form of bootable media. How to enter BIOS on a laptop? Here everything depends solely on the manufacturer of the laptop itself and the developer of the software shell of the primary system.

Most often used function keys(F2-F12), sometimes they work in combination with others additional buttons like Fn or combinations with Ctrl and Alt. You can also find three-key combinations like Ctrl + Alt + Esc. On some models it seems SONY Vaio There are special buttons right on the keyboard panel.
How to reinstall the BIOS on a laptop as the latest UEFI system?
Now let's proceed directly to the installation new firmware and first let's stop at the very simple method, which is used for the latest systems UEFI. As a rule, installers for them are supplied in the form of the most common executable EXE files, which can be run directly in running operating systems Windows. It goes without saying that in all the latest modifications, the installer must be started exclusively as an administrator (even if Account super administrator is deactivated).

After launch, the program will automatically reinstall the BIOS, and in some cases, instead of one restart, several reboots may be required.
Questions about flashing outdated BIOS modifications
But how to reinstall the BIOS on a laptop if the user is dealing with a classic system for which launching the installer in a Windows environment is not provided?

If the BIOS itself has an update tool, the easiest way is to write the downloaded firmware to a removable drive (flash drive), then enter the BIOS, find the update section, which will identify all devices that may contain the update package, then activate the update and wait for completion procedures.
But how can you reinstall the BIOS on a laptop if there is no built-in toolkit for flashing the primary system? To do this, you can use a set of tools disk utility Q-Flash Utility. In this situation, as mentioned above, the firmware along with the program will need to be written to a flash drive, creating a bootable MS-DOS disk (the easiest way to perform such actions is in the well-known portable application Rufus).
Once the flash drive is prepared, you can begin reinstalling the BIOS on the laptop. The instructions do not look particularly complicated, but during the flashing process you need to pay attention to several important details. First, in the BIOS settings, you should set the created media as the first device to boot, save the changes, and exit the primary system, after which an automatic reboot will follow.

After starting the utility, an update from the media (Update BIOS from drive) is selected from the main menu, and then the list indicates required version(usually there will be only one there, but sometimes you can meet more). After this, all that remains is to confirm the start of the process, and the procedure itself will take only a few minutes.
Some laptop models even have built-in update tools. For example, when reinstalling the BIOS on an HP or ASUS laptop, you can find such proprietary utilities.

You just need to call such a tool (for example, Live Update), find the MB BIOS item there, if there is something there, download the file, then run it, select the mode for Windows (In Windows Mode) and confirm the installation of the update.
What should you not do under any circumstances?
It is important to know that when updating the BIOS on an HP laptop or on devices from other manufacturers, under no circumstances should you disconnect the laptop from the power supply (it should only be powered by the network, and not by battery, so that the process does not interrupt) or forcefully turn off the power using the appropriate on/off button, since such actions can only lead to your device not only not being updated, but also turning into a “brick.” The same applies to increased care when choosing firmware, since unsuitable software can trigger similar situations.