How to take a screenshot on Android in different smartphones.
A screenshot is a screenshot taken by a user on their device. Why is it needed? It is known that it is better to see once than to hear a hundred times, so it is easier and more visual to take a screenshot of the screen on Android and then send it to another person than to type text in a message.
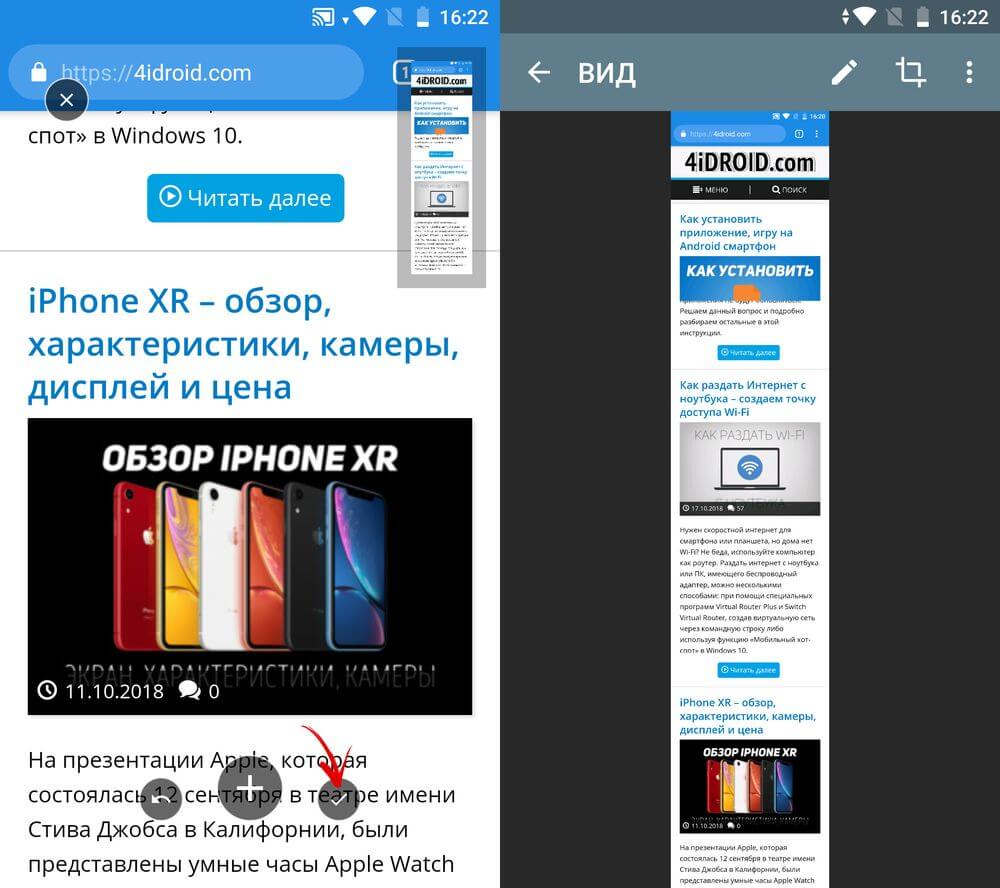
First, we’ll take a screenshot on our smartphone, and then we’ll figure out what we can do with it next.
Taking a screenshot on Android Samsung
Before taking a screenshot using buttons, I suggest you decide on the names and location of the buttons on your Samsung phone.

Rice. 1. Position and names of buttons on a Samsung phone
To take a screenshot of the screen on Android version 4.4 or 5.0 from a Samsung smartphone, you need to press two buttons at the same time:
- “Home” (other names for this button: “Home” or “Power”) and
- "Nutrition"
and hold them for 1-2 seconds.
Moreover, these two buttons should be pressed on the smartphone so that a characteristic click is heard, as if the shutter of a camera or an old camera is clicking, which means “It worked! The screenshot was taken and placed in the Android memory.”
After the characteristic click on Android has sounded, all that remains is to find the screenshot on your phone in order to further dispose of it at your own discretion.
In other smartphone models, the combination of buttons that must be pressed simultaneously to take a screenshot may be different, for example, buttons
- "Home" and
- "Volume".
Some smartphone manufacturers have equipped their devices with a different method to take a screenshot. For example, the “Screenshot” command can be built into the “Home” menu (aka “Power” or “Home”, Fig. 1), or in the “Back” button menu, or in the “Recents” open source software" That is, by clicking on these buttons, a menu pops up, in which, among other actions, there is a “Screenshot” command.
Some Samsung smartphones with Note technology supplied with a pen. Then to take a screenshot, you should touch the screen with the tip of the pen.
I think that users who claim that "android screenshot could not be saved" are actually:
- did not take this screenshot, because if a screenshot is taken, it is automatically saved in the Android memory,
- or could not find the screenshot on your device.
How to find a screenshot on Android
I offer two options for searching for screenshots in Android memory on a Samsung phone:
- through the “My Files” folder,
- by connecting your smartphone to your computer.
Let's consider both options in order.
We are looking for a screenshot in the “My Files” folder
IN Android applications find the “My files” folder (Fig. 2):

Rice. 2. The “My Files” folder, in which we are looking for the screenshot
If the smartphone is connected to the computer, then we then work with it exactly as if it were a flash drive connected to the computer.

Rice. 6. Connect the smartphone to the computer. Looking for a smartphone through Explorer
1 in Fig. 6 – open Explorer on the computer,
2 – in the “Computer” folder we look for the smartphone exactly as if it were a flash drive,

Rice. 7. Looking for the “Pictures” folder on Android
By clicking on “Pictures”, you can see the “Screenshots” folder (Fig. 8):

Rice. 8. Hurray, the “Screenshots” folder has been found!
So, you can find your screenshot on Samsung Android in the “Screenshots” folder (Fig. 9):

Rice. 9. 3 screenshots are highlighted. The menu is shown, what can be done with screenshots
If you select a screenshot (one or several) and press RMB (right mouse button), you will see context menu. It shows what you can do with highlighted screenshots.
To copy a screenshot from an Android smartphone to a computer, you can click “Copy” (1 in Fig. 9). After this, the screenshot will be placed on your computer. Next, on your computer, open the folder into which you should transfer the screenshot from your smartphone.
For simplicity, I suggest placing a screenshot from a Samsung smartphone on your computer desktop. Click RMB ( right click mouse) on the Desktop, click “Insert” (Fig. 10). If the "Insert" option is grayed out (faint gray), this means that the clipboard is empty and nothing has been copied there.

Rice. 10. A screenshot from Android can be pasted onto your computer desktop
How to highlight a screenshot on Android
First you should highlight the screenshot. To do this, you need to hold your finger on the unnecessary screenshot, hold it a little and release it. Opposite the file will appear green tick, which means the file is selected. At the same time, a context menu will appear at the top, which shows what exactly can be done with the selected file:

Rice. 11. The screenshot is highlighted, its context menu: numbers 1-3.
2 – Trash: delete screenshot,
3 – Menu, what can be done with the screenshot,
4 in Fig. 11 – a green checkmark means that the file is selected.
To deselect a file, you need to tap (tap your finger) on the file and the file selection will disappear.
How to send a screenshot on Android

Rice. 12. How can you send a screenshot from Android
For example, to send a screenshot as an SMS message, you need to tap “Messages” (Fig. 12).
Menu for screenshot on Android Samsung
If the screenshot is selected, then it has a menu (3 in Fig. 11) that shows what you can do with it:
- Move,
- Copy,
- Rename,
- find out its properties.

Rice. 13. You can Move, Copy, Rename the selected screenshot, and find out its properties
How to delete a screenshot from Android
First you should highlight the screenshot. To do this, hold your finger on this file, a green check mark will appear - the screenshot is highlighted (4 in Fig. 11). At the same time, a trash can icon will appear at the top (2 in Fig. 11), which means that the selected file can be deleted.
If you click on the trash can icon, the file highlighted with a green checkmark can be deleted. In this case, the warning message “Delete file. This file will be deleted" and two active buttons"Cancel" and "Delete". If you change your mind about deleting the screenshot, click “Cancel”.
Before deleting the selected file, make sure that not all files are selected, namely the one that is NOT needed (that is, there is a green checkmark next to this file). If you are sure, click on the “Delete” button.

Rice. 14. Deleting a screenshot from Android
You can also delete a screenshot from Android via a computer (Fig. 9). This can be done by connecting your smartphone to your computer.
The above describes how to work with a screenshot on a smartphone. Android Samsung, like selecting a screenshot file, transferring a file from a smartphone to a computer, deleting a file from a smartphone, sending a file to another user. Of course, all these same actions apply to other files that are on the smartphone: pictures, photos, etc.
How often do we, Android device users, have to take screenshots: to save correspondence, show an area on a map, cut a fragment from a video, make a copy of a train ticket, capture an achievement in your favorite game, etc. In each of these situations, you will need to take a screenshot, so it is useful to know what combination of buttons is used to take it.


If you need to upload the screen to your computer, connect your smartphone or tablet to the PC via USB, go to the internal memory → “Pictures” → “Screenshots”. Then select the images you want and transfer them to your computer.

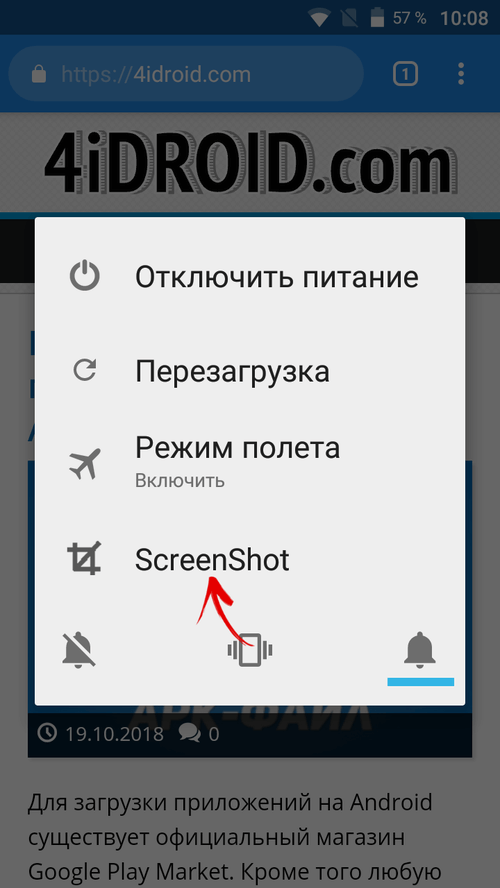
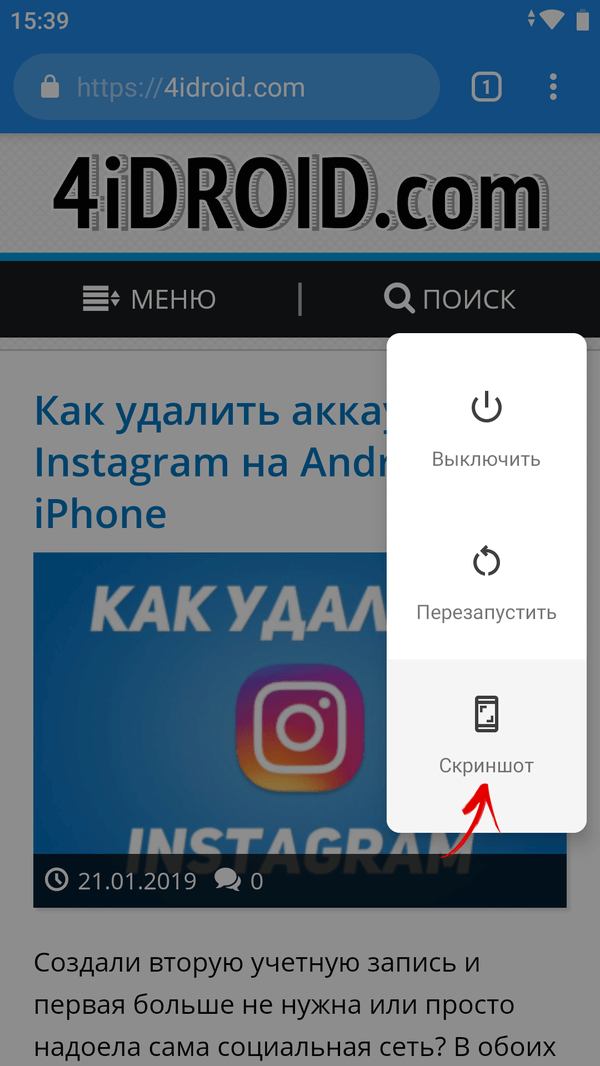
Another standard way capture what is displayed on the display - long press the power button to bring up a menu with available actions and select the desired option. Usually the list consists of the following items: “Shutdown”, “Reboot”, “Airplane mode”, and in some firmware (usually custom ones) there is also “Screenshot”. We are interested in the latter.
The feature also appeared on stock Android 9 Pie.
How to take a screenshot on Samsung Galaxy
On most smartphones and Samsung tablets screenshots are made as follows: press and hold for a couple of seconds lock key and home button until it sounds like a camera shutter clicking. An icon will appear in the notification area indicating that the screenshot has been saved.

On new models Samsung Galaxy S8, S8 Plus, S9, S9 Plus, Note 8, Note 9, J8, J6 Plus, A6 Plus, A9 and others where there is no Home button, the usual key combination is used to capture screenshots: "ON" + decrease volume.

On older devices such as the first generation Galaxy S, press and hold for a couple of seconds Home buttons And "Back".

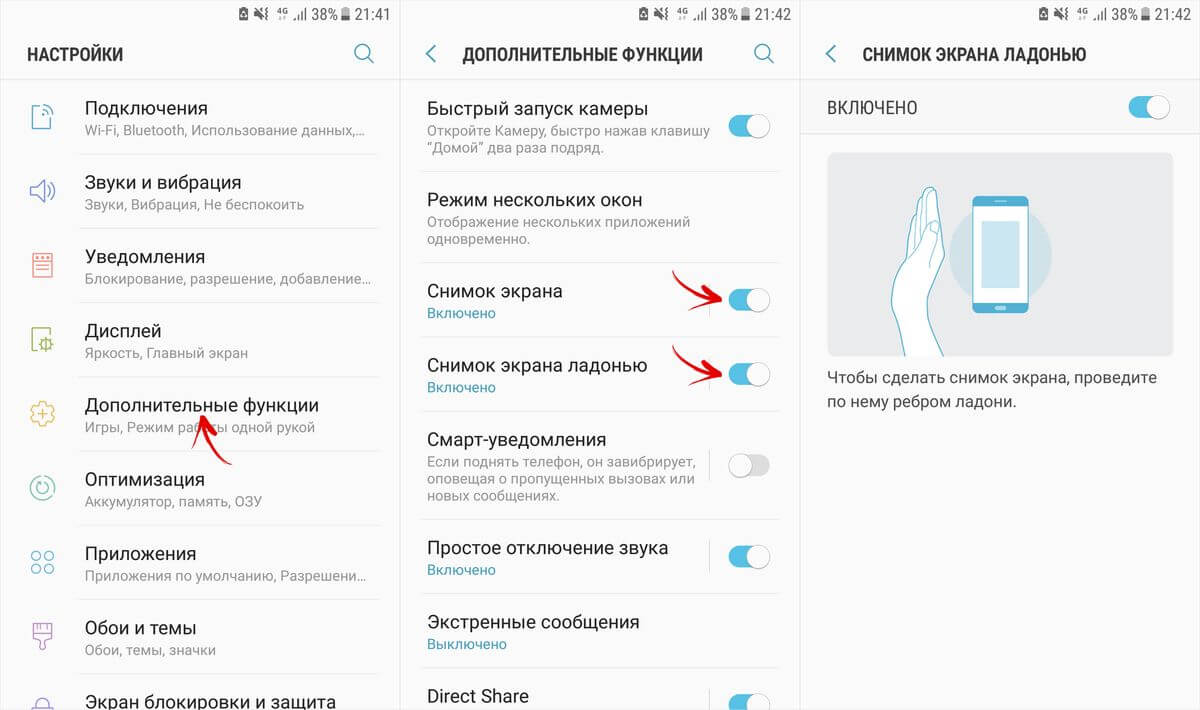
Modern flagship smartphones Samsung and some mid-range models price segment Support Palm Screen Capture function. On most devices, the option is enabled by default, but if not, go to Settings → Additional functions”(depending on the model and firmware, it may be called “Palm Control”, “Gesture Control” or “Motion”) and activate the “Screenshot” and “Palm Screenshot” items. Now, to take a screenshot, swipe the edge of your palm across the screen from right to left or left to right.
On Samsung pictures screens are saved to the “Pictures” → “Screenshots” or “Pictures” → “ScreenCapture” folder. You can also view them in the Gallery or Google Photos app.

Ways to take a screenshot on Xiaomi
Xiaomi developers have come up with 6 options for taking a screenshot. Four of them are available only to owners of smartphones and tablets with MIUI 7, 8, 9 and 10, but as of the end of 2018, most Xiaomi mobile devices run these firmware.
The first standard method is to press and hold the buttons for a second nutrition And decrease volume.

Another option to capture an image from the screen using keys is to quickly press touch button "Menu" and a hardware key Volume Down.

Starting with MIUI 7, the firmware added a screenshot function from . To use it, swipe from the top edge of the display to open the notification shade. Then swipe down a second time to fully open the panel. quick settings. Click on “Screenshot” if installed English language) and the screen image will be saved.

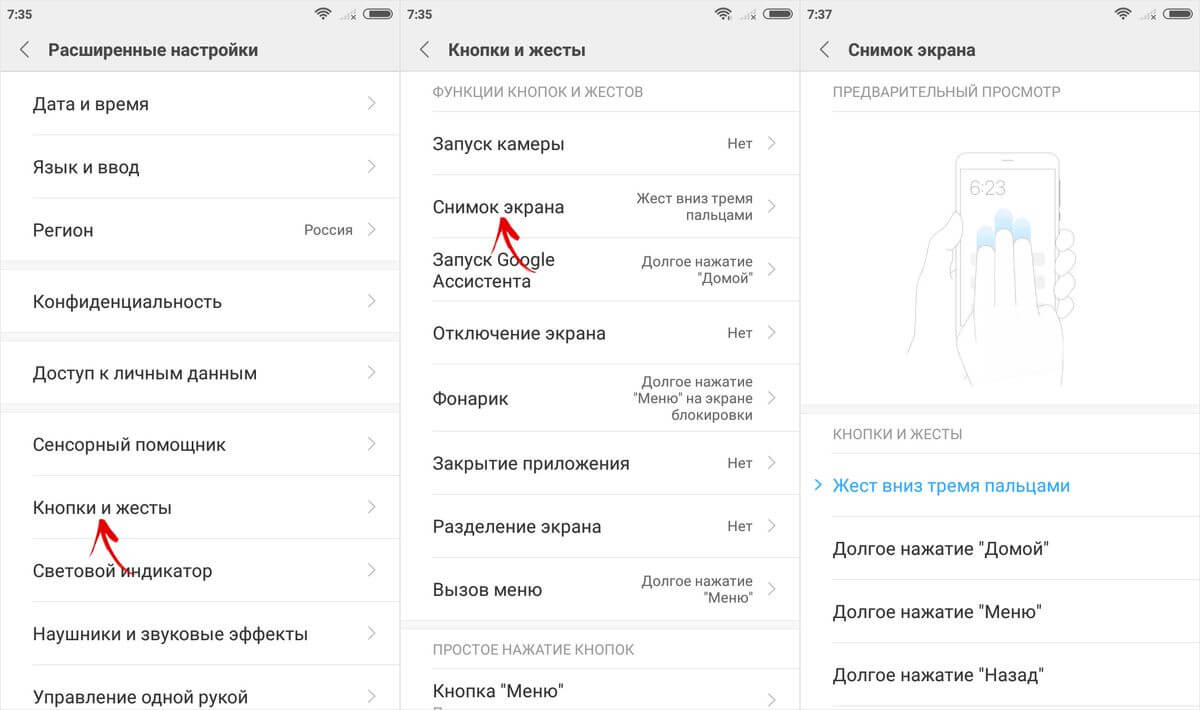
Users of Xiaomi smartphones running MIUI 8 and higher now have access to two more ways to create a screenshot. The first is to swipe down the screen with three fingers. This gesture is set by default, and if you want to change it, go to “Settings” → “Advanced settings” (in older firmware, instead of this item – “Advanced”) → “Buttons and gestures” → “Screenshot” and select another option or simply disable the function.

MIUI 8 also features the Quick Ball touch assistant. This useful feature, making it easier to use a smartphone with a large display with one hand. To display Quick Ball on the screen, go to Settings → Advanced Settings (or Advanced) → Touch Assistant and turn on the toggle switch. A translucent arc will appear on the side, clicking on it will open interactive menu with available options. Among them there is an icon with scissors. Click on it to capture what is shown on the display. If you pull the arc, it will turn into a circle - its location on the screen can be changed by simply dragging it. In addition, by going to “Shortcut Functions” in the Touch Assistant settings, you can change the purpose and order of the buttons.

A thumbnail of the created photo will appear in the right top corner display and will “hang” there for some time. If you click on it, you will go to the list available options. To add text, sketch, or crop an image, select Edit, make your edits, and click Save.
But the most interesting feature – long screenshot. It comes in handy when you need to “screen” the contents of the screen along with what does not fit on it. After creating a photo, click on its thumbnail and select “Scroll” in the list of options (or “Advanced” in previous versions MIUI). The image will begin to descend and to crop it, click on the Stop button. If you do not press it, the application will scroll to the maximum set by the developers. You can also scroll to the right moment manually. For an unknown reason, the Scroll function does not work correctly in mobile browser Chrome.


On Xiaomi, screenshots are stored in the “DCIM” → “Screenshots” directory internal memory and are displayed in the Albums → Screenshots section of the gallery.


Quick Memo on LG
On LG smartphones, in addition to standard screenshots, the Quick Memo function is available. First of all, it is intended for creating text and graphic notes. You can also use it to save and edit the image from the display: crop to required sizes, apply your own drawings, delete fragments and add text.
The Quick Memo app is not installed on all LG phones. Check if it is present in the menu and if the corresponding button is located on the quick settings panel (opened by swiping down from the top edge of the display).
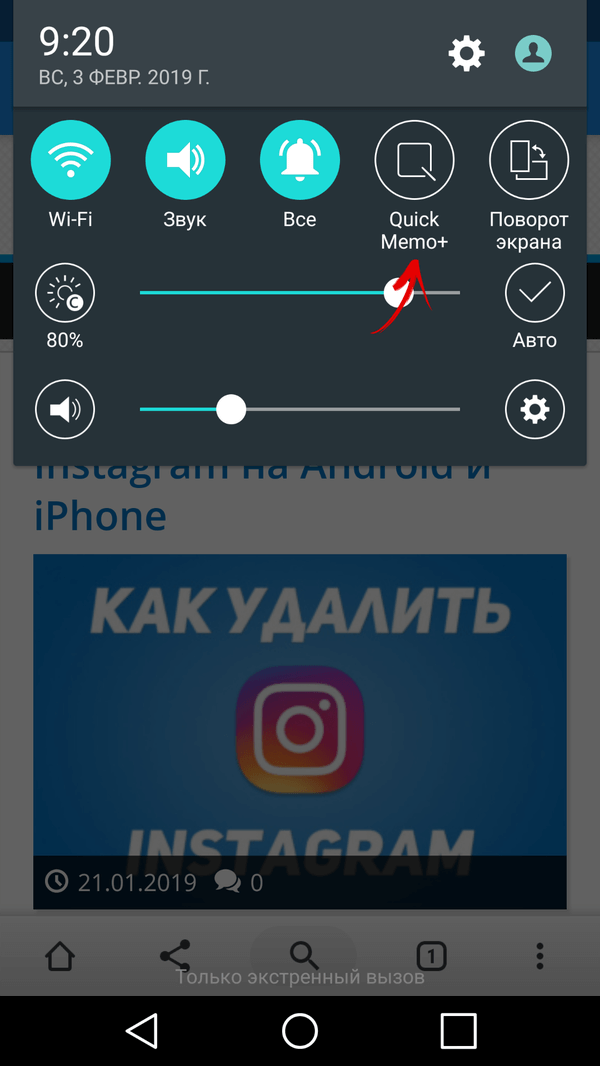
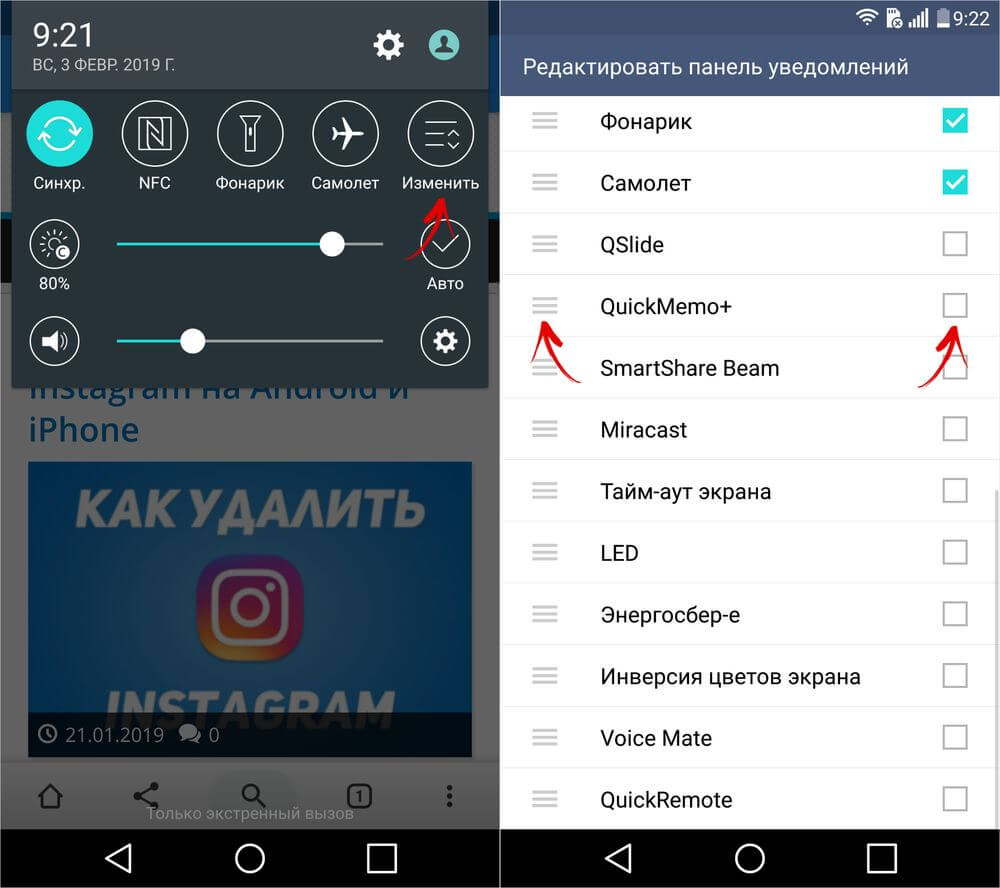
If not, scroll to the last option and select Change. Check the “QuickMemo+” checkbox and, if necessary, move the item - this will change the location of the button in the notification area.
If you don't see "QuickMemo+" in the quick settings panel editor, go to "Settings", open the "General" tab and select "About phone". Go to Update Center and click on Application Updates. Scroll down to the "Applications in Idle Mode" section and click on the "Download" button. After the installation of the program is complete, activate Quick Memo in the notification panel editor.


Now, to “screen” the information displayed on the screen, open the “curtain” and click on “QuickMemo+”. You will immediately proceed to editing the photo and can add text or drawing. To crop the image, click on the arrow in the center at the top, which will open a window where you can set frames.

To save a picture, click on the checkmark in the upper left corner and select QuickMemo+ or Gallery.

In the first case, a note will be saved, which will be available for viewing and subsequent editing in the QuickMemo+ application, and in the second, a picture will be saved, which will be displayed in the Gallery in the “QuickMemo+” folder.

Long screenshot
The extended screenshot feature is available on Xiaomi smartphones, Huawei and Samsung working on latest firmware. But what to do if such an option is needed, but the mobile device manufacturer has not added it to the system? In this case, use one of the proposed programs.


Screen Capture Applications
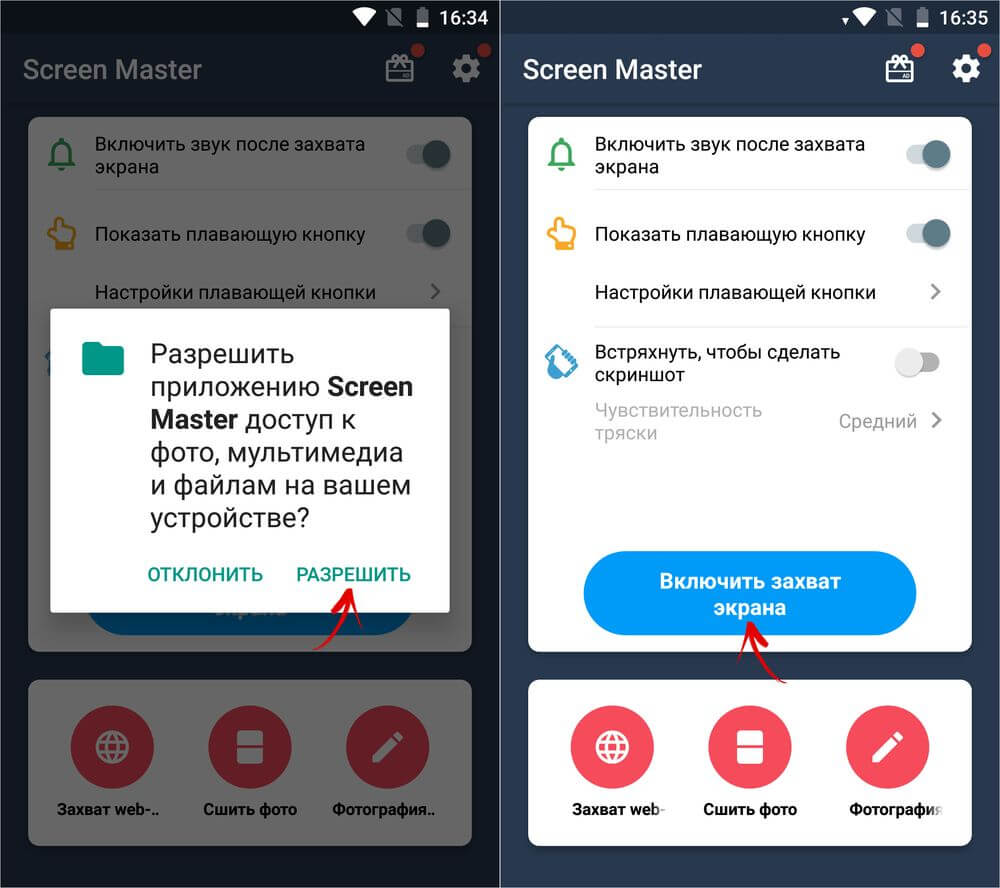
If the hardware volume buttons or the lock key do not work on your smartphone, programs that “can” capture screenshots will come in handy. For example, applications and Mobizen designed for support this function. Download any of them, run and provide necessary permissions, after which a “floating” button will appear on the side. Click on it and a list of available actions will open. Select the camera icon and click “Start” in the pop-up window. At the same moment, a screenshot will be created.


There are other screen capture apps available on Android that work in a similar way. For example, Screen Master displays a button that, when pressed, performs a screen. You can immediately crop or change the picture: add text, a sticker, a drawing, or create a long photo. And the Screenshot Assistant program will be needed to assign Print Screen long press the home button.

We use a computer
To take screenshots of the display on an Android device connected to a computer via USB, you need the ADB utility. Turn on and connect your tablet or phone to your PC via USB. Go to the “platform-tools” folder and, while holding down the “Shift” key, right-click on empty space. Select "Open a Command Window" or "Open a PowerShell Window Here."

Command to capture screenshot – adb shell screencap /sdcard/screen.png . You can change the file name and path and it will come out, for example:
adb shell screencap /sdcard/pictures/screenshots/screen1.png
Paste the command into the running command line or Windows PowerShell and press "Enter" to execute. In PowerShell, add ./ before ADB commands. The image will be saved in the specified directory and will be displayed in the gallery.
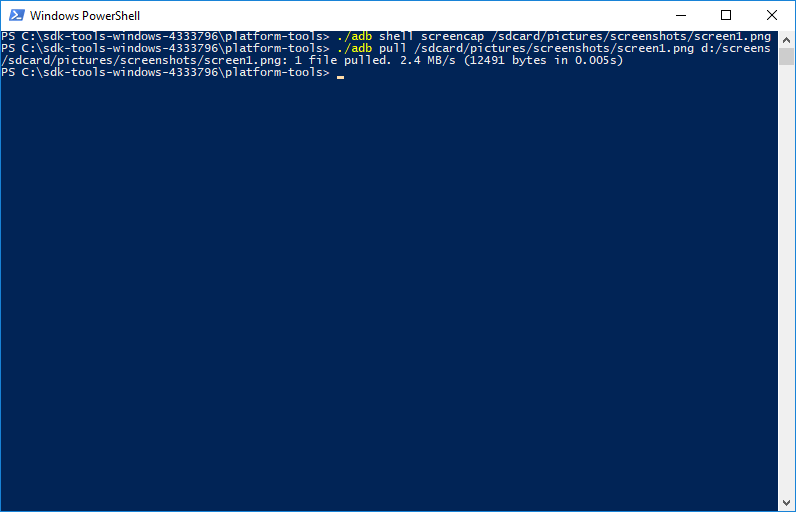
To send a file from your mobile device to your computer: adb command pull. Eg:
adb pull /sdcard/pictures/screenshots/screen1.png d:/screens
In this particular case, the file “screen1.png”, which is located in the “pictures/screenshots” directory on the smartphone, will be downloaded to the “screens” folder on the “D:\” drive on the computer. If you do not specify a path to download the file, it will be saved in “platform-tools”.
(5,00 out of 5, rated: 4 )
Often there is a need to save something important (for example, to record a new record in a game). In this case, a screenshot comes in handy. A screenshot is a screenshot. On a smartphone or Android tablet It’s very easy to take a screenshot; you can use both the built-in functionality and individual applications. There are many methods available, so you can choose any of them.
Using built-in functions
This method Can be used for some devices. You need to go to the settings, select the “ScreenshotSetting” item and activate the option “Show the screenshot button in the status bar" After this, a new button will be available below; if you click on it, a screenshot will be automatically created and saved in the “Screenshots” folder. A notification about the saving process will also appear on the screen. This is very convenient because you don’t need to use additional software. Starting from Android 4.4, this procedure does not need to be done. In some, there are other ways.
Almost every gadget has a function for creating screenshots. To do this, use special keyboard shortcuts:
1. Home + power button.
2. Power button + volume down button.
3. Lock button + volume down button.
Using apps
Method number 1 - with RootIf your device has root rights ah, then you should install special program for screenshots, for example, Screenshot UX. With its help you can take a screenshot very quickly. The software has flexible settings, a screenshot will be taken by shaking the device or using a separate icon located in the status bar (parameters are set in the settings). For convenience, you can select the image format. The application has a built-in editor (you can add text to the screenshot or change its size). The program is quite convenient and easy to use.

Method number 2 - without Root
If you don’t have root rights, you can download various utilities, but there aren’t too many of them, and some of them are paid. You can find them on specialized forums. The software settings are quite simple, so no difficulties should arise.

Conclusion: Taking a screenshot on Android is quite possible, you can try several methods to find the most optimal one. This functionality is very useful, so it will never be superfluous. If your device has built-in options that allow you to take screenshots, this can save you time. If they are not there, then you will have to use specialized applications.
Good afternoon, dear users and, I hope, happy owners of an Android gadget. By “gadget”, I naturally mean your mobile device based on the operating system Android systems(Android). In today's article I will tell you how to quickly and easily take a screenshot Android screen .
So, ways to create:
Built-in function
If you are the proud owner of a gadget running Android 4.0 or higher, then take a screenshot from your mobile screen Android gadget(Android) not difficult. You, take a screenshot. screen, it will be very simple. To do this you need to do the following actions: Press and hold simultaneously (required!) two buttons on your Android device - the “Power” button and the “Volume Down” button. These buttons are usually located on the side Android devices.
On Android 3.2, a function is also available that allows you to quickly take a screenshot. This is done as follows: press and hold the “Recent Programs” button.
Unfortunately, on Android versions lower than version 4, you won’t be able to perform a similar operation (which I described above, taking a screenshot), because In those versions of the operating system there is no such function.
Using third party applications
If, for some reason, you do not want or cannot use the built-in function to take a screenshot, you can use third party applications. Below you can find a list of similar applications:
- No Root Screenshot it– if your Android device does not have superuser rights (ROOT), then you can create a screenshot using this application. It works like this: you install it on your desktop Personal Computer special client, then install its Android version on your device. Taking a screenshot, in my opinion, is very convenient;

- Screenshot UX is another good app to take a screenshot. I want to warn you right away that the application will not work without Root. The application also has the ability to set key combinations for creating screenshots;
- Screenshot Ultimate– not bad, paid (at the time of writing this material the application cost Google Play about 40 rubles) application for creating beautiful screenshots your mobile screen.
On various devices
If you haven’t chosen a suitable option for yourself or if not one of the options offered does not work, then you can familiarize yourself with how you can take a screenshot on various Android(Android) devices. All gadgets are sorted by manufacturer:
- Samsung– if you are the owner of a mobile device from a company, then you can take a screenshot as follows: press and hold the combination of the “Back” and “Home” keys;
- HTC– on gadgets from this company, screenshots can be taken like this: press the “Power” and “Home” buttons simultaneously. After completing this simple operation, the screenshot you created will be saved in the “Photos” folder on your Android gadget;
- Sony– to take a picture, do the following: simultaneously press the combination of the “Volume Down” and “Power On” buttons;
- Huawei– Are you the owner of a gadget from this company? Then, to take a screenshot, do the following: press and hold the “Volume Down” and “Power” buttons for about two seconds;
- ASUS- on tablet computers You can also take a screenshot of this company. Go to “Applications”, then go to the “Settings” menu -> “Display” -> check the “Screenshot” box. Now, click the “Recent” button running applications” and hold it.
That's all for today. I hope you have figured out your problem (you know how to take a screenshot of your screen) and I dare to hope that my article, to some extent, contributed to this. I would be grateful if you write your opinion in the comments to this article, and also share it in social networks by clicking on the special buttons.
In this article we will talk about how to take a screenshot of the screen of an Android device or, I think, it will be a little clearer, take a photo of everything that is on the screen. On computers, the “Printscreen” key is used for this purpose. On communicators and tablets different companies A screenshot is taken using a combination different keys, but there are also standard key combinations built into the Android operating system that work on almost all phones. The first thing you should try is standard set, since I have HTC Sensation XE both keyboard shortcuts from both the OS and HTC work.
How to take a screenshot on Android 3.0 and higher
To screenshot the screen on this version operating system, you need to press the “Recent Programs” button for 2-3 seconds. This method Works mainly on tablets running Android OS versions 3.0, 3.1 and 3.2.
How to take a picture of the screen on Android 4.0 and higher
In order to screenshot the screen Android versions 4.0, 4.1, 4.2 and higher, you must simultaneously hold down the “Power” and “Volume Down” keys for 2 seconds. When you create screenshots using this key combination, all pictures are saved to the “sdcard/Pictures/ScreenShots” folder.
Taking screenshots on communicators and tablets from certain companies (HTC, Samsung, ASUS)
To create screenshots on HTC communicators, use the following button combinations:
- For HTC Sense below 4.0 – simultaneous pressing of the “Power” and “Home” buttons;
- for HTC Sense 4.0 and higher – press the “Power” and “Back” buttons simultaneously.

All screenshots on HTC are saved to the “sdcard/DCIM” folder.
Samsung phones and tablets use the TouchWiz shell and take screenshots by pressing the “Home” and “Back” or “Power” and “Home” buttons for 2 seconds.

On devices ASUS You need to enable the ability to create screen photos; to do this, go to “Menu - Settings - Screen” and check the “Screenshot” box. Next, create screenshots using the standard method for your operating system.
If you know any combinations of buttons for creating screenshots on other phones, then write them in the comments.
- How to remove an application (game or program) on an Android system
Below are instructions for removing programs and games you have installed. So let's get started. Removing applications from...
">How to delete an application (game or program) on the Android system - 07/08/2013 - How to Russify Android
Step 1. Checking for language availability Go to the following path “Menu – Settings – Language & keyboard”. Click on the topmost item...
">How to Russify Android - 05/10/2013 - How to set your own ringtone for alarms, messages, reminders and system sounds
In general, everything is simply outrageous. Create a media folder on the memory card, audio in it, and 4 folders in it: /alarms,...
">How to set your own melody for alarms, messages, reminders and system sounds - 03/01/2011 - How to install programs on Android?
All applications for the Android system have apk extensions. Attention: applications for the Android system need...
">How to install programs on Android? - 02/17/2011