Installing Linux on an Android tablet. Installing Ubuntu Touch on your phone
Is very popular, especially among system administrators and software developers. Great amount various devices work under its control. Unfortunately, there are virtually no mobile devices, such as a tablet, that support Linux natively. On this moment Only one model has been released, running on Ubuntu. But buying it may not be so easy, since it is not available in every country.
If desired, you can install Linux on your tablet, replacing Android.
Naturally, many may wonder whether it is possible to install Linux on a tablet that originally runs Android instead of this OS. Officially, both Android and Linux have the same kernel, but, unfortunately, Linux will not work fully on an Android tablet. Developments are underway in this direction, and many programmers are actively working to solve the problem, but the reality of today is that you need to be sophisticated to launch Linux distribution on an Android tablet.
In this material, we will provide an overview and step-by-step steps on how to install a Linux distribution on your tablet. We will tell you what conditions need to be met, how to prepare your device, and also tell you about the features of the procedure.

What you will need:
- Android tablet.
- SD card with a capacity of 3.5 GB or more.
- root access
- a complete backup of all data for one hundred percent certainty of a safe outcome. you move large files and perform many operations, so this is simply necessary.
IMPORTANT. DENIAL OF RESPONSIBILITY. Despite the fact that this process does not cause any damage, the site's editors are not responsible if something happens to your Android device during the installation or launch of Ubuntu.
Make sure you have superuser rights. On almost every device you can do this by checking if you have the Superuser app. If you don't have root rights, you can get them. To do this, find out the instructions specific to your device.

BusyBox libraries will help you interact with the Android system. You can download the installer from the Play Store (or Android Market), by going here (https://play.google.com/store/apps/details?id=stericson.busybox) and downloading it. Go to the BusyBox Installation tab and click the Install button. Once the utility is installed, you can move on to the next step by installing a terminal emulator.
Step 2: Install the terminal emulator and check that it works correctly.
The most popular terminal emulator for Android is on this page (https://play.google.com/store/apps/details?id=jackpal.androidterm) at Play Market. By following the link, download it, install it on your tablet and run it.
After the application window opens, enter the word “su”. The utility will ask you to provide root access, and you must give it because the utility runs system scripts that we will later use to start Ubuntu.

To check if the BusyBox terminal and libraries are working correctly, enter the command “busybox arping –help”. If the terminal gives you a text with a lot of options, such as -f -q -b, everything works. If not, check whether your phone has root rights and whether it is done correctly installing BusyBox, and whether the terminal has permissions. If everything is in order, you can continue.
If you have completed all the necessary steps in steps 1 and 2, there is no need to worry. The next few steps are very simple. Start by connecting your phone to your computer. You must enable the USB drive, which will allow you to open your SD card on your computer (most of you will know this when you have moved music and other files from your computer to Android).
Next, you need to create a folder called “Ubuntu” on the SD card. Then you should download this one (https://sourceforge.net/projects/linuxonandroid/files/Ubuntu/10.10/ubuntuV5-image.zip/download) and this one (https://sourceforge.net/projects/linuxonandroid/files/Ubuntu /10.10/ubuntuV5-script.zip/download) files. These are ZIP files that contain 2 important things: the startup script and the Ubuntu file system. If you open the first ZIP archive, you will find the IMG file, and if you unzip the second file, you will find the SH file.

Unzip both archives and move the files to the “Ubuntu” folder. You should now have two files in the folder. Most of the necessary processes have been completed.
Step 4: Start Ubuntu System
Go back to your terminal application and type "su" again, then write "cd/mnt/sdcard". To make sure everything works, try typing "ls" and see if you can recognize your folders (you should also be able to find Ubuntu folder).
To start your Ubuntu, type "cd /ubuntu" followed by "sh ubuntu.sh". This will cause many processes to run that will try to install your system. Next, the utility will ask you to select a screen resolution. Enter it in width x height format, for example 1280 x 720. For more better performance To prevent the tablet from slowing down, choose a lower resolution. Now everything is done.
The Ubuntu system is working, but we cannot see it. To see the GUI, you need to use the VNC protocol client. We can download any of them from the Play Store.
As an inveterate lover of OS Linux, I would of course like to have a phone with this operating system. But unfortunately you can’t find such a phone in a store. But still there are craftsmen who manage to install Linux on the phone.
To do this, they create special firmware, usually for specific model phone. In this case we have regular phone, where you can buy spare parts if you need anything, and if something doesn’t work, return the phone to its original appearance.
What phone models can, for example, install Linux on? The website www.linuxmobile.org has firmware for at least several models. These models can be equipped with firmware based on Android. If you didn't know, Android is also Linux.
What phones can you install it on? Linux?
Motorola Atrix Motorola Razr HD Cyanogen Mod 10 Cyanogen Mod 9 Cyanogen Mod 7
Perhaps one of these models is in your store and you can buy this phone and install Linux on it. How will it look like? This is what stripped down Android looks like Linux on the phone:


Of course, the developers warn that you use these firmwares at your own risk, and this is understandable. But on the other hand, would an ordinary user undertake to install Linux on a phone? He simply doesn’t need it, this is the lot of people who are well versed in the topic. Yes, it would be great to install Linux on my old phone, it’s a shame it’s not on the list….
Linux on a tablet - is it worth installing?
Linux on a tablet is the dream of many Linux lovers. I wrote some time ago that they had already made a tablet with Ubuntu, but so far in small quantities and buy a tablet with Linux today is not so easy. But this is just the beginning, as there is no doubt that in the future new mobile phones and tablets will increasingly use Linux on their devices. But today everyone can install Lynx on a tablet, if they are comfortable with Linux, of course.
The first question that arises for those who want to load Linux on a tablet is the question of which Linux to install? Here you should immediately take off your rose-colored glasses: any Linux that you install on a regular computer cannot be installed on a tablet.

The fact is that most tablets today are made based on processors that have an ARM structure. Therefore, the easiest option to install Linux on your gadget is to buy a tablet with the usual x86 architecture. Finding such a tablet is not difficult, since it will most likely have Windows 7 or something similar pre-installed on it. By purchasing such a tablet, you can install any Linux on it.
But finding such a tablet today is not so easy, and even if you find it, you may not like it in appearance or characteristics.
Running Linux on Android
What is the way out? And there is only one way out: find OS Linux, which has already been ported to ARM processor. There are not many such developments today, and one of the options is Kali Linux. But this is only one of the options. If you type in search engine the phrase “Linux ARM”, you can see which Linuxes are already running on this processor. Here are some of them:
Arch LinuxARM Debian Linux on ARM Ubuntu Linux on ARM Gentoo Linux on ARM
So you have a choice and you can try installing Linux on your tablet. But I have a question: are there enough ports of Linux programs for this platform? Is the game worth the candle? After all, it’s not enough to just port Linux; it’s also important to port applications for it.
In general, I admire the abundance of applications for Android, which are no less numerous than for Linux. And I would like to see many of them in Linux. But won't it turn out that by installing Linux on my tablet, I will deprive myself of this variety of applications that Android has?
In general, you need to think a thousand times before installing Linux on your tablet. Maybe his time has not come yet?
![]()
18+ © Seclub.org 2003-2018
In this article we will tell you in detail how to install Linux to an Android device. For installation and full operation alternative system you will need: a smartphone or tablet, a software emulator, root rights and several gigabytes of free space.
1. Installation applications complete linux installer
We enter the word “emulator” into the Google Play search menu and get a list of several dozen approximately identical utilities. They are all good, but we focused on the Complete Linux Installer application. It is completely free, perfectly localized and equipped with detailed instructions for beginners.
The program can be downloaded from http://goo.gl/5C6Xa. The installation algorithm for Complete Linux Installer is no different from installing any other software, so we will not dwell on this point.
2. Working with the Complete Linux Installer application
Before starting to work with the program, I would like to emphasize once again: what we are describing in this article is not installing Linux instead Android, but emulation of the operation of one system in another.
So, we launch the application and agree to install additional software components. It is working with these modules that will subsequently make it much easier for you to use the operating room. Linux systems.
As mentioned earlier, Complete Linux Installer requires root rights to fully function, which the application will remind you of in a pop-up window.
We provide the program full access To system functions mobile device.
This completes the initial preparation of the emulator for operation. The main application menu will open in front of you. Go to the sub-item “Installation Guide”.
The emulator will scan the hardware of your gadget and display a list of operating systems that are guaranteed to run on your mobile device. We choose Ubuntu 13.10 as an example.
From this moment on, the program begins to “guide” you through the stages of installing the operating system, accompanying each necessary action detailed instructions. For example, after reading the emulator requirements in the first step, be sure to install “Terminal” and “VNCViewer” in the second. Only after this select “Download image”.
Read the description of the differences between distributions of the Linux operating system and choose the one you need.
Create at the root external storage gadget folder with the name of the future system. This will make it much easier for the program to find the necessary files. In our case, we create the “ubuntu” directory. Unpack the downloaded archive into this folder.
As a result, two files should appear in the “ubuntu” directory. One of them is with the .img extension.
Is it possible to install Linux on a phone?
This is the image of the Linux system being launched.
After completing these steps, go to the “Launch” sub-item of the main menu of Complete Linux Installer and click the “Settings” auxiliary menu in the upper right corner of the window. By selecting the “Edit” option, provide the application with the full path to the system executable file. Confirm your choice by clicking on the “Save Changes” button.
This completes the next stage of installing an alternative operating system into the memory of your gadget. Feel free to select the “Run Linux” option.
Application in background will launch a terminal to execute test commands and request root access to the device’s system functions. We allow it.
Now your smartphone or tablet will be able to work as an emulator of the Linux operating system and you will have access to all the capabilities of the operating system with a penguin on the logo - from executing simple commands in the terminal to installing a full-fledged graphical environment. Linux installation on Android is complete.
Why
So this is so that you clearly understand the difference between an actively developing system in a relatively highly profitable market and a decaying platform for hairdressers.
It’s just that Android has a lot of things and actively uses interfaces in the form of file systems.
Happenes.
Is it possible to install Linux on a phone?
Development always comes through mistakes.
Maybe just not do this?
Yes, anywhere. This is more of an android question than a unix forum question. The absence of lines in fstab does not prohibit mounting simply by command.
Very little time passed from the release of the first smartphones running Android OS before enthusiasts learned to run full-fledged Linux distributions on them. Today, methods for installing Linux distributions on Android devices are widely known, and the Google Play repository even contains automated systems installations and launch Linux. In this article, I will try to accumulate all the accumulated experience of working with Linux on smartphones, tell you why this is needed, and show how to avoid possible pitfalls when transferring Linux to a smartphone or tablet.
For what?
At first glance, it may seem strange that someone is trying to run an operating system on a mobile device that, in principle, is not designed to work with a screen small sizes and without a sufficiently precise manipulator (mouse) and keyboard. However, you should not make hasty conclusions. A Linux distribution can give the owner of a smartphone quite a lot of advantages, including a set of old proven tools, such as utilities command line, advanced editors, FTP and SSH servers, networking tools and application development tools. Running Linux without graphical shell on a smartphone with a hardware keyboard (Motorola Droid, for example), you can use all this quite comfortably on the go without having to leave Android itself. All tools are available at any time, and the smartphone continues to be a smartphone, allowing you to receive calls and listen to Internet radio.
The second argument for installing Linux on a smartphone is the ability to use it as a portable workstation that can be connected to any PC and immediately access the terminal using an SSH/Telnet client or a VNC/RDesktop client. This is by definition better than flash drives with Linux installed, since there is no need, firstly, to reboot the machine, and secondly, to drive data back and forth; the results of your work will be available immediately after you disconnect your smartphone from the computer.
Finally, Linux gives the greatest benefit on tablets, the screen of which allows you to work more or less tolerably in a graphical environment, and the ability to connect a mouse and keyboard via an OTG cable generally gives the chance to turn the tablet into a full-fledged one. workstation. At the same time, there is no particular difference between installing a Linux distribution on a tablet and a smartphone.
How?
It's really easy to port Linux to Android and main role This is where the Linux kernel comes into play. Any Linux distribution is a set of applications and libraries running on top Linux kernels, and since Android itself is based on an almost unchanged Linux kernel, these applications and libraries can be run inside the Android environment without any problems. You just need to find a distribution for which there is a port to the ARM platform (don’t forget that 99% of all Android devices run on ARM), install it using an ARM emulator on the virtual HDD(that is, to a file), drop this file onto the device’s SD card, open a terminal, mount the image as a loopback device and chroot it inside. All! It's as simple as running an FTP server in a chrooted environment - a simple and decades-tested method.
The only stumbling block when you decide to run a Linux distribution inside Android is the graphical environment. While there are no difficulties with accessing the console thanks to the presence of a full-fledged terminal emulator, with graphic applications Problems begin - there is no native X server for Android, and it is impossible to run a regular X server inside the distribution itself due to fundamental differences in the architecture of the green robot's graphics subsystem. Despite the fact that it is based on the standard Linux Framebuffer, on top of which you can run an X server, the exclusive right to use it initially belongs to higher-level Android libraries, so you can either download a Linux distribution instead of Android (which is completely impractical) or come up with workarounds.
Checking the operation of the necessary modules
Keep in mind that support for loopback devices and ext2/ext3 file systems required to mount the image is not available in all Linux kernels installed on smartphones running Android control. You can check for support using the lsmod | grep -e loop -e ext2.
Enthusiasts got out of this situation by using a simple method of “remotely” connecting to the desktop using any VNC client available for Android. Inside the chroot environment, the Xvnc X server runs and all applications run under its control. The user just has to install the VNC client, enter local address- and voila, a full-fledged desktop appears on the screen.
The only bottleneck when using Remote Desktop is performance. Even when working locally, VNC cannot provide the proper level of power, which would be enough for smooth scrolling or moving windows without lag. It has not yet been possible to solve this problem; projects to develop a native X server that would use the Android graphics subsystem are still very crude and cannot be used to run full-fledged graphical environments. However, no one forbids using them; for example, X Server from Darkside Technologies Pty Ltd (goo.gl/ap3uD) is quite suitable for running simple software.
Initially, Linux for Android existed only in the form of an image with an already installed system, as well as explanatory instructions on how to connect and use this image. Then scripts appeared that automated the process of connecting the image and starting Linux, but they also required some brain work. Finally, in Lately installers have appeared that are available on Google Play (for example, goo.gl/RSA1j), which to some extent automate the process of launching the distribution, although, in essence, this is still the same installation guide, but interactive, with direct links to downloading images and scripts.
Alternative options
I already mentioned above that the Linux distribution may well be loaded instead of Android, thanks to which it will be possible to use Framebuffer for direct access to the video adapter and significantly speed up the operation of the graphical interface. However, doing this on a smartphone is almost pointless - Linux is unsuitable as the main system on small screens, and it will be impossible to receive calls and use the Internet. But on Linux tablet will look quite decent.
Typically, the so-called native version of the Linux distribution is installed on a device that initially runs Android as follows. On the internal NAND drive of the tablet is created additional section, to which the Linux distribution is copied. The U-Boot boot loader (used by most tablets) is then configured to use this partition as the boot partition. As a result, the tablet will automatically boot into the Linux system after turning on the power.
To leave a possibility Android downloads, the U-Boot bootloader is reconfigured so that the partition with the Linux system is not the main one, but serves as a “recovery partition” ( Recovery Mode), accessible by turning on the device while holding down the volume key (the same one that is used to flash the device and perform various recovery operations). This way you can get a dual-boot device: Android by default and a Linux distribution when booted into recovery mode. Recovery Mode itself remains accessible only with the help of special tools.
If the NAND memory is not enough to accommodate a full-fledged Linux system, parts of it (usually the /usr partition) are moved to an image or partition on an SD card. By the way, the ext2 partition on the memory card can also be used to install Linux running in a chroot environment.
Installing a native Linux distribution is more difficult than installing one running in a chroot environment, but it's worth it if you have a tablet and an OTG cable with which you can connect a keyboard and mouse.
Practical lesson
As I already said, only distributions ported to the ARM architecture are suitable for running Android. First of all, these are Ubuntu and Debian, and the first, for obvious reasons, is of much greater interest among robotics. You can also install Gentoo and several specialized distributions, such as Backtrack. Let's consider the most typical case, that is, installing Ubuntu using standard scheme, without using any automated installers or anything else.

First, we need a hard disk image with the distribution installed. You can create it yourself using the QEMU emulator, however, due to the fact that the installation procedure is absolutely standard and typical, I will not describe it, but will simply direct you to the address goo.gl/9nvBi. Here is an archive with an image on which Ubuntu 12.04 is preinstalled graphical environment LXDE (it would be unwise to run Unity/Gnome on a phone/tablet). The archive should be unpacked and the ubuntu.img file should be placed on the memory card.
Next, you need to mount the image and chroot it into the distribution environment. To do this, you need root rights, firmware with support for block loopback devices, and busybox installed (search the Market for “busybox installer”; CyanogenMod has it by default). Sequencing:
- Open the terminal emulator in Android (if not, you can install Terminal Emulator from the Market). Or we connect the smartphone/tablet to the computer and get access to the terminal with using adb: $ cd path-to-Android-SDK/platform-tools $ sudo ./ adb shell
Do not forget that the debugging mode in this case must be enabled: “Settings -> For developers -> Android Debugging”.
- We get root rights:$su
- We create a block loopback device, connect a disk image to it and mount it:# mknod /dev/block/loop255 b 7 255 # mount -o remount,rw / # mkdir /mnt/ubuntu # mount -o loop,noatime -t ext2 \ /sdcard/ubuntu.img /mnt/ubuntu
The contents of the image should appear in the /sdcard/ubuntu directory. Check that this is the case.
- We connect all the virtual file systems necessary for the distribution to work:# mount -t proc proc /mnt/ubuntu/proc # mount -t sysfs sysfs /mnt/ubuntu/sys # mount -o bind /dev /mnt/ubuntu/dev
- We configure it so that you can get full access to the Network from the chroot environment:# sysctl -w net.ipv4.ip_forward=1 # echo "nameserver 8.8.8.8" > /mnt/ubuntu/etc/resolv.conf # echo "nameserver 8.8.4.4" >> /mnt/ubuntu/etc/resolv.conf # echo "127.0.0.1 localhost" > /mnt/ubuntu/etc/hosts
- Let's go to the chroot environment:# chroot /mnt/ubuntu
Actually, this is where the installation ends. Now you can launch console software, update the system, start network services and do almost everything that can be done with a regular desktop Linux system, not forgetting, of course, that some software that directly interacts with hardware and various specialized pseudo-devices will not work. Also, do not forget that virtual FS should be unmounted after completion of work.
Now we need to install and run the Xvnc X server, which exports display and input devices using the VNC protocol. TightVNCserver is already in the presented image and is even configured, but so that you can better understand the process and be able to solve any problems that arise, I will describe in detail the process of installing and launching it.
- Update and install TightVNCserver:# apt-get update # apt-get install tightvncserver
- Create a file /root/.vnc/xstartup and write the following into it:#!/bin/sh xrdb $HOME/.Xresources xsetroot -solid gray export XKL_XMODMAP_DISABLE=1 icewm & lxsession
The third command is needed here to fix problems that may arise due to the physical absence of a keyboard on the device.
- We launch Xvnc using the vncserver wrapper with root rights:
# export USER=root # vncserver -geometry 1024x800
As a result of executing the last command, a request for a password to access the VNC server will be displayed on the screen; it is better to specify something simple like “123”. You can set virtually any resolution, but it is better if it matches the physical resolution of the device screen.
- Install the AndroidVNC application on your smartphone, launch it, specify the IP address and port 5901, and connect. The LXDE desktop should appear on your screen.
In order not to bother with manual entry all commands, you can use the ubuntu.sh script located here: goo.gl/xSpK4. Just put it and the ubuntu.img image in the ubuntu directory on the SD card and run the script with the command sh ubuntu.sh, and after 5-10 seconds connect to the desktop using AndroidVNC. Keep in mind that the script mounts the image to the /data/local/mnt directory.

Installing Gentoo on an ext2 partition
So, we installed Ubuntu using an image with a file system and tricks with a loopback device and a chroot environment. This turned out to be easy to do, and with the use of scripts it is generally very easy, but what if we go further and install a more hardcore distribution, and not using images, but on a dedicated ext2 partition on the memory card? This way we can solve the problem of some firmware and kernels without support for loopback devices and, moreover, we can enjoy a normal distribution installed according to all the rules.

Let's take Gentoo as an experimental system. To install it on an ext2 partition, we need a memory card with a capacity of at least 2 GB and a rooted smartphone with busybox installed. The sequence of actions is as follows.
- Let's do data backup from the memory card and create an additional partition on it, with a capacity of at least two gigabytes. This can be done using any disk partitioning program, but keep in mind that if you want to continue to use the SD card for its intended purpose, then you should create a FAT32 partition at the beginning of the card, so that it becomes the first one, and an additional partition for installing the distribution should be the second one.
- Formatting SD card partitions:$ sudo mkfs.vfat /dev/sdc1 $ sudo mkfs.ext2 /dev/sdc2
- We take the phone, go to “Settings -> About phone” and look at what processor is installed. Next, go to the page goo.gl/PRfux and download stage3 for the desired architecture, for example stage3 for ARM v7 is in the current-stage3-armv7a directory.
- We mount the ext2 partition of the memory card on the computer and unpack the contents of the resulting archive into it:$ sudo mount /dev/sdc2 /mnt $ sudo tar -xxpf stage3-*.bz2 -C /mnt
We immediately edit the configs and everything you need, to your taste, including editing /etc/resolv.conf according to the example from the previous section.
- We launch the terminal emulator (or run the “adb shell”), mount everything we need and go to chroot (almost the same as in the case of Ubuntu): # mount -o remount,rw / # mkdir /mnt/gentoo # mount /dev/ block/mmcblk0p2 /mnt/gentoo # mount -t proc proc /mnt/ubuntu/proc # mount -t sysfs sysfs /mnt/ubuntu/sys # mount -o bind /dev /mnt/ubuntu/dev # sysctl -w net. ipv4.ip_forward=1 # chroot /mnt/gentoo
Access to the desktop is done in the same way as in Ubuntu, except that now you will have to assemble a bunch of software directly on the phone :). However, you can set up an environment for cross-compilation on your computer, but this is a topic for a separate article.
Native installation
Having launched Ubuntu using a VNC server, you will notice the slowness of its operation, which is associated with the VNC protocol overhead for transmitting images “over the network”. To avoid this problem, you can install Ubuntu as the main system next to Android so that it can use the video adapter directly. Unfortunately, there is no universal way to do this. Each device is unique in its own way, including different partition tables of the NAND memory on which it is installed, various devices and drivers for their operation.
Fortunately, the process of installing the native version of the distribution is well described for many devices in Russian-language forums, so finding instructions will not be difficult. However, it is worth immediately paying attention to several features of this type of installation:
- Separate or main NAND partition. The Linux distribution can be installed either in a pre-created partition in NAND memory or in the main boot partition. In the first case, the firmware developer usually leaves the option to boot Android using special script or by loading the Linux distribution in recovery mode, in the second it will be installed instead of Android and to return the ability to download the robot, you will have to reflash the device again.
- Dual boot capability. If the Linux distribution is installed on separate section, the developer can leave the option to boot Android. However, you should immediately pay attention to how this download occurs: using recovery mode or a script launched from a regular computer. Still, the second method will be inconvenient on the road.
- Hardware support. The original Linux kernel of the Android firmware already includes all the necessary drivers that may be needed for the operation of a full-fledged Linux system, but not all Linux firmwares will start everything by itself. Problems often arise with the Wi-Fi adapter and touch screen who reacts inappropriately to touch. Therefore, before installing the firmware, you should carefully read about possible complications.
In any case, be prepared for the fact that during the installation of the Linux distribution all your data will be destroyed. There is no way without this.
What's next
A Linux distribution installed next to the original Android system can become a very convenient working tool, but at the moment “Linux inside Android” is considered more of a toy and a way to show off to friends than a serious solution. I am sure that soon, when a full-fledged implementation of the Wayland graphic server appears for Android, the situation will begin to change and we will see distributions adapted for small screens interface, as well as full-fledged Linux applications distributed in the form of regular APK packages. Also, don’t forget about the “Ubuntu for Android” project - within its framework, work is underway on an official port of Ubuntu for Android, which will allow you to use your smartphone as a portable system unit connected to any monitor.


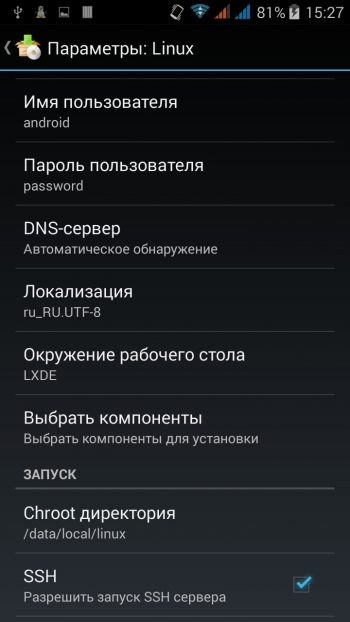
Linux Deploy . This application is open source code, designed to automate the process of installing, configuring and running GNU/Linux distributions on Android platform inside the chroot container. The application creates a disk image on a memory card or other media, mounts it and installs the selected Linux distribution there. Installation is supported in a file, directly on a memory card partition, in a directory with the ext2/ext3/ext4 file system, and in RAM. Applications from a Linux distribution run in a chroot environment, run in parallel with the main system and are comparable in speed. All changes made to the device are reversible, i.e. The application and the components it created can be completely uninstalled.
Installation of the Linux distribution is carried out over the network from official mirrors on the Internet. Because the Linux work Deploy is based on system call Linux kernels, then only Linux distributions can act as “guest” systems. Through the program interface you can control the installation process of the Linux distribution, and after installation you can start and stop services installed system(there is support for running your own scripts). The installation process is displayed as text reports in the main application window. During installation, the program itself configures the working environment, which includes the base system, SSH server, VNC server and graphic environment to choose from. You can also manage parameters through the program interface SSH servers and VNC.
Installing a Linux distribution takes about 30 minutes. The recommended minimum size of a disk image without a GUI is 512 MB, and with graphical interface- 1024 MB (for LXDE). After initial installation The password for access via SSH and VNC is assigned as “changeme”, which can be changed using standard distribution tools, or through application settings.
Characteristics:
- Supported distributions: Debian, Ubuntu, Kali Linux, Arch Linux, Fedora, CentOS, Gentoo, openSUSE, Slackware, RootFS (tgz, tbz2, txz)
- Installation type: file, partition, RAM, directory
- Supported file systems: ext2, ext3, ext4
- Supported architectures: ARM, ARM64, x86, x86_64, architecture emulation mode (ARM<->x86)
- Methods of connecting to the container: CLI, SSH, VNC, X server, framebuffer
- Management interfaces (CLI): Android terminal (or adb), telnet, web interface (terminal via browser)
- Desktop environment: XTerm, LXDE, Xfce, MATE, other (manual setup)
- Supported languages: multi-language interface
ATTENTION!
This program comes WITHOUT ANY WARRANTY, and the author is not responsible for any possible consequences its use. It's free software, and you can redistribute it under the terms of the GPLv3 license.
GNU/LINUX INSTALLATION INSTRUCTIONS
- Connect WiFi or another network with Internet access. Installation is carried out over a network and will not work without Internet access.
- Make sure your device has received superuser rights (root). Install latest version Linux programs Deploy and run it.
- When you first launch the application, the update of the working environment is automatically launched, which is a directory containing all the necessary scripts, settings and container profiles. Working environment settings can be viewed in the " Settings -> Working environment". The environment directory should not be changed unless there is a reason to do so. It is useful to leave the option " enabled. Settings -> Keep the screen on" ("Settings -> Screen Lock"), while the application is active, the screen, WiFi and processor will not go into sleep mode.
- The program supports working with several profiles, where the parameters of each GNU/Linux instance are stored. You can quickly switch between instances through the profile management window (opens by clicking on the icon in the main window header). By default, a profile is created with the name "linux". Go to the settings of the current profile (last right button) and configure the necessary options for installing and running the GNU/Linux distribution ( see parameter description).
- Linux Deploy 2.x is not required mandatory installation into the BusyBox system, but in rare cases you may need to use the system BusyBox. To do this, install ®BusyBox compatible. In the BusyBox parameters, before installation, you must select the option " Replace applets". Then in the settings of the Linux Deploy working environment you need to specify the path to the system BusyBox in the " field Settings -> PATH variable" ("Settings -> PATH variable"), For example, /system/xbin, and start updating the working environment" Settings -> Update environment" ("Settings -> Update ENV").
- Run the installation of the selected distribution: " Menu -> Install" ("Menu -> Install"). The installation log is displayed in the main application window. Installation takes about 30 minutes on average. The image creation stage can take a long time (about 15 minutes) if the size is more than 2 GB.
- If the installation is completed without errors, you can start the Linux system with the " START" ("START"). This will launch the services specified in the parameters - SSH, VNC and others.
- To access the console of a Linux system via SSH, you should install ConnectBot (or another SSH client). To access the Linux desktop, you must install an X server, such as XServer XSDL. In the settings you should specify the IP of the device to connect, for the same device - 127.0.0.1. The password for SSH and VNC is specified in the container parameters. Change password current user You can use the passwd command from the console. To run programs as root, use the sudo command (for example, sudo synaptic). By default, the root user (unless specified in the settings as a username) has no password, but you can set a password for it sudo command passwdroot.
- To stop the Linux system, all services running under it and unmount the disks, just press the button " STOP" ("STOP").
- Linux Deploy allows you to manage containers via CLI (Command Line Interface). To access the CLI, you can use telnet or a web browser, having previously activated the appropriate management interfaces in the settings.
- To reduce installation time basic system or in case of problems with installing the system from official repositories, you can import the container from a pre-prepared archive. For this purpose, there is a repository of containers created using Linux Deploy and accessible through the application interface in the " Repository" ("Repository"). Just select the desired container in the repository interface and click the " Import" ("Import"). After this, a new profile, the parameters of which can be changed if necessary. Then you just need to run the installation" Menu -> Install" ("Menu -> Install"), the installation path will be prepared (an image for the container will be created), the container archive will be downloaded, unpacked and configured. After completing the procedure, you can start the container with the " button START" ("START").
PROGRAM UPDATE
After updating the program, the working environment is automatically updated. If necessary, the update can be started manually: " Settings -> Update environment" ("Settings -> Update ENV"). Program (environment) updates do not affect an already installed GNU/Linux system, i.e. the installed system cannot be damaged or changed in any way due to an update.
To change the settings of an already installed system or to return the settings to the original ones, you need to perform the configuration: " Menu -> Configure" ("Menu -> Configure"). If some components are selected in the parameters, then the configuration will install packages for the selected components.
UNINSTALLING A PROGRAM
Before uninstalling the program, you need to stop the GNU/Linux distribution using the button STOP, if you cannot stop the distribution, it is recommended to reboot the device. After that, run the command " Settings -> Delete environment" ("Settings -> Remove ENV"). After this, you can delete the application. Deleting an application with an unmounted container is dangerous; deleting an application version lower than 1.5.3 also deletes all data from all partitions mounted in the container! There may also be .img files that are created on the memory card when installing distributions , such files can be deleted manually through any file manager.
Download the application to install Linux on Android - Linux Deploy on Android you can follow the link below.
Running Linux on Android is possible! And you don’t need a device with root rights for this: all the necessary software is available in official store Google Play. In just 10–15 minutes you can get an operating system that differs from Android in advanced functionality.
Note: if you follow our instructions, Linux OS will run in virtual environment. Android will still be running in the background. To call such a system complete would be incorrect. However, with the list standard tasks she's coping well.
Please close everything before installation. required applications and clear the RAM of your Android device.
1. From the Google Play Store, install GNURoot Debian and XServer XSDL.
2. Before you start installing Linux, make sure that your device is connected to a stable Wi-Fi networks. Launch GNURoot. The required environment packages will begin downloading.
Installation takes from 30 seconds to several minutes depending on the speed of your Internet connection. Ignore the tickers until the following message appears:
root@localhost:/#
For those familiar with the concept of “”, don’t let this line scare you: the application will not cause any harm to the device, since it works in a “sandbox”.
3. Enter the following command:
apt-get update
Wait until the packages are downloaded. This will be indicated by the line Reading package lists...Done.
4. Now enter another line:
apt-get upgrade
To the question “Do you want to continue?” enter the English letter Y and press Enter. The installation of packages will begin.

This time the installation procedure will take a little longer. Wait patiently for the installation to complete until the coveted line appears:
root@localhost:/#
The Debian Linux environment is installed, and now you can proceed to deploy the graphical shell.
5. Installation of all Linux distribution packages is performed with the following command:
apt-get install lxde
There is also an option to install the system kernel using the line:
apt-get install lxde-core
Confirm the installation by re-entering Y and pressing Enter. The package download process will begin.
During installation, make sure that all files have been successfully downloaded, and that when unpacking, your device has not run out of free space. Otherwise, the system startup will fail.
6. To complete the installation of the operating system, you must download three additional utilities:
- XTerm - to access the terminal from the Linux graphical shell;
- Synaptic Package Manager - for management apt packages and application downloads;
- Pulseaudio - for installing sound drivers.
All three utilities are installed using one GNURoot terminal command:
apt-get install xterm synaptic pulseaudio
Approximately 260 MB of data will be downloaded to the device.
7. Now minimize the GNURoot application and open the previously installed XServer XSDL. Agree to download additional fonts. After the installation is complete, tap on the screen several times (the application will ask you to select the resolution and font size - it all depends on your preferences) until you see a splash screen with a blue background and white text.

Re-launch GNURoot and enter the following two commands one after the other:
export DISPLAY=:0 PULSE_SERVER=tcp:127.0.0.1:4712
startlxde &
The sequence for further restarting the system (when you want to open Linux again) looks like this: run XServer XSDL and wait for the blue screen, open GNURoot and enter the two commands above, return to XServer XSDL.
If the terminal complains about an invalid command, return to step 5 of these instructions and try installing a bare kernel. Check the memory status of your Android device.
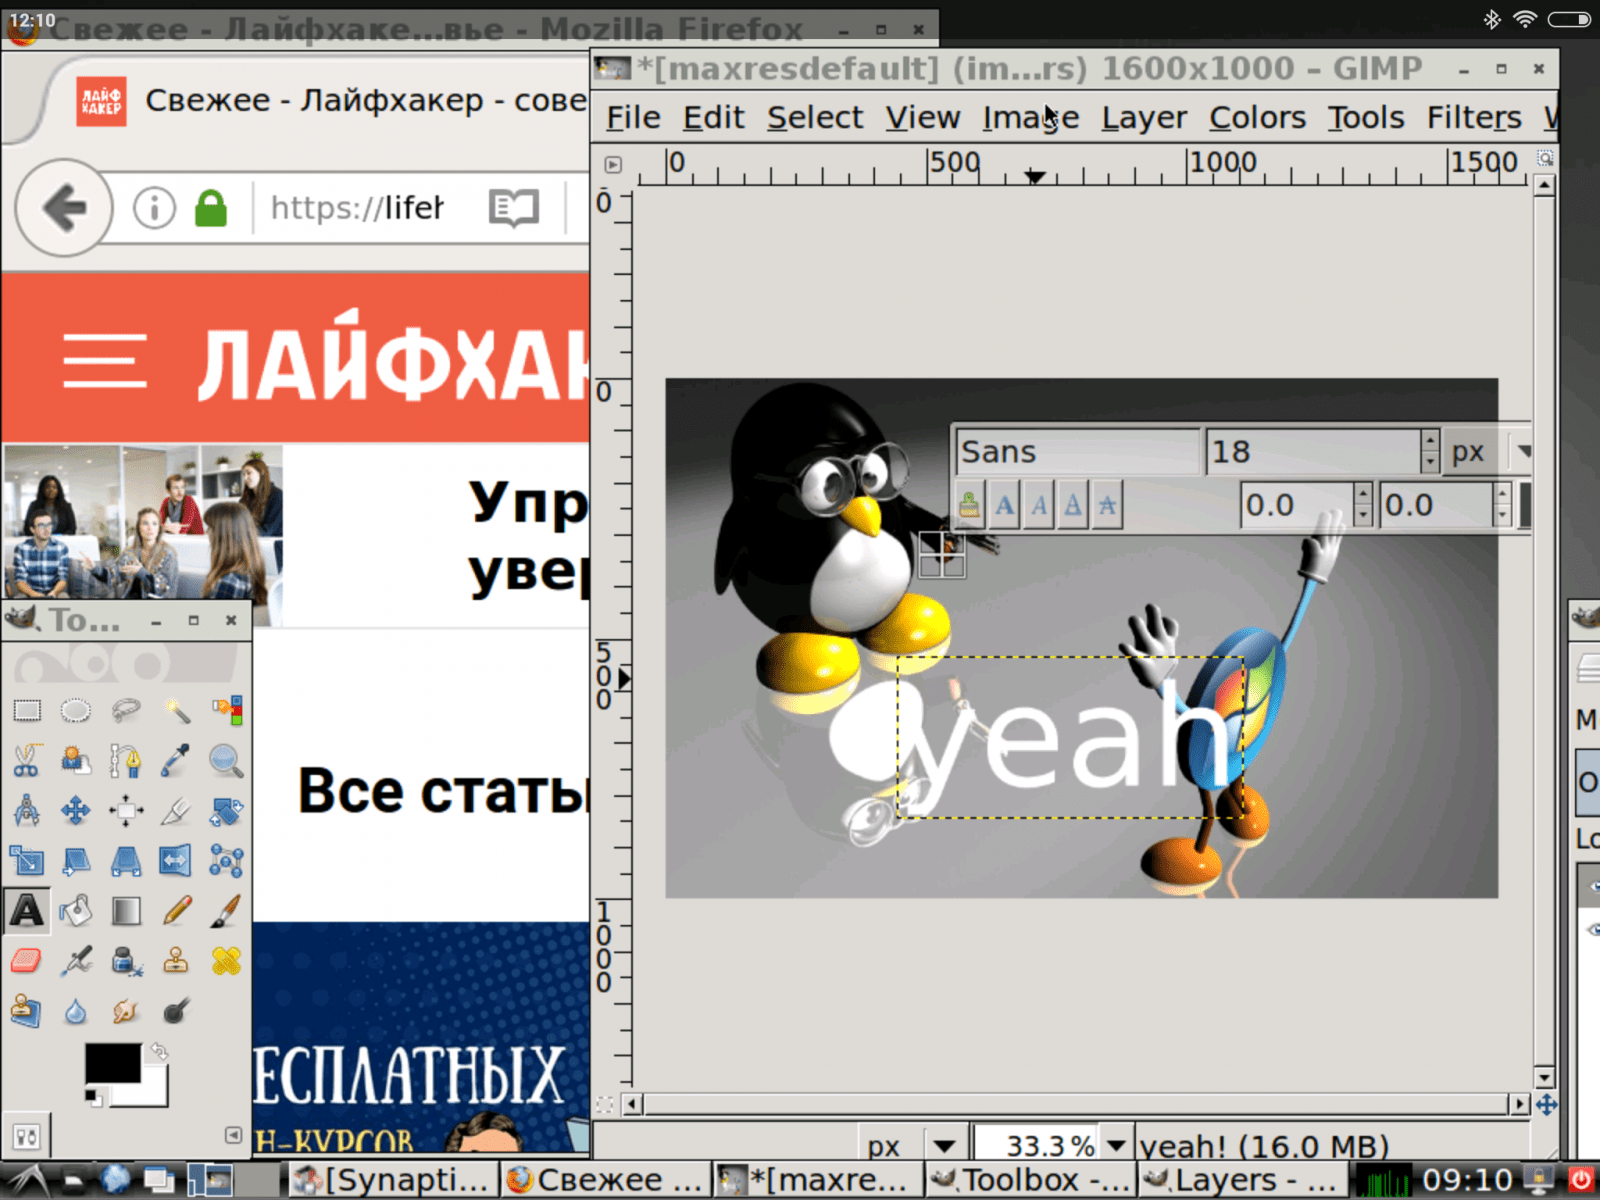
8. Now open XServer XSDL, wait a few seconds, and you'll have Linux ready to go.

To install applications, in the lower left corner, open the Start menu and select Run. Type Synaptic and press Enter.

In the window that opens, use the search and install the necessary applications. This could be the Firefox browser, editor GIMP images, Libre office suite and other Linux-compatible programs.

Of course, this option for installing Linux cannot be called a full-fledged launch of the operating system on Android. Virtual Linux has several limitations, but when used wireless mice and keyboard (it is also possible to connect using an OTG adapter and a USB hub), you can turn your smartphone or tablet into laptop with the functionality of an adult OS.
