Connect via local network. Connection via router
Instructions
Call the context menu of the one selected for opening (sharing) in local network folder by right-clicking and using the “Properties” item (for OS Windows versions XP). Go to the " Access» dialog box that opens. Check the “Share this folder” checkbox in the “Network Sharing and Security” group. Type desired value the name of the folder to be opened for access in the line “Name shared resource" Check the “Allow editing files over the network” checkbox if you want to allow other users to edit the selected folder. Authorize the application of the changes by clicking the OK button and wait until the palm symbol appears under the shared folder (for OS Windows version XP).
Open main system menu Windows version 7 by clicking the "Start" button and going to the "Control Panel" node. Expand the “Network and Internet” link and expand the “Network and Sharing Center” section. Use the “Change additional sharing settings” button and check the “Enable sharing, …” checkbox in the “Access to public folders” section. Check the “Disable sharing with” checkbox. password protection" in the "Password protected sharing" section and authorize the command by clicking the "Save changes" button.
Call the context menu of the folder selected for sharing on the local network by clicking right click mouse and use the “Properties” command. Select the “Sharing” tab of the dialog box that opens and use the “Advanced Settings” button. Type the desired name of the shared folder in the “Share name” field and check the “Share this folder” checkbox. Authorize the application of the saved changes by clicking OK (for OS Windows version 7).
Sources:
- Sharing folders and printer in Windows 7 and Windows XP
Some users create home locales networks. Typically, this process is carried out so that you can access the Internet from any equipment connected to this network.
You will need
- network adapter.
Instructions
In order to avoid large additional financial costs, focus your attention on already existing network. Configure one of your computers to act as a router.
Connect the Internet connection cable to one of the network cards. Turn on your computer (laptop), create and configure a new connection to the Internet.
Connect another network adapter to a second computer that is part of the local network. Open the settings of the network that appears. Go to TCP/IP Internet Protocol. Set a permanent (static) IP address for this network adapter. Let's say its value is 134.134.134.1.
Not enough. If, for example, you have a two-story house or a large apartment, then the coverage area is often not enough, so you cannot use the Internet in certain rooms . Easy purchase best model devices is not as effective as adding another access point on the same network.
Routers are connected to each other by cable, but in different ways
Two routers can be connected using a cable or wirelessly, via Wi-Fi connection. Let's consider all the options in turn.
Decide right away which router will be the “main” one. It is better to choose a device with more power, unless, of course, you have two identical models. There are two types of connection using a LAN cable - LAN-WAN or LAN-LAN, but the first is more popular, so we will start with it.
Setting up a LAN-WAN connection
How does this type of connection work? One of the routers becomes the main one - it receives the Internet, and the second device plays the role of a secondary network and receives data from the “main” access point.
This connection has the following advantages:
- The secondary network can be controlled and limited access to certain sites, for example if you are concerned about preventing children from accessing “adult” sites.
- The connection becomes more secure from outside interference.
- This connection method is in most cases recommended by experts, since it is considered the most correct and problems rarely arise when using it (compared to the LAN-LAN type).
To connect LAN-WAN, make sure that when the main router is running you can access the Internet without interference, and that the settings are set to: following parameters(they are universal for most models):
- a server called DHCP is enabled;
- The IP address is distributed automatically.

If you are not sure that you have the same settings or do not know how to check them, follow these steps:
- Enter your IP address in your browser and you will see your device settings.
- In the LAN section there should be a checkmark next to the DHCP server.
- In the WAN section, the connection type is set to Dynamic IP.
We've sorted out the first router, let's move on to the second - it's better to reset all settings on it. This is especially true if you previously used the services of another provider (it could have completely different parameters). So click on Reset button, located next to the connectors and hold it for about ten seconds, after which the basic settings will be restored.
Now you need to properly connect both devices with a cable. In the main router we use a LAN connector, in the second - a WAN cell. Check indicator lights- on the body of each of them a light should light up next to the inscriptions of the same name.

In the main router we do not change anything else, but in the second we check whether dynamic type connections (we have already looked at how to do this earlier). Don’t forget to come up with a password to access the Internet - to do this, go to the parameters of the Wireless section, Wireless Security.
LAN-to-LAN connection
This type of connection is different in that here the equipment for accessing the Internet is located in one network segment, and in the previous case, the second router created its own separate network. To establish a LAN-to-LAN connection in the main device, all data remains as default.
We change the parameters on the second router using the following steps:
- We connect it to the PC.
- We go into the equipment settings through the browser, disable the DHCP server.
- We change the IP address - increase by one the last digit in the original combination specified in the standard settings.
After this, connect both routers using a cable through the LAN ports; you will connect a cable to the first and main device for Internet access.
Connecting two routers via Wi-Fi
In this option, we do not need any cables to connect a pair of devices, so this method seems more attractive to many. As a result, we still have single network, but with the addition of another access point. Thanks to her, the zone Wi-Fi coverage increases without loss of quality. The only requirement for such a connection is that the second router acts as a repeater for the main signal. This feature was once called repeater mode, but today most equipment has WDS technology.
Let's move on to setting the settings. We do not change anything in the first and main router, all parameters remain the same. You only need to check the channel number in the Wireless section (Chanel line) - you will set the same value on the second model, otherwise they will not start working together.
Now our task is to configure the second device to signal relay mode. We will consider the sequence of actions in the same order as on most TP-Link brand models, since they are the most common among users.
Make sure the second router supports WDS technology- this can be checked in the documents or on the manufacturer’s website. Then connect it to your computer and go to settings through your browser.
Here we make the following changes:
- In the WPS section, disable the active status and reboot the router.
- It is recommended to go to the DHCP section and disable the server of the same name, since the function of the repeater is to receive network data and not distribute it.
- Select the Network section and change the last number in the IP address (you can increase it by one) so that it does not coincide with the combination specified in the operating data of the main router. After reboot, enter already new set numbers to enter parameters.
- Open Wireless:
- Change the Network Name - come up with a name for the access point so that you know which device you are connecting to.
- Go to Chanel and select the same number as in basic settings Internet.
- We check the box next to Enable WDS Bridging - this will enable the operating mode as a repeater.
- Now that work has begun in the new mode, new settings will appear, so click on Survey to search for the network to which we will connect.
- From the search results, select the main access point, click Connect. In the window that appears, all that remains is to set the encryption type (Key Type) and enter a password for logging into the Internet.
![]()
Now you've done everything necessary actions for settings wireless communication between two routers on the same network. If you want to make sure you did it correctly, then home page the WDS Status line will indicate Run.
As you can see, there are several ways to combine two routers, and you can choose the most convenient option for your home. After installing a second access point, you will significantly increase your Wi-Fi coverage area without losing speed and quality of connection - these indicators will be excellent no matter in which part of the room you use the Internet.
In the Windows operating system, you can connect shared access to a folder on a local home network to exchange data between computers using shared folders. It is very convenient and quick way for transferring files using a computer-to-computer scheme, without using external media(flash drive, external hard disks, memory cards, etc.).
In this article I will talk about creating a local network using the example of an operating room Windows systems 10. Creating and configuring a local network in Windows 8 and Windows 7 occurs in a similar way, this instruction universal.
The article discusses the following option for using shared folders on a local network: several computers are connected to the router, connected via cable and wireless network Wi-Fi integrated into home network. A shared folder is created on each computer; all computers included in this local network have access to the shared folders.
On computers connected to the home local network, you can install OS Windows 10, Windows 8, Windows 7 (different OS, or the same operating system), connected to the router via Wi-Fi or cable.
Creating and configuring a local network takes place in four stages:
- first stage - name verification working group and network card settings
- second stage - creating and configuring local network parameters
- third stage - connecting shared access to a folder on the local network
- fourth stage - data exchange over the local network
First you need to check the workgroup settings and network card settings, and then create a local Windows network.
Checking network card and workgroup settings
On the Desktop, right-click on the “This PC” icon (“My Computer”, “Computer”), in context menu select "Properties". In the “System” window, click on the “ Extra options systems."
In the “System Properties” window that opens, open the “Computer name” tab. Here you will see the workgroup name. By default, in Windows 10, a workgroup is named "WORKGROUP".
On all computers connected to this local network, the workgroup name must be the same. If the workgroups have different names on the computers you connect to the network, change the names by choosing one name for the workgroup.
To do this, click on the “Change...” button, in the “Changing computer or domain name” window, give a different name for the workgroup (write a new name in capital letters, better in English).
Now check your network card settings. To do this, in the notification area, right-click on the network icon (Internet access). Click on "Network and Sharing Center" shared access" In the Network and Sharing Center window, click the Change adapter settings link.
In the Network Connections window, select a network card, Ethernet or Wi-Fi, depending on how your computer connects to the Internet. Next, right-click on network card, in the context menu click on “Properties”.
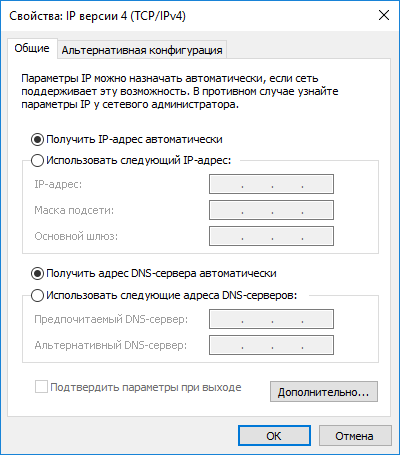
In the network card properties window, in the “Network” tab, select the “IP version 4 (TCP/IPv4)” component, and then click on the “Properties” button.

In the Internet Protocol Properties window that opens, in the “General” tab, check the IP address and DNS service settings. In most cases, these parameters are assigned automatically. If these parameters are inserted manually, check the corresponding addresses with your Internet provider (the IP address on computers connected to the network must be different).
After checking the settings, you can proceed directly to creating a local network in Windows.
Creating a local network
First of all, configure the local network settings in Windows. Enter the “Network and Sharing Center”, click on the “Change advanced sharing settings” item.
The Advanced Sharing Settings window allows you to change sharing settings for different network profiles. The Windows operating system creates a separate network profile with its own special parameters for each network used.
There are three network profiles available:
- Private
- Guest or public
- All networks
In profile private network In the Network Discovery option, select Enable network discovery».
In the File and Printer Sharing option, enable the Enable File and Printer Sharing option.
In the "Connection" parameter home group» select “Let Windows manage homegroup connections (recommended)”.

After that, open the “All Networks” network profile. In the Public Folder Sharing option, select Turn on sharing to network users could read and write files in shared folders."
In the File Sharing Connection option, select the Use 128-bit encryption to secure sharing connections (recommended) option.
In the “Password Protected Sharing” option, enable the “Turn off Password Protected Sharing” option.

After completing the settings, click on the “Save Changes” button.
Repeat all these steps on all computers that you plan to connect to your home local network:
- check the workgroup name (name must be the same)
- check your network card settings
- In sharing settings, enable network discovery, enable file and printer sharing, disable password protected sharing
How to enable folder sharing
IN in this case I created a folder called "General". Right-click on this folder and in the folder properties window, open the “Access” tab.
Then click on the “Advanced setup” button.

In the “Advanced sharing settings” window, activate the “Share this folder” option, and then click on the “Permissions” button.
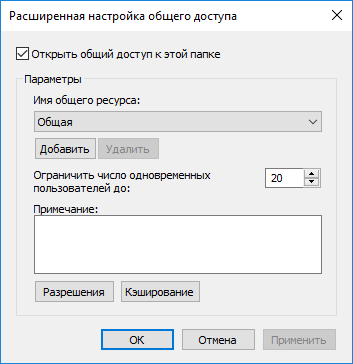
Select permissions to use shared folder data from another computer. There are three options to choose from:
- Full access
- Change
- Reading

To save the settings, click on the “OK” button.
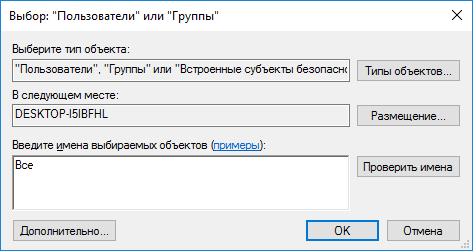
Go back to the folder properties, open the “Security” tab, and then click on the “Change...” button.

In the window that opens, enter the name “Everyone” (without quotes) in the “Enter names of selected objects” field, and then click on the “OK” button.
In the folder properties window, in the “Security” tab, configure the permissions that you previously selected for the shared folder.
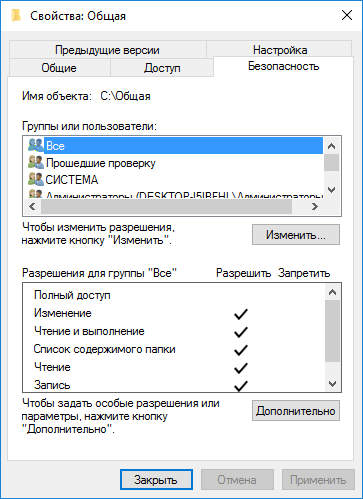
To change the permission for the “Everyone” group, click on the “Advanced” button. In the “Advanced security settings for a shared folder” window, select the “Everyone” group, and then click on the “Change” button to change permissions.
Setting up a local network in Windows is complete. In some cases, you may need to restart your computer for all changes to take effect.
Logging into your local home network
Open Explorer, in the “Network” section you will see all available computers connected to your local home network. To log into another computer, click on the computer name, and then click on the shared folder name to access the files and folders located in the shared folder.

The local network in Windows 10 has been created and configured.
Troubleshoot some network problems
Sometimes, after setting up the network, problems arise with accessing folders on the local network. One of possible problems, the network profile may be incorrectly selected. I encountered this myself on my computer. After reinstalling the system, I created and configured a local network, but my computer did not see two laptops connected to this network. From the laptop I could easily access the shared folder on my computer, but the computer did not see them at all.
I checked all the local network settings several times, and only then noticed that it was working on my computer public network, and not a private (home) network, as on laptops. How can such a problem be solved?
Enter the “Network and Sharing Center”, click on “Troubleshooting”. Select the “Shared Folders” section and run diagnostics and troubleshooting. At the very end, the application will offer to configure the network as private. Apply this fix, and then restart your computer. After performing this operation, my computer gained access to shared folders on laptops on the local network.
Problems often arise due to incorrect setting networks. Windows 10 has the option to reset network settings to default settings. Go to Settings, Network and Internet, under Change network parameters» click on “Network reset” to apply network settings default.
Other problems may arise; look for solutions on the Internet.
Conclusions of the article
In Windows OS, you can create a local private (home) network between computers, organize data exchange using shared folders, and gain access to a printer. Computers on the same network can have different or the same operating systems installed (Windows 10, Windows 8, Windows 7).
Good day everyone!
As a rule, when connecting and setting home internet, you need to go into the router settings at least once by connecting to it with a network cable (via the LAN port). At least to set up a Wi-Fi network...
In general, problems usually arise more with Wi-Fi setup than directly connecting to the LAN port of the router. However, in a number of cases interesting “incidents” happen: when I connect the computer and the router with a cable, but for some reason the network icon in Windows reports that there is no connection - the cable is not connected (and the red cross is lit on the icon).
In general, in this article I will consider sequentially all the steps for connecting a PC/laptop to the LAN port of the router. I think the article will be useful to all novice users who are trying to set up a home network.
Connecting to the router with a LAN cable
I'll start right off the bat...
1) The first thing we need (besides the router and PC, of course) is network cable. In general, usually such a cable comes with the router (in 99% of cases). Most often, the length of such a LAN cable [from the kit] is no more than 1÷2 m. This length is quite enough [in most cases] to connect and configure the router.
Note! If you don’t have one, or its length is clearly not enough, you can purchase it at any computer store. Moreover, there you can ask that the cable be cut to a specific length...

Network cable (1-2 m cable is included with all routers)
2) Next, connect the power adapter to the router and turn it on. Then connect the cable from your Internet provider to the "Internet" socket. One of the blue ones (often they are yellow) ports (LAN) must be connected to the network LAN port of the laptop/PC.

As a rule, there are no problems with computers. Most models have at least, built into the mat. The board is a network card, and its port is easy to find on the back wall of the system unit.
With laptops, things may be a little different. The fact is that modern laptops, usually connect to the Internet using a wireless network, and not all devices have a LAN port. If you do not have a LAN port, then you need to purchase a special one. USB adapter...

There are quite a lot of such adapters: some are suitable for both classic USB 2.0/USB 3.0 ports, and there are also more universal ones (with support for LAN, HDMI, USB) for USB Type-C. See screenshot below.
Note! You can purchase such adapters for pennies in Chinese online stores. The best of them are described in this article:

3) If both the computer and the router are turned on, everything is in order with the cable - then on the router’s case you should see several LEDs light up (blink): those responsible for power, LAN port, Internet (if the connection is established).

The LEDs on the router lit up (including the LED responsible for the LAN port)
4) Ideally, you should see a network icon in the tray without any warnings (signaling that the connection to the router is established and the Internet is available).

Network icon (Windows 10). Everything is OK!
But, unfortunately, in some cases, the router does not always automatically start working immediately (sometimes without manual settings- no way) ...
Why does the exclamation mark appear on the network icon after connecting (without Internet access)
This is perhaps the most popular option (especially when connecting and setting up the router for the first time, for example, after changing equipment).
In this case, first of all, I recommend opening network connections and check if everything is okay there. To do this, press the button combination Win+R and use the command ncpa.cpl(see screenshot below).

How to open network connections || command ncpa.cpl and Win+R
In the network connections window you need to open properties your connection (usually called "Ethernet" (as in my case) or "Local Area Connection").

- obtain an IP address automatically;
- get the DNS server address automatically (in some cases it is recommended, instead of the auto option, to specify DNS 8.8.8.8 - this is DNS from Google.).
Save the settings and check the network operation.

Second important point - this is checking the router settings. If you have not previously configured it, then, in principle, in most cases there will be no Internet until the connection parameters are specified. Different providers have different requirements: as a rule, find the necessary logins and passwords, IP addresses, etc. [which must be entered into the router settings] possible in an agreement with the provider, which was concluded when connecting to the Internet.
To help! How to enter the router settings [exactly where you need to set the connection parameters] (for beginners) -

Settings PPPoE connections in the Tenda web interface (for connecting to the Internet)
Why does the red cross appear on the network icon after connecting?

This icon means that you do not have a connection between the router and your computer (laptop). This can happen by various reasons. Below are the most common ones.
1) Check the cable condition.
Is everything okay with him, is he overextended? It often happens that outwardly the cable may seem intact, but it has been severely bent several times, and the copper strands inside have been broken. Therefore, I would recommend trying a different cable.

2) Check if the cable is firmly inserted into the LAN port.
Often due to minor manufacturing deviations (as well as rubber gaskets that are often placed on them, roughness, etc.) RJ-45 connectors and LAN ports - not always and not every connector is fully inserted into each port. Ideally, after the connector has been inserted, you should hear a slight click (and on the network card of the PC/laptop, the LED should light up indicating that the cable is connected (the same as on the router)). If your PC has several LAN ports, try using another one.
3) Check if your network adapter is enabled.
In Windows, it may happen that the network adapter is turned off. To check if this is true, go to network connections (to do this, call the "Run" window with the combination Win + R, and use the command ncpa.cpl) . Next, pay attention to what the icon is: for a switched off device it is black and white (as in the screenshot below).
You can simply right-click on the adapter to see the operating status and turn on the device (if necessary). See example below.

Turn on the adapter / Network connections
I also recommend going to Device Manager (combination Win+R, and command devmgmt.msc) , and find your adapter in the tab "Network adapters" . Next, try turning it off/on (just right-click on it). An example is shown below.

To help!
That's all, have a successful and fast connection everyone!
All the best!
Today, many users are looking for the following information on the Internet: LAN – what is it and why is it needed? Of course, in worldwide network you can find a very simple and short definition.
It sounds like this: LAN is a local area network. That's all.
But this decryption gives absolutely nothing, especially if a novice user has to deal with this.
In fact, this approach to the matter only complicates the whole situation. Therefore, we will try to explain what LAN is, in simple language, so that even a child can understand it.
If you still don’t understand something, write about it in the comments, we will be happy to answer all your questions. So let's start with a simple theory.
Theoretical page
So, LAN stands for Local Area Network. This actually translates to .
To put it simply, a LAN is several interconnected computers and other devices that can connect to the network.
And they are connected to each other either using cables or using . In Figure 1 you can see a fairly clear example of a local network.

Rice. 1. LAN example
As you can see, the main element of the network here is a router that is connected to the Internet (WAN). Remember this abbreviation, we will talk about it later.
For now, let’s look at the diagram shown above. On it, numbers indicate network segments, specifically:
3. DVD player connected to the router using a cable. For this purpose, the router has special LAN connectors, which are usually marked yellow. In most cases there are 4 such connectors.
As we said above, a LAN connector is used to connect to the router via cable. We can see this in Figure 3.

Rice. 3. Router - rear view
As you can see, everything is standard in this model - 4 LAN connectors, but there is one more and it is already different in blue.
Actually, this is the WAN (remember, we said that this concept needs to be remembered?). To more accurately understand what a LAN is, you can compare it with this very WAN.
By the way: Both LAN and WAN are connected via the most common cable with an RJ45 tip, shown in Figure 4. Above we said that, for example, segment No. 3 in Figure 1, that is, a DVD player, is connected to the router with using a cable. This cable is a regular twisted pair with RJ45 lugs on both sides. It's that simple!

Rice. 4. RJ45 tip
Comparing LAN and WAN
Let's start with what a WAN actually is. Again, to put it simply, this is the Internet. That is, it is the same network, but not local, like LAN, but global.
It includes all devices and millions of local networks. WAN stands for Wide Area Network.
Through this very network, each user can access the resources of another computer or other device that can be connected to the network.
By the way: This information is stored on servers. To put it simply, it's great amount high-capacity disks collected into one large device that can provide this information.

Rice. 5. Example of a working server
Differences between LAN and WAN:
- Dimensions. Typically, a local network covers small areas, for example, an apartment or some kind of industrial premises. And here global network spreads over the entire surface globe.
- Number of users. Of course, many people can connect to the global network more people than to the local one. There, the equipment used is much more powerful, and in general, a lot of people usually connect. This is what we are counting on.
- Type of services. Local networks have their own services, such as a file access service, a printer service, and so on, in general, everything that is needed for a small network. But in the global network, for example, a routing service is used (determining the route of information to network nodes) and much more, which is necessary for working in large networks.
As for the distance or area that these two types of networks can cover, we have already said above that the global network extends over the entire surface of the globe.
Accordingly, it can also work on distant spaceships if they are connected to any device within this network.
So, it’s interesting that local networks can also reach quite large sizes
The largest such network to date had devices that were located at a distance of 14,000 km from each other. These were space stations and orbital centers.
Although usually a local network covers the same offices, houses, firms or a small group of buildings.