Printer status is disabled: how to turn on windows 10. What to do if the printer does not connect

If the computer writes a message saying that the printer is not connected, then do not rush to get upset, because... This problem is quite common and widespread, and therefore any competent user of office equipment can solve it. Of course, if none of the recommendations below help you, then the only thing left is to call an experienced and knowledgeable technician to your home or take your device to the service center.
If you tried to turn on the printer, but your PC confidently insists that the printer is disabled, then possible source The problem is a “failure” in the operation of the device. To make sure that the reason that the printer is not visible to the computer is the driver, open the “Devices and Printers” menu through the “Start”. In the list that opens, try to find your printer or multifunction printer. If it is not there or near the driver you notice Exclamation point message indicating an error in the software, it is better to reinstall the drivers. To do this, remove the “broken” driver by clicking the corresponding button in “Devices and Printers”. Then insert the software CD that came with your device into the drive and install the driver. If there is no CD, then, or, on the official website of the manufacturer of your printing device.
It should be added that quite often drivers intended for old printers for Windows OS are not presented in a convenient and simple way. installation file, but in the form of an archive. If you unpack it, you will get a folder with many incomprehensible files. To install them, you need to go to the “Devices and Printers” menu, which can be accessed through “Start” and click on “Install” / “Add local”. Then follow the instructions and specify the folder on the disk where you unpacked the previously downloaded drivers. Restart both the computer and the printer, and then check the status of the latter. If after turning on the system still writes that the printer is not connected, then check out other possible reasons such a problem.
Checking the Printer Status
After reinstalling the drivers, the question may arise as to why the printer is not visible? It would seem that reinstalling a special software was supposed to help start the device in normal mode work and correct its status displayed on the PC monitor. But not everything is so simple!
So, if your printer has a serious problem in the form of the computer showing it as offline, then check its status in devices. To do this, go to “Devices and Printers” through “Start” and “Control Panel” and pay attention to the status of your device. If you notice that your printer's status is indicated as "Offline", then click right click on its icon and select “Use Printer Online”, which implies using the printer in operational mode– these steps are relevant for Windows XP and Vista. For Windows 7 and higher, after right-clicking on the printer icon, you need to select “View Print Queue”, and then in “Printer” uncheck “Use printer in offline mode».
In addition, when checking the status of the device, its status may be displayed as suspended, i.e. "Paused". To resume printing, you need to select the appropriate item after right-clicking on the printer icon or remove the icon from “Pause Printing” for operating systems Windows 7 and higher.
Other possible solutions to the problem
If a device connected to a PC appears on the computer as turned off, then try checking it on other computers. In addition, to answer the question “the printer is disabled, how to turn it on”, you need to turn off the power to the device and remove all cartridges from it. After a short period of time, install Consumables back to its place and, having disconnected the USB cable, turn on the device. As a result of this action, the office equipment must perform self-diagnosis and switch to ready mode.
In this case, pay attention to the indicator, which should be constantly lit. If you try to connect to a PC, but notice that the indicator is blinking rather than lit, this indicates the following: one of the device’s sensors is reporting a print-ready error. In this case, you will have to contact the service center. If you have a warranty on your printer, this means that its diagnostics and repairs should be carried out absolutely free of charge.
In general, treat the problem described above with all seriousness and give it Special attention. Don't assume that it will go away on its own anytime soon. Therefore, there is no point in putting off solving it, even if you don’t need to print anything in the near future, because there is no guarantee that the problem will be fixed in a short time.
How to connect a printer to a computer
There are only two ways to connect the printer to a computer:
- Local.
This method involves connecting the printer to a computer via Wi-Fi or USB. In this case, the connection occurs using the driver included with the purchased printer. The driver can also be downloaded from the Internet. As a rule, connecting in this way eliminates any problems with the connected printer, unlike the second method. - Network.
With this method, the printer can be connected to a computer locally and, thanks to the shared access provided, it also becomes possible to connect to other computers local network or print server this printer. It is very easy to make a network printer: just connect it to a computer or print server using Wi-Fi, USB or Lan and open access to all users of this network.
Situations often arise when there are fewer printers in an office or home than there are computers on a given network, and when printing documents, additional printer settings are required so that it can print over the network.
An example of the most common situation. There is a printer to which one computer is connected, and printing is required from another over the network. In such cases, there are several options for connecting the printer to a second computer. The simplest ones are the following:
Connect a network printer using a computer
Sometimes, in order for two computers to work with a printer over a network at the same time, additional settings are required (if the “No access” error occurs during setup of a network printer).
Method No. 1
Initially, you should find out the name of the computer (to which the printer is connected). To do this, you need to right-click on the “My Computer” icon. In this menu, select the “Properties” checkbox and in it – a tab called “Computer name”. In Windows7 software, this tab will be the last one in the list of “Properties” marks. IN this menu You can also get there another way - by going to the control panel menu, find the “System” icon (“System Properties”).
Having found out the name of the computer we need, we can move on to another computer. In it, click on the “START” button, or you can simply open one of the folders. Next, in the address line (folder address) that appears at the top, you must enter \\computer name. Example: if the computer name is “printserver”, then you need to enter “\\printserver” in the line. After these manipulations, press ENTER. Thus we find ourselves in remote computer and we can see all the network resources available to it. These include a printer that can be installed by simply clicking on it.
If the printer does not appear in the list of available network resources, then you need to open access for it. To do this, go to the computer to which the printer is connected. In it we go to “START”, then selecting the “Printers” tab and in this window that appears we should right-click on the printer that we need. In this menu window, select “Properties”, then find the “Access” tab. In this tab, you need to check the box next to “Open” general access" Thus, this printer will appear in the list of network resources.
Method number 2
You need to go to the control panel and select the “devices and printers” folder from the proposed menu. Then click “Add a printer” (or in other versions “Add a printer”). In the wizard window that appears for installing new devices, you need to click the “Next” button, then selecting “Connect to a printer” or “Browse printers on the network”, confirming your choice by clicking the “Next” button. A new window that appears will offer a list of devices on the network, where you will need to find the printer you need and confirm its selection by clicking the “Next” button. The process will be completed operating system without your further participation.
Note
There are cases (if computers on a network with different versions Windows), when during installation you may need a driver for the printer. Such a driver can be taken from the disk that came with the printer, or downloaded from the Internet - from the website of the manufacturer of this printer.
If the printer is connected directly to the network using its own network interface or via a print server, it is easier to connect such a device using the installation wizard, which, as a rule, comes with the printer (MFP) in the form of a CD.
If it is not possible to use such a disk, then you should use another method. To do this, go to the “Add Printer Wizard” following the instructions in Method 2. Here you should select the “Local printer” checkbox and then – “Create new port" In this menu, select “Standard TCP/IP port”. The “Add Printer Wizard” will appear on the screen. In the “Printer name/IP address” field, you must enter the IP address of the printer, which is specified in the instructions and settings of the printer itself. Having completed all the steps correctly, the process can be completed with a few clicks of the “Next” button in the windows that appear.
Some printing devices require additional settings, which includes TCP/IP port settings.
It doesn't matter which printing device you use, even the most sophisticated and expensive printer one day, instead of a result, may give you a message that the device is disabled.
What will we talk about:
Causes of the problem
What does the "Disabled" status mean? In fact, the system “sees” the device, but in reality it just sits on the nightstand. If the computer writes that the printer is disabled, you need to figure out what caused the device to malfunction.
There are several most common reasons:
- The device is not connected to a computer or electrical network;
- Uncontrolled operation mode is enabled;
- The cartridges are dirty or the ink has run out;
- Problems with the print service;
- Problems with the driver.
How to turn on an HP printer with the status "Disabled"? The first step is to perform the simplest and, one might say, banal action: disconnect the device from the power source for a few seconds, then connect it again.
Majority modern models equipped with an automatic diagnostic system (during the “debriefing” process, the light indicator on the panel will blink). After analysis, the printer will return to working condition, and the light diode will light constantly.
If this action does not help solve the problem and the computer still says “printer is disabled,” check whether the USB cable is connected.
Important! Does the LED constantly blink when you turn on the printer? This may indicate that the cartridge is low on ink, just replace it. The cause of the failure may also be contamination of the surface; to fix the problem, wipe it with a clean cloth and restart the computer along with the printer.
How do I activate a device that has a disabled status?
Most often, the cause of such a failure is software problems or incorrect settings. Before you deal with the question: how to “make” the printer work again, check its condition and the specified parameters.

Devices and Printers
Through the control panel, go to the “Devices and Printers” section, find the “frozen” device and check if it is connected to the computer. In the “Device Status” window, in the “Printer” category, uncheck the boxes next to the “Paused printing” and “Offline operation” lines. Sometimes it is necessary to “clean up” the print queue.
It happens that the device itself is working properly, but the print service is not functioning correctly. In this case, use the services.msc command to get into the services directory. The command must be entered in the “Run” console (to call it, use the Win+R combination), find there the required service(“Print Manager”), stop it by pressing Stop. After this, disconnect the device from the power source for one minute, go back to the service and activate the HP printer.

Driver problems
Often the computer writes that the device is disabled if there are problems with the drivers (outdated, damaged important files, malfunction, etc.).
There is only one way to fix this: completely remove all drivers from the PC, to do this, use the “Device Manager” section. If they are “visible” in the section installed programs, removal is best done from the “Programs and Features” section. Next, download the most latest drivers, you can find them on the official website of the HP manufacturer and install them on your computer.

You can solve this problem even easier and faster. Outdated driver can be updated to latest version by using special program Driver Booster.
Utility fixers
HP printer says "Offline"? Install special software on your PC that will automatically troubleshoot your device. To fix minor malfunctions, a program is suitable - Fix utilities it Center, but for full diagnostics and solve various problems with any device, use HP Print and Scan Doctor.

Fix it Center utility program
We hope our tips will help you quickly deal with the problem yourself, without calling a specialist. Save not only time, but also money. However, in most cases, troubleshooting requires special knowledge and skills. You can check for yourself whether the device has jammed the paper, whether the cartridge is installed correctly, and remove dirt or foreign objects that have gotten into the printer.
By setting up the printer correctly, you can receive any text and graphic information on paper in seconds. This process will not take you too much time.
Connection
In order to properly connect the printer to your computer, you will need to follow three simple steps:
- at USB help cable connect the device to the computer;
- connect it to the network;
- make the necessary settings.
Connection procedure
Anyone can probably connect a device to the power supply, and this step should not cause absolutely any difficulties. USB cable, as a rule, is included with the device, but it is also sold separately. The cable has two ends with different plugs on them. You need to connect a Type A plug to your computer.

Driver installation
Most manufacturers pre-equip the equipment they sell with CDs with the necessary drivers and software. As soon as you have connected the equipment to the computer, you must immediately insert this disk into the drive. Start the installation process and prompts will appear on the screen with further actions and recommendations.

Modern devices do not require additional installation, you just need to connect them to your computer and the installation will be done automatically.
How to do without a driver disk
You can easily find a way out of this situation, but provided that the Internet is turned on.
Algorithm of actions:

With these simple steps you can install necessary drivers and proceed to the next installation step.
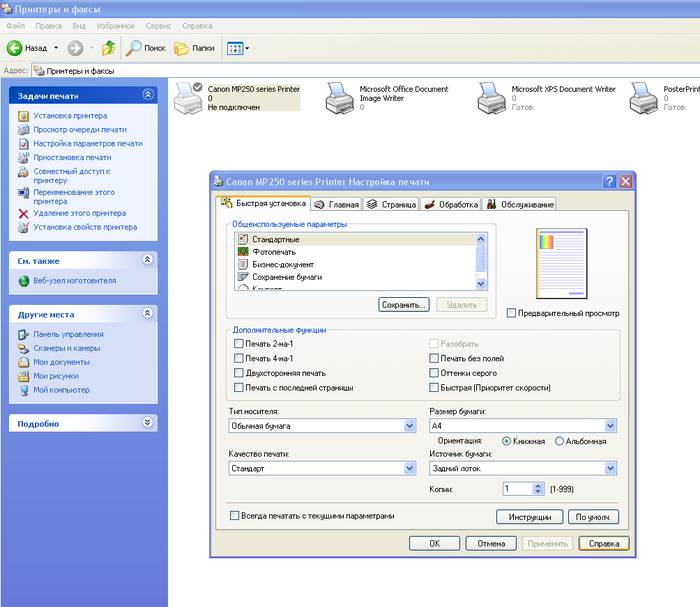
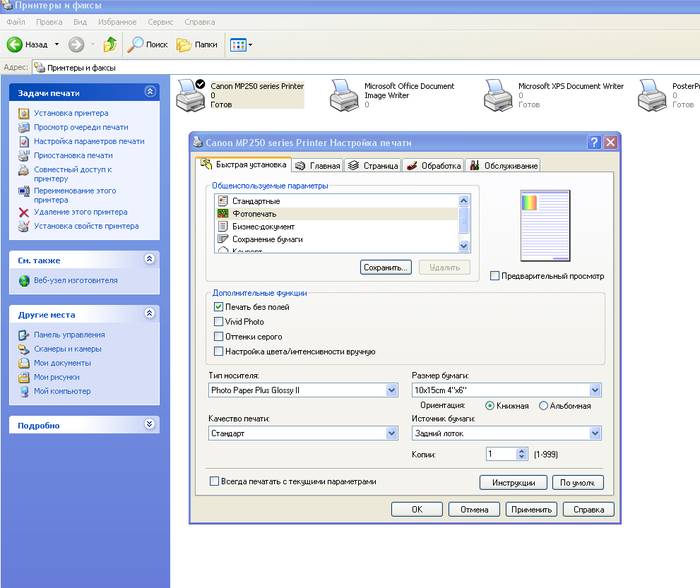
How to set up a printer for printing
Before you can start printing, you need to set up your equipment correctly.
You can do this using the instructions described below:

These settings may be different for each printer, but the standard ones are present for all.
Select page layout, number of sheets, paper quality, print mode.
Here are just a few of the features you need to choose from. They may differ depending on the model. Read carefully what is written there and choose the one you need. As you can see, setting up a printer to print is not that difficult, the main thing is to take your time.
Video: Printer - setting up, printing photos on disk
Changing the default printer
Quite often situations arise when several printers are connected to one computer at once. Of course, you can choose each time you print required device, but for this you will have to do several unnecessary steps.
For this problem, you can find an appropriate solution - make the default printer:

Test page
After installation, you need to print the first test page. This allows you to check if everything is done correctly. Thanks to the test page, you can also check the print color. In addition, it will contain all the information about the driver version, as well as the printer model. This sheet you need to save it, because if any problems arise, it will be useful.
Need setup ZYXEL router KEENETIC LITE. Details here.
Printing a test page correctly:

After printing is finished, do not close the page, but evaluate the print quality of the test page.
Changing settings
Some users have situations where they need to change settings. They are usually set on the ports tab in the printer properties window. It is here that you can change the type of printing (landscape printing, etc.), the connection port to which the equipment is always connected. By the way, landscape printing is very convenient for printing photographs, since this particular page format is more suitable for this.
Regarding other settings, such as print mode, print queue, limited time access to the device, then all this can also be changed in this dialog box.
Printing a document
When creating one or another type of file, it doesn’t matter whether it’s a document or a photograph, sooner or later you will need to print it on paper.
There are several different ways where you can send a document for printing:

Anyone, even the most inexperienced user, can easily figure out these simple steps.
Managing print jobs and queues
By managing print queues, the user has full control over all documents sent to the queue. You can view print jobs and resend documents there at any time. But you can, for example, send a document to the favorites section, this will eliminate the need to perform operations to send the document for printing each time.

There are three main print queues:
- straight. They will allow you to receive a printed document from a pre-assigned printer;
- safe. All print jobs will each be blocked until you are authenticated;
- are common. Completely different users can perform the same tasks.
There are times when a document was not printed due to a failure, and you already need to get the next one. But the printer will persistently print the first document. You just need to clear the print queue.
This is done simply:
- go to the control panel;
- select your printer and right click on it. A small one will appear context menu, in which you need to select the line clear print queue;

- confirming this action, you can get to work and print a completely new document.
Setting Print Color
Color profile- this is a large set of different commands for a printing device, which are written in the form of a file. Many of you have probably seen print modes in the settings: matte paper, glossy. Each of these settings stores its own color profile.
While you are using original cartridges, you will not have any problems with printing. All documents and photographs will be of very good quality.
But since not everyone can afford it, you will have to look Alternative option. The color profile is built for a specific printer, paper and ink. This is very important point which cannot be forgotten. After all, color is an important point when printing documents and photos.

You need to download from the official website Adobe program Photoshop and install it. Then find your printer, right-click on it and select properties. A new window will appear in front of you, in which click on the color management item. Then select your device and remember.

A window with settings will open again in front of you, different computers they may differ. But in general, you just need to select the options you want and save them. And then just print a test page and see the result.
Installing and setting up a printer is a fairly simple task. Having previously studied necessary information, you can perform all the steps described above on your own, without the help of a specialist.
It's best to follow the instructions on the box. Typically, such instructions require installing software, and in strict sequence. Installation bypassing the instructions may result in incomplete or incorrect installation.
Before the actual installation, it would be a good idea to look at the manufacturer's website and download the driver from there. Of course, a driver disk is always included with the printer, however, it is possible that by the time of installation the manufacturer will release one or more updates. If you download new driver, then you should use it instead of the standard one. If for some reason you cannot find drivers for your printer, which connects to your PC via USB port, then just connect and install a set of basic drivers. This works with both Windows and OS X. However, remember that the printer can only use all its functions with installed drivers from the manufacturer.
Let's look at how to add a printer or multifunction device if you use an operating system Windows system. If your printer is not yet connected to USB and you do not have the instructions, follow these steps:
- With the computer turned off, connect the printer to it, and then turn on both devices.
- In Windows 7, click the "Start" button, then go to the "devices and printers" folder. IN Windows Vista go to Start - Control Panel - Hardware and Sound - Printers.
- Click the "Add Printer" button.
- If your printing device is directly connected to your computer, click Add local printer» and follow further instructions. If you use wireless connection or network printer, go straight to step 5.
- Select "Use an existing port" and then select one of the ports from the drop-down list. Most likely, by default it will be LPT1, then click the “Next” button.
- Select the model and manufacturer from the list. If suddenly your printer is not listed, but you have drivers on disk or downloaded from the Internet, click “Have from disk” and specify Windows path to the driver. After this, click the “Next” button again.
- Assign a custom name to your printer for easy identification. "Further".
- If necessary, share the printer. If you are unsure or don't know what we're talking about, just click “Do not share”, “Next”.
- Click the "Print Test Page" button to make sure everything is done correctly, then click the "Finish" button.
- If your printer is networked or connected via a wireless connection, you should select “Add a network, wireless, or Bluetooth printer.”
- From the drop-down list, select the printer you need and click the “Next” button.
- If necessary, click the "Install Driver" button.
- Print a test page to verify installation and click Finish.
 Add a printer when using OS X. If your OS X does not automatically recognize your printing device and you do not have instructions, follow these steps:
- Go to the menu " system settings", then go to "Printers and Faxes".
- Click the "+" button at the bottom of the Printers panel.
- Click the "Default" button, after which the system will display a list of all available wired and wireless printers.
- You are taking desired printer and click the "Next" button.
To remove a printer in Windows, you need to go through “Start” to the “Devices and Printers” folder, right-click on the icon of the printer you need and select “Delete”.
In OS X, go to system settings, then to “printers and faxes”, select the desired printer and click “-”, confirm your decision by clicking the “Delete” button.