Getting root rights to android. What is root rights? How to check that you got Root rights on Android
Want to take complete control of your smartphone? Having received root rights on Android, it is possible, because wide opportunities open up for the user. However, you will have to say goodbye to the guarantee, and also to be prepared for the fact that the smartphone may become unusable. In general, this activity is not for the faint of heart.
Smartphone manufacturers and suppliers have a personal interest in persuading users to opt out of receiving root, because if you make a mistake in the rooting process, you can cause irreparable damage to your gadget.
Yet the potential benefits justify the risks. Having obtained superuser rights, you can:
- remove unnecessary software that eats memory,
- increase processor performance,
- customize each element of the interface for yourself.
We invite our readers to walk with us through all the necessary stages of rooting a phone. On some devices, the process may take as little as a few minutes. Others will have to tinker with. Rooting is the best way to realize the full potential of your Android smartphone anyway.
What is root rights on Android?
Rooting a smartphone or tablet is the same as removing restrictions on access to system files on the iPhone (jailbreaking). Both the first and the second allows you to dive into the depths of the entire operating system and smartphone subsystems. Also, by being rooted, you can bypass any manufacturer or vendor restrictions.
When obtaining root rights, you should be careful and careful in your actions. And it's better to back up your data before starting the process.
Loan Need Root Rights to Android: Benefits
One of the main reasons why users resort to rooting their Android is to get rid of unnecessary software that cannot be removed without extended rights. On some devices, access to previously hidden settings opens, for example, to wireless teasing (you can distribute Wi-Fi from your gadget).
Among other advantages: the ability to install special programs and custom firmware, which, in turn, can further expand the functionality and increase the performance of a smartphone or tablet.
In fact, there are not so many really decent programs for rooting, but enough to have something to work with. For example, with the help of some programs you can create a backup copy of Android data and upload it to a cloud service, block ads in the browser and applications, create a secure connection while surfing the Internet, overclock the processor or use your gadget as an access point to a wireless Internet connection ...
Flaws
Rooting on Android has four potential pitfalls:
- Cancellation of Warranty : Some manufacturers or suppliers will void the warranty if the device has been rooted. However, do not forget that this is a reversible process, and root-rights can always be removed. If you need to return the device under warranty for repair, we simply restore all data from the backup, thus returning the gadget system to its original state.
- Non-working smartphone(brick- folk.): if something goes wrong while getting root rights, there is a risk that the phone will become unusable. Therefore, you should make sure that the instructions are up to date and strictly adhere to them.
- System security breach : Rooting carries a security risk. Various types of vulnerabilities may arise depending on the services and applications used on the device. Certain malware can also use root privileges to steal user data, install other malicious applications, or launch network attacks on other devices.
- Disable apps : Some secure apps and services do not work on a rooted device, such as Android Pay and Barclays Mobile Banking. Digital copyright services like Sky Go and Virgin TV Anywhere won't launch either.
Root programs for Android
The easiest way to root an Android gadget is to use specialized applications, including:
- Kingo Root,
These programs have stood the test of time and worked well. They allow you to complete the entire process in five minutes. But some of them are incompatible with older versions of Android.
It is claimed that over 10,000 different gadgets can be rooted with this program, but only from Android 2.0 to Android 5.0. Support for Android 6.0 devices is limited.
List of Supported Devices is constantly increasing, but many of them run on Android 6.0.
compatible with older devices:
- Verizon Galaxy S5
- Galaxy S4 Active
- Nexus 5
- AT&T Galaxy Note 3
- Verizon Galaxy Note 3
On newer devices with Android 6.0 or higher (such as Galaxy S8 or Galaxy S7 Edge), the above apps will not work. They are compatible with Android 6.0, but Android 7.0 Nougat is a different OS, with a new "verified boot" function that checks the integrity of system files to protect the device from unauthorized third-party application root access. At the same time, it makes it somewhat difficult to obtain root rights.
Kingo root Is one of the few programs compatible with Nougat that allows you to carry out the process of obtaining root rights in an instant. In the list of supported phones:
- Alcatel
- Coolpad
- Google / Nexus / Pixel
- Huawei
- Lenovo / Motorola
- Oneplus
- Samsung
Getting root rights through the command line and Fastboot
The instructions below are suitable for obtaining superuser rights on a Samsung Galaxy S7, S7 Edge, Samsung Galaxy S6 or S6 Edge with Android 6.0 Marshmallow. There will also be a description of rooting a smartphone based on. The instructions below are suitable, in fact, for any smartphone, but will require the user to be careful and strictly follow the rules.
Preparing to get root rights
Before starting the process, you should back up any important data. And before installing a new firmware, it is a smart step to create a backup of the current one.
It's also best to keep your device fully charged.
To complete the operation, you will need to enable USB debugging and factory unlock.
Open "Settings" on your device. If the item "Developer options" is absent, enable it as follows:
- We return to "Settings"
- Turn on USB debugging
Installing the Android SDK
Before the next step, you will need to install Android Debug Bridge on your computer.
- Download the Android SDK from here. The developer platform is available for Windows, Mac and Linux (this guide is for Windows)
- Install anywhere, but we recommend to drive C.
- After installation, run the Android SDK via the Start menu
- The SDK Manager will open. Uncheck all the items, except for the Android SDK Platform-tools at the very top
Installing drivers for the device
To properly connect to your smartphone or tablet, you need to install a suitable USB driver.
We follow the instructions of the installer. After installation, let's move on.

We will now unlock the bootloader. The bootloader is the program that loads the OS of the gadget. It determines which applications are launched when the smartphone or tablet is turned on.
Some devices require a key to unlock the bootloader. The Motorola, HTC, and Sony websites have step-by-step instructions on this topic. But please note that you will need to create a developer profile.
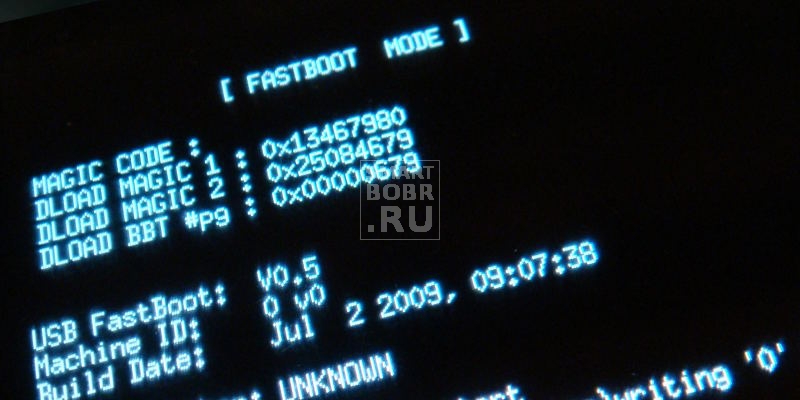
After completing this operation, we can proceed to the next stage. Now you need to put your device into fastboot mode. On most models, it is invoked by holding the power button and the volume down button at the same time for ten seconds during the reboot (on HTC, you first need to press and hold the volume down button, then, without releasing the power button).
Fastboot commands
After translating the device in fastboot mode, open the command line on the computer. If a code is required, a long string of characters will be displayed. We insert it into the appropriate field on the developer's website, fill out the form and wait for an email message with a key, a file and further instructions.
To unlock the bootloader, connect your gadget to your computer and switch to fast boot mode again. Then we open the command line on the PC.
For Google Nexus and most smartphones, the commands are as follows:
- For Nexus and most smartphones: enter "fastboot oem unlock" (without quotes) and press "Enter"
- For Pixel: enter "fastboot flashing unlock" (without quotes) and press "Enter"
- The command for Motorola looks a little different: we enter "oem unlock UNIQUE_KEY" (without quotes), replacing "UNIQUE KEY" with the received code.
- For HTC: enter "unlocktoken Unlock_code.bin" (without quotes), replacing "Unlock_code.bin" with the resulting file.
We confirm the unlocking and get one step closer to getting root rights.
Unlocking the bootloader is not provided on devices of some manufacturers and suppliers, but this does not mean that it is not feasible in principle. Again, in this case it is worth looking for information on specialized forums.
Getting root rights on Android using programs
There are many ways to obtain superuser rights. Here are a few of the preferred ones.
Root Android rights using CFRoot

CFRoot is a restriction removal utility from Chainfire. I must say that obtaining rights through it is not the easiest way, but at least one of the most reliable. The program is compatible with over 300 gadgets and provides the user with step-by-step instructions during the process so that rooting is as easy as possible.
Download the ZIP file suitable for your device.
Then we do the following:
- We extract the folder from the archive.
- We find the file root-windows.bat there. We open it.
- We are waiting for the script to do its job, and press any key
- Next, the device should automatically reboot with already root-rights
Rooting with BaiduRoot
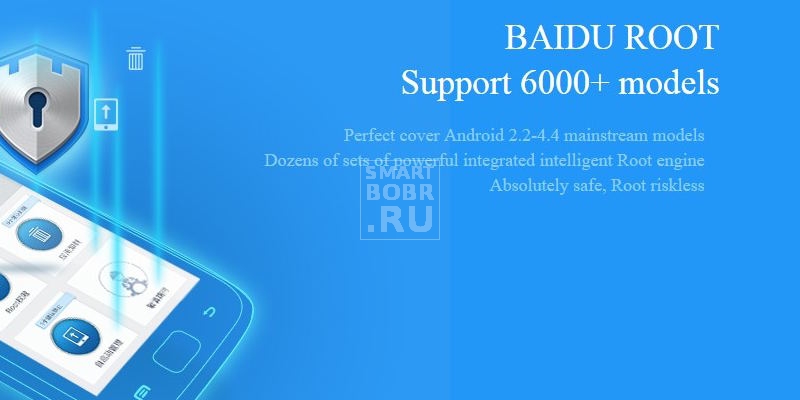
Baidu Root is a utility from the Chinese company Baidu that is compatible with over 6000 devices, ranging from Android 2.2 to Android 4.4. It is clear that the program is in Chinese, but there is also a version in English and Russian.
Removing restrictions with Baidu Root is one of the easiest ways. After downloading the program, all that remains is to follow the step-by-step instructions.
First, let's unpack the archive in ZIP format. Find Baidu_Root.RAR and extract the content (on Windows, you can use the 7-Zip program for this).
And manually install Baidu Root. To do this, do the following:
- On a smartphone or tablet, go to "Settings", then go to the "Security" section
- We put a tick on the item "Unknown sources" and agree with the pop-up message
- Open the folder with BaiduRoot and click on the file with the APK extension. Follow the instructions to complete the installation.
Now we are working with BaiduRoot.
- We open the program and accept the license agreement
- Click on the "Root" button in the center of the screen
- After a few seconds, a message will appear stating that the device was successfully rooted
Root rights using Towelroot

The method of obtaining root rights using Towelroot is one of the most optimal and does not require unnecessary actions from the user. Unfortunately, the program is not compatible with all gadgets - some smartphones from Motorola and HTC are not supported.
In addition, the utility is only compatible with devices with a kernel build before June 3, 2014. You can find out the assembly of the kernel by following the path "Settings" → "About the device", and, having scrolled below, find the item "Kernel version".
In order to use Towelroot, you need to check the "Unknown sources" item in the device settings (the process has already been described above). After that, we can move on.
- Open Towelroot.
- Click on the "Make it rain" button. If the gadget starts to reboot, the rooting process has failed. If not, then the device was successfully rooted.
Root Android with Kingo Android Root

Kingo Root can be installed on a Windows computer or directly on a device that needs to be rooted.
To get started, it's worth checking this list to see if it has a device that we're going to root for.
Then we find the version of Kingo Android Root for Windows and install the program. Or we download the version for the gadget (before that we check that there is a check mark on the item "Unknown sources" in the settings), and also install it.
Those who will be using the Windows version should enable USB debugging on the smartphone.
And now we perform the following actions:
- Launch Kingo Root on the computer and connect the device via USB
- The program will automatically detect the user's gadget and offer to root it. Select "Root" and just wait - the whole process will take Kingo only a few minutes
Those who want to do without a computer should do the following:
- Install Kingo Root
- Opening the program
- If the device is compatible, there will be a One Click Root button on the screen. Click on it and gain patience - the process can take a lot of time
- After successfully obtaining unlimited rights, a large checkmark will appear in the center of the screen
We get root on a phone or tablet using KingRoot

As with Kingo Root, KingRoot has a Windows and Android version. Since the program supports over 100,000 devices, the chance that it is compatible with a smartphone or tablet on which you need to get superuser rights is very high.
Both Windows and Android versions can be used, but we recommend using the latter. After installation, follow the instructions below:
- Open KingRoot.
- If the device is compatible, there will be a button "Try to Root" on the screen, click on it
- Be patient - the process may take some time
- If the operation is successful, a large checkmark
Programs that will be needed after obtaining root rights

There is probably no other mobile OS that is as diverse as Android. That is why there is no universal way to get root rights for this platform. If all the options mentioned above did not work, do not lose heart. Surely there are already instructions on the Web for the desired device, you just need to find them.
After finding a suitable guide, all that remains is to follow all the instructions. The process can be delayed, certain difficulties can arise. But if you follow the instructions, you can avoid many mistakes and minimize risks.
Downloading Root Checker
To check how well the rooting went, we need one application. In general, there are several applications on Google Play with which you can check if you have superuser rights. Root Checker is very popular for this purpose. You just need to install and run the program.
Installing the root manager
Rooting makes the gadget more vulnerable to security threats. It will be calmer with a root manager. Typically, any application that asks for superuser rights will also ask the user for permission. It is for such applications that programs like SuperSU are needed. With SuperSU, you can accept or reject site requests for root rights, monitor applications that infringe on root rights, and automatically grant access permissions. SuperSU also determines the number of requests to superuser rights from a specific application.
How to remove root rights on Android
Even with all the benefits, some may want to return everything as it was. In any case, it doesn't hurt to back up your data before doing this.
Get rid of root-rights with SuperSU

To remove root-rights using SuperSU, simply go to the program settings and select the option "Complete removal of root-rights" (Full unroot). Really very simple.
Launch SuperSU. Go to "Settings", scroll down and find the item "Full unroot". Click on it, then click on "Continue" - and the process of removing superuser rights will begin.
Get rid of root rights with Universal Unroot
There is one app that takes care of all the hard work. It's called Universal Unroot and it handles root removal on most Android devices. However, not everything is as smooth as it seems.
For example, many smartphones from Samsung are incompatible with the program, and on gadgets from LG, after the successful removal of root-rights, the application will display that they seem to be there.
Remove with native firmware
Installing factory firmware is one of the most reliable ways to remove root privileges. All traces of rooting will be removed, but let's say right away: this process is not an easy one.
First of all, download the factory firmware for your device to your computer.
Then we extract the contents of the archive. There will be another one inside - unpack it too. The unpacked folder should contain a bootloader image, various scripts and another archive in ZIP format. Guess what to do with it?
You will also need an Android Debug Bridge and Fastboot on your computer.
- Download Android SDK Tools from the official site. There is a version for Windows, Mac and Linux. The instructions below are for Windows.
- Install anywhere, but it is better to install on the C drive.
- After installation, launch the Android SDK, launch it through the "Start" menu
- The SDK Manager will open. Uncheck all the items, except for the Android SDK Platform-tools at the very top.
- Select "Install 2 packages" on the top right
- We accept the license agreement and click "Install"
Checking that bootloader unlocking is enabled
Open "Settings" on your phone or tablet. If the item "Developer options" is absent, enable it as follows:
- Click on the item "About device" and find the "Build number"
- Click on the "Build number" seven times and the "Developer options" will appear in the settings menu
- We return to "Settings"
- Open "Developer options"
- Turn on bootloader unlocking
Now we are working on the computer
Transfer the boot.img file from the unpacked folder to the directory with the Android Debug Bridge.
We connect a smartphone or tablet to a computer. Then open the command line on the PC
And we enter the following commands (as it is written here):
- adb reboot bootloader
- fastboot flash boot boot.img
- fastboot reboot
Remove root rights using the file manager
If your device is running Android Lollipop or lower, you can get rid of root privileges by deleting the files responsible for them. We recommend using a file manager such as ES File Explorer. In the program settings, we find the item "Tools" and a list appears in front of us. To enable the ability to manage root-rights, set the switch opposite the "Root Explorer" item to the on position.
- Find the main drive of the device
- We go along the path "system" →» bin ", delete the folders" busybox "and" su "
- Now we go from "system" to "xbin" and delete the folders "busybox" and "su"
- And finally, go to the system folder, then open the "app" folder and delete the supeuser.apk file
- Restart the device and you should be unrooted.
Remove root-rights using over-the-air (OTA) updates
Sometimes a simple over-the-air update removes root privileges. To update the software, go to "Settings" and go to the "About device" section. Also, do not forget that with some methods of rutting, a rollback to the original state is impossible. In this case, you may need to install the stock firmware.
There is no rooting method that does not involve risk, so before that you should create a backup copy of your data, fully charge your gadget, follow the instructions exactly and take your time.
Quite a lot of specialized applications today require the phone to have the so-called superuser rights or just root rights, so people start looking on the Internet for information on how to get root rights to Android. And to do this, there are many different ways, each of which differs from the other in complexity, efficiency and, ultimately, popularity.
Some of them are free of charge, while others will have to be paid. Some run without a computer, while others can only be done through a PC. The problem is that some method can be very convenient, run without a computer, and in all respects good, but not suitable for your device. Therefore, below we will describe several ways how to get root rights. It is likely that at least one of them will fit your device - a phone or a tablet.
Framaroot
One of the most popular programs for obtaining root rights for a computer. Its use is as simple as possible - in fact, everything is done in one click. Now the developers have removed the download limit, so there shouldn't be any problems with this. Framaroot allows you to root your device for free, but it exists through voluntary donations.
You can download it on Google Play, like other applications that work without a PC. How to root with Framaroot? After downloading and installing, the window shown in Figure 1 will appear. There you need to select the item "Install SuperSU" ("Install Superuser" in some versions of the program).

Next, you will need to select a character who will manage root rights (this is such a "trick" of the developers). It is best to take Boromir. Then a message about successful installation will appear, which will mean that the device has got root rights. Finally, you need to reboot the device for the changes to take effect.
Baidu Root
Also a very simple program. Questions related to how to make the device have root rights using it do not even arise, because when you start, there is one simple button at the top of the program window - "Get root". Click on it, wait a while and everything is ready!

It is worth saying that this application is best downloaded as an .apk file. Practice shows that it will work better this way.
iRoot
iRoot also works without a computer. Therefore, there are no problems with how to install this program. It works on almost all versions of Android, starting from 1.3. To date, this is almost the most effective program that allows you to root your tablet or phone.

And its use is also extremely simple - we launch it, press the "Get" button, wait for the end of the installation and use it. That is, to assign the device superuser rights, you need to click on a single button. But what do these same rights give!
You will be able to use a large number of specialized applications to recover, delete, redistribute data and perform other tasks that are inaccessible to a regular user.
Root Tool
This program is a whole set of tools related to root management. Among them is a tool for managing startup, creating a backup and much more. There are no difficulties with how to make a device a supervisor using the Root Tool - there is a "Get ROOT" button. You need to click on it, wait and everything will be ready.

Most of the programs listed above have analogs for computers, that is, such programs that need to be installed on a PC, then connect the phone and continue to work on obtaining root rights. But they work best in exactly the same form as discussed above.
In addition, there are specialized and very effective programs that are installed on a computer and help root your Android phone or tablet. They will be discussed further.
MTKdroidTools
Here everything is already done directly through the PC. To start the program, you need to download, install and run. Initially, it will look like the one shown in picture # 5. But when you connect a phone with Android OS, the buttons "SuperUser", "Build .prop", "Backup" and others will become available. Actually, we will need to click "SuperUser" and wait for the end of the installation. With this program, you can remove unnecessary applications, create backups, prepare files for FlashTool and perform many other specialized functions.

Most likely, you will need to enable USB debugging to work with MTKdroidTools and other similar programs. To do this, developer options must be available on the phone. How to make them available is described below.
- We go into the settings, click "About device" and "Software information".

- We find there the field with the build number and touch it 7 times.

- Now a new item will appear in the main settings menu - "Developer options". We go into them and turn on the "USB Debugging" item.

In general, as to what such manipulations give, there is a lot of controversy - someone writes that ordinary users cannot perform such operations. But the fact remains: Without USB debugging enabled, most root applications will not work.
VRoot
In terms of ease of use, VRoot is comparable to apps that only run on a phone. In order to give root rights, you need to launch the program, connect the phone via USB cable and press the ROOT button in the lower right corner of the program window. After that, it just remains to wait for the end of this process.

Kingo Android Root
Another very easy-to-use program - we launch, connect the device, press the "ROOT" button below and wait.

An overview of three more programs can be seen below.
Data-lazy-type = "image" data-src = "http://androidkak.ru/wp-content/uploads/2015/08/Android-Root..jpg 500w, http://androidkak.ru/wp- content / uploads / 2015/08 / Android-Root-300x127.jpg 300w "sizes =" (max-width: 500px) 100vw, 500px ">
 If you have opened this article, then you probably already have at least some idea of superuser rights. But in that rare case, if you are a regular Android user and have opened an article out of idle interest - a small educational program.
Superuser rights, they are also root-rights (from the English "root", which means "root") - this is the ability to write, modify and delete information located in the system (or root) section of the file system. This concept is similar to Windows administrator rights and applies to UNIX-based operating systems (Linux, Android, Tizen, etc.)
Root rights can be obtained on almost all Android devices, and we will definitely go through the most popular ways to get them, but first, let's answer two very important questions: is what we are going to do now, is it safe, and is it worth it.
What are the consequences of obtaining root rights
Data-lazy-type = "image" data-src = "http://androidkak.ru/wp-content/uploads/2015/08/vnimanie.jpg" alt = "(! LANG: pay attention" width="145" height="121" srcset="" data-srcset="http://androidkak.ru/wp-content/uploads/2015/08/vnimanie..jpg 300w" sizes="(max-width: 145px) 100vw, 145px">
!}
 First of all, answer the question - have you read the warranty agreement that came with your phone? If you have read it, then you know that getting root-rights is a gray area and whether your warranty will remain with you at the end of the process depends only on the manufacturer's policy.
Next, remember one thing - the superuser gives you full access. FULL. That is, if it suddenly occurs to you to delete important system files, no one will stop you. So keep a close eye on which programs get these rights from you, and consult other, more experienced Android users before doing anything stupid.
What are the benefits of being rooted?
Data-lazy-type = "image" data-src = "http://androidkak.ru/wp-content/uploads/2015/08/android-vigody.jpg" alt = "(! LANG: Benefits of obtaining rights" width="159" height="50" srcset="" data-srcset="http://androidkak.ru/wp-content/uploads/2015/08/android-vigody..jpg 300w" sizes="(max-width: 159px) 100vw, 159px">
!}
 The list of what you can do with root rights is huge. Just take a look at the most popular reasons for obtaining superuser rights!
IMPORTANT: The program that allows you to perform this action is indicated in brackets.
- Removing preinstalled programs like Facebook or Twitter from the system partition (Titanium Backup);
- Transferring the application cache from an internal memory card to an external one (FolderMount);
- Transferring the section with applications to the memory card (Xposed App2SD);
- Global modification of the interface with the ability to fine-tune (almost all Xposed modules);
- Disable ads in all applications (Adaway);
- Hacking purchases in applications with PlayMarket (Freedom);
- Disable license check in uncracked applications, as well as their hacking (Lucky Patcher).
Read also: How to change imei on Android
And that's not all! In fact, by having root access to your phone, you can make almost anything out of it. And if your fuse is still hot, let's move on to the actual process of obtaining root-rights.
Instructions
data-lazy-type = "image" data-src = "http://androidkak.ru/wp-content/uploads/2015/08/Android-s-root-pravami.jpg" alt = "(! LANG: Rooted Android" width="165" height="91" srcset="" data-srcset="http://androidkak.ru/wp-content/uploads/2015/08/Android-s-root-pravami..jpg 300w" sizes="(max-width: 165px) 100vw, 165px">
!}
 Unfortunately, you can't just enable root access on Android - the manufacturers tried to protect their creations from the crooked hands of users, and this is, in fact, correct - otherwise the number of calls to service centers would have increased significantly. But this does not mean that it is impossible to get root-rights at all. Moreover, for most phones, this procedure is extremely mundane and only takes a few minutes.
There are many ways to root, and just like our other tutorials, we'll go from easy to hard.
1.From the device itself
Data-lazy-type = "image" data-src = "http://androidkak.ru/wp-content/uploads/2015/08/google-play-logo-274x300.png" alt = "(! LANG: google play market" width="92" height="100" srcset="" data-srcset="http://androidkak.ru/wp-content/uploads/2015/08/google-play-logo-274x300..png 405w" sizes="(max-width: 92px) 100vw, 92px">
!}
![]() Despite the fact that many manufacturers block access to their smartphones as much as possible, hackers from all over the world from time to time find loopholes that allow them to get the rights with just one tap on the screen. And other manufacturers simply trust their users and even publish algorithms to bypass their protection. It is on this principle that various automatic root recipients are based, the most famous of which is KingRoot.
Despite the fact that many manufacturers block access to their smartphones as much as possible, hackers from all over the world from time to time find loopholes that allow them to get the rights with just one tap on the screen. And other manufacturers simply trust their users and even publish algorithms to bypass their protection. It is on this principle that various automatic root recipients are based, the most famous of which is KingRoot.
All that is required to root a device using KingRoot is to press one button. Of the shortcomings, KingRoot is not the most familiar rights manager for old Android users. Instead of the usual SuperSU, KingRoot uses its own program, which, however, does not differ much from SuperSU in terms of functionality.
In addition to KingRoot, the Framaroot program is popular, as well as numerous other applications for Android devices, for example, VRoot,
2.Using a PC and special programs
Data-lazy-type = "image" data-src = "http://androidkak.ru/wp-content/uploads/2015/08/android-i-pk-300x258.jpg" alt = "(! LANG: Connection android to pc" width="150" height="129" srcset="" data-srcset="http://androidkak.ru/wp-content/uploads/2015/08/android-i-pk-300x258..jpg 473w" sizes="(max-width: 150px) 100vw, 150px">
!}
 If you cannot transmit instructions for unlocking from inside the Android system, this does not mean that this cannot be done at all. At least, programs such as SuperOneClick, Kingo and many others operate according to this principle. As the basis of their work, they use the USB connection of the Android smartphone and the PC, through which commands are sent.
Read also: How to reset Android phone to factory settings
In order to be able to do this, you need to enable the "USB debugging" option in the settings of your Android smartphone. It is located in the hidden section "For Developers", and to open this section (if it is closed), go to the section "About the tablet" and ten to fifteen times click on the item "Build version".
After you have turned it on, simply connect your Android smartphone to a PC (in Mass Storage mode, of course) and launch the program of your choice, then follow the instructions for working with it. You will have to think on your own about which program to choose and how to use it - the number of Android devices is too large to be able to say with confidence which of them work with one program, and which - with another.
3.Using PC and ADB terminal
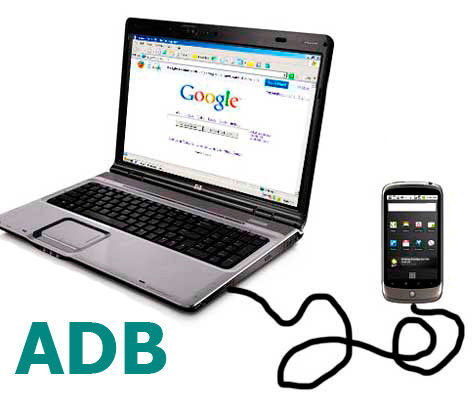
For those who do not know what adb is, we answer. ADB is a special protocol that allows your Android device to receive instructions from a computer via a USB cable. Due to the fact that ADB is part of the Android system itself, such commands in most cases have a higher priority than the protective solutions of the phone manufacturer.
For ADB to work properly with your phone, you will need at least:
- A computer with the Windows 7 operating system (newer operating systems may be unstable or not work at all with the required drivers);
- A set of adb drivers for your device (usually provided by the manufacturer);
- USB cable;
- Actually, a smartphone with the option “USB debugging” enabled in the settings;
- Unpacked into the “X: // ADB” folder, where X is a (preferably) non-system disk, archive with an ADB terminal.
Some smartphone owners want to get the most out of their device. In this case, it is impossible to do without getting root rights. After all, only they will allow you to use all sorts of tweaks, activate additional functions and even block ads displayed in free applications.
The Android operating system is renowned for its openness. But in fact, some of its components are still blocked for the average user. You can download a banner ad blocker to your smartphone, but it won't work. The fact is that the advertising part of the OS is closed for other applications - it is impossible to change the corresponding files. However, if you get root rights on Android, then everything changes. After that, all hidden sections become available. But you need to be careful - these sections also contain those files, deleting or changing which will destroy the operating system, and therefore the device itself.
In general, root access provides the following benefits to the user:
- The ability to install unofficial firmware and mods;
- The ability to change system files;
- Easy removal of system (pre-installed) applications;
- Gaining access to additional functions of the operating system;
- Installing tweaks and other programs that increase productivity;
- Installing special applications for which root rights are required.
But, as mentioned above, root-rights come with a few unpleasant moments:
- They often void your warranty;
- The procedure for obtaining root rights can result in the failure of the gadget;
- In the future, you will no longer receive OS updates over the air.
Obtaining superuser rights without a computer
Rooting is not easy on modern smartphones. The process can vary greatly depending on the device manufacturer and other specifics. Attached no Kingo Root n Supports almost all modern Android smartphones, so you can get super user rights with it. Instructions:
Step 1... Download and install Kingo root to your smartphone. To do this, make sure the device is allowed to install from unknown sources. If there is a ban on the smartphone, then you will be prompted to go to the settings and change the parameters.
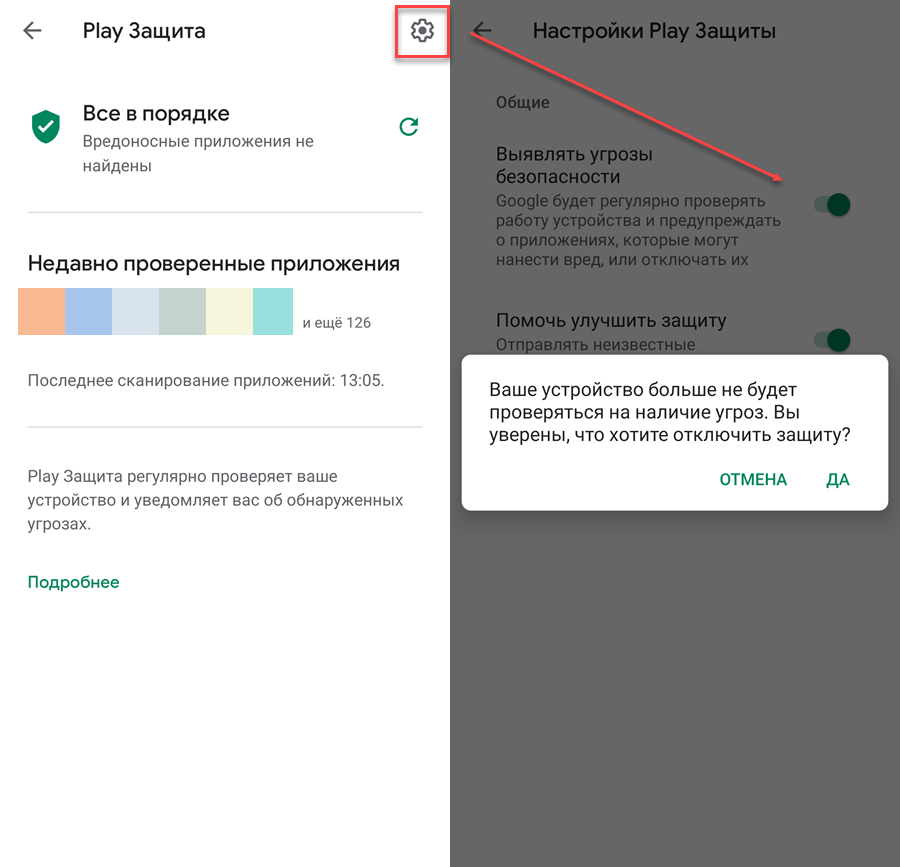
Step 2... The installation may be blocked by Play Protection. If this happens, then launch the Play Store and swipe to the right. In the menu that opens, select the item "Play Protection".
 Step 3... Go to settings here. To do this, click on the gear-shaped icon. After that, turn off automatic check of applications and move the slider "Identify security threats"(may have another name) to the off state.
 Step 4... Complete the installation normally and run Kingo Root. Then press the button "One Click Root".
 If successful, the message "Root Succeeded" will appear on the screen. If it was not possible to obtain superuser rights, then "Root Failed" will be displayed. In this case, you will have to use another application.
If you don't have the newest smartphone or tablet, then there is a high probability that you can open root access on it using the Framaroot app. To do this, you do not even need to connect the device to a computer, and therefore the process proceeds quickly and without any difficulties. You will be required to do the following:
Step 1. Download the latest version of the Framaroot software.
Step 2. Install this APK file on your gadget. If necessary, check the box next to the item “ Allow installation of applications from unknown sources«.

Step 3. Run the program. If your smartphone or tablet is supported by it, then you will see a menu that contains options for further actions.

Step 4. Choose one of the methods for obtaining root rights. A prompt will appear shortly indicating the results of the program's action. If the method does not work, then try the second and third.
Step 5. If the application crashes, then restart it.
Step 6. If you are informed that you managed to get root on Android, then restart your device and start using its advanced features.

Unfortunately, the list of supported devices for this application is strictly limited. If the program did not cope with its task, but you still want to use the user rights, then you can try to install the following applications:
- 360 Root;
- PingPong Root;
- KingRoot;
- Root Master.
The latter program will give root rights even to the owner of a very old device running Android 1.5. The rest of the applications, on the other hand, try to hack the latest devices, including those made in South Korea (they have support for KNOX technology, which significantly complicates the task).
Getting root rights through a computer
It is possible that you are still thinking about how to get root rights to Android using a computer. You may find it very easy to do this. But practice shows that in this matter the PC is almost not an assistant. The fact is that almost every smartphone requires special algorithms, according to which superuser rights are granted. In this regard, there is no universal way of obtaining such rights. But you can try using the following programs:
- ROOT Wizard;
- VRoot;
- Root Zhushou;
- Unlockroot.
However, remember that no one guarantees the successful completion of the process - it all depends on the specific device and the version of the operating system installed on it.
Types of root rights
In the menus of some programs, you may find that they are capable of granting different root rights.
- Shell root- full root, but the user is not given access to the hidden System section.
- Full Root- full root, the owner of the device is provided with all the hidden functionality of the operating system.
- Temporary Root- this root will disappear after the first reboot of the gadget.
Such a concept as "root rights" is quite common among users of devices with Android OS, especially amateurs who constantly test their devices, installing new and interesting functions on them. Those who have the ability to get root rights have access to very interesting and useful settings of their android device. You can find out how to root an android user, get to know these "rights" better, get or check their availability very soon after reading this article.
"Root" or Superuser rights have moved from Unix OC to Android OC. Their main advantage is the ability to access the Android OS settings, which were previously hidden. The list of permissions is simply amazing, with these rights you can make changes to both system and hidden OS files; change the screensaver on the device that appears when the OS is turned on; your applications can be inserted into the firmware; absolutely change the OS interface in your own way; control of the processor frequency of your smartphone will be available; installation of unofficial firmware, as well as creating a backup copy is allowed; the user, using fine-tuning of the hidden functions of the OS, will be able to optimize the OS performance and battery life.
These operations clearly confirm that the real meaning of getting root rights to your android device exists. Important information before you root your android: the desire to get root access will lead you to those irreversible changes in which the warranty for your device will be lost. Official service centers will legally deny you their service when you provide them with your rooted device! Therefore, think carefully when deciding to get root rights, whether you really need Superuser access!
It so happens that after installing root rights, the device hangs or gives errors, then it is advisable to reset the settings by selecting the "Restore and reset" checkbox. If the malfunctions of your device are more serious, reset through the Recovery menu and click "wipe data / factory reset". The entrance to this menu is individual for each device, it is performed by a certain combination of buttons!

Another addition with the acquisition of root rights: it is not uncommon for the antivirus installed on the device to often signal the presence of viruses due to the OS vulnerability received, the best solution for this would be to simply reinstall the antivirus application to a new one.
You can check if the Superuser is active on your android device and find out about the presence of root rights on it in this way: find a shortcut called "Superuser" or "SuperSU" in the programs menu. By the way, smartphones made in China often already have a corresponding application in the firmware. If you still did not find root rights, then you can also check their presence through the Root Checker program.
So, now let's move on to the main question: how to put root rights on android? It should be noted that due to the variety of smartphones, the instructions for everything are different. Before starting the steps to root your device, back up all the information that is important to you. The desire to get root rights is entirely yours, so do not forget that you are taking risks. There is a very convenient and free Kingo Android ROOT program, in just a few steps you will be able to root your android.
The only caveat is the need to connect your android device to a PC with Internet access. On mobile companies such as SONY and HTC, you need to complete an additional step - unlock the bootloader. There is also a way to root the device without involving a PC using programs, but if the version of the android corresponds to a certain program. We put the root of the rights to the android only when you read the instructions in detail before starting. Be extremely careful, successfully obtained root access will allow your android device to become even more functional and more convenient!