Batch processing. Lesson: Batch Processing Photos in Photoshop
Hi all! This time I'll show you some of the basics of automation in Photoshop, as well as their practical use. We will create complex action, based on it we will build a Droplet and carry out the operation batch editing with a whole folder.
Part I - How to Create an Action in Photoshop
Step 1 - Let's get started!
Not every Photoshop user is a designer. There are many people who need graphical tools that can make their life easier. If you are a photographer or webmaster, this tutorial will help you.
First, place all the photos you want to process in separate folder. Then open any of these pictures.

We will use it to create Actions in Photoshop.
Step 2 — Setting up actions in Photoshop
To begin, open the Actions window (select Window> Actions or press Alt + F9). Let's create new group Action.

After creating the group, let's create a specific action. Click on the leaf at the bottom of the Action panel. Let's call the new action "Vintage Halftone".

Once created, pay attention to the three small icons: stop, record and play. For the next step, the recording icon must be active.
Step 3 — Resizing the Image Using Image size
Let's build an action. I will explain how and what to do. Be careful and follow the instructions.
Once you have your photo open and the recording icon is active, start recording your steps.

The first step is to resize the image. Since I'm going to use photos in a web gallery I need to make them smaller. For this I choose Image> and set the width to 700px and check the box to keep the proportions. In addition, a checkbox is required Resample Image and choose Bicubic Shaper (best for reduction).
Do not resize the image using other methods (such as Free Transform). Because this will not work on vertical images.
Click OK and go to the next step.
Step 4 - Copy the image.
Now, it would be good to reset the colors with which we draw. To do this, you can simply use D on your keyboard.
Do not change colors using the color picker or eyedropper.

Then double click on the "Background" layer in the Layers palette. And click "OK"
Drag the layer to the icon "Great new layer", a copy of the layer will be created.
Make sure "Layer 0 copy" is selected and move on to the next step.
Step 5 - Add Diffuse Glow
The "Layer 0 copy" layer is selected and we are going to add a Diffuse Glow filter to it. This will increase the lighting and give a dramatic look to the image. Go to Filter>Filter Gallery and select Distort>Diffuse Glow. Set the values as shown below and click OK.

Step 6 — Changing Opacity and Merge Layers
Don't use the slider to change the opacity value because Photoshop will record each step at each percentage (100, 99, 98, 97...75) and we don't want that.

The resulting layer should be called “Layer 0 copy”.
Step 7 - Gaussian Blur Filter
Duplicate the “Layer 0 copy” layer as described above.

Make sure "Layer 0 copy 2" is selected and go to Filter> Blur> Gaussian Blur, set the radius to 2 pixels and click OK.
Step 8 - Change the Blending Mode of the copy.
Change the Blending Mode of the “Layer 0 copy 2” layer to Overlay.
If you want to try different modes mixing, click on the Stop button in the Actions window and experiment! Then click Record, and select the desired blending mode.
Finally, set the Opacity value to 70%.

Step 9 - Create a layer fill
Now, let's add a black background to our work.
To do this, go to Layer >New Fill Layer > Solid Color, click OK and select color #000000.

Move the “Color Fill 1” layer to the very bottom.
Step 10 - Add a Layer Mask
Click on the "Layer 0 copy" thumbnail and select Layer > Layer Mask > Hide All.

Step 11 - Select the Layer Mask
Now we're going to create a random stroke on our photos.
After creating the layer mask, you should click on its thumbnail and then select everything by clicking Ctrl+ A on keyboard.

This important step, if you don't click on the layer mask thumbnail, you will end up with an ugly result =)
Also, when you select everything, you cannot use the Marquee Tool and make a random selection. If you do this, Photoshop will only store the coordinates as exact numbers for that specific photo, and it won't work for any other.
Step 12 - Selection Transformation
Now select Marquee Tool in the tool palette. Right-click on the selection and select the option Transform Selection.
pay attention to top panel, there are two values W and H (this is the width and height, it should be 100%). Click on the small chain in the middle and change the values to 95%. This way you will reduce your allocation by 5%. Click on the checkbox and apply the transformation.

Step 13 - Create a Custom Border
Let's change the selection arbitrarily.
Make sure the "Layer 0 copy" mask is selected.
Then go to Select>Refine edge, and set the value as in the screenshot and click OK.

You should end up with something like this.
If you are working with a different image size, you should play around with the Refine edge values a bit.
Step 14 - Fill the Selection
Now fill the selection with white.
Reset the colors with the D key. Then select the Marquee tool from the Tools palette, click right click mouse and select Fill... In the dialog box, set the settings as in the screenshot.

Finally, press Ctrl + D to deselect it.
Step 15 - Copy the actions
Now let's repeat the process of creating a custom border (steps 10 to 14), but this time on the "Layer 0 copy 2" layer.
These actions can simply be duplicated in the Actions window.
To copy steps, first select "Layer 0 copy 2". Stop recording.
Then select (in the Actions window) all the steps in the boundary creation process, i.e. from “Set Selection” to the step before Select “Layer 0 copy 2”.

Click the button on the right and select Duplicate. They will be copied.
Now simply drag the selected actions below the "Select "Layer 0 copy 2"" step. Start playing the selected fragments.
Finally, click on last step in the Actions window and start recording.
Step 16 - Processing with Halftone Pattern
Then click on the layer mask thumbnail “Layer 0 copy.” Next, log in Filter>Filter Gallery, and go to Sketch>Halftone Pattern and set the values below, and then click OK.

Step 17 - Add a Photo Filter
Select "Layer 0 copy 2" in the Layers palette and then go to Create New Fill or Adjustment Layer > Photo Filter, select a color (#957345) and set the Density to 100%. Click OK.

Step 18 - Hue/Saturation
Afterwards, let's go Adjustment Layer > Hue Saturation, select the values as in the screenshot and click OK.

Step 19 - Fill a New Layer
In the layers palette, create a new layer and place it above all the others. Let's leave it as "Layer 1." Then Ctrl + A (select all) then select the Marquee tool, right click and select "Fill..." use the foreground color. Everything should be filled with black.

Step 20
Now add a Pattern Overlay effect to “Layer 1”. I use "Gray Granite" from the Grayscale Paper pack.
Step 21 - Rasterize the Layer Effect
Create another layer.
Then Shift+click on the “Layer 1” layer in the Layers palette to select both layers. And press Ctrl + E to combine them.

Step 22 - Change the Blend Mode and Opacity
Now change the Layer 2 Blending Mode to Multiply and the Opacity to 75%.
Step 23 - Flatten image
In the layers palette, select all layers. Right-click and select Flatten image. Finally, in the Actions window, you can click Stop.
That's all! Now we can apply these actions to any photos.

End of Part I – check!
Now it's time to check if your steps work correctly on another photo. To do this, open the photo, find our action (Vintage Halftone) and press the play button.
Before moving forward, it's a good idea to save the action itself.
To do this, select the "site" action set in the "Actions" window, and then go to the advanced options (the icon in the upper right) and select Save Actions... Enter a name for your action and save it anywhere.
Now you can move on to batch editing.
Part II - Batch processing of photos in Photoshop
Step 1 — Create a Droplet for Batch Processing
Droplets apply actions to one or more images, or even a folder if you drag them onto the droplet icon.
You can save the droplet anywhere and use it as many times as needed. To create a droplet, go to File > Automate > Create droplet... There you can see all the many options.
First select the source photos folder and save the droplet there.. For the destination folder I will select a different folder.

You can also customize the name of the resulting image by adding custom text, number sequence, extension, and clicking maximum compatibility. Once you have configured the droplet, click OK.
Step 2 - Working with the droplet.
Now open your images folder. Select and drag the desired images onto the droplet icon. You will see that Photoshop will automatically edit the selected images and save them to the specified folder.

Conclusion
Automating actions in Photoshop can sometimes save a lot of time. Future designers, webmasters and photographers should be able to use it.
I recommend trying these techniques with your photography =)
Batch Processing files is indispensable when working with a large number of images that require the same type of editing. Almost any routine operation related to processing (batch mode) can be completed much faster this way.
For graphic formats possible various options transformations: from changing the image size and format, adding a watermark and text to applying effects and filters. It is noteworthy that many image viewing programs already have similar functions built into them. In addition, as an alternative there are individual programs for processing - converters.
Next, we will consider methods of batch processing of images according to the level of complexity from the simplest to using the functions of such packages as Adobe Photoshop And Adobe Lightroom. At the end of the review - comparison table(Table 1) and conversion performance test (Diagram 1).
Image Tuner
A simple program that works on the “one window” principle and is not too complicated with settings. Files for processing are added on the left side of the window, and conversion parameters are indicated on the right. A preview is available by clicking on the image thumbnail.
Transformation options include changing the hue, size, orientation of the image, and adding a watermark. There are filters available, but they are so simple that they don’t even have settings and for some reason are hidden in the “Resize” section. Half of the settings are in English, the rest is translated into Russian.
The number of formats for saving is small - only 5. At the input, Image Tuner supports such popular formats as JPEG, BMP, PNG, GIF, TIFF, as well as RAW, NEF and others.
So a very simple converter for very basic image processing.
The IrfanView viewer, while free and small size, supports and includes converter functions accessible through the “Batch Conversion/Rename...” menu. There are three modes to choose from: batch renaming, conversion and mixed.
About 20 formats are available for saving (the “Output format” menu), although the parameters are not available for each of them.
The selection of other transformations is only possible when activating “Use advanced options...” by clicking the “Advanced” button. Settings allow you to resize, crop the image, flip horizontally or vertically, add a watermark - standard set for graphics viewer.
However, in practice it becomes clear that the “advanced” options are not at all intuitive: the thing is that preview windows are not expected (preview in the main window refers to original image). Of course, you can crop a photo or change its size pixel by pixel. How to deal with filters for adjusting brightness, balance and other color parameters when you need to specify numbers? Based on the above, after applying the transformations and exiting “Advanced”, the changes can only be seen after the conversion is complete. But for batch renaming files, test mode is available.
Thus, IrfanView cannot be called a convenient image converter. It can be used only for basic transformations that do not require advance planning: changing the image orientation, size and saving format.

AVS Image Converter is part of the AVS4You suite of image processing programs. Apparently, that’s why the 27 MB distribution kit (which is not so small for a converter) includes auxiliary utilities Software Navigator and Update Manager.
There are 8 supported image formats for recording, and a little more than 20 for reading. For processing, you can import photos from Flickr or Facebook accounts (after prior authorization).
The graphical interface is user-friendly inexperienced user: Some functions have been simplified or replaced with presets. When resizing an image, presets are available for different monitors and standard photo proportions, which is especially useful when publishing on the Internet.

There are few conversion settings (the “Correction” tab): changing brightness, contrast, color temperature; blur/sharpen effects, adding texture. The last tab is “Watermark”, which allows you to overlay an image or text on a photo.
FastStone Photo Resizer
Most of all, the batch conversion here is reminiscent of IrfanView. But, unlike the last one, FastStone Photo Resizer is less user-friendly and provides convenient advanced options.
The interface is divided into two parts - which is not very rational, since the area for selecting files takes up most of the workspace.
After adding images to the conversion queue, you can specify the output image format (“Output Format”) and the saving folder (“Output Folder”).
To access transformation tools, the “Use Advanced Options (Resize...)” option is activated. The set of transformations is purely basic: resizing, perspective, adding text, a watermark, a frame. Settings can be saved or loaded from a configuration file, just like in most reviewed programs. There is no viewing window.
A separate “Batch Rename” tab contains a tool for batch renaming files. In addition to the standard name change using a mask, the “Search and Replace” function is interesting; with its help, it is easy to correct the name of files without completely changing the name.

XnConvert is a spin-off from the popular image viewer XnView. In fact, all the same actions performed in the XnConvert environment can be performed in XNView (as discussed below), however, the standalone converter has a number of differences. First of all, it is not intended for viewing. On the one hand, nothing distracts from the functionality. On the other hand, if you need to find out the most basic information about the source file, you have to turn to another viewer program.
To begin working with the program, you need to specify the files to be processed (drag and drop is supported, you can also specify using buttons). Please note that at the top there are columns for sorting. When you click on any of them in context menu There are many other options to choose from - the list is huge. However, it would be more convenient if the files were displayed in the form of a table rather than thumbnails - then it would be convenient to view information about source files, otherwise it simply does not exist, and the sorting is somewhat “conditional” in nature - it is not clear what it is for.
The main tab where the list of transformations is collected is “Actions”. For free program The number of settings is pleasantly surprising. Transformations are divided into 4 groups:
- Image - for the most part, working with transformation and file properties.
- Correction - working with levels, color.
- Filter - applying blurring, sharpening, and changing focus effects.
- Miscellaneous - for the most part, all the same effects.
The output data tab specifies options for saving processed files: name mask, location and graphic format. For popular formats(JPG, GIF, PNG, etc.) it is possible to specify Extra options conservation. There is an inconspicuous, but very useful export option - you can upload processed photos to a Picasa or Flickr account, package or send via FTP or email.
Import/export of scripts (transformation settings) are available at the bottom of the window, the “Load script” button.
Also available for reading great amount formats - more than 500 (of those supported by the XNView viewer), with the caveat that specific ones require the installation of GhostScript or a CAD plugin.

Briefly about the possibilities of batch photo processing in XnView. The settings window can be called up through the “Tools - Batch Processing...” menu.
First of all, the interface is different from XNConvert. It consists of only two tabs, the first one specifies the format and saving options. In the second tab there is a list of transformations that, to activate and configure, need to be added to the right side of the window. The ability to save scripts is also provided, but the format is not compatible with XnConvert: here XBS, in XNConvert - BAT.


Setting up conversions in Photo Converter
Adobe Photoshop
Download pageOf course, Adobe Photoshop graphics package has built-in necessary tools for batch photo conversion. Current on this moment version - CS6, this review covers CS5. Processing can be done using actions, a Batch operation (“File - Automate - Batch…”) or an Image Processor script (“File - Scripts - Image Processor…”).
First way
First, through the Actions palette, an action is recorded that will be applied to each image. It is best to take a “test sample” for this purpose. At this step, the list of possible transformations is limited only using Photoshop. Next, the Action is saved to a specific Set. Once finished, the action can be edited anywhere: for example, optimized by removing unnecessary actions.
To mass-apply an action, after recording and editing it, you need to go to the “File - Automate - Batch...” menu. In the “Play” settings group, the desired action is selected, the source and destination folder are determined. Additionally, you can specify a mask for naming files.
Second way
Most often, the second processing method using the Image Processor script will be more acceptable. It is convenient for performing such simple actions, such as changing the format or resizing the image. You can access the settings through the menu “File - Scripts - Image Processor...”. The convenience of the approach is that there is no need to record the action. All other settings are almost the same as the above method. Saving is only possible in JPEG/PSD/TIFF.
| Program | Terms of distribution | Functionality | Formats | ||
| Filters/effects | Preview | Reading | Record | ||
| Image Tuner | Freeware | Yes | Yes | 30+ | 5 |
| IrfanView | Freeware | Yes | No | 80+ | 20+ |
| AVS Image Converter | Shareware | Yes | Yes | 20+ | 8 |
| FastStone Photo Resizer | Freeware | No | Yes | 30+ | 500+ |
| XnConvert | Freeware | Yes | Yes | 500+ | 30+ |
| XnView | Freeware | Yes | No | 500+ | 30+ |
| Photo Converter (Pro) | trial | Yes | Yes | 400+ | 30+ |
| Adobe Photoshop | trial | Yes | No | JPG | |
| Adobe Lightroom | trial | Yes | No | 3 | |
Converting images 4288×2848 → 1024×680, JPG format 100% (all settings are set to default, quality 100%), conversion algorithm and progressive method are disabled.
Diagram 1. Comparison of processing speed in image resizing mode

It was not possible to determine the speed of operation in the Photo Converter program, since the shareware version only allows processing of 5 images.
You can process a large number of photos according to the recorded scenario. This is very easy to do and will save you a lot of time.
Let's come up with a photo processing scenario, for example:
1. reduce the photo to 1000 pixels in width;
2. apply the auto-contrast function;
3. make a white frame;
4. sign the photo;
5. save the photo.
If you are setting an Action for the first time, take one single function (for example, reduce photos) and try batch processing on it.
Let's create a new Action.
Let's call our script "Frame and Signature". Please note that we can call this Action using hotkeys for a photo opened in Photoshop. Let's install them, it will be Crtl+F12.

We press the Record button and Photoshop begins recording our script.
1. Open the photo. Use the Image Size command to reduce the size of the photo. For example, let's set the Width to 1000 pixels. If you are sure of your measurements original photos are all the same, then you can set the height in pixels. But if there is no such certainty (for example, cropping has previously been applied to some photographs, etc.), it is better to determine the size of only one side.

2. Apply the Auto Contrast function to the photo.

3. Make a frame using the Image / Canvas Size command. If your photos are not the same height, it is better to set the frame as a percentage, let's set it to 115%. It should be remembered that Actions record a strictly defined sequence of actions and cannot themselves determine what and how they need to do. As a rule, different Actions are used to process horizontal and vertical photographs. But in in this case we were tied only to the width of the photo and set the frame as a percentage, that’s why the vertical photo Photoshop will process correctly.

4. Write the text on the frame using the Horizontal Type Tool on the left toolbar. Move the text to the desired location, in this case it is the lower right corner. All our photos will be 1000 pixels wide, so the text will be positioned correctly for all photos.
Next, you need to merge the layers (the text is written in a separate layer). To merge, press Ctrl+E.
And save the photo using the Save or Save As functions. Select the desired format and quality.
This is what the image looks like after processing.

Next, click the Stop Play button in the Actions window and see what happens in the end. Now we can open any photo in Photoshop, select the Frame and Caption Action, press Play and get a processed image in a matter of seconds.
Notice that there is a check mark next to each action. You can turn off any action from the script and turn it back on.

You can apply Actions immediately for large quantity photographs. To do this, we will use the Batch function in the File->Automate tab.
Tools for automating actions in Photoshop can significantly reduce the time spent on performing the same type of operations. One of these tools is batch processing of images (photos).
The meaning of batch processing is to record actions in a special folder (action), and then apply this action to an unlimited number of photos. That is, we process it manually once, and the rest of the images are processed automatically by the program.
It makes sense to use batch processing in cases where it is necessary, for example, to change the size of photographs, raise or lower the lighting, or make the same color correction.
So let's get started with batch processing.
First you need to place the original images in one folder. I have three photographs prepared for the lesson. I named the folder "Batch Processing" and placed it on the desktop.

If you noticed, this folder also contains a subfolder "Ready photos". The results of processing will be saved in it.
It’s worth noting right away that in this lesson we will only learn the process, so many operations with photos will not be performed. The main thing is to understand the principle, and then you can decide for yourself what kind of processing to do. The procedure will always be the same.
And one moment. In the program settings you need to disable mismatch warnings color profile, otherwise, every time you open a photo you will have to press the button OK.
Let's go to the menu "Editing - Color Settings" and uncheck the boxes indicated in the screenshot.


Now you can start...
After analyzing the pictures, it becomes clear that they are all slightly darkened. Therefore, we will lighten them and tint them a little.
Open the first picture.
Then call the palette "Operations" on the menu "Window".

In the palette, you need to click on the folder icon, give the new set a name and click OK.

Then we create a new operation, also call it something and press the button "Record".

First, let's resize the image. Let's say we need images no more than 550 pixels wide.
Let's go to the menu "Image - Image Size". Change the width to the desired one and click OK.


As you can see, changes have occurred in the palette of operations. Our action was successfully recorded.

For lightening and toning we will use "Curves". They are called by keyboard shortcut CTRL+M.
In the window that opens, set the current on the curve and drag it in the direction of lightening until the desired result is achieved.

Then we go to the red channel and adjust the colors a little. For example, like this:

At the end of the process, click OK.
When recording an action, there is one important rule: if you use tools, adjustment layers and other program functions where the values various settings change “on the fly”, that is, without the need to press the OK button, then these values must be entered manually and press ENTER key. If this rule is not followed, then Photoshop will record everything intermediate values, while you drag, for example, the slider.
Let's continue. Let's assume that we have already completed all the steps. Now we need to save the photo in the format we need.
Press the key combination CTRL+SHIFT+S, select the format and location to save. I selected the folder "Ready photos". Click "Save".

The last step is to close the image. Don't forget to do this, otherwise all 100500 photos will remain open in the editor. Nightmare…

We refuse to save the source code.
Let's take a look at the operations palette. We check whether all actions were recorded correctly. If everything is in order, then press the button "Stop".

The action is ready.
Now we need to apply it to all photos in the folder, and automatically.
Let's go to the menu "File - Automation - Batch Processing".

In the function window, select our set and operation (the last ones created are automatically registered), specify the path to the folder with the sources and the path to the folder in which you want to save the finished images.

After pressing the button "OK" processing will begin. The time spent on the process directly depends on the number of photos and the complexity of the operations.

Use the automation provided to you by Photoshop and save a lot of time on processing your photos.
I spent the whole evening studying automatic processing. I share the instructions below.
Batch Reduce Photos in Photoshop
IN graphic editor Photoshop provides the Action tool to automatically process photos according to a predetermined algorithm.
1. Create two new folders and give them names in Latin! For example, Begin and End. If the folder name contains Cyrillic characters, an error may be thrown during batch reduction. In one of the folders, for example, Begin, we put all the photos that need to be reduced. All photos must have the same resolution, for example JPG.
2. Call up the Action palette located in the Window menu.
3. Create Operations in the palette new set commands To do this, click the Create new set button. You can assign any name to the set of commands, for example, SmallPhoto. Next, in the created new set of SmallPhoto commands, we create a new action, for example, called Size750. To do this, click the Create new action button. We immediately launch Record.
4. In the process of reducing images, their quality deteriorates and in order to minimize losses, it is better to use the Bicubic Sharper interpolation method from the Edit – Preferences – General menu.

5. Open one of the original photos intended for reduction from the File-Open menu.
6. In the Image – ImageSaze menu in the Resolution window, set the value to 72 pixels/inch.

7. To reduce the size of the photo, execute the command File – Automate – Fit Image (File-Automation-Change Dimension). In the dialog box that opens, set the necessary Width and Height parameters, for example, 750 and 500.

8. In the File menu, open the Save for Web command (Save for the Web and devices...). Set the quality level for the photo, the extension (should be .JPEG) and click Save. In the menu that opens, specify the path to the End folder. In the menu that appears, click “OK”. Close the photo without saving the editing results.

9. In the menu Edit – Preferences – General (Editing-Settings-Basic) we return the interpolation back to Bicubic.
10. Stop recording with the Stop button – the button with a blue square at the bottom of the Action palette.

11. In the End folder, delete the photo that got into it while recording the Action command.
All of the above steps need to be done only once to write down the command you need. To continuously batch reduce files to a specified size, you will only need to perform the following step.
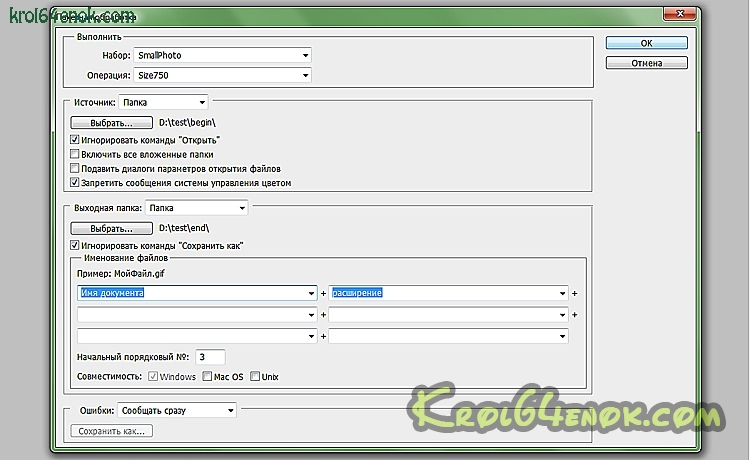
12. Open the menu File – Automate – Batch (File-Automation-Batch Processing). In the Set section, select the SmallPhoto command set we created and the Size 750 command. In the Source window, select Folder. Click the Choose button and specify the folder with the processed photos Begin. In the Destination column, select Folder and indicate the folder where the processed photos will be saved, that is, the End folder. Check the boxes next to Override Action “Open” Commands (Ignore “open” commands); Suppress Color Profile Warnings; Override Action “Save as” commands. In the Starting serial# window (the number of photos processed at a time), set the value to 3. The File naming column is filled in as you wish, as is the method for notifying errors. Next, you only need to click OK, and the program will finish working. The thumbnail photos can be found in the output folder you specify, in our case the End folder.
P.S. After writing this labor-intensive article, I found an easier way batch change photo sizes. To change the size, go along the path File-Scripts-Image Processor (I’m not sure that all builds of Photoshop have this function). Then everything is very simple, select the source folder and destination folder, check the Resize box and enter the parameters W, H (in pixels), click Run.

P.S.S. The 12-point instructions outlined above may be useful for more complex photo processing than just resizing. By analogy with the described example, you can record any operation you are interested in (for example, a set of commands Open image - Auto contrast - Auto tone - Smart sharpening filter - Save image) for batch processing.