Hello dear reader, today I have prepared a delicious form for you feedback html, which works without reloading the page Ajax technologies + a powerful trigger that will motivate your visitors to use the form. Readers of my blog very actively discussed my previous article on Landing Page , now we evaluate, look at the modified new form. All necessary source code and demo attached in the article
UPD: Fixed a bug with name encoding in the subject line. Now everything is displayed correctly. We thank the reader (Ekaterina Karacheva)
The format of the form itself also includes a handler file on php language , additionally needed for work jquery library and scripts, but about everything in order, I won’t load it for too long - let’s move on to the review and analysis of our feedback.
HTML feedback form - work structure
Our form looks like this:
What's the point here? There is such a form on the right side, but on the left side I made special block , which will encourage your visitor to enter their contact information immediately! The secret is simple: Do you see the date and time in the left block? Today's date will be displayed all the time, over time the range of these two hours is calculated from the present hour, let's say if your time now is 13:14, then the hour range will be: from 12 to 14. Look at how it works)))
The visitor will see: wow, there’s a discount today, and I was just on time, there’s also a discount! Must take it immediately! - This is our trigger.
I downloaded the source code of the html feedback form, looked at the demo - I think I’ve played enough)) Now about the most important thing, the principle of operation:
Validation of fields in the input form occurs in the handler file contact.php below in the listing program code You can see that a message about errors and the successful sending of a letter appears in the form itself, this is what it looks like after sending:
Form handler source code
Paste in line 52
your email, so all letters will be sent to the specified email.
1
2
3
4
5
6
7
8
9
10
11
12
13
14
15
16
17
18
19
20
21
22
23
24
25
26
27
28
29
30
31
32
33
34
35
36
37
38
39
40
41
42
43
44
45
46
47
48
49
50
51
52
53
54
55
56
57
58
59
60
61
62
63
64
65
66
67
68
69
".$error."
";
}
}
?>
"; ) // Phone verification function ValidateTel($valueTel) ( $regexTel = "/^(7,12)$/"; if($valueTel == "") ( return false; ) else ( $string = preg_replace( $regexTel, "", $valueTel); ) return empty($string) ? true: false; ) if(!$tel) ( $error .= "Please enter a phone number. [email protected] ", $subject, $message, "From: ".$name_tema."<".$tel.">"."Reply-To: ".$email." "." X-Mailer: PHP/" . phpversion()); if($mail) ( echo "OK"; ) ) else ( echo "
".$error."
";
}
}
?>
Form performance
To receive letters to your Mailbox , change the line I mentioned above. I advise you to use gmail.com mail, there are no delays or jambs when receiving a generated letter from the form. I warned you, because... Readers had many questions (letters do not arrive at mail.ru). Be careful about this.
We fill in all the fields, please note that the phone number is entered with an 8 - I specifically wrote the number with an eight “89251122333” in the tooltip. When entering a character «+»
An error message will appear. If someone needs it, it’s easy to add this to the handler «+»
.
Completed form with test data
Letter on the mailbox
As you can see, we received the letter with all three fields that were filled out and sent. The header of the letter “Request from the site site” changes in the handler contact.php
Everything works fine, it will be nice to hear your feedback (constructive criticism) in the comments, if you have any difficulties and can’t cope with something, feel free to write to me on VK (you will find it in the contact details). I hope you liked the design and functionality of this symbiosis of a feedback form (ordering services, application) and a trigger calling for action. Good luck to everyone in your work and a positive attitude, bye))
Prepared with the support of
From the author: Greetings, friends. This article will be a continuation, in which we implemented sending form data to the server without reloading the page. Here we will continue this topic and learn how to accept data on the server and implement form submission to email (email). So, let's set up a feedback form and add the ability to send it by email.
Source files You can download the current article at .
In this lesson we will do everything as simply as possible and on our own. In particular, to send letters we will use a special PHP function called mail(), which was previously often used to send letters.
Let's start with the syntax of the mail function. This function has three required parameters and two optional (not required). Required parameters:
to — recipient’s email (you can also specify several addresses, listing them separated by commas);
subject — subject of the letter;
message — text of the letter.
Of the optional parameters, only the first one is almost always used, which is responsible for the letter headers: encoding, sender, letter type, etc.
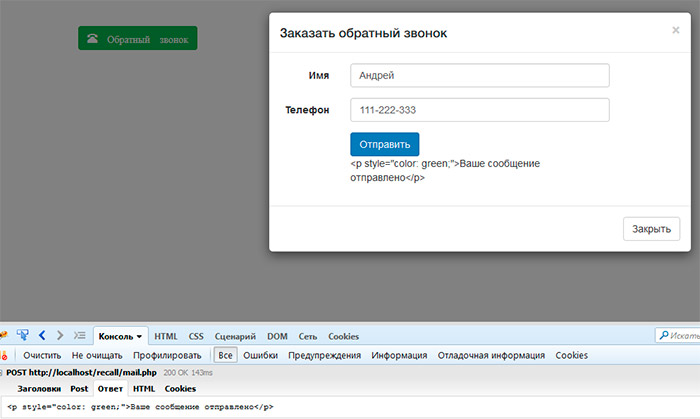
Let's try sending an email using this function . Let's do this in the mail.php file, in which we accept data from the form. New code this file will be like this:
Your message has been sent
"; )else( echo "
Error!
";
}
<
?
php
$to = " [email protected] "
;
// address of the recipient
$subject = "Order a call back" ; // letter subject
$message= "Name: ($_POST["name"])\r\n" ;
// add name to text
$message. = "Phone: ($_POST["phone"])" ;
// add phone number to text
$headers. = "Content-type: text/plain; charset=utf-8" . "\r\n" ; // set the encoding
$headers. = "From: [email protected] " . "\r\n" ; // add the sender
if (mail ($to, $subject, $message, $headers)) (
echo "Your message has been sent
"
;
) else (
echo "Error!
"
;
This is the minimum code that will already allow you to generate a message for sending. Let's check how it works:
As you can see, the code works, in response we receive a message that the letter has been sent. Since we are working on a local server, letters are not actually sent by the mail() function; they are saved as a text file in a special folder. In Open Server this is the \userdata\temp\email\ folder. Let's open this folder and make sure that the letter is there, it will look something like this:
Great! There are a few things left that wouldn't hurt to fix in the JS script. For example, it is necessary to display a message not in plain text, but in HTML code, and also to clear the form fields after sending the message. The final JS code will be like this:
$(function())( $("#recall").submit(function(e)( e.preventDefault(); var data = $(this).serialize(); $.ajax(( url: "mail.php ", type: "POST", data: data, beforeSend: function())( $("#submit").next().text("Sending..."); ), success: function(res)( $ ("#recall").find("input").val(""); $("#submit").next().html(res); ), error: function())( alert("Error! "); ) )); )); ));
$(function()(
$("#recall" ) . submit(function(e)(
e. preventDefault();
var data = $(this) . serialize();
$. ajax ((
url: "mail.php" ,
type: "POST"
data : data ,
beforeSend : function () (
$("#submit" ) . next(). text ("Sending..." ) ;
Create a feedback form
Creating a feedback form on the website
In the process of website promotion, along with studying visitor statistics, information about the website from the visitors themselves is of particular importance. One of the easiest ways to obtain such information is to place a page on the website with feedback form . The visitor leaves a message, and it will be sent to your email address or any other one you specify. In this case, the visitor does not need to use his own mail program, he does not even need to have his own e-mail.
The simplest example of this form is shown in Fig. 1. (This is a completely working sample, and you can use it to send me a thank you note.)
Fig.1. Simple feedback formTo place such a feedback form on a website, you only need basic information about HTML and the ability to operate two commands - Copy And Insert. Let's consider the sequence of actions to create a feedback form (Fig. 1) on the HTML page of the site.
1.
Check that your hosting plan (the office where your site is hosted) supports PHP. If not, then you will most likely have to pay extra to switch to another tariff that supports this same PHP. You don’t have to look up the meaning of this abbreviation, since you don’t need knowledge of PHP.
2.
Let's select the page on which we want to place the feedback form and paste the following code in the right place:
As you can see, the entire form is created by the tag
action=mail.php (indication to the site page where the script for processing the entered data is located) and method=post (method of sending data to the server). Individual lines created by tag
</b> the dimensions of the area for entering message text are set: the number of rows and columns (rows="3" cols="25").</p>
<p><b>3.
</b> Let's create a new page <b>mail.php</b>, similar to regular HTML, but with a .php extension. The full page code is shown in Fig. 2:</p>
<p><!DOCTYPE html PUBLIC "-//W3C//DTD XHTML 1.0 Transitional//EN" "http://www.w3.org/TR/xhtml1/DTD/xhtml1-transitional.dtd"><br>
<html xmlns="http://www.w3.org/1999/xhtml"><br>
<head><br>
<meta http-equiv="Content-Type" content="text/html; charset=UTF-8"/><br>
<title>Feedback</title><br>
</head><br>
<body><br><?php
<br>if (isset($_POST["name"])) ($name = $_POST["name"];) <br>if (isset($_POST["email"])) ($email = $_POST["email"];) <br>if (isset($_POST["mess"])) ($mess = $_POST["mess"];)</p><p>$to = "pupkin@rambler.ru"; /*Enter your email address*/ <br>$headers = "Content-type: text/plain; charset = windows-1251"; <br>$subject = "Message from your site"; <br>$message = "Sender's name: $name \nEmail address: $email \nMessage: $mess"; <br>$send = mail($to, $subject, $message, $headers); <br>if ($send == "true") <br>
{<br>echo " <b>Thanks for sending your message! <p>";<br>echo " <a href=index.html>Click</a> to return to the main page"; <br>
} <br>else <br>
{<br>echo " <p><b>Error. Message not sent!"; <br>
} <br>?>
<br>
</body><br>
</html></p>
<h5><i>Fig.2.</i> Feedback form processing page code</h5>
<p>Addresses of links that you need to pay attention to are highlighted in red:</p>
<ul><li>pupkin@rambler.ru - replace Pupkin's address with your email address, where messages will be received from site visitors, as well as from tireless spammers. By the way, to protect against them, a so-called captcha is often entered into the form. <b>CAPTCHA</b>- Completely Automated Public Turing test to tell Computers and Humans Apart - a fully automated public Turing test to tell computers and people apart). Usually these are highly distorted numbers and letters that you are asked to enter before sending a message. We'll talk about captcha in one of the following articles. <br>If you want to send letters to several addresses, then simply list them separated by commas.</li>
<li>a href=index.html - the address of the main (home) page of the site.</li>
</ul><p>Created page <b>mail.php</b> must be placed in the same site directory (directory, folder) where the page with the feedback form is located.</p>
<p>Check the functionality of the feedback form. If everything is done carefully, then after filling out the form and pressing <b>send a message</b> The following text should appear: " <b>Thank you for sending your message. to return to main page</b>". After this, you will find in your mailbox (or the other one that you specified when creating the feedback form) your own message to your loved one.</p>
<blockquote>
<p><b><i>Comment:</i>
</b> on some hosting sites, the new (just installed on the site) feedback form does not start working immediately, and the first letters do not arrive at all or arrive with a delay of 1-2 days. Probably, there is a "grinding in of the gears" and then everything works fine. In addition, letters from some hosting sites do not reach certain addresses, for example, I had problems with my mailbox on Rambler and Mail.ru. To solve these problems, contact your hoster - they usually help.</p>
</blockquote>
<p>Sometimes when using the described feedback form, problems arise with encoding. If in an incoming letter, instead of the native Cyrillic alphabet, the text consists of “crazy codes” or empty squares, then you have to manually select the encoding, which is of course inconvenient. To prevent this from happening, check that your page with the feedback form is encoded <b>charset=UTF-8</b>. If you are using the program <b>Adobe Dreamweaver</b>, then to do this you need to select the menu section <b>Edit - Page Properties - Encoding</b>.</p>
<p>The problem with the encoding of site files is discussed in more detail in the article Problems with encoding in the feedback form.</p>
<p>In the example described, for simplicity, the message about sending a letter is displayed on a blank page. Of course, you can place it on any page of your site so that the visitor can use the navigation (menu) to choose what to do next. To do this, place the PHP code (the one located from<<b>?php</b> before <b>?>
</b>) to the desired location on the menu page and change its name to mail.php.</p>
<p>In addition to posting the feedback form itself, it is advisable to check that the visitor has filled out its fields correctly. This must be done so that you do not receive empty letters and your mailbox is not clogged with rubbish sent by pranksters who just love to push a button <b>send a message</b>. Methods for checking the completion of the feedback form and protecting against spam are described in the articles "</p>
<p>One of the most common tasks in practice is the implementation of a feedback form. You mean writing its HTML code, designing it in CSS, creating a PHP script that would process the data received from the user and send it to our mail, writing a JS script that would check the form for the adequacy of the entered data, protecting our brainchild from spam so that our the mailbox did not collapse from bot attacks.</p>
<p>All of the above points will be discussed in our review and commented on in detail.</p>
<p>So, let's start creating a feedback form:</p>
<h3>HTML</h3>
<p>First of all, we write HTML code, which specifies the fields that the user will fill in. They will be formalized in the future. The form code looks like this:</p>
<p><
form method=
"post"
action=
"mail.php"
>
<
div class
=
"left"
>
<
label for
=
"name"
>Name:</
label>
<
input maxlength=
"30"
type=
"text"
name=
"name"
/>
<
label for
=
"phone"
>Telephone:</
label>
<
input maxlength=
"30"
type=
"text"
name=
"phone"
/>
<
label for
=
"mail"
>E-mail:</
label>
<
input maxlength=
"30"
type=
"text"
name=
"mail"
/>
</
div>
<
div class
=
"right"
>
<
label for
=
"message"
>Message:</
label>
<
textarea rows=
"7"
cols=
"50"
name=
"message"
></
textarea>
<
input type=
"submit"
value=
"Send"
/>
</
div>
</
form>
</p>
<p>And visually it now looks like this:</p>
<p><img src='https://i0.wp.com/vaden-pro.ru/sites/default/files/forma-html.png' width="100%" loading=lazy loading=lazy></p>
<p>I agree, so far everything is ugly and nothing is clear, but we have just begun.</p>
<p>Let's look at the above code in detail:</p>
<ul><li><p><
form method=
"post"
action=
"mail.php"
>
… </
form>
</p><br>In order to create a form you need to use the form tag. It is he who determines the beginning and end of the form for the code interpreter. It, like any tag, has a whole set of attributes, but there are only two required for the form to work, these are method (the method of sending a request to the server, post is used as standard for forms) and action (indicates the path to the form handler file, namely in This file will contain a PHP script, which will then send the user-entered values to us by email. In our case, we see that this file is called mail.php and it is located in the same site directory as the page we are considering).</li>
<li><p><
input maxlength=
"30"
type=
"text"
name=
"name"
/>
</p><br>Next we have inputs. These are actually the form fields themselves into which users will enter the information we need (type="text" indicates that this will be text). The maxlength attribute specifies how many characters the user can enter in a given form field. The most important attribute is name - it specifies the name of a specific field. It is by these names that the PHP script will subsequently process the information entering it. If desired, you can also set the placeholder attribute, which displays text inside the field that disappears when the cursor is placed inside it. One of the problems with placeholder is that it is not supported by some older browsers.</li>
<li><p><
label for
=
"name"
>Name:</
label>
</p><br>Used if we have abandoned placeholders. A regular field signature, the for attribute tells which specific field this signature refers to. The value indicates the name of the field we are interested in.</li>
<li><p><
textarea rows=
"7"
cols=
"50"
name=
"message"
></
textarea>
</p><br>Just like input, it is intended for the user to enter information, only this time the field is tailored for long messages. Rows specifies the field size in rows, cols in characters. In general, they set the height and width of our field.</li>
<li><p><
input type=
"submit"
value=
"Send"
/>
</p><br>Type="submit" tells us that this is a button for submitting a form, and value specifies the text that will be inside this button.</li>
<li><p><
div class
=
"right"
>
</
div>
</p><br>are used only for further visual design of the form.</li>
</ul><h3>CSS</h3>
<p>In order for our feedback form to look presentable, it needs to be formatted. To get the following result:</p>
<p><img src='https://i0.wp.com/vaden-pro.ru/sites/default/files/oformlenie-formi.png' width="100%" loading=lazy loading=lazy></p>
<p>We used this code:</p>
<p>form ( background: #f4f5f7; padding: 20px; ) form . left, form . right ( display: inline- block; vertical- align: top; width: 458px; ) form . right ( padding- left: 20px; ) label ( display: block; font- size: 18px; text- align: center; margin: 10px 0px 0px 0px; ) input, textarea ( border: 1px solid #82858D; padding: 10px; font- size: 16px; width: 436px; ) textarea ( height: 98px; margin- bottom: 32px; ) input[ type= "submit" ] ( width: 200px; float: right; border: none; background: #595B5F; color: #fff; text- transform: uppercase; )</p>
<p>I don’t see the point in describing CSS in detail; I’ll only draw your attention to the key points:</p>
<ol><li>There is no need to write a design for each tag in the form. Try to build your selectors in such a way that you can design all the elements you need in a couple of lines of code.</li>
<li>Do not use unnecessary type tags to break lines and create indentations <span><
br>,
<
p>
</span> etc. CSS with the display: block and margin with padding properties copes well with these tasks. More about why you shouldn't use it <span><
br>
</span> in layout in general, you can read in the article Tag br, but is it really necessary? .</li>
<li>You should not use tabular layout for forms. This contradicts the semantics of this tag, and search engines love semantic code. In order to form the visual structure of the document, we only need div tags, and the display properties specified in CSS: inline-block (arranges blocks in a row) and vertical-align: top (prevents them from scattering across the screen), set them to the required height and voila, nothing superfluous and everything is located the way we need.</li>
</ol><p>For those who want to save their time on website design, I can recommend using CSS frameworks when creating websites, especially self-written ones. My choice in this regard is Twitter Bootstrap. You can watch a lesson on how to design forms using it.</p>
<h3>PHP</h3>
<p>Well, it's time to make our form work.</p>
<p>We go to our root directory of the site and create the mail.php file there, to which we previously specified the path in the action attribute of the form tag.</p>
<p>Ultimately his code will look like this:</p>
<p><!doctype html>
<html>
<head>
<meta http-equiv="Content-Type" content="text/html; charset=windows-1251" />
<title>Your message has been sent successfully</title>
</head>
<body>
<?php
$back
=
"<p><a href=<span>\" javascript: history.back()\" >Go back</a></p>"
</span>; if (! empty ($_POST [ "name" ] ) and ! empty ($_POST [ "phone" ] ) and ! empty ($_POST [ "mail" ] ) and ! empty ($_POST [ "message" ] ) ) ( $name = trim (strip_tags ($_POST [ "name" ] ) ) ; $phone = trim (strip_tags ($_POST [ "phone" ] ) ) ; $mail = trim (strip_tags ($_POST [ "mail" ] ) ) ; $message = trim (strip_tags ($_POST [ "message" ] ) ) ; mail (, , "I wrote to you: " . $name ." <br />His number: " . $phone . " <br />His mail: " . $mail . <span>"<br />His message: "</span>. $message, ) ; echo <span>"Your message has been sent successfully! <Br>You will receive an answer shortly <Br>$back "</span>; exit ; ) else ( echo ; exit ; ) ?></body>
</html></p>
<p>You can skip the discussion of the HTML and CSS portions of this document. At its core, this is a regular website page that you can design according to your wishes and needs. Let's look at its most important part - the PHP script for processing the form:</p>
<p>$back = " <p><a href=<span>\" javascript: history.back()\" >Go back</a></p>"
</span>;
</p>
<p>With this line we create a link to return to the previous page. Since we don’t know in advance from which page the user will get to this one, this is done using a small JS function. In the future, we will simply access this variable to display it in the places we need.</p>
<p>if (! empty ($_POST [ "name" ] ) and ! empty ($_POST [ "phone" ] ) and ! empty ($_POST [ "mail" ] ) and ! empty ($_POST [ "message" ] ) ) ( <span>//internal part of the handler</span>) else ( echo <span>"To send a message, fill in all fields! $back "</span>; exit ; )</p>
<p>Here we add a form check to ensure that the fields are full. As you guessed, in the $_POST["name"] part, in quotes, we write the value of the name attribute of our inputs.</p>
<p>If all the fields are filled in, then the script will begin to process the data in its internal part, but if at least one field has not been filled in, then a message will be displayed on the user’s screen asking them to fill out all the fields of the form echo “To send a message, fill out all the fields! $back” and a link to return to the previous page that we created with the very first line.</p>
<p>Next we paste into the internal part of the form handler:</p>
<p>$name = trim(strip_tags($_POST["name"])); $phone = trim(strip_tags($_POST["phone"])); $mail = trim(strip_tags($_POST["mail"])); $message = trim(strip_tags($_POST["message"]));</p>
<p>Thus, we cleared the user-entered data from html tags and extra spaces. This allows us to protect ourselves from receiving malicious code in messages sent to us.</p>
<p>The checks can be made more complicated, but this is at your discretion. We have already installed minimal protection on the server side. We will do the rest on the client side using JS.</p>
<p>I don’t recommend completely abandoning form protection on the server side in favor of JS, since, although extremely rare, there are unique ones with JS disabled in the browser.</p>
<p>After cleaning the tags, add sending a message:</p>
<p>mail ( <span>"mail_to_receive_messages@gmail.com"</span>,
<span>"Letter from your_site_address"</span>, "Wrote to you: " . $name . " <br />His number: " . $phone . " <br />His mail: " . $mail . <span>"<br />His message: "</span>. $message <span>"Content-type:text/html;charset=windows-1251"</span>)
;
</p>
<p>It is this line that is responsible for generating and sending the message to us. It is filled out as follows:</p>
<ol><li>“mail_to_receive_messages@gmail.com” – here you insert your email between the quotes</li>
<li>“Letter from your_site_address” is the subject of the message that will be sent to your email. You can write anything here.</li>
<li>"Wrote to you: ".$name." <span><
br />
</span> His number: ".$phone." <span><
br />
</span> His email: ".$mail." <span><
br />
</span> His message: ".$message – we form the message text itself. $name – we insert the information filled in by the user by accessing the fields from the previous step, in quotes we describe what this field means, with the tag <span><
br />
</span> We break the line so that the message as a whole is readable.</li>
<li>Content-type:text/html;charset=windows-1251 - at the end there is an explicit indication of the data type transmitted in the message and its encoding.</li>
</ol><p><b>IMPORTANT!</b></p>
<p>The encoding specified in the “head” of the document ( <span><
meta http-
equiv=
"Content-Type"
content=
<span>"text/html; charset=windows-1251"</span> />
</span>), the encoding from the message Content-type:text/html;charset=windows-1251 and in general the encoding of the PHP file must match, otherwise in messages received by mail, “crazy words” will be displayed instead of Russian or English letters.</p>
<p><img src='https://i0.wp.com/vaden-pro.ru/sites/default/files/kodirovka-faila.png' width="100%" loading=lazy loading=lazy></p>
<p>Many people do not explicitly indicate the encoding of the message being sent, but on some email clients this may cause problems in the future (unreadable emails are sent to the mail), so I recommend specifying it anyway.</p>
<h3>Checking the form for adequacy of the entered data</h3>
<p>To ensure that users do not inadvertently miss fields and fill out everything correctly, it is worth checking the entered data.</p>
<p>This can be done both in PHP on the server side and in JS on the client side. I use the second option, because this way a person can immediately find out what he did wrong and correct the error without making additional page transitions.</p>
<p>We paste the script code in the same file where we have the HTML part of the form. For our case it will look like this:</p>
<p><
script>function checkForm(form) ( var name = form. name. value; var n = name. match(/ ^[ A- Za- zA- Jaa- z ] * [ A- Za- zA- Jaa- z ] + $/ ) ; if (! n) ( alert( <span>"The name entered is incorrect, please correct the error"</span>) ; return false ; ) var phone = form. phone. value; var p = phone. match(/ ^[ 0 - 9 + ] [ 0 - 9 - ] * [ 0 - 9 - ] + $/ ) ; if (! p) ( alert( <span>"Phone number entered incorrectly"</span>) ; return false ; ) var mail = form. mail. value; var m = mail . match(/ ^[ A- Za- z0- 9 ] [ A- Za- z0- 9 \. _- ] * [ A- Za- z0- 9 _] *@ ([ A- Za- z0- 9 ] + ([ A- Za- z0- 9 - ] * [ A- Za- z0- 9 ] + ) * \. ) + [ A- Za- z] + $/ ) ; if (! m) ( alert( <span>"The email entered is incorrect, please correct the error"</span>) ; return false ; ) return true ; )</script>
</p>
<p>Well, now the usual analysis:</p>
<p>For that, <b>so that when you click on the form submit button, we check it</b> We attach the launch of our script to the form tag:</p>
<p><
form method=
"post"
action=
"mail.php"
onSubmit=
"return checkForm(this)"
>
</p>
<p>Now let’s take the checklist point by point:</p>
<p><img src='https://i0.wp.com/vaden-pro.ru/sites/default/files/proverka-formi.png' width="100%" loading=lazy loading=lazy></p>
<br><img src='https://i2.wp.com/vaden-pro.ru/sites/default/files/soobchenie-o-oshibke.png' width="100%" loading=lazy loading=lazy><p>As you can see, such a mini check is written for each of our fields. I highlighted the check for one field in the screenshot with a red square; for other fields it has a similar structure, and if there is a need to add a field or remove it, you can now easily do this.</p>
<p>Hi guys. Seryoga is in touch. I know that I haven’t written for a long time - things to do, things to do... And now, to be honest, I don’t have any time at all. And we will make the form not according to my lesson, but according to the lessons of my friend - <a target="_blank" href="http://www.youtube.com/channel/UC7adbVu6XjmCnGyUml-O-xw?sub_confirmation=1">Krotova Romana</a>.</p>
<p><b>Create a feedback form for the site</b> we will be consistent. Therefore, this article will be divided into 3 lessons.</p>
<p>We will simply enter it into HTML and create a PHP handler for sending letters. Everything will be consistent, from scratch to result. So that you understand everything and can embed the necessary fields yourself.</p>
<p>Roma will show you how to do Ajax loading. That is, send data from the form without reloading the page. Which, you see, is very convenient and modern.</p>
<p>Well, in the third <b>(lesson is being prepared - there will be a link here later)</b>, we will build in a validation check. Not using the browser, but using special scripts.</p>
<h2>Video 1. Creating a feedback form for the site.</h2>
<p>Paying attention! For the form to work, it is necessary that your hosting supports PHP.</p>
<p><span class="X_kZCHrhXJI"></span></p>
<p>If you have any questions regarding unclear points in writing a form handler for sending letters, do not hesitate to ask them in the comments.</p>
<h3>Code from the lesson on creating a feedback form</h3>
<p><b>This is what we ended up with in the index.php file</b></p>
<p>Let me remind you what it contains <i>simple feedback form</i>. Without decoration or other bells and whistles. So as not to burden you with unnecessary information.</p><p>
<html>
<head>
<meta charset="utf-8"/>
</head>
<body>
<form action="/testform/submit.php" method="POST">
<input name="email" placeholder="Email">
<input name="name" placeholder="Name">
<input name="phone" placeholder="Telephone">
<textarea name="message" placeholder="Message">