Windows 10 notification center does not work. The easiest method
Today in more detail Let's look at how to turn off notifications in Windows 10. On the one hand, the emergence of the notification center, as smartphone users have known it for a long time, provides instant access to quick functions(removing the flash drive), allows you to react to changes in the system and respond to incoming messages, on the other hand, constantly pop-up notifications are quite distracting from work.
Action Center is a completely new element for Windows 10 user interface, not much different from the analogue that has long been used on mobile platforms. It displays alerts coming from the app store, user programs and system events. If necessary, you can easily turn off Windows 10 notifications regarding third party programs(including specific ones) or events occurring in the system. This is what this article is devoted to.
The classic method for changing settings in Windows 10 is the Settings menu.
- Call it using the keyboard shortcut Win+I.
- We activate the block called “System”.
- Go to the “Notifications and Actions” subsection.

It allows you to disable information about programs, the operating system, reminders about scheduled events and calls that the user does not need. In the Show notifications for these apps section, you can set the notification pop-ups to appear for any program. This is done by simply moving the switch to one of two positions.
By the way, to instantly turn off all information in Windows 10, you need to click on the notification center icon and stop at the option to enable Do Not Disturb mode. The option is also available through the center context menu; if notifications are turned off, you may miss something important, so you should use the function carefully.

Deactivating notifications through the registry editor
The user probably knows that everything Windows settings are stored in the registry, and they can be changed directly through its editor.
1. Call the registry editor using the query of the same name in search bar or by running the "regedit" command. It can also be done in the search bar.
2. Expand the HKCU branch.
3. Go to the path Software\Microsoft\Windows\CurrentVersion\PushNotifications.
4. Using context menu In the element-free part of the right frame, we call the command to create a 32-bit DWORD key.
5. Call it “ToastEnabled” and set the value to zero.

6. To apply the new settings, restart Windows 10 or Explorer (the explorer.exe process) through the device manager.
Deactivating the Notification Center
In addition to the methods described above for getting rid of annoying notifications, there is the possibility of permanently abandoning the notification center by removing its icon from the taskbar. This is done in two ways, so let’s look at both of them.
Via Registry Editor
- We launch the registry editor as before.
- Go to the HKCU section.
- Go to the “Software\Policies\Microsoft\Windows” directory.
- Go to the “Explorer” section or create it if you don’t have one.
- We add a parameter of type DWORD 32 with the value “1” and the name “DisableNotificationCenter”. After restarting the PC, the Notification Center will be permanently disabled. To enable it, you must delete the created parameter or change its value to “0”.
Through the Group Policy Editor
- Run the command “gpedit.msc” in the search line.
- Go to the “User Configuration” section.
- Go to “Admin. templates".
- In the “Start Menu and Taskbar” directory, find the option called “Remove notifications and the action center icon” and call it “Properties”.
- Select the “Enabled” value and save the changes.

After restarting the “explorer.exe” process, the Action Center icon will not appear in the taskbar.
This section contains a child section called Notifications, which allows you to deactivate a wide variety of alerts and set the duration of the Do Not Disturb mode, which is useful while working.
The improved Notification Center, or Action Center, is one of the best features in Windows 10. It ensures you never miss notifications from the system and applications, which in turn can be read later at your leisure. Unfortunately, some wrote that Action Center won't open in Windows 10. If you find yourself in this situation, then we'll look at a couple of ways to get the Action Center working.
1. Restart Windows Explorer
The first and obvious thing is when you encounter any problem in your system, reboot it. Rebooting the system can solve most problems. If you cannot reboot the system for any reason, you can restart the process conductor Windows. This approach opens any locked files and resolves the issue.
- Press a combination of buttons Ctrl+Shift+Esc or Ctrl+Shift+Delete to open task manager.
- Find the word Conductor (windows explorer), select it and click below Restart.
After the restart, the action center should work, if it doesn’t help, then move below and solve this problem.

2. Rename the UsrClass.dat file
Let's try to rename the file usrclass.dat. This is the file in which Windows stores all the data in a user's profile.
- Press a combination of buttons Win+R and enter %localappdata%\Microsoft\Windows

Need to find the file UsrClass.dat and rename it to UsrClass.dat.bak, add .bak at the end.
- The file is hidden by default, to do this, click View and check the box Hidden elements, to .
- Select a file UsrClass.dat, press F2 to rename and add .bak at the end.
- The system may prohibit you from renaming the file because it is currently in use. See the paragraph below on how to rename.

Since the file is used by the system and does not allow renaming, you need to log in under a different account and do the same steps. , if you haven't.
- When you are logged in under a different account, do not forget that the path to the file UsrClass.dat already different.
- Go to the path C:\Users\username\AppData\Local\Microsoft\Windows, where usernsme is your name Account, where the notification center does not open.
- Rename the file. If after all that has been done the notification center does not open, then consider another method below.

3. Re-register Notification Center using PowerShell
Let's re-register the notification center with using PowerShell, the latest and most reliable method.
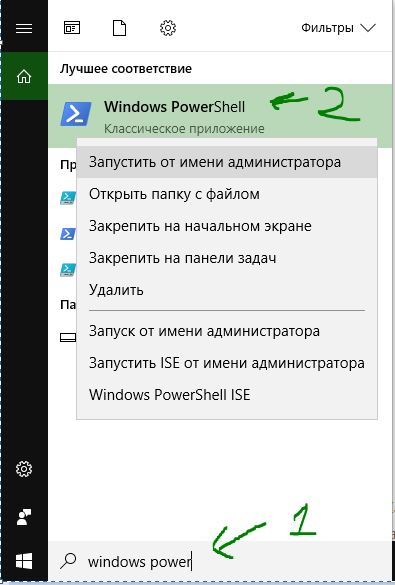
- Click Search in windows and enter PowerShell.
- In the best match, right-click on PowerShell And Run as administrator.
In the blue window that opens, enter the following command:
Get-AppxPackage | % ( Add-AppxPackage -DisableDevelopmentMode -Register "$($_.InstallLocation)\AppxManifest.xml" -verbose )
The process may take some time, after which restart your windows system and make sure that the action center is working.

In his new version operating system famous company Microsoft has presented users around the world with a very useful interface - Windows Action Center. Given system application is irreplaceable, as it provides the user with all the information he needs. Thanks to "TSU" you can always be aware of the latest updates, system messages, notes from various applications and the like.
The main, most common and annoying problem that has ever arisen with the notification center is the inability to launch or simply “open” this application. Thus, the user has no way of knowing operational information about the state of the operating system. In addition, this application collects important information about the security of the device. It is undesirable to skip them, so you always need to be able to correct problems with the “TsU”.
Method 1: Troubleshooting
There are many ways you can use to fix this problem. There are both universal ones and those that are suitable for solving specific problems. The first method that is worth trying as soon as the user notices the appearance of the above situation is full reboot systems personal computer. If this does not help, then you can resort to using other possible methods.

In order to implement this manipulation, you must strictly follow this algorithm:

Method 3. Re-registration of “TsU”
Note! In order to fix such a common problem, you can use the PowerShell application. Thanks to him, it is worth re-registering the program.
To do this correctly, you will need:

Easy setup of the “TsU” in “Windows 10”
Please note that in this version of the system there is no ability to change the parameters of the way reminders or notifications are displayed. However, any user will be able to independently partially configure notifications to suit their own requirements.
To do this, the user will need to run standard application"Options". To do this you should:

We open access to the “TsU”
So that the user can easily open the necessary program, developers from Microsoft worked on two possibilities at once.

How to disable "CU" in Windows 10
Some users are bothered by frequent notifications, no matter how important they are. In addition, by disabling this application, you can take the load off your PC. In order to produce complete shutdown notifications, you need to go to settings, as shown in the instructions above, and disable all options.
Also, by editing the registry, you can achieve better results. To do this, you need:
- Combine pressing two keys - “Win” and “R”. This will launch the "Run" program, in which you need to enter "regedit".

- In the window that opens, you should go to a section such as “HKEY_CURRENT_USER Software Microsoft Windows CurrentVersion PushNotifications".

- After completing these steps, you need to click right click controller over an empty area, and using the menu that appears, create “DWORD32”.

- The new section should be named “ToastEnabled” and press Enter.

- Right-click to set the value to zero. Then click “OK”.


- After completing all the steps correctly, restart the PC or Explorer.
“TsU” and “Start” do not work
There are situations when, in addition to the notification center itself, Start refuses to function. In order to restore functionality, you will need:

Clearing accumulated messages
Note! In order not to clutter up the workspace, as well as the “TsU” itself, it is necessary to clear all received messages from time to time.
To do this you need:

Stable operation of the Notification Center application allows you to always be up to date latest events and changes to your computer. Therefore, it is strongly recommended not to remove or disable this software.
Video - Action Center does not open in Windows 10
Good day, dear readers!
A year ago, Microsoft offered a free option Windows updates to the new version of the operating system - Windows 10. But the update did not go smoothly for everyone, in particular, many encountered the problem that the start menu and notification panel did not work (often, this is a critical error).
Sometimes this can also affect those who have not updated their operating system, but I bought it already pre-installed. And today, in this article, I will tell you about ways to fix this problem.
A total of 3 ways were found to resolve this problem.
They are somewhat complicated for a beginner, but if you follow the instructions provided, everything will turn out to be quite simple.
What to do if the startup does not work and the taskbar does not open in Windows 10
Method 1: Checking system files
Because this error often affects system files, they may become damaged, which is what causes our problem.
That is why, before looking for more complex ways to solve the problem, it is necessary to perform an integrity check system files built-in Windows utility.
The necessary utility can be launched either through the command line or using powershell.
We will use the second option, as it will be useful in subsequent methods.
Launch the Task Manager. To start you can use Ctrl + Shift + Esc or in the usual way - Ctrl + Alt + Del and choose Task Manager.
The task manager can be launched in expanded or collapsed form.
We need an expanded view, but if the dispatcher started in a minimized view, click on the “Details” button 
Select: File\Run new task

Let's launch Windows PowerShell- to do this, enter in the window powershell and be sure to check the box next to “Create a task with administrator rights.”

Click OK.
Enter the command to check and press Enter
Sfc /scannow
We are waiting for the verification to complete.

This method is the simplest of those proposed, but it also helps in rare cases, but nevertheless, it is worth trying it before moving on to more complex ones.
Method 2. Automatic reinstallation (re-registration) of applications for Windows
To fix a broken Start button, you can re-register applications. This operation takes place in automatic mode and takes a few minutes.
It is worth noting that this operation may delete your data in these apps, so you need to do this first backup copy your programs
Don’t worry about your data on the Internet—OneDrive—nothing will happen to it. Also, nothing will happen to applications that use the Internet as a place to save their data.
Important! Please note that some users experienced that some applications did not work for them after this operation. Please take this into account before using this method.
Let's start the process powershell with administrator rights, as we did in Method 1.
Copy the following text
Get-AppXPackage -AllUsers | Foreach (Add-AppxPackage -DisableDevelopmentMode -Register "$($_.InstallLocation)\AppXManifest.xml")
Paste the copied text into the window powershell pressing a key combination Ctrl+V and press Enter

Wait until the procedure is completed.
Method 3. Adding a new user to recover a damaged file
Another cause of the problem in question could be a damaged “Tile Data Layer” file.
To fix this problem, you need to create a new user, and then copy the file of interest to us and paste it into the current profile.
In principle, you don’t have to copy the file, but simply continue working in a new profile, but I will still consider a complete solution to the problem.
First of all, launch the command line.
1.To do this, use the Win+X key combination and select Command line(administrator).
You can also launch using the task manager, as we did in the previous methods, but instead of powershell you will need to write cmd and don't forget about the tick.

netuser tempadmin1 password /add
netuser tempadmin2 password /add
netuser localgroup administrators tempadmin2 /add
Why do you need two? The fact is that further actions will require exactly two working profiles.
Since in our case, the main profile does not work properly due to the start menu and notification panel, we create two new ones.
Thanks to this, we will be able to access the correct file.
3. So, let's continue - we have created two users, now we log out of the system - Ctrl + Alt + Del and select the “Log out” item.
4. Log in as tempadmin1 with the password password.
5. Then immediately exit.
Do not confuse this with changing users; we need to log out of the system.
6. After this, log in to the system under tempadmin2 with the password password.
7. Now click on the start button with the right button and go to “Explorer”.
8. On the “View” tab, check the box next to “Hidden elements”.

9. In the same window, go to the path C:\Users\TempAdmin1\AppData\Local\TileDataLayer
10. Right-click on the Database folder and select Copy.
11. Go to the following path C:\Users\!!Your username!!!\AppData\Local\TileDataLayer
12. Right-click on the Database folder and select rename. rename it, for example, to Database.old
13. Right-click on any empty space and select Insert
14. Reboot the computer and try to log into your normal profile, everything should work.
That's all.
I hope that these methods will help you resolve the error associated with the non-working Start button and notification panel.
I would like to note that most often it helps last method, but nevertheless, before that it’s worth trying the previous ones.
And if more than one method did not help, write a comment below. Or have you found another solution and want to help others?
Total best friends, see you again!
“Ten” constantly keeps the user informed about everything that is happening, displaying notifications about any actions or processes in the lower corner of the display.
Such messages pop up for a matter of seconds, however, in the future they do not disappear forever, but are sent for storage to a special section called the “Notification Center”. Therefore, you can read them again and without haste at any time - you just need to know how to activate this panel. Thus, the developers were able not only to amuse users with a high-quality and useful innovation, but also to get rid of the “figure of eight” problem, in which the user was not able to read the notification that came when he was not in front of the device monitor.
How do I open access to the Notification Center?
In general, there are several ways to get into the mentioned section. The simplest method is intended for PC owners. IN in this case you just need to click on the panel icon in the system tray. Of course, the creators did not ignore combination lovers, so the Win+A key combination was created especially for them, thanks to which the “Notification Center” will appear on the monitor of your device.
As for tablets and similar gadgets, the panel is activated by moving your finger from the right side of the display.
Setting up quick actions
If you understand in more detail the essence of the functioning of the notification system, it will become clear that in addition to the notifications themselves, this panel is also intended for a kind of “ quick action" These actions play a very significant role in the “ten”. The list of actions is located at the bottom of the Notification Center window. In the list of “tiles” you can see options such as “Tablet Mode”, “Note”, “All Settings”, etc.
To select an action, go to the “Settings” section, then select the “System” subsection and the “Notifications and actions” item. On the right side of the dialog box you can select necessary action. At the top, 4 main action tiles will be displayed, which you can replace with more necessary ones.
 To do this, click on the link “Select the icons displayed in the taskbar.” A list of actions that you can enable or disable for display in the Notification Center will appear on the screen.
You can also turn Notifications & Actions on or off in your settings. system icons– this option was available in previous versions.
How to set up notifications?
In the Notifications and Actions settings window, you will also see a Notifications section, which you can use to make adjustments. For example, you can disable application messages or not display tips regarding handling services and processes in the “top ten”.
In the same window you can see the “Show notifications for these applications” subsection. Actually, the purpose of this functionality is probably clear without explanation. A list of applications will be displayed on the screen. Opposite them there will be switch indicators with which you can configure the display of notifications for specific programs.
As for notifications, the system informs the user about various events that occur on the device.
In particular, notifications on PCs are divided into 4 groups: security and maintenance, settings, applications and other events.
Viewing system messages is very simple - you just need to click on the alert. In some cases, the notification may contain a lot of text and to display all the information, you must click on the arrow located on the right side of the selected message.
 To remove an alert, click on the “cross” that is usually displayed above the mentioned arrow. It is worth noting that only unread notifications are eliminated in this way, since those messages that you opened are deleted by the system automatically. You can also delete a message using Delete keys, which must be pressed after the cursor highlights the notification.
Deactivating the display of alerts
As you know, there is a type of user who is not particularly concerned with “filling up” the PC and does not bother installing various applications. In this case, even such a useful “Notification Center” will not cause delight, but on the contrary, constant messages will only begin to irritate. Fortunately, the system has necessary functions to disable the CPU, so you don't need to download special utilities. So, to activate the mute option, the user needs to click on the “Do Not Disturb” tile.
 This mode can be found in the list of actions in the Notification Center. After you click on this option, the system will stop displaying notifications on the screen, but collection will continue as normal. As soon as the user wants to look at the accumulated alerts, he can open the control center and read the most important or interesting ones.
Disabling the Notification Center icon
If the control center is not at all serious for you and the right tool, it is possible to completely remove the icon from the taskbar. To do this, in the “Notifications and Actions” tab (“Settings” - “System”), click on the link called “Turn system icons on and off.” A new dialog box will display a list of programs whose icons can be disabled using the switch indicator. This list also includes “Notification Center”. As soon as you complete the procedure, close the window and the control center icon will no longer appear on the taskbar of your device.
 Well, as you already understand, the “Notification Center” is a very useful thing, thanks to which the user can always be aware of the events that occur during system operation.
If you still have questions on the topic “How to open the Notification Center?” Setting up notifications in Windows 10", then you can ask them in the comments
if(function_exists("the_ratings")) ( the_ratings(); ) ?>