Treatment of bad sectors of hdd. Programs for checking your hard drive for bad blocks (bad sectors)
Restoring bad sectors will help extend the life of your hard drive and even recover some previously lost files. However, you should remember that this is a responsible and rather risky business, since by pressing the wrong buttons you can ruin your HDD at all. Follow the instructions provided in this article strictly and you will be able to recover some bad sectors. Before starting work, select the software with which you will restore sectors. There are many for you to choose from convenient programs: Victoria, HDAT2, HDDregenerator.
How to recover bad sectors of a hard drive using HDAT2
Working with this utility requires the presence of a boot disk or bootable flash drive. You will learn how to write them down in another article. Must be installed on your computer Daemon program Tools or Ultra ISO.
- Download the HDAT2 program from the official website https://hdat2.com.
- You need the “CD/DVD Boot ISO” partition.
- Download the latest version that comes with ISO format, not SFX.
- Find your file in your downloads folder and open it with using Daemon Tools, or other software for mounting images.

- Take a blank disk and click on the “Burn image to disk” field.


Please note that all your further work with this utility will take place entirely in the BIOS. Read carefully the fields you click on.
- To begin, turn off your computer and enter the BIOS. Each brand of computer has its own login buttons. Try holding F12 or F7, or better yet, read about it on the Internet.
- After entering the BIOS, select the system boot method - CD/DVD, and then enter the HDAT2 command, as in the screenshot below.


- After this, a menu will appear in front of you with hard drives that are connected to your computer. If he is alone, then you should not have any problems with the choice. Click on your hard drive and press Enter.
- In the window that appears, select the line “Hidden areas menu”.


- Now test your computer for bad sectors. Even if you know their exact number, you will still have to run the test, since the program needs it to further fix the problem. Click “Powerful test READ/WRITE/READ/COMPARE”

- That's all. Click on the very first line, as shown in the screenshot, to repair your sectors. Please note that this will take quite a long time, so you can move the laptop aside and go about your business. As soon as the program finishes working with Bad sectors, do not forget to return the system boot not from the CD, but from the hard drive.


How to recover bad sectors of a hard drive using HDD Regenerator
When starting to work with this utility, you can read a lengthy article about its work in order to roughly understand the structure of the program: . The advantage of the utility is that you do not have to create bootable USB flash drive or disk and log in from the BIOS. Experienced users note that this program actually corrects the problem by degaussing, rather than simply disabling bad sectors.
Download the program on the Internet, keep in mind that only its first use is free. If you want to heal bad sectors again, you will have to buy the software.
Installing the program takes just seconds.

Look carefully at the window interface:
- Left button “Bootable” USB Flash” will help you create a bootable USB flash drive for working with the program in the BIOS.
- The right “Bootable CD/DVD” creates a boot disk for the same purposes.
- The most top line allows you to work from under the Windows axis, which saves a lot of time.
Click on the top line.

Select your hard drive. The model, amount of memory and all sectors will be written on it. Just double click on it.

Please note that all windows must be closed and all processes stopped. Only then can you start working with sectors - the hard drive should be unloaded as much as possible.
Select the second item in the menu that appears – “Normal Scan (with/without repair)”. This option repairs bad sectors while scanning all sectors of the hard drive. Please note that the mouse does not work in this program. You need to enter the number 2 and then press Enter.


Now you need the “Scan and repair” item to confirm your intention to fix all sectors. Enter number 1.
You can also enter the number 3 to activate the “Regenerate all sectors” item. This option carries out preventive maintenance on absolutely all sectors, even if they are not damaged. This is more suitable for experienced users who can handle it on their own. possible problems during the regeneration process.


Now you have to select the start of the scan:
- Point number 1 “Start sector 0” starts scanning and treatment from the very beginning.
- The second option “Start sector ***” continues the previous scan if it was interrupted for one reason or another.
- And the third item “Set start /end sectors manually” allows you to enter the range of sectors to check manually.
It's better to start from the very beginning by choosing the first option.


The process will start instantly, all you have to do is wait.


If the computer suddenly starts to freeze, or when loading it, a check for errors on the hard drive (HDD) periodically starts, or data is no longer copied normally from the HDD - all this may indicate that there is a problem on the disk. bad sectors that need to be eliminated.
Around HDD magnetic This method creates special, logically marked areas, or rings, called tracks, divided into clusters and sectors. Information on the disk is written to sectors of 512 or 4096 bytes, but is actually stored in clusters ranging in size from 1 to 128 sectors.

A broken (damaged, faulty, bad) sector on a HDD is a place that has lost its writing or reading potential, and the operating system (OS) cannot find data in it or write information to it.
Bad sectors occur either due to physical damage disk surface, or due to software errors and are corrected using system utilities, in particular, "Chkdsk".
These utilities recover logical sectors by matching them to an index in the MFT (master file table) file, and mark physical sectors so that they are not used by the system.
Before using the chkdsk utility, you must close all running programs, because The utility will not be able to recover damaged sectors when they are used by the system.
Step 1. To do this, you need to press “Win” on the keyboard, and hold it down, “R” (Win is located between Ctrl and Alt on the left), and in the “Run” window that starts, type “taskmgr” and click “OK”.

Step 2. In the opened “Dispatcher” Windows tasks» Go to the “Applications” tab and close all applications running in the operating system one by one, selecting them with the mouse button and clicking “End task”.


Step 4. In the window that appears, click on the “Service” tab and in the “Error-Checking” segment, click the “Check Now” button.

Step 5. The Check Disk dialog box will appear on the screen. If you need to check and fix only bad sectors, disable the “Automatically fix file system errors” checkbox (top item).

Step 6. Click the “Start” button to begin the process of checking and fixing bad sectors.

Step 7 If the HDD being checked is boot disk for the OS, “Chkdsk” will offer to perform the selected procedures the next time it starts. Click “Yes” as the answer.

The next time the system boots, a blue window with a countdown (timer) will appear. There is no need to press any buttons during this time. As soon as the countdown reaches zero, the disk check will begin. After it is completed, the computer will reboot on its own.
When "chkdsk" completes the task of repairing bad sectors of the hard drive, it will generate a report about it. A code of "0" means that no errors were found during the disk scan, and a code of "1" means that errors were found and corrected.

Important! If the disk check process fails, there is a problem with the disk and it is important to back up your data to protect your data. In Windows XP and Windows 7, there is a built-in program for these purposes. operating system a utility called NTBackup.
Fixing bad sectors in Windows 8 and Windows 10
Step 1. Open File Explorer Windows combination Win+E, right-click on the icon of the required HDD, and click “Properties”.

Step 2. Go to the "Tools" tab and click "Verify" (you may need to enter administrator account information at this step).

Step 3. The error checking scanner will tell you whether the hard drive has bad sectors or not. If no errors are found, the application will still allow you to run a search for errors on the disk. Click “Scan drive”.
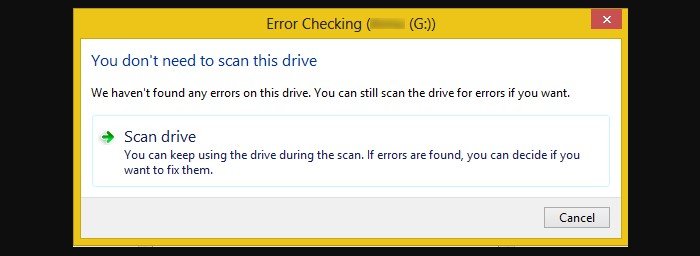
Step 4. You will be able to use the disk during the test. If errors are found, they can be corrected. At the end of the disk scan, the system will issue a report on the results. Click "Close".

Reference! Despite the fact that Windows 8 and 10 allow you to use OS applications while the utility is running, this is not recommended to avoid interrupting the scanning process.
If the HDD has physical wear on its sections, there are “unstable” sectors, etc., the OS may “freeze” when the above-mentioned utilities are running. Forcibly interrupting their work can damage OS system files.
Important! Damage system files OS requires latest download successful configuration OS (using the F8 button) or Windows recovery from the installation disk.
Despite the fact that physical bad sectors are not, except for marking with chkdsk, it is possible to reassign them (in English remap) or cut them off.
Determining the location and volume of bad sectors using the Victoria program.
Step 1. Install and run the Victoria program under account administrator. Select the Standard tab in the window. If there are several HDDs in the system, select the required one with the mouse on the right side of the window.

Step 2. To determine the location of bad sectors on the HDD, go to the “Tests” tab and click “Start”.

The example shows that from block No.771093375 there are:
- “candidates” with a read delay of 600 ms, there are 190 of them in the example;
- There are 8 bad sectors (Err) in the example. Just below the counter shows the figure 376507 MB (376 GB).
You can also see that from the 376 GB point you can cut off everything HDD space to its end, cutting off the bad sectors grouped here in one place.

Reference! In the presented example, the start of hard disk scanning (Start LBA) is set manually from block No.750000000. When conducting a test scan of “your” HDD, this value does not need to be set.
The HDD shown in the example has an exact capacity of 465 GB, and the calculation of the cut volume will look like this: 465-376=89 GB. In this case, it is better to cut off the disk volume with a margin - for example, 100 GB, for the possible appearance of additional bad sectors in this area.
Trimming HDD using AOMEI Partition Assistant
To increase the speed of trimming bad sectors on the HDD to “acceptable”, it is desirable that it does not contain partitions at this time. Important data from the disk must be copied, if possible, before starting the procedure.
Step 1. Install and run the program. In the main window, select required HDD and click “Delete partition”.

Step 2. Select the “Quickly delete partition” option and click “OK”.

Step 3. Click "Apply".

Step 4. In the next window, click “Go” (you may need to restart the OS). The partition removal process will begin.

Step 5. An unallocated area (Unallocated) will appear in place of the disk. Select it and click “Create partition”.

Step 6. In the window that appears, click the “Advanced” button.

Step 7 In "How to create" select "Primary partition". When creating a disk, move the slider with the mouse by a certain amount, leaving an undistributed area where the bad sectors will be located.

Click OK.

Reference! The program has right and left sliders (delimiters). The delimiter that is required in the specific case of trimming the hard drive is used. In the example presented, the right slider is shifted to the left by 100 GB.
Step 8 Click "Apply".

Step 9 Click "Go".

Step 10 Click "Yes".

The process of creating a partition on the HDD will begin.

As a result, a partition will be created on the HDD, at the end of which there is unallocated space (Unallocated Area) with bad sectors.
![]()
Using the Remap function in Victoria
If the bad sectors marked in the program are not grouped nearby, but are distributed throughout the HDD, the remap function present in Victoria can help.
The remap function repeatedly writes to the problem sector, and if these attempts are unsuccessful, the sector is replaced by assigning its address to a healthy sector taken from a special place on the HDD.

Reference! In this technical situation, it is necessary to create bootable usb drive(flash drive) containing the Victoria program, and after booting from a USB drive via DOS, it will get rid of bad sectors on the HDD.
In the video below you can see how these steps can be implemented in practice.
Video - Trimming a hard drive from bad sectors REMAP, Treating BAD sectors of HDD
Checking the HDD for bad sectors
After treating bad sectors, you can find out whether there are still . To do this, you need to manually run the “Chkdsk” check.
Press “Win+R” on the keyboard, and in the “Run” window that opens, type: chkdskH:/F/R, and “OK”.

Reference! Instead of “H” you need to type the letter of the person being checked hard section disk. The /F flag starts fixing file system errors, and the /R flag starts searching for bad sectors.
If no bad sectors are detected, at the end of the work “chkdsk” will display in a special window information about 0 KB located in bad sectors.

Physical damage to the HDD is often caused by defects in its manufacturing, overheating, scratches due to impacts, dust, etc. Software (logical) bad sectors are caused by a conflict software, viruses, sudden termination of a program or OS, including due to power problems.
Eliminating situations that could cause damage to HDD sectors will allow you to maintain the integrity of important data and avoid purchasing a new HDD if its physical resource is exhausted.
Video - How to remove bad sectors on a hard drive
Over time, bad sectors appear on any HDD that are unreadable. When the number of bad blocks exceeds all acceptable standards, the hard drive refuses to work. However, under certain conditions, the hard drive can be cured using special software.
What are bad blocks?
HDD (hard disk) consists of several magnetic disks, above which there is a head that writes and reads information. The surface of the drive is divided into tracks and sectors (the smallest division unit). If information is not read from a certain sector, then it is: bad, faulty, broken or simply a bad block.
Restoring bad sectors is not an easy task, but it can be done. If there are few bad blocks on the HDD, you can cure the disk, while simultaneously extending its service life.
The very presence bad sectors is a bad sign, so even after repair you cannot use the HDD for a long time - it can fail at any time.
Working with VictoriaHDD
VictoriaHDD is one of the most famous programs for hard drive treatment. It spreads across free license and allows you to fix bad blocks in DOS mode. However, working with it requires some preparation.
Creating a bootable USB flash drive and setting up the BIOS
Download the ISO image of the VictoriaHDD utility and write it to a flash drive using WinSetupFromUSB.
- Open WinSetupFromUSB and select the connected flash drive.
- Check "Auto format", select "FAT32".

- Specify the LinuxISO/otherGrub system and click the button on the right. Through Explorer, show the path to the downloaded file ISO image, click “Go” to start recording.

- After creation bootable media Victoria needs to restart the computer and open the BIOS. In the “Main” section there is an item “SATA Mode” - you need to set it to “IDE”, because in the “AHCI Mode” Victoria does not recognize the connected drive. Press F10 to exit the BIOS and save the changes.
After completing all the preparations, restart your computer again. When starting, start pressing F11 so that the boot menu appears. Select the bootable Victoria flash drive to run the program in DOS mode.
Recovery and follow-up
To restore, do the following::
- Once launched, press "P" ( English layout) to bring up the “Select Port” menu. If the hard drive is connected via SATA interface, select the option “Ext. PCI ATA/SATA". For hard drives connected via IDE, you need to select the appropriate port.

- A list of channels will appear, each of which has a number. Look at the number for your drive and enter it in the field below.

- Press F9 to open the SMART table. Study two items: “Reallocated sector count” and “ Current pending sectors". The first line indicates the sectors transferred to the reserve zone; in the second - places from which information cannot be read (bad blocks). If there are only a few bad sectors, try restoring them.
- Press F4 and launch “BB: Erase 256 sect” mode. If during the analysis the program finds a bad block, it will try to fix it. If the sector is not physically damaged, then Victoria will heal it. Information from this place will be erased (therefore it is advisable to transfer everything necessary files in advance to another medium), but there will be fewer bad blocks.

- If the sectors cannot be restored, move them to the backup area. Press F4 again and launch “BB: Classic REMAP” mode. Look at the SMART table after the scan is completed - the number of bad blocks should decrease.

After work Victoria HDD It is advisable to check the disk:

These measures will help you eliminate problems on the disk, which will ultimately lead to an increase in the operating time of the hard drive.
Using HDD Regenerator
If Victoria seems complicated, try restoring the disk and fixing the so-called bad blocks using the program HDD Regenerator. The peculiarity of this utility is that it has access to the software and hardware of the HDD. HDD Regenerator actually tries to cure bad sectors, while most programs deny access to bad blocks, as a result of which the hard drive capacity is reduced.

To fix this problem, launch Task Manager (Ctrl+Shift+Esc) and close all applications. Go to the Processes tab and end all processes running by the user. Click "Retry" to have the program try to access the disk partitions.
If the warning window appears again, restart your computer and start the system in safe mode. You can ignore the warning by clicking “Cancel” rather than “Retry”, but then HDD Regenerator will work with some restrictions. 
A window will open resembling command line. In it you will see 4 options for the program:
- Checking and restoring bad blocks.
- Check without recovery, display information about bad blocks.
- Regeneration of bad sectors at a specific location.
- Output of statistics.
First select operating mode No. 2. The hard drive will be checked for bad data. The following screen will appear, asking you to specify the interval in which to search for bads. It's better to start testing from the beginning, so leave the value at "0". 
After starting the disk scan, a progress bar will appear. It will be a long wait; sometimes the system will freeze - this indicates that the program has detected bad sectors and is now determining the extent of their damage. 
Once the HDD surface analysis is complete, a report will appear. Study the items “bad sectors founded” and “bad sectors recovered”. These lines indicate the number of bads found and restored. If the line “bad sectors founded” contains many bad sectors, then it is unlikely that you will be able to fix the bad sectors, but you can try.
Recovering bad blocks in HDD Regenerator
Connect the USB flash drive and run the HDD Regenerator program. Select the “Boot-booting flash drive” mode. Select the connected drive and click OK. All information will be erased from the flash drive. Instead, files will be written that allow you to start DOS mode. Further:
- Restart your computer.
- When the system starts, start pressing the F11 key until the drive selection window appears.
- Select removable drive, on which they are recorded HDD files Regenerator.
The program will run in DOS - this mode is better suited for treating bad sectors. A window will appear that you have already seen when working in Windows. Select checking and restoring bad blocks (operation mode No. 1).
Copyright infringement Spam Incorrect content Broken links
All modern houses have desktop computer or laptop. Some people need it for games, others for work or study. In any case, photographs, some important records, contact information of people, required addresses etc. And the place where all this information is stored is a hard drive.
Not without reason, experienced programmers say that in a situation where the computer has hard error disk, formatting it is a real disaster. After all, formatting is fraught with the loss of all information. But this is the case if appropriate measures are not taken. But if you notice some errors and malfunctions in the disk in time and correct them, then you can avoid this global catastrophe
The main causes of HDD problems are “broken” sectors - segments disk space that are damaged in some way.
They are divided into physical and logical. The latter appear due to software errors and can be corrected, while physical ones cannot be corrected. In the latter case, you will have to replace the hard drive.
Such damaged areas can appear on both magnetic and standard SSD drives.
Causes of bad sectors and errors
Hard drive failures depend on the type of damaged areas:
- brain teaser“broken” - displayed when there is malware or viruses, as well as when sudden shutdown power supply or power cable during recording;
- physical“broken” - found on a completely new product. Then you need to contact the manufacturer with a request to replace the product.
IN magnetic storage devices“broken” sectors can appear as a result of wear of the moving parts of the device, when foreign bodies get into the disk mechanism, or from a simple fall to the floor. In the latter case, the magnetic head of the disk is scratched, which leads to errors.
SSD drives give errors because they have tried to write any information to them many times.
Checking the hard drive for bad sectors is quite possible. Windows has an application called "chkdsk" (check disks). You need to open the folder on your desktop or in the Start menu "My computer" by clicking on the drive to be scanned. By using context menu select “Properties” - “Tools”. Under the phrase “Check” there will be a button, by clicking on which you will be able to see the number of “broken” sectors.
During the test, the computer will eliminate errors in logical “broken” sectors, as well as mark areas with physical damage.
Attention! You can run the scan system manually, but if Windows independently detects “bad” sectors, the utility will launch itself when the system starts.
Checking utilities
Some software does not have built-in verification. For such cases there are special programs, helping to identify “broken” sectors and errors and, if possible, correct them.
"Victoria"
It is a popular software for searching damaged areas. Besides in various ways analysis and reassignment of problem areas, has a function for searching for damaged contacts in a cable, as well as a function for assessing the performance of the hard drive. The only “disadvantage” of the program is the lack of official assemblies. Therefore, experts recommend using it separately from the OS.
"HDD Regenerator"
This utility uses its own methods to restore “bad” sectors (a combination of high and low signals) and supports any drive connection interfaces.
The downside is the high cost of the license ($90).
One of the best and multifunctional utilities for checking a device for damaged areas. Has the following functionality:
- restores and reconfigures sectors;
- fixes partition tables;
- restores files and creates backup copies;
- selects files in the table;
- copies data from remote partitions;
- creates backup copies of data.
This utility uses several methods to identify problems, as well as the ability to track SMART attributes and cleaning hard disk.
Important! The program supports everything Windows versions, however, it does not scan/test the drive where the OS is installed.
With it you can scan one or several hard drives at the same time.
"Seagate Seatools" for Windows
The application supports all modern Windows systems. It can be used to do both basic and advanced testing. Simpler than "Seagate Seatools" for DOS, but less powerful.
Modern digital media, including a hard drive, can be perceived as a huge array of sectors - tiny memory cells designed to store digital information. Because of long term disk service or violation of operating conditions (after shock or shaking, overheating or hypothermia, if) some of the sectors may become unreadable. Sometimes there is no reason at all for bad sectors to appear: the disk is relatively new and has been used without any violations. In such cases, it can be attributed to marriage. Both individual bad sectors and entire areas of disk space can become unreadable.
What are bad sectors or bad blocks?
Bad sectors of a hard drive are sectors that, when you try to read them, various reasons Errors occur, for example, due to a malfunction of the magnetic head unit, errors during recording (inconsistency of data and CRC checksum), microdamage to the surface, damage to the internal firmware of the hard drive (P and G sheets, defect sheets) and others. When appearing on hard disk bad blocks - the disk slows down or does not even open.
Access to data on such a disk is possible when connected to a specialized hardware and software complex (DATARC uses PC-3000 Data Extractor Express complexes). This toolkit allows you to carefully (to prevent the appearance of new bad blocks) read undamaged areas, and then repeatedly read problem areas. In some cases, it is necessary to re-create disk defect sheets or even replace the magnetic head unit.


How bad blocks appear
Possible symptoms:
- any files or folders are no longer readable;
- some data is not displayed;
- – does not open, requires formatting;
- The disk slows down, freezes, takes a long time to be detected in the BIOS, or does not work at all.
As a rule, the user notices alarming symptoms when there are already a lot of bad blocks on the disk. It is possible to identify a problem at an early stage only with the help of diagnostic programs, for example, Victoria but the average user does not use them.
The condition of a disk with bad sectors worsens if you continue to work with it using standard software. The number of bad blocks will increase, and repeated unsuccessful read attempts made by such a disk, as a rule, lead to failure of the magnetic head unit.


To work with “poor” disks, which are considered physically faulty devices, our specialists use the latest hardware and software systems PC-3000Express+DataExtractor.
With their help, you can gain access to the contents of the disk, which cannot be worked with using standard software. Special means allow you to subtract the contents of the entire disk space undamaged by bad sectors, and then begin to improve the quality of recovery. To do this, in a special mode, multiple attempts are made to read data from bad blocks, most of them are successful.
Thus, the data on the disk is unreadable bad sectors can be restored either completely or with minimal losses.
What is the difficulty of working with bad blocks?
When performing such work, the most valuable resource is the time for which the channel of expensive equipment will be occupied. Unreadable sectors on a disk are one of the problems that require a lot of time to obtain a high-quality result.
We guarantee the shortest possible time frame for completing work, based on high level professionalism of our specialists. This is achieved by choosing the optimal data recovery methods and modes for each specific case. Continuous investments in the purchase of new equipment and increase bandwidth laboratories.
Combined problems
The most common accompanying diagnosis for disks with unreadable sectors is destruction of logical structure. Partitions that do not open, missing folders or files (the main symptoms of the problem) are a consequence of the fact that, partially falling into bad sectors, file system damaged. In such cases, with the sector-by-sector image obtained using hardware and software complex, there is still work to be done, as with a disk with logical destruction. That is, specialists carry out further restoration using special programs.
Logical destruction of the file system caused by unreadable sectors or bad blocks should in no case be corrected by procedures like CheckDisk or fsck. They will only worsen the situation and complicate the further work of professionals
Specialists in recovering hard drives with unreadable sectors
How we are working

Delivery
free courier

Diagnostics
fast and free

recovery
on professional equipment

examination
quality and completeness of restoration

only if successful
How much does it cost to restore a hard drive?
| Description of the problem | Price |
| Copying data from working media (without data recovery work) | 2000 rub. |
| Creating a sector-by-sector copy of working media | 2000 rub. |
| "Logics" (removal, formatting, partition magic/acronis/ghost errors, reinstalling windows, files/folders are missing, viruses, asks to format, partition is missing, file RAW system and so on. ) | from 3,000 rub. |
| Unreadable sectors | from 6,000 rub. |
| Controller malfunction | from 3,000 rub. |
| Malfunction of the magnetic head unit | from 12,000 rub. |
| Sticking magnetic heads | from 6,000 rub. |
| Spindle wedge | from 15,000 rub. |
| Firmware problems (service information) | from 3,000 rub. |
| Damage to pancakes (scratches/cuts) | from 40,000 rub. |
Recovery bad sectors HDD is a task for specialists. First, the disk is tested for system errors. Depending on the reasons for their occurrence, recovery of hard disk sectors can be carried out in two directions - in the event that it is impossible to read the data due to a discrepancy between the information in it and the amount at the end of the sector, and in the event of physical damage to the sectors.

In the first case, you need to write down new checksums. In the second case, you will need to enter a new physical address in the reserve area, the logical address will remain the same. This option for restoring bad HDD sectors leads to a decrease in file reading speed, which is associated with the movement of magnetic heads to the reserve area. This fix is recommended if there are a small number of bad sectors that need to be redirected.
Recovery damaged HDD- this is often a long and painstaking work that can bring back to life seemingly forever lost data.
In order to save time and obtain positive result, HDD recovery It is recommended to perform hard drive sectors only if you have special knowledge, skills and sufficient software and hardware tools.
FAQ – popular questions about bad sectors
Still have questions?
Leave your phone number and the manager will call you back