How to find a webcam in a laptop. Instructions for enabling and disabling the webcam on Asus, Acer, HP, Lenovo, DNS, Sony Vaio, Samsung, MSI laptops and personal computers
When buying a new laptop, we simply do not pay attention to some details. Which? For example, we know very well that every modern laptop is equipped with a camera - even the cheapest one. It is clear that more expensive devices use a better camera. But the first laptop models didn’t have any cameras; back then they didn’t even know that in the near future everything would change so much...
The webcam is most often used when communicating. For example, many users use it when communicating via video or any other similar program. At the same time, with the help of the camera you can take pictures or even shoot video - it all depends on your desire. And considering that social networks, in particular, are enjoying enormous success, the presence of this device is simply necessary...
Very often, users complain that the webcam does not work. Or rather, it just works, but for some reason it doesn’t want to turn on. And indeed, very often the initial configuration of the laptop does not contain any program for the operation of that same camera, which is why it does not start. Today I will talk about how to enable it.
I want to say in advance that the instructions apply to any of the modern laptops, including companies such as: Asus, Lenovo, Acer, Sony, HP, MSI, Samsung, Dell, Packrad Bell, etc.
Software
You can check the operation of the camera quite simply - to do this, launch any client that supports its operation. The most famous client is the same Skype. Launch the program, click on the test image and if it appears, then the camera is functioning, it just turns on exactly at the moment when it is needed.
If you want to use a webcam to record videos or take photos, I recommend that you use special programs that allow you to do this. As a rule, they are produced by third-party manufacturers and are often distributed free of charge. For example, LiveWebCam or WebCam Companion.
Additional keys
Very often the camera can actually be turned off and it turns on with the help of additional manipulations. So, on some few older models a separate button is used for this.

The solution, I must say, is ingenious and extremely convenient. However, for some reason it did not catch on (most likely due to savings) and the manufacturers decided to go a different route. As you know, laptops have a special Fn key that is used to perform additional operations. For example, you can use it to change the sound level of your device, its brightness, go into sleep mode, etc. So, very often it is with the Fn button that the webcam is turned on and off.
Look at your keyboard. At the top of it you can see the keys F1, F2, F3, etc. Immediately below them are blue icons that indicate additional options. Find the camera icon among them (I have it on the F5 key), then press the Fn button and, while holding it, press F5. This will turn on the camera. You can disable it in exactly the same way.

Using the task manager
If nothing works out, let's try a different route. You need to open Device Manager. This can be done, for example, in this simple way: move the mouse cursor over the “Computer” icon on your desktop and click on the right button, thereby bringing up the menu. In it, select “Properties”. Then you will see a window with basic information about your computer. On the right side there is a menu with a “Device Manager” item. That's exactly what we need.

Once you open the task manager, you will see a list of devices. Find “Image processing device” in it, left-click on this item - this way you will see the installed camera.

Then hover over the device itself, click on the right button and go to “Properties”. If the camera is disabled, then turn it on. Alternatively, you can try reinstalling the drivers for the device, which can be downloaded from the laptop manufacturer's website. In some cases, it is advised to remove the camera from the task manager and then try to find it again. They say that sometimes it helps, but I haven’t tried this method myself.
Well, in conclusion, I will say that many users confuse the concepts of working and disabled. Most often, it actually works, it’s just in a non-working state, since it’s not required. It turns on on demand or when you turn on the same client for video communication.
If you need to turn on the camera on a laptop, you can do it as follows:
If you have Windows 8 or 10, then everything is very simple. You need to use the standard search and open Camera app. Press the WIN+Q key combination and enter the query Camera in the search bar.
Now run the found program.

The webcam runs full screen and there are only two buttons on the right: one for recording video, and the second for taking photographs. On the left there is a button to view photos. This is how easy it is to launch the camera on Windows 8 or 10.

Also, all pictures taken will be stored in the following path: You need to open the Computer section, then the Images folder - Camera Roll.

How to enable the WebCam on a laptop in Windows XP
If you have Windows XP, then everything is even simpler here: Open the Computer section and at the very bottom find USB video device and double click the mouse.

Well, now, let's talk about Windows 7, since most users have this version installed.

How to enable the camera on a laptop in Windows 7
If you have Windows 7, then it’s a little more complicated, since in this version of Windows it is impossible to turn on the camera on a laptop using standard system tools. But don’t be upset, because this can be quickly fixed. I recommend downloading a simple program called MyCam, which will allow you to turn on the webcam on your laptop and take photos and shoot videos.

The program does not require installation, you just need to unpack the archive with the program and run the main MyCam file.


The functionality of the program is simple: at the top there are buttons for photographing and video shooting.

And everything we filmed is displayed below. Double-clicking on any photo opens a folder with other files (videos and photos).


Now let's talk about possible problems.
What if the Webcam doesn't work? Black screen!
If you already tried to enable the webcam on a laptop in Windows 7, 8 or 10 using the methods described above, but did not see anything other than a black screen, then you need to check the following:
The first step is to go to Properties of the Computer section and open device Manager.


There we find the section Imaging devices, and inside Webku. You need to right-click on it and select Enable.

If the webcam is not displayed there, then perhaps the driver is simply not installed on it. Please note if there are any devices with an unknown or exclamation mark?
Satellite communications and the World Wide Web have opened up great opportunities for people to communicate living at different distances, in different parts of the planet. The online mode allows you not only to hear, but also to see your interlocutor thanks to the web camera. Despite universal computer literacy, not all users know how to enable the built-in camera on a laptop. Now we will tell you how and in what sequence you can do this.
The process of turning on the built-in camera on a laptop
Many models have built-in web cameras, so before you start turning on the video device, you need to make sure it is available. If your laptop does not have it, then you can connect the camera using the USB connector. You can turn it on for a video call by pressing the “video call” button in Skype. There are also online services that provide services for broadcasting images from a video device.
The peculiarity of the camera is that it does not manifest itself in any way until it is “awakened” by a program designed for collaboration.


Important! If the manager list does not contain a webcam icon, you will have to reinstall the drivers or try to configure the device.

These simple steps, coupled with a visual video, will allow you to make the settings yourself. If problems arise, then you should ask for help from specialists.
How to turn on a webcam on a laptop is a very common and popularly asked question lately. The fact is that modern laptops and netbooks are equipped with built-in cameras so that the user can have a video conversation via the Internet from anywhere in the world. And today we’ll talk about the cameras that are built into laptops, how to turn them on correctly, and what to do if they don’t work. This information will be relevant to computer users. In this article I will talk about several activation methods, and also describe some possible malfunctions that make the camera not work entirely correctly. Let's go!
The first step is to contact owners of external webcams who are not satisfied with the quality of the built-in one. As a rule, such devices are connected via a USB cable, so if it does not turn on or is not detected, check the connection, try inserting it into another USB connector. Did not help? Or do you still have a built-in web camera? Maybe you forgot to install the drivers? Read on!
Drivers for webcam
Drivers are special utility utilities that “tell” the computer about a new connected device so that the system “understands” it and operates correctly. You probably have drivers installed on your laptop for a printer, scanner, or some other things? So, a webcam is no exception. It also needs its own drivers, and if you don’t have them installed, be sure to download them from the Internet and install them.
I would like to note that now you can very often find webcams that do not require special drivers from the manufacturer. It is enough to insert the camera into the desired connector, after which the system will install the drivers for the webcam, which were already preinstalled in the system. This especially applies to users who have Windows 7 and Windows 8 installed.
If you need to find a driver for a webcam, then don’t worry, finding them won’t be difficult, you just need to know the model of the camera, or the laptop if it has a built-in camera. In order to determine the model, pay attention to the packaging (when you bought it) of the webcam or on the webcam itself or on the wire; there may be a sticker in which the model is written, see the image below.

How to install drivers for a webcam
As an example, I decided to take a non-built-in webcam in a laptop so that you know how to turn on a webcam on a computer. So, if you know the model, you can now start searching. We type something like this into Google: “(driver model)” and you will be happy! In order not to be unfounded, let's look at a live example. I have an old web camera, for which we will now find the necessary driver.
I recognized the camera model from the sticker. I go to Google and enter “ilook 300 drivers”, after which I look at the links so that they lead to the manufacturer’s website, and not some sharashkin’s office.

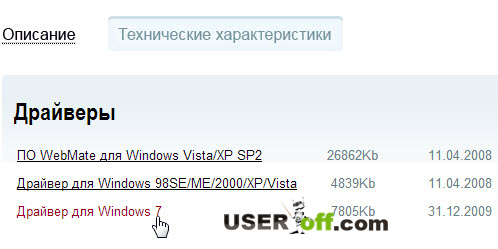
I opened two links, one in Russian and the other in English. Let's figure out how to download a driver for a webcam using the example of a Russian-language site. I go to the website, but there is no link to download drivers, so I click “Technical Specifications”.

This is where the drivers are located. I select the one I need and download it.
After downloading, we simply install them, agreeing to all the requirements and agreements in the software installation wizard. You can then restart your computer, although this is usually not necessary.
Skype can help you
What to do if the drivers did not help? How to turn on the webcam on a laptop then? Firstly, there is no need to remove them under any circumstances, let them be. And secondly, we should check the Skype settings and see if there is any signal at all or not. To do this, turn on the program, select “Tools” - “Settings” in the top menu. Next, in the “Basic” tab, click on the item: “Video settings”.
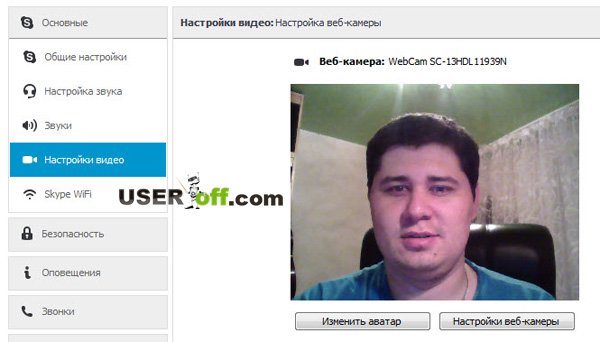
If you see a video broadcast in the window that opens on the right, then the camera is configured correctly. By the way, in this window you can also adjust the camera, for example, make the picture lighter or darker; if you play a little with these settings, you can improve your image.

And in the case when no video broadcast appeared, and instead you saw the message: “Skype did not detect a video camera,” then you have a problem either with Skype or with wires or connectors, which, by the way, is more likely.
Reinstall Skype, and if this does not help, deal with the technical side of the issue, and not with the software, since everything is fine with it. But let me remind you once again that the correct driver is the key to successful operation of the device. If you install the wrong driver or not for your system version, you will not see any image. Therefore, I advise you to install the correct driver for your webcam.
Additional options for turning on the webcam
You can also check the correct operation of the web camera using standard Windows tools. To do this, go to the Start menu - Control Panel - Hardware and Sound.

In the “Devices and Printers” section, select the “Device Manager” subsection. In the window that opens, look for “Image processing devices.” If you don’t have anything there, then the problem is really on the technical side.

You can try turning on and then turning off your webcam again. To do this, right-click on it and select “Disable”.

Reboot the computer. Then go back to the device manager and select “Enable” by right-clicking on the webcam.
The following information will be relevant for users who use the built-in web camera. Thus, I will show you how to turn on the webcam on your laptop. The following option can be proposed as a way to enable it. Among the F1...F12 keys, we are looking for the one with a blue icon with a camera on it. After that, press the combination of the Fn + desired key buttons. This way you activate and deactivate the webcam.
So, you understand how to turn on the camera on your laptop and computer. Now let's check it not through Skype.
There are special programs that are designed to work with web cameras, but to check the functionality of a web camera, Skype programs are usually used, or in other similar clients where video conversations are possible, for example Mail Agent.
As for online services, here we can cite as an example the world-scale project “”. Both sites offer their users to chat online with a randomly selected interlocutor from among those who are also currently on the site. It doesn't really matter, we're here to test the webcam.
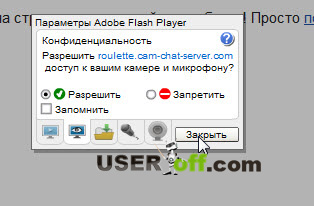
I'll look at an example of the first service. Move your mouse pointer to the bottom left screen and click “Allow access to devices.”

A window will appear, select Allow and click Close.
Basically, everything after which you can see yourself on the screen, which is what we needed.
Webcam program
I didn’t want to talk about the programs, but after finishing the article, I decided to add to the article. I think this addition will be important for some users.
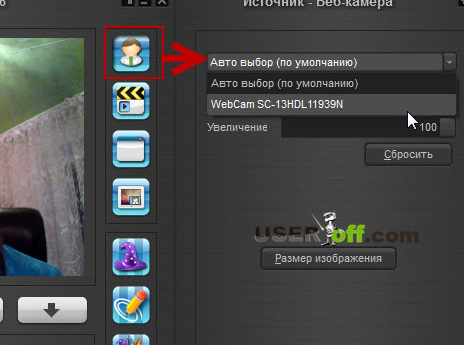
The most popular, as I know, is the WebcamMax program. This program is paid, but for those who studied my video course and more experienced users, I think they understand how and where to get it.
The program is simple, after opening, click on the “man” picture, a menu will appear on the right. Here you can select your webcam if it does not want to show.
The program also has all sorts of effects to apply to you. How to do it? Click on the cap.

Effects that you can use will appear on the right.
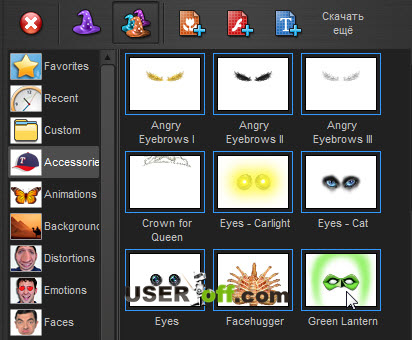
To apply multiple effects, select 3 hats in the top menu, then navigate through the categories on the left, where there will be different overlays. The cool thing is that when you move your head, these overlays move with you. I experimented a little and this is what I came up with:

That's all I wanted to tell you on this topic. I hope that now the question of how to turn on a webcam on a laptop will no longer arise. If you can’t turn on the webcam, then you can try connecting it to another computer and check if it’s working. And don't forget that you need to install drivers.