How to make a print screen of a page on a computer. How to take a screenshot on a computer using the Print Screen key
IN Lately Many personal computer users are interested in the question: how to take a screenshot on a computer? The answer is both simple and complex at the same time. Let's start with the Windows operating system. Fortunately, the developers of this system took care of this. They've attached a screenshot feature to the "print screen" key, which is located in the top right corner of your keyboard (Figure 1).
How to take a standard photo?
Interesting fact: If you have a multimedia keyboard, then most likely the key can mean quickly sending a document to the printer.Tip: Consult your keyboard's documentation. Basically, a special disk is supplied with the keyboard which will help you reconfigure the keyboard keys.
Although this is one of the oldest methods, it is also the most reliable. When you press this key, a screenshot of your screen is saved in temporary memory (clipboard). Also, when you press the key combination “Alt” + “print screen”, a screenshot is taken in the window on which the focus is located, or, more simply put, which is open in this moment.
Once you have copied your screenshot to the clipboard, you need to save it as graphic file. To do this, we will need any graphic editor, in our case it will be “Paint”. Despite the fact that this is a very simple graphic editor, it is quite suitable for our purposes. In order to open it, you will need to go to the “Start” menu, click on the “All Programs” tab, find the “Accessories” tab, and then click on the “Paint” icon (Figure 2).

A working window of the graphic editor will open in front of you. Now you need to go to the “Home” menu and click on the “Insert” tab or press the key combination “Ctrl” + “V”. You will see that the screenshot taken will appear in the graphic editor window (Figure 3).

Next you will need to save this screenshot in graphic format. To do this, click on the menu tab and select the “Save” tab. You will be offered several formats for saving the graphic file, select one of them. Give your file a name and save it (Figure 4).

Cutting the screen with scissors
This stage of saving the screenshot has come to an end. But what if you only need to save a certain part of the screen? If you have the operating system Windows 7 or Windows 8, you can use the “Scissors” tool. This program is located at “Start” - “All Programs” - “Accessories” - “Scissors” (Figure 5).

When you run this program, the entire screen will become light and you will need to select the area of the screen that you want to save. Clamp left button mouse and moving smoothly, select a fragment of the screen. When you release the button, the cut fragment will open in a new window (Figure 6).


I would like to draw your attention to the fact that a rectangular selection of the screen is used as standard. If you click on the arrow to the right of the “Create” tab, you will be offered four options for selecting the screen.
- Freeform is any shape you want to apply when drawing with your cursor.
- Rectangular shape is the standard screen highlight shape.
- Window - screenshot under the cursor, highlighted in red.
- Whole screen – respectively, a snapshot of the entire screen except the cursor.
Also, the Scissors program can take a screenshot of a drop-down menu. To do this, you need to hold down the key combination “Ctrl” + “Print Screen”. The program will take a screenshot which you will need to save.
Working with screenshots - programs that will help you
Now it's time for programs to work with screenshots. One of the main programs that I would like to describe is Lightshot. This is an easy and accessible program that will help you do beautiful screenshot. You can download it on the Internet, and the features of the program will be described below.
After installing and launching the program, the Lightshot icon will appear in the lower right corner next to the clock (Figure 9).

First, let’s get acquainted with the settings of this program; to do this, right-click on the Lightshot icon and select “Settings” (Figure 10).

The settings window will open and you will see four options:
- Basic - standard program settings, in which don't need to be changed.
- Hotkeys – You can change the keystrokes to save a screenshot.
- Formats – allows you to change the graphic format of the screenshot.
- Proxy – allows you to run a proxy server (an unnecessary function in this program).
We've sorted out the settings, now let's move on to the best part - working in the program itself.
To take a screenshot, press the well-known “Print Screen” key. Your computer screen will darken a little, now you must select the area of the screen you are interested in and save it by clicking on the floppy disk icon in the program (Figure 11).

Pay attention to the small menu on the side, it displays, additional features programs (Figure 12).

These include the following:
- Pencil – allows you to draw or highlight randomly on a screenshot.
- Line – allows you to draw a line, it is very convenient to mark certain areas of the screenshot.
- Arrow - very convenient function, which allows you to specify in the screenshot.
- Rectangle – allows you to mark the places you need in the screenshot with a rectangle.
- Marker – you can highlight any area of the screenshot with a marker.
- Text – as the name suggests, can sign your screenshot.
- Color – selects a color from the palette to mark the top items.
The bottom menu allows you to send or save your screenshot (Figure 13).

The bottom menu has the following items:
As you can see, the Lightshot program has all the necessary capabilities for creating screenshots.
Description of some programs for taking screenshots
There are a lot of programs for creating screenshots. And each user likes this or that program according to his tastes. A small list and descriptions of these programs are given below.
FastStone Capture
Very good program to take screenshots (Figure 14).

Its features include:
- Setting up hot keys. You can choose the keys yourself instead of the “Print Screen” key
- Built-in graphic editor. After taking a screenshot, you can easily edit the image in the editor
- Supports all known graphic formats.
Snagit
One of the most popular programs on the Internet (Figure 15).

The amazing features of this program are described below:
- Ability to create screenshots high resolution, in other words, several pages long.
- Built-in graphics format converter.
- A graphic editor that allows you to finely edit screenshots.
- Timer for the frequency of taking screenshots. You can set a time period for taking a screenshot.
- Russian language support.
Floomby
Very simple and effective program(Figure 16).

The main advantages of this program:
- Take a snapshot of your screen with one click.
- Ability to send a screenshot to your server for further work.
- Doesn't take up much memory.
Looking for “print screen” or how to take screenshots on Macos
Now it’s the turn for Apple connoisseurs. What should those users do who do not have the “Print Screen” key and have a completely different operating system? Let's take a closer look at the steps needed to take a screenshot in the operating room. MacOS system. The main keys that replace “Print Screen” on this system are:
- "Cmd" + "Shift" + "3" - a screenshot that is saved on the desktop
- “Cmd” + “Shift” + “4” - A specific area marked by the user and saved to the desktop
- “Cmd” + “Shift” + “4” + “Space” - Select a specific window with the ability to take a screenshot
But several unpleasant situations arise:
- Screenshots are saved only in png format.
- All screenshots are saved on the desktop.
- A small shadow along the entire outline of the screenshot.
In order to fix these problems, you should use the Terminal program and its commands. To do this, you must go to the “Go” menu, then click on the “Utilites” tab and find the “Terminal” program (Figure 17).

After the console (terminal) has opened, you need to enter commands to change graphic format enter the commands:
- defaults write com.apple.screencapture type format…
- killallSystemUIServer
After the word format we put one of the graphic format options (Jpeg, tiff, etc.).
If you need to remove a shadow from a screenshot, then to do this, enter the commands:
- defaults write com.apple.screencapture disable-shadow -bool true
- ekillall SystemUIServer
And finally, the solution to the third problem, file location. Accordingly, enter the following commands:
- defaults write com.apple.screencapture location ~/Documents (or any other folder)
- killall SystemUIServer
Programs for taking screenshots in Macos
Naturally, there are programs for taking screenshots for this famous operating system. Let's take a closer look at them:
Skitch
One of best developments for Macos (Figure 18).

The possibilities of this program are endless:
- Cutting out any part of the screen.
- Inscriptions of any type and format.
- History of your saves.
- Free, which is rare for the family of these operating systems.
LittleSnapper
Very beautiful program. (Figure 19)

The advantages are not so great, but they are:
- Built-in browser for creating screenshots for websites.
- Converting graphic formats.
- Grouping screenshots in iPhoto.
Of course, the list of programs does not end there, but the remaining programs simply copy the functionality of the ones described above and there is no point in dwelling on them. This is where I would like to end this review. I hope that you were pleasantly surprised and that you learned a lot about taking screenshots on your personal computer.
Taking screenshots using PrintScreen – useful feature, which may often be required by any personal computer user. If any program or website is not working correctly, the right solution would be to contact technical support. Very often, operators ask to take a screenshot of the page with the error. In this case, it is also useful to know how to use the service key to take a screenshot on your personal computer or laptop.
You might want to help another PC user perform a certain action on their computer. Many people like to save moments in video games somewhere, take screenshots of pages in in social networks and much more. For all this you need to know how to use Print Screen. The following article describes how to use Printscreen on a PC and the basics of working with it.
In the operating room Windows system There is a built-in tool that you can use to take a screenshot. The Print Screen key is used for these purposes. It is located on the upper right side of the computer keyboard.

If you're using a laptop rather than a PC, you probably won't have a PrintScreen button. The functions of this service key will be assigned to an alternative action of some other, for example, F10 or F12. In this case, you will need to hold down the Fn service key, and at the same time the desired button, which has blue inscription"Print Screen" or "PrtScr" for short.
If you want to capture only the selected window in the captured image, and not the entire PC screen, use the combination “Alt” and Printscreen. On laptops, the combination will accordingly expand to “Fn” + “Alt” + “Print Screen”. If you only need 1 browser page, this is an ideal option. 
After clicking Printscreen, you need to figure out where to save the screenshot you took. It first goes to the clipboard as if you copied the image. You can attach it to a post on social networks or Skype messenger, or save it on your PC’s hard drive as a picture. To insert a screenshot into a message, simply open the desired dialog and press the keyboard shortcut “Control” + “V”. Saving the data on your computer will be a little more difficult.
Working with the graphic editor Paint
The easiest way to save a screenshot on a personal computer is to paste it into a graphics editor. Windows has a standard Paint program preinstalled that is perfect for these purposes. If you have never used it, follow the instructions provided:

Lightshot app
Lightshot - very useful utility, which will make working with Print Screen easier. Exists as a PC application under Windows control, and as a convenient plugin for Google Chrome.

To download the program, visit the official website of the developer by following the link http://app.prntscr.com/ru/download.html. Here you need to select the version that interests you. Click on the “Install” button to download a small exe file for installation on your PC. Run the installer and follow the instructions. The utility installs very quickly on any PC. Do not forget to refuse additional offers - installation of unnecessary free programs.
This is a screenshot, a picture that shows everything that is on your screen. The need to take a screenshot arises quite often. That's why this function built directly into the operating system. In this material you will learn about which key to take a screenshot on a computer with the Windows operating system.
In the operating room Windows system To take screenshots, use the PRINT SCREEN key (on some PRT SCN keyboards). This key is located in the upper left part of the keyboard, next to the NUM LOCK, CAPS LOCK and SCROLL LOCK indicators. In order to take a screenshot you just need to press this key.
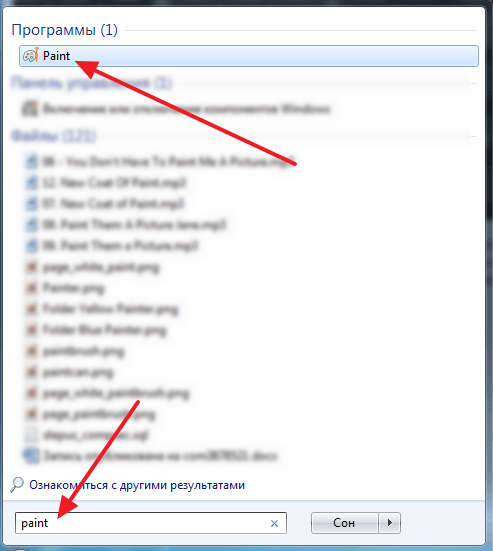
After pressing the PRINT key SCREEN screenshot will be placed on the clipboard. In order to save this screenshot as a picture, you need to open any graphics editor, paste the screenshot into it and save it as a file. For example, you can open the built-in graphics editor Paint. To do this, open the Start menu and search for “Paint.” After this the system will find this program, and you can open it.
After opening Paint programs click on the “Insert” button or use the combination CTRL keys-V. After this, your screenshot will appear in Paint.

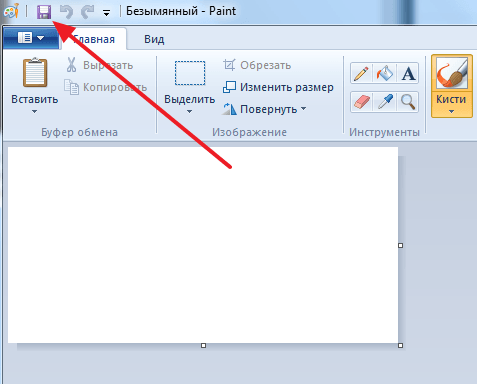
After saving the picture, you will receive the screenshot you need as a file.
A little trick:
When taking a screenshot, you can use the PRINT SCREEN key along with the ALT key. In this case, the system will create a screenshot of only the active window. This way, you can create screenshots only of the program you are currently working with.
This approach saves a lot of time. Since the resulting screenshot does not contain unnecessary information and does not need to be cropped in a graphics editor.
Need to take a screenshot on your computer?
I will help you:
I will show you 2 proven ways to take a screenshot on a computer or laptop, as well as how to save and send it.
I was inspired to write this article by people who in 2019 still use phones and cameras to capture what is happening on the screen.
Firstly, it produces an ugly blurry image. Secondly, it takes a long time and takes a lot of effort.
Let's get started:
At any Windows versions There is standard programs, installed by default, with which you can take a screenshot.
I will tell you about the most popular tools:
“Print screen” key + “Paint” program
To begin, find the Print screen key (possible next versions: PrtScr, PrtSc or Print Scrn). Most often it is located in the vicinity of the F12 key.
The next step is to open the window of which you want to take a photo: a website page, VK correspondence, a check for money transfer, ... In general, what you need to record at the moment.
I'll show you how to take a screenshot using a desktop example:
Press the “Print Screen” key if you want to take a photo of the entire screen. “Alt + Print Screen”, if you need a screenshot of only the active window, the program in which you are working in currently. — It makes sense to use it if it is not open on the entire screen.
The screen will be saved to the clipboard. However, you will not hear sound effects or animation, so don’t rush to get scared that this function doesn’t work for you.
Once a screenshot is in the buffer, you cannot copy any information before you save it. Otherwise, there will be a loss.
To see the resulting screen, you need to paste it into a program that can display graphics. For example, Paint, Photoshop - you can not only display it, but also make changes. Word, PowerPoint - viewing only.
I'll use the easy to use graphic editor Paint. Simply put, an image editing program.
I paste the screenshot into the editor using the key combination “Ctrl + V” or the “Paste” button in the upper left corner.
The key combination, pressing “Ctrl + V” at the same time, works in absolutely any program. If you can't, use the usual pasting using a computer mouse.
If you only need a specific part of the image, then use the tools - “Select” and then “Crop” - highlighted in red rectangles in the picture above.
Don’t forget to left-click “Save”.
Scissors program
The easiest way to find a snipping tool is to use Windows Search:
- Click on the magnifying glass icon next to the Start button
- Enter the word “Scissors”
- Right-click or Enter to launch the application
Alternative method: go to “Start” → “Accessories - Windows” folder:
Click “Create” and select the area of which we want to take a photo. The default mode is “Rectangular”.
Mode functions:
- Free form - the outline of the screenshot is drawn by hand using the mouse
- Rectangle - selects a rectangular area
- Window - takes a picture when you click on the mouse desired window. Convenient when several programs are open at once, not in full screen. By clicking the mouse you can select to capture only one of them.
- Full Screen - Takes a photo of everything you see on the monitor in front of you
Let's assume that you need to take a screenshot of VK correspondence:
- Go to the dialogue and find the messages you need
- In the Snipping Tool, click New
- Select the area you want to take a photo of
Then you will have:
By the way, using the Pen and Marker tools you can make inscriptions and notes on the screenshot. And erase any mistakes you make with an eraser.
F1 - open help. Useful for those who want to get acquainted with the work in “Scissors” in more detail.
- Click "File" in the scissors program, in the upper left corner
- "Save as…"
- Select a location to save the file
- Change name if necessary
The first and second points can be replaced with the key combination “CTRL + S”.
In my case: Location - desktop, File name - Untitled.jpg, which ideally needs to be changed to something more understandable. Otherwise, after a while you will not be able to find the desired photo: The screenshots will have almost the same name, except for the number at the end.
If you try to close Snipping Tool without saving the image, a dialog box will pop up asking you to do so.
This can also be regarded as another saving option.
How to take a screenshot without programs?
In order to take a screenshot without using programs, you must simultaneously press the “Win + Print Screen” keys.
After which a screenshot, without sound and visual effects, will be automatically saved in PNG format at: “This PC” → “Images” → “Screenshots”.
You can go to this folder to edit, copy or send the picture.
Don’t forget to come up with a unique name for each photo, otherwise you’ll end up with something like this:
How to send a screenshot in a message?
There are two ways to send a screenshot:
Second, press the “Print screen” button or highlight desired area to take a photo using the Snipping Tool program. Then, in the message sending field, use the key combination “CTRL + V” or right button mouse and then “Paste”.
Conclusion
Each of the 3 methods described in this article has its own pros and cons:
“Print Screen” + Paint - works in 100% of cases, but is the longest and most labor-intensive.
“Scissors” are very easy to use. Indispensable when the “PrtSc” button does not work, is broken or is missing at all. But they don’t always work, for example, when you need a screenshot of a window that closes with a click.
"Win + Print Screen" - quick way take many pictures of the entire screen without changing titles or editing.
Choose a snapshot creation method based on your specific tasks. Remember, there is no best, only the most convenient in the current situation.
If you have any problems or questions, feel free to ask them in the comments!