How to make a small column into a large one. Devices with three speakers
Assembling a speaker at home is not such a difficult task as many might think. Possessing necessary materials and information, you can not only get good and quality speaker with clear sound, but also save a decent amount of money.
First you need to buy or make your own sound amplifier.
How to make a homemade speaker amplifier
This is a very simple way to build an audio amplifier. Absolutely anyone can assemble such an amplifier without much effort.
Necessary materials
Crown connector;
Krona 9 Volt;
1 Watt speaker with 8 kOhm impedance;
Mini-jack 3.5 mm;
10 kOhm resistor
Switch;
Chip LM386;
Capacitor 10 Volt and 220 µF;
Soldering iron.
Manufacturing
Step 1
Place the chip on the table. In order not to confuse the sides and to correctly solder all the wires to the microcircuit, you need to pay attention to the hole on one of the sides of the microcircuit. This hole needs to be positioned away from you, as shown in the image:

Step 3
The positive contact of the connector must be soldered to the second contact of the switch.

Step 4
The fifth “leg” of the microcircuit must be soldered to the positive contact of the capacitor.

20 Signs You've Found the Perfect Guy

How to behave if you are surrounded by boors

What happens if you look into a person's eyes for too long?

Step 5
Connect the remaining contact of the capacitor using a soldering iron and cord to the positive contact of the speaker.

Step 6
Having made a jumper as shown in the picture, you need to solder the negative contact of the speaker to pins 2 and 4 of the microcircuit.

Step 7
Solder a resistor to the third pin of the microcircuit.

Step 8
Disassemble the mini-jack, connect the left channel to the right and solder the resistor to the remaining channel through the wiring.

Step 9
Connect the minus of the mini-jack to the minus of the speaker using a wire and a soldering iron.


Benefits of Drinking Coffee

13 signs you're wasting your life but don't want to admit it

How a cat can ruin your life
Step 10
Solder the negative wire of the connector to the negative terminal of the speaker.

Step 11
The speaker for the future speaker is ready! Now all that remains is to test. If the speaker does not work, then it is worth reviewing the previous paragraphs to correct errors.
Column assembly
Now let's start making the column itself.
Necessary materials
Polypropylene pipe, the diameter of which is equal to the diameter of the column or slightly larger;
DVD or CD;
Drill;
Hot melt adhesive;
Scissors;
Drill or screwdriver with drilling attachments;
Sandpaper;
Manufacturing
Step 1
Cut the pipe, leaving a small bulge for the connector. Before you start cutting, you need to mark this bulge on the pipe according to the size of the connector itself.

Step 2
Draw a circle on the disk in the center using a polypropylene tube. This circle needs to be cut out with scissors and the edges smoothed with a drill. Using scissors, make two small indentations on the disk not far from each other for the wires.

Step 3
Insert the amplifier into the tube. If necessary, carefully fix it with hot glue from the inside.

Step 4
Drill a hole above the convexity for the switch, equal in size to the switch itself or slightly smaller.

Step 5
You need to unsolder the wires from the switch in advance in order to insert the wires into this hole, and then solder them back. Then insert the switch into the hole. If necessary, secure with hot glue on the inside.

Step 6
Using hot glue, glue the disk, having pulled out the wires in advance, to the inside of the tube. And also fix the connector on the bulge with glue. It should look like the image shown:

Step 7
Use a drill to trim off all excess protruding parts, helping with sandpaper.

Step 8
The column is ready! If desired, you can decorate it with stickers or carefully paint it with spray paint.
All that remains is to test it. You need to insert the crown into the connector and connect the mini-jack to the device. It turned out portable speaker with very high quality and clear sound.

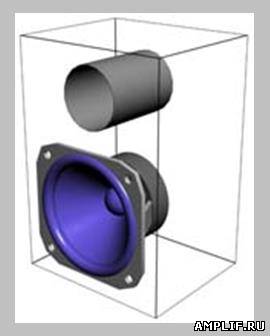
I want to provide my project, so to speak home audio complex. At the beginning, I had absolutely zero knowledge of acoustics; I didn’t even know how to assemble ordinary class A amplifiers, let alone amplifiers for a subwoofer. Interest arose after an even greener radio electronics engineer than me came to me and offered to make a subwoofer. I didn’t want to seem like a layman and went to Google to find something on this topic, but either I Googled badly or really useful information there wasn’t, in general I didn’t dig up anything useful, I went to the forums, gleaned information there and got down to business. First of all, we need a low-frequency speaker, I’ll warn you right away - our sub is low-budget and not very powerful, I only found 35gdn-1m-4 in my store, it looks like this:
Also known by the secret Soviet code name 25gdn-1-4. I don’t know why two identical speakers are called differently, I need to ask the Soviets, because I don’t know what was going on in their heads when they came up with this. Its characteristics are as follows:
- Main resonance frequency: 80 (100) Hz;
- Frequency band: 63-5000 Hz;
- Unevenness frequency response: 14 dB;
- Characteristic sensitivity level: 83 dB/m W;
- Dimensions (in plan): 125x125 mm;
- Height: 75.5 mm;
- Equivalent volume: 11 dm;
- Total quality factor: 0.55;
- Weight: 1.3 kg.
1. Closed box(ZYa, closed box). The simplest case in design and manufacture. Widely used acoustic design. It is a sealed box. The radiation from the rear part of the speaker diffuser is closed in the housing and, in fact, is not used. All energy is converted into heat. Often, in order to combat this, ZYs are filled with various materials such as synthetic winterizer, wool, mineral wool, and so on. A significant disadvantage is the extremely low efficiency, since only one side of the speaker emits sound. To obtain high sound pressure in this case, powerful speakers are required. The main advantage of this design is best quality sound. The bass of the subwoofer in a closed cabinet is soft, clear and fast. EBP 40-60

2. The main principles of operation of a bass reflex enclosure- make the radiation from the rear part of the diffuser work to your advantage. To do this, the internal volume of the housing is connected to the atmosphere using pipes or slots. A port (pipe or slot), contrary to popular belief, does not create a “draft” or “blow”.
The operating principle is somewhat different. The port contains a certain volume of air. Together with the air contained in the box, as well as the moving speaker system, this creates an oscillatory system, the oscillations of which coincide in phase with the oscillations of the diffuser. In other words, we force the radiation from the rear part of the diffuser to work in our favor, adding up with the radiation from the front part.
Thus, the efficiency of the system essentially doubles. Configuring the bass reflex enclosure, both by selecting the volume and by using the area and length of the port. The downside of this design is the lower sound quality compared to ZY. The bass is more spread out and boomy. To increase the sound quality, the design uses many tricks, such as the use of a port without rotation, a port design in the shape of a prism, rounding the ends of the port, and so on. EBP > 50
3. Passive radiator(passive radiator, passive radiator). The principle of operation of this design is the same as that of the phase reflex. The difference is that instead of a volume of air in the bass reflex port, a passive radiator is used, which is a speaker without a magnet and a voice coil. The advantage of this design is better sound quality since the passive radiator does not introduce distortion, unlike the bass reflex. from EBP > 50

4. Bandpass(bandpass, bandpass) 4 orders - The body is divided into two parts by an internal partition. One part is a closed volume of air, like in a closed box. The second part communicates with the atmosphere through a port. Due to the concentration of radiation in a narrow frequency band, it has more high efficiency than that of a phase inverter, with more high quality sound. EBP 40-60

As you have already noticed, the complexity in manufacturing the case increases according to the principle: further more. Since I’m, frankly, a bad carpenter, I chose the simplest option - a closed box, for which I received a cradle from my father, who said that bass reflexes rule and sent for it.
Bass reflex in principle the best option for this purpose, the dynamics, as I later realized due to resonant structures and other incomprehensible riffraff, did not go into detail, and I don’t advise you to, because the forest there is impenetrable, and I can already get lost in three pines. Then a problem arose with the size of the case, I went back to Google and again found nothing, then I read somewhere that the larger the case, the better, and went to the workshop to make a miracle out of plywood. Why plywood and not chipboard? After all, chipboard saws better. I was really too lazy to stomp 200 meters behind her, and, to be honest, I was tight on money. The dimensions of the box were as follows:

Drawn in Paint, the dimensions were taken from heaven, but it turned out to be about 40-50 liters, which is generally the salt for this speaker. The bass reflex is a sewer pipe glued with mounting adhesive and reinforced with two planks. Its diameter is 5 cm and its length is 15 cm.
Once the box is put together, not literally put together, it is better to fasten it through the aluminum corners, otherwise there will be a lot of cracks and the bass will be bad. Then we buy a sealant, not silicone, not a bathtub, but a regular installation sealant, white. And at the joints and cracks we seal everything. On the sealant they usually write how long it takes to dry, but I don’t know how it goes. Next, we take the back wall of the box and match the size of the terminal block that you will buy, by the way it looks like this:

We cut out a hole, insert a terminal block, secure it with self-tapping screws, and seal it. After everything has dried, you need to insert the speaker and fasten it with self-tapping screws, then seal it in the same way, and wait until it dries. Then we connect the terminal block and the speaker with wires, preferably using solder. So as not to tear it off later. In the front wall below the speaker we cut a hole along the bass reflex (pipe). We insert it, fasten it with glue, and two boards across them are also glued:

Again we seal everything and everyone so that it doesn’t blow through. We wait until it dries. Having finished tormenting the plywood, I suggest closing back cover a couple of self-tapping screws, and a generous amount of sealant at the joints, because remember: cracks = garbage, not sub. Finally we can start working on the amplifier. I suggest collecting on tda2051, he gives good power, and for state employees it has a unipolar circuit connection in order to use a regular power supply. Here is the circuit itself, don’t pay any attention to what is written on the tda2050 circuit, the switching circuits for amplifiers like tda20xx are all the same and differ only in output power. It’s just that tda2051 screams more powerfully.

I just want to warn you right away, place the microcircuit on the radiator, and the larger it is, the better and safer, the legs of the microcircuits - amplifiers are kept on the Chinese word of honor and it is not recommended to fiddle with them, if they fall off, you can’t put them back, but it costs 150 rubles, plus you will have to pay for it and go ahead, you will buy 2 of them at once, just for every fireman. Use electrolytes at 36 volts, also for safety. Replace C1 with 100 nf, 2.2 uF seemed too much to me. There is no need to force the entrance; in terms of nutrition, I advise you to supply electrolytes with a larger capacity and larger in size, otherwise there may be a background from the block.

In general, a P-filter would work very well here in order to reduce all the hum. The amplifier case was taken from an old CD drive, which bears the proud name of Pioneer. There are holes cut in the back for the audio input, power and two wires going to the terminal block.

By the way, for aesthetics, you can upholster the subwoofer with drape, which is what I actually did. The drape additionally dampens the sound, which increases the quality factor. The whole thing is powered by a power supply from a charger for a screwdriver and has a voltage of 21.7 volts, of course it’s not so hot, give it free rein, they will eat even 35 and not choke, it will work even better, but don’t get carried away, remember that amplifier microcircuits are capricious guys , and they can make a bang, or just burn out.

I don’t recommend painting the speaker with paint from a spray bottle; personally, for me, it started to eat the rubber surround, which became thinner and it was eaten away, I had to change the suspension, thanks to the narrow-eyed brothers for the paint, which included at least half of the periodic table. I wish you success in the assembly, your S9018.
There are many sound systems available on today's acoustic market - they can be... different types, power and design, you can choose speakers to suit every taste and every need. However, purchased speakers are not always the ideal option. Many people want to try making acoustic devices with their own hands - from the realization that this is not a product from a Chinese factory, but something created on their own, the speakers will even begin to subjectively sound better.
Of course, buying speakers is much easier and probably cheaper. But building your own speakers isn't that difficult. The complexity of the process depends on several factors:
- What speakers do you need? Whether you want to assemble a full-fledged multi-channel system or a simple stereo pair, they should be powerful or not, broadband or multiband. First of all, the complexity of the calculations depends on all this, and then the complexity of the assembly.
- Number of parts available. The scale of the project can be different - someone assembles only the housing and buys the electrical parts ready-made, while others even make the control chip (crossover) and amplifier themselves. The only thing that is purchased in all cases is dynamic emitters, since it is almost impossible to assemble them outside the factory.
- Experience and skills. The main thing you need to have is straight hands, capable of doing woodworking at a decent level, since in the case of assembling speakers with your own hands, the final quality of the speaker system depends on the quality of the housing.
If you are sure that you are ready to assemble the speakers yourself, you need to prepare the tools and materials, and you can get started. Let's leave aside the question of what type the final speaker system will be - it doesn't matter, general principles the builds are similar whether you're building small front speakers or a huge, powerful 5.1 system. In principle, only the volume of work and the number of calculations will differ.
Speaker design
Before you start making acoustic devices with your own hands, you need to figure out what they can be made of and in what form. First of all, you should find out what the speaker body can be like.
The quality of the cabinet plays a huge role in giving the sound purity and volume. If the box is assembled with gross design errors, the consequences can be very different - from a simple deterioration in sound quality (for example, it will be too muffled) to complete inoperability of the speaker. Don’t worry ahead of time - having calculated everything exactly, everything will work out in a very decent time. If there are any flaws, it is unlikely that they can be identified with the naked ear. It is also worth remembering that when working with wood, a decimeter of error is not an error, so minor errors are quite forgivable.

The first thing you need to choose is the shape of the future columns. It can be almost anything, but for independent work It is best to choose a traditional rectangular shape. If you plan to manufacture not a broadband speaker, but a subwoofer, then the shape should be cubic. Please also note that when making a low-frequency speaker, the most accurate calculations of the volume of the speaker, as well as the bass reflex, are required, otherwise the bass will not be reproduced well enough, which will defeat the purpose of the work.
Column sizes may also vary. If a large set of speakers will be used - up to three midrange speakers, one high-frequency tweeter and a low-frequency subwoofer - the speaker, of course, must be tall. At the same time, it can be narrow - the volume is quite enough for high-quality sound. In general, there is a lot to be said about calculating volume - but all the particularly accurate calculations are of little use if you do not have ears that can detect the slightest deviations in the amplitude of the sound from a perfectly straight line. So it’s enough to roughly calculate the required volume based on the diameter and power of the dynamic emitter. If the speaker is multi-way, the subwoofer is used as the basis.
One of the most important moments – right choice material. The walls of the speaker housing can be made of different types material, the main thing is that it meets three requirements:
- rigidity - so that the walls do not bend under the influence of vibration of the speakers;
- ease;
- affordable price.
Medium-density particleboard, or MDF, is best. Solid wood is not suitable because it is too flexible and creates a resonance effect. In addition, the column is not an absolutely static object - during operation, vibrations and similar movements that are invisible to the naked eye always occur in it, which is why unpressed wood dries out relatively quickly and becomes unusable. One of the few types of wood that can be used to make a DIY speaker is ebony, or ebony, which is the hardest of all types of wood and also polishes perfectly. However, ebony is very expensive, so in most cases it will not be suitable - after all, one of the goals of independent work is cost-effectiveness.

Another possible variant material – multilayer plywood. It is easy to process, and after assembling the body, it can be finished with any decor - for example, natural veneer. Its only drawback is that it is not the highest rigidity, so for greater structural strength, you will have to additionally cut out ribs that will be placed inside the box.
In addition to the materials described, it is possible to use GVL or DSP - they themselves have good sound insulation properties, which allows you to save somewhat on protective material. However, they are heavy and very difficult to process. It is not recommended to use plastic at all - we will leave polymers to factory manufacturers. Thus, it is best to opt for chipboard, especially laminated chipboard - it has better properties and looks good, imitating almost any material - for example, ebony.
As a result, the column should have the following qualities:
- Smooth amplitude-frequency response - this parameter reflects the sound quality, since it represents the difference between the received electrical signal and the output sound waves. It is precisely to obtain an ideal frequency response that all efforts in manufacturing should be directed homemade speaker. The quality of the frequency response is influenced by many factors - the correct location of the speaker parts inside the housing, the quality of the materials used, and even the environment.
- Decent efficiency. Since in dynamics the electrical signal is converted into mechanical movements of the diffuser - vibrations of its membrane, which create sound - the efficiency is always very low. You need to try to raise it as high as possible. Can help with this correct selection details.
- Subjective sound quality - the speaker should be pleasant to listen to, because it will not be a device for measuring sound characteristics that will be used, but you yourself.
- Nice design - the more attractive the speaker looks, the more pleasant it will be to use.
Having fully prepared for work and having drawn up an approximate design of the column, you can begin making the column with your own hands.

Acoustic device technology
One of the main principles to be followed when working is accuracy. You need to take all measurements as carefully as possible before you start cutting out the parts, and before attaching them you need to try everything on to each other.
The stages of column manufacturing are as follows:
- On prepared chipboard sheets The walls of the future building are outlined. On the walls you need to mark places for installing speakers - the holes should be round and ideally fit the size of the emitters, so that in the end there are no gaps.
- The details are cut out. If the board is varnished, it is better to saw it with the finished side up so as not to damage the decorative coating.
- How to fasten the walls of the column? You can use two methods: either use glue or epoxy resin, or simply screw it together with screws. In the first case, you need to do everything very carefully so that the column does not become warped. To press the glued parts together, you can use a vice system. You also need to carefully fasten the walls with thin screws so that they fit in at a perfectly right angle.
- The case must be sealed, therefore, if the joints of the walls are not tight enough, the cracks must be filled with felt soaked in glue. If back panel will be removable, you need to stick a polymer or rubber seal along its edge.
- If the box is closed, instead of upholstering the walls with sound insulation, cotton wool or foam rubber can be filled directly, filling the entire volume of the speaker. The main thing is that it does not come into contact with the rear surface of the diffuser. In addition, a channel must be formed from the emitter to the bass reflex.
- It is not necessary to calculate the length of the bass reflex - it is perfectly selected experimentally. The diameter is easy to calculate - for example, for a speaker with a diameter of more than 100 mm, a pipe 5 cm wide is perfect. The length is determined as follows - take two homemade pipes made of cardboard and inserted into each other, and then placed in the hole intended for the bass reflex. Then the column must be turned on and the tubes must be moved relative to each other until the air flow from the hole becomes most active.
- Once the case is assembled, all that remains is to place the speakers and amplifier in it. The emitters are connected either in series or in parallel, depending on the required characteristics of the speaker.
If you follow the technology, you will undoubtedly get a very high-quality speaker.
Making your own speakers: video
If you do not want to buy equipment, it is quite possible to make sound system on one's own. In this article we will tell you how to assemble a column for such a system. Of course, we will talk about stationary speaker, since the technology for manufacturing portable speakers is much more complex and will require you not only to have special knowledge and skills, but also special equipment and materials.
How to assemble speakers correctly
First you need to take 2 identical dense cardboard boxes. The boxes should not be deformed and it is desirable that they be strong enough and attractive in appearance. Please note that the sound quality will directly depend on their size. Now we take 2 dynamic heads (of any suitable size) with a power of about 3 W. The dimensions of the heads are not so important, because the sound quality will primarily be determined by the cardboard housing of the speakers. Remember that it is better to use small speakers in large enclosures than large ones in small ones. Next, you need to cut holes in the middle of the box lids that follow the shape of the head diffuser. Now we drill holes for mounting the speakers - 4 in each box. Next, between the box lids and heads you need to lay any fabric that has good sound-transmitting properties. Then we secure the heads with screws, nuts and washers and drill with reverse side Each box has 20-30 small diameter holes. On top of the boxes we make holes in the shape of thermometers for fastening to the wall.
We complete the assembly
Now you need to glue 4 rubber circles about 5 mm thick in the corners of each back wall. This is necessary so that the speakers are not attached tightly to the wall, otherwise you will not get high-quality sound. With this simple procedure, you can get your 3-watt speaker system to sound as powerful as a modern, foam-lined 15-watt speaker system. Moreover, your system will also benefit from bass performance. Next, we just need to take a 2-wire flexible multi-core cable with a cross section of 0.75 mm2. and solder it to the dynamic heads. Now you need to take the cable out and secure the covers to the speaker housing. Having assembled the speakers in this way and hung them on the wall, connect them to an amplifier with an output power that does not exceed the power of each of the speakers. Please note that these systems are designed for indoor use. Well, we found out how to assemble a speaker with our own hands, and now a few words about the amplifier, because without a good, high-quality “amplifier” the speakers will not sound as they should. This is actually a topic for another article, but we will give you instructions on how to build your own IC-based speaker amplifier.
How to assemble a speaker amplifier
Best to do transistor amplifier, the circuit of which has long been known - unlike an amplifier on microcircuits, a transistor one will reproduce sound much better. However, if you don’t want to bother with such a design and sound quality is not so critical for you, the easiest way is to make an amplifier using microcircuits. To make an amplifier, take printed circuit board and install the corresponding microcircuit on it (usually a microcircuit with legs numbered 5, 11, 12 removed is used). The radiator area must be at least 600 sq.cm. Now connect the case to the common wire, and for the power supply, take a step-down transformer with a current of 5 A and a voltage of 25 V. The transformer must have two windings. Next you need to solder the capacitor in parallel with the diodes and the filter capacitors. The capacity of the first capacitor should be 0.01 μF, capacitors C2 and C4 0.1 μF, and capacitors C1 and C3 - 22 μF with a voltage of 50 V. The supply voltage with a load of 8 ohms should be 35 V, and with a load of 4 ohms - 27 V. In this case, the voltage on the transformer windings (secondary) should be 20 V. You can find the circuit diagram of such an amplifier here
Do you often have to disconnect and connect your headphones to your computer due to circumstances beyond your control? This is not very good, because... frequent connection headphones over time can lead to bad contact in the audio jack, this will result in sound noise or even cutting out. Therefore, I recommend that you turn on your headphones and speakers at the same time so as not to wear out your equipment prematurely. Headphones and speakers playing at the same time can play simultaneously and below you will learn how to organize this.
Simultaneously playback sound on 2 pairs of wired headphones, or wired and wireless
This method works for doubles wired headphones, both wired and wireless. In the same way, using this method, you can connect headphones and speakers, the sound will be played simultaneously. I tested this method on a computer with a built-in Realtek sound card, on computers with other sound chip this method may not work.
Step 1 - Playback Devices
Find the speaker icon in the lower right corner of the screen, click on it right click mouse, in the window that appears, select the “Playback Devices” menu.
Step 2 - Recording Devices
Now open the “Recording Devices” tab. You see a list of all devices connected to the computer that can record sound. Click on empty space inside the window with the right mouse button, in the appeared context menu select "Show disabled devices".
Step 3 - Stereo Mixer
Now in the list of devices you have hidden device, which is called "Stereo Mixer". It will be disabled, right-click on it and select “Enable”.
Step 4 - Listening Settings
Right-click the Stereo Mixer device and select Properties. A window with several tabs will open, we are interested in the “Listen” tab. Enter it. Check the box “Listen with of this device", and below in the drop-down menu, select the second headphones or speakers in which you want to hear the sound. If you want to simultaneously send audio to wired and wireless headphones, select from the drop-down menu bluetooth headphones. After that, click "Ok".
That's it, now you should hear sound in two devices simultaneously. The method is universal and works on most computers, but not all. Likewise, you can configure simultaneous playback sound on speakers and headphones.
Simultaneous playback on speakers and headphones on computers with a Realtek sound card
This method requires that you have sound installed on your computer. Realtek card and the latest official drivers To her.
Step 1 - Control Panel
Go to the control panel of your Windows computer. Click “start”, find the “control panel” menu and click on it. If you have Windows 10, you need to click on “start”, then start typing the word “panel” in Russian on your keyboard, your search will turn on, and in the first search results you will see the “control panel” menu. Click on it.
Once you are in the control panel, find the menu “ Realtek Manager HD" or simply "Realtek HD". Launch it.
Step 2 - Realtek Setup
On the right top corner Realtek settings you will see the “Advanced device settings” menu. Click on it.
Step 3 - additional settings Realtek
Set the settings as you see them in the screenshot above.
Step 4 - connector parameters
Do you see where the mouse cursor is in the screenshot? Click on this yellow folder, you will see a window for setting up the connector parameters. Set it up the same way as you see in the screenshot, otherwise simultaneous audio playback in headphones and speakers will not work.
That's all, now if you connect headphones to the output on and a speaker to the rear panel (or vice versa), then the sound will go to both the speakers and the headphones simultaneously. You no longer need to plug and unplug your headphones every time you need them.