How to work with Windows. Windows operating system - operating principle
We would like to give you a brief overview of the features of the Windows 7 operating system. Microsoft has added and improved several features such as new themes, graphic effects, and taskbar features.
In this tutorial we will look at Aero function, let's study and find out how to set up Desktop.
If you used earlier versions of Windows, then I hasten to please you - everything is the same in Windows 7. There are no major changes in this version, all the same familiar functions, desktop, etc. The design is certainly more attractive. But if you are new to Windows, then you need to know about some basics like Taskbar, Start Menu, etc.
1) Cart: When you delete a file, it is moved to the Recycle Bin. You can restore files from the Recycle Bin. And to delete a file completely, you need to delete it from the trash.
2) Folders on the desktop: You can store folders, files or shortcuts on your desktop.
3) Open folders: Double-clicking opens the folder in Explorer.
4) Background: Desktop background. You can use your photos as your desktop background, or you can choose one of the built-in images.
5) Start button: Click the Start button to open a menu that allows you to access applications, files, and settings. Also, the Start menu is used to turn on/off. computer.
6) Icons on the taskbar: Some programs will have icons on the taskbar for quick access.
7) Taskbar: The taskbar contains the Start menu, quick access, date and time. When you open a program or file, it will appear on the taskbar and you can easily switch between open programs.
8) Date and time: The right side of the taskbar shows the current date and time. There are also various settings such as audio volume, internet settings, etc.
Aero function
Windows 7 uses a group of features called Windows Aero. Aero is a visual desktop that combines translucent windows, attractive colors and graphic effects with user-friendly functionality. Aero includes Peek, Snake and Flip.
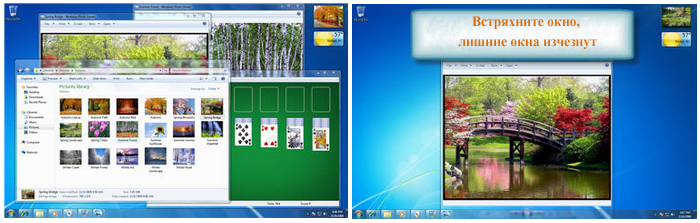
Snap
The Snap feature allows you to resize open windows. The images below show two windows, before and after using the Snap feature.

- Drag the window to the left or right side of the screen until a transparent window appears, then lower the window.
- Your windows should fall into place.

Peek
The Peek feature allows you to view open windows in the taskbar as thumbnails. Just hover your mouse over the icons of open programs on the taskbar and thumbnails of open windows will appear.

- Hover your mouse over the open window icon in the taskbar and a thumbnail of the window will appear. Now hover over the thumbnail and the full window will appear.
- Click on the thumbnail to open the window or click on the "X" button to close the window.

Snake
When your desktop is cluttered with open windows, you can use the Snake feature to keep one window open and minimize all the others.
- Press the top of the window, hold the window, shake. All other windows will disappear except the one you were holding.
- Shake the window again and all closed windows will reappear.
Flip
Flip and Flip 3d functions - 2 ways to view thumbnails of all open windows at once. When using Flip, thumbnails of all windows in a row will appear, and Flip 3d will display all windows in a stack.

- Hold down the Alt key and press the Tab key.
- While holding down the Alt key, press the Tab key to switch between windows.
- Stop at the window you want to open and it will appear in full screen.
Flip 3d (3d version of the Flip function)

- Press and hold the Windows (Start) button on your keyboard, and then press the Tab key.
- Use the Tab key to scroll through all open windows.
Instead of holding down the Windows key, you can press Ctrl+Windows and press Tab to keep Flip 3D open.
Features of the Taskbar
Microsoft has improved the taskbar. It has become very convenient for viewing and accessing files and windows.
View tasks
When you open several windows of the same type, for example, the same browser is opened several times, the icons in the taskbar will look like the picture.

- Aero Peek will show you all windows when you hover over an icon on the taskbar.

- If you want, you can change the order of the icons by simply dragging and dropping.
Pin a program to the taskbar
You can pin programs to the taskbar. This is done in order to have quick access to them.
- To pin a program, drag it to the taskbar.

- And to remove a program from quick access, just right-click on the icon and select “Remove program from taskbar”


1) Hidden icons: Click to view additional settings and icons.
2) Action Center: View important notifications. A red cross will appear on the icon if there are notifications.
3) Internet access icon.
4) Adjust the sound volume.
5) "Collapse all windows" button
You can easily minimize all windows with one click.

Personalize your desktop background and theme
Windows 7 has attractive new themes and backgrounds to choose from. They include vibrant photographs, digital images and Aero themes, using colors and glass effects in an attractive way.
Themes and background
In the Start menu search bar, type “personalization.” Or right-click on your desktop and select .

1) You can change the appearance of your desktop icons.
2) You can change your account picture.
3) Desktop themes
4) You can set your image as the background, or select one from the Windows collection. You can also create a slideshow and your background will change automatically from time to time.
5) You can choose a color for your windows and taskbar.
6) If you want, you can change the sounds for Windows 7.
7) Windows 7 offers a variety of screen savers that you can select and customize.
Font and ClearType settings
You can adjust the font and ClearType settings on the desktop based on your preferences.
To change the Font:
- In the search bar in the Start menu, type “Fonts.” Or Start -> Control Panel -> Appearance and Personalization -> Fonts
- Select the Font you like.

To change the Font size:
- On the left side of the Fonts panel, click on “Change Font Size”
- Select the desired font size and click Apply.

Please note that larger font sizes may prevent some elements from appearing on screen.
You can also customize ClearType for your screen. ClearType helps improve the readability of text on LCD monitors and screens.
- To configure ClearType, select Setting ClearType Text from the menu on the left side of the font panel, and select the best example of text from those offered.

Gadgets
Gadgets are mini-programs that are installed on your desktop. Gadgets can show you information about the weather, date and time, news and much more.
To add gadgets to your desktop:

Setting up Gadgets
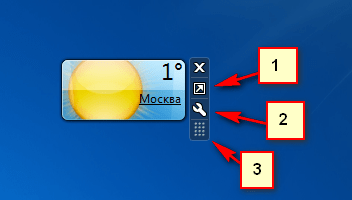
1) Click on this button to resize the gadget.
2) The options button for your gadget.
3) Use this button to drag and drop.
Working with Windows 7. First steps
Starting Windows 7
So, you have turned on your computer with the Windows 7 operating system installed. The message Starting Windows will appear on the screen after the BIOS splash screen. At this moment, Windows downloads the files necessary for operation and checks the settings. It’s too early to touch the keyboard or mouse yet. Let them rest. During this period, you can think about why four UFOs of different colors collide on the screen, explode, and as a result the Windows logo appears. Apparently the developers put some kind of metaphysical meaning into this animation.
If you haven't read the section on installing Windows 7, now is a good time to learn about some of the terms we'll be using.
A mouse pointer is a graphic element that can be moved around the screen using the mouse. In most cases, the mouse pointer looks like an arrow. It is used to select objects on the screen. To point to an object, you must place the tip of the arrow representing the pointer on top of that object.
Left click – briefly press the left mouse button while hovering the mouse pointer over the desired object on the screen. In addition, the double-click action will be used. For example, “double-click with the left mouse button.” This means that you need to briefly press and then release the left mouse button twice. The pause between presses should be short (presses should go like this: one-two, not one-and-two). Sometimes we will say, “click the button.” This means that, while moving the mouse with your hand, you need to move the mouse pointer (arrow on the screen) to the drawn button, and then briefly press and release the left mouse button.
We've sorted out the terms. And at this time the picture on the screen changed.
A list of users on your computer appears in front of you (if this list has been configured in advance). Or you will see one administrator name and a password request.
Left-click on the image with your name underneath it. If you are prompted for a password, enter it and click the round arrow button.
The list of users may not appear and the password request will not appear either. In this case, the Desktop will immediately appear on the screen (see Fig. 2.15).
From this moment on, the Windows 7 operating system is ready to work.
Windows 7 desktop
What is the Desktop and why was it called that? Because its purpose is the same as that of your desk. The desktop is a platform for placing control icons and windows of running programs. We have already talked about windows, but what other icons are these?
The fact is that the Windows 7 operating system has graphical user interface. The user is you. An interface is a method of communication between different environments (in this case, human-machine). Thus, a graphical user interface is a way of controlling the actions of the operating system using various
A. N. Lebedev. “Windows 7 and Office 2010. Computer for beginners. I have to go to work tomorrow"
graphic elements placed on the screen. Simply put, to see your document or run a game, you don’t need to know special commands that you would type manually from the keyboard. You just need to click on the desired icon (small image) located on the screen.
Working with the Windows 7 Desktop is similar to working at your desk. You arrange program windows on the Windows 7 desktop in the same way as sheets of documents, notebooks and books on your desk. You can open a book, read something in it, and then put it down, pull your notebook towards you and write something in it. And then take a calculator from the desk drawer and calculate something and again open the notebook and write down the result of the calculations in it. Working with the Windows 7 Desktop works in exactly the same way. You can keep several program windows on the screen at the same time and work with one or the other. Programs for Windows 7 are called applications.
The window you are currently working with is called active. It is located on top of the other windows. It turns out that since several program windows are running simultaneously, the programs themselves are executed in parallel. Operating systems in which this is possible are called multitasking. This means that Windows 7 is a multitasking operating system.
Window
Let's remember the definition of a window again. A window is a rectangular area of the screen that displays the results of an application or information for the user.
There is usually a bar at the top of the window where the name of the window is written. This bar is called the window title bar. The application window that the user is currently working with is called active. Windows of other tasks seem to fade into the background and do not interfere with work in the active window.
You can move windows on your Windows 7 desktop just like you move objects on your desk. Just do this not with your hands, but with the mouse.
Windows can be divided according to purpose into standard and dialog. All windows have some similar elements. This is the convenience of working with the Windows 7 operating system (and other operating systems with a graphical interface) - you can easily learn to work with a new program due to the fact that its window has the same elements as everyone else. What are these elements? Let's look at them.
The standard window (Fig. 2.16) in Windows 7 has the following elements:

A. N. Lebedev. “Windows 7 and Office 2010. Computer for beginners. I have to go to work tomorrow"
Rice. 2.16. Elements of a standard window
The window borders are the outer edges of the window. When the mouse pointer hovers over a border, it turns into an arrow, indicating where the border can be dragged. The dragging operation is performed as follows: place the mouse pointer on the dragged object; press the left mouse button and, without releasing it, move the mouse pointer to the place where you want to drag the object; then release the left mouse button. By dragging the border, you can resize the window;
header – located along the top border of the window and contains the application icon, window name and window control buttons. You can drag a window by its title bar to any location on the screen surface. Window control buttons allow you to change its state. It can be: normal, when the window has the boundaries you set; minimized, when the window turns into a button on the Taskbar (we'll talk about it later) and is not visible on the screen; maximized when the window takes up all the available screen space. The buttons look like this:
Minimize – allows you to minimize the window to a button on the Taskbar. The window seems to “flow” off the screen and turns into a button;
Maximize – “opens” the window to full screen;
Minimize window – restores the size of the window after it is “expanded” to full screen. In this case, the window becomes normal in size. This button appears in place of the Maximize button after “expanding” the window to full screen;

A. N. Lebedev. “Windows 7 and Office 2010. Computer for beginners. I have to go to work tomorrow"
Close – closes the window and stops running the program. It turns out that this way you can finish working with any program:
menu bar – usually located under the title and contains commands from the main menu of the program;
toolbar– a special element in the form of a strip or rectangle, containing tool control buttons and parameter fields (there may be several such panels);
ribbon – an area where tabs are located (see below) with various control elements;
work area – the middle part of the window, in which all object processing occurs. If the window size does not allow you to see the entire work area, then only a part of the work area, called the viewing area, will be visible. Scroll bars can be located along the right and bottom borders;
scroll bar– a bar used to move the viewing area around the work area. It has arrow buttons at the ends. Clicking the left mouse button on such a button moves in the direction of the arrow. A button without a label on the scroll bar is called a slider and serves as an indicator of the position of the viewport in the work area. By dragging it to another location on the scroll bar, you are dragging the viewport. The ratio of the slider size to the scrollbar size is equal to the ratio of the corresponding sizes of the viewport and workspace;
status bar– usually located along the bottom border of the window and contains information about the object being processed.
The dialog box contains elements that allow you to specify additional information for executing a command, setting any operating parameters, etc. Dialog boxes can be very simple or extremely rich in various information. One thing about dialog boxes is that they usually cannot be resized.
If all the parameters do not fit on the surface of the dialog box, then they are grouped and placed in subwindows called tabs. A tab is a rectangle that has a protrusion called a tab with a tab name that identifies the group of options located on that tab. One tab is always visible completely in the foreground and is called active. From other tabs only shortcuts are visible, for example
You can make a tab active by clicking on its tab.
Dialog boxes can use elements from the following set:
Button – looks like a rectangle with an inscription or other designation of the purpose of this button. Clicking a button, called a push, begins the operation associated with that button.
An introduction to the Windows operating system should be given. This section is intended for both beginners and experienced users of computers and laptops. So let's get started:
How Windows works
The Windows operating system and all its applications are based on the so-called event mechanism.
Operating system applications are programs written to run under its control.
Usually a program is a broader concept than an application, but if the article is about the Windows system, then you can consider that they are almost the same thing...
The main feature of Windows applications is that they are not allowed to completely take over the processor. If a Windows program is written correctly, it must pause its work from time to time and give up the processor to the operating system itself.
No matter how many applications are running simultaneously, the operating system periodically takes away the processor from them and transfers it to other programs (including its own), and then returns it again.
Thanks to this, the operating system is constantly aware of the affairs of all its applications. This happens so quickly that we simply do not notice that many programs are running in turn - it seems to us that they are working simultaneously. This ensures multitasking operation.
If you run an application of another operating system on your computer, for example a program written for MS-DOS, then Windows will not always be aware of its affairs; in other words, the program will not work.
It works not only as a dispatcher, allowing programs access to the processor, but also as a controller. Inside it there are tools that check the operation of applications, and if a certain event occurs in an application, the operating system becomes aware of this, and it, in turn, can take appropriate measures.
Ideally, this should be the case if the application does not have internal errors. In practice, errors do occur, as a result of which we sometimes experience the computer freezing. A freeze is when the operating system is unable to regain control of what programs are doing and the computer stops responding to our commands.
For example, let's look at how a computer works with a mouse. In the depths of the operating system there is a program responsible for interacting with it - the mouse driver.
Drivers are programs that are responsible for interaction between the operating system and devices.
If the mouse driver reports that the mouse has moved or some of its buttons have been pressed, then this is an event for the operating system ;). The system checks where the pointer was at the time the event occurred, determines which application is responsible for the operation of the window over which the pointer was located at that moment, and informs it about the recorded event. The application, in turn, takes action according to what the programmer who created it intended.
It turns out that she herself Windows operating system, and all its applications are constantly ready for external events.
By the way, events are not only manipulations with the mouse, but also signals coming from the keyboard, printer, modem, internal clock and many other devices and programs.
When the question arises of how Windows works, we mean the fact that we are talking about the operating systems of the Microsoft family of different generations, the principle of which, of course, has a lot in common. It won't be a mistake if we isolate the main four functions of any modern operating system and see how Windows copes with them. This article provides a formal description of the operation of the operating system of the Windows families and provides a list of the main components of the system. I'll show you how Windows manages programs and works with hardware and explain the concepts process, flow etc. The article is not for professionals and will help a beginner get a general idea of how Windows works.
ATTENTION! THE ARTICLE IS NOT FINISHED. MATERIALS WILL BE ADDED AS THE FINAL BLOG INTERFACE IS DEVELOPED. THANK YOU FOR YOUR UNDERSTANDING.
What does the operating system do?
Any working computer is a combination of four types of software: operating system, programs and applications, drivers and BIOS. These are the main functions of the operating system, which determine its place among other software shells.
- equipment management(includes receiving microcode from the BIOS chip of the motherboard, managing RAM, diagnosing faults and connecting installed equipment and programs for it)
- program management(includes installing and uninstalling programs, launching programs and participation of hardware components on behalf of programs)
- file management(everything that can be created, moved and deleted on solid state drives)
- creating a user interface(graphical or command/text) to provide or control all or many of the above functions
Windows components or what Windows consists of
How Windows works block by block can be displayed like this:
The diagram shows that the main components of any operating system are three blocks:
How Windows works: shell = Shell
This is part of the operating system, which is connected to both the user and applications. It is the shell that allows us to launch flash drives, install programs, run word- document and print in it, saving it in any place allowed by the system that is visible to the conductor. Shell– this is File Explorer (Windows Explorer), and the Start control panel, and windows Properties of the system And My computer. The person or user knows shell like various user interface tools, such as dialog boxes, shortcuts and icons, and context menus for additional commands.

And for programs shell these are commands and procedures that these programs can call: printing information through a printer, reading data from databases, displaying something on the screen.
The shell itself consists of several subsystems that are controlled in user mode. This mode means that these subsystems have very limited access to system information, and access to the hardware can ONLY be carried out through system services (services of Windows itself). One of these subsystems, the Win32 security subsystem, provides login (user registration), saving and propagation of user privileges to files and folders, as well as other security functions. Absolutely all programs and applications “hello to Windows” only through the Win32 subsystem.
How Windows Works: The Kernel
As in other operating systems, it is responsible for working with equipment that is located inside the computer or is “attached” to the computer during operation. Kernel mode has much more power. No program installed in Windows has access to the hardware directly - only through the shell, which, in turn, sends all requests to the kernel. This interaction system ensures stable operation of the OS. This is somewhat reminiscent of a restaurant: before ordering a dish, you need to call the waiter (you will not be allowed to see the chef or into the kitchen itself).
Core consists of two components:
- hardware abstraction layer HAL – hardware abstraction layer
– (level closest to the iron) - level of executive services (ensures the interaction of subsystems in user mode with a layer of hardware abstractions)
What do you need to remember here? The operating logic is clear from the description: Windows executive services work with hardware using the HAL itself and drivers for a specific device. This operating principle is installed unnoticed by the user when Windows is installed on the computer. At the very moment when we see the installation status bars of components and services/programs, and the layer structure is built HAL based on the processor that is installed on the motherboard of your machine. That is, the usual processes during Windows installation now appear in this light:


prompt to compile HAL
What appears after installing the OS cannot be transferred to another computer one-to-one: for normal operation in the new configuration before- or re installation of individual drivers or their entire package is inevitable.
How Windows Works: Configuration Data
Well, all operating systems need a place where data about programs and hardware, as well as user settings and preferences can be stored. It is necessary to store information about how the user wants Windows and programs to look, where to store what is downloaded and created, etc. For all of this (or almost everything), Windows uses... that's right, . Some information is stored in initialization files (characteristic files with the extension .ini And .inf).

And when the installed program starts, before any window appears, it will first look at the registry and read these files, and only then can the launch of the application be considered successful.
How does Windows manage programs?
If a program is installed, we mean that its skeleton is stored somewhere. Most often this is a hard drive or flash drive. When a user runs a program, some of its files are copied into RAM. This is how it appears process. almost in the form in which we see it in the Task Manager or Process Explorer. A process can be called a program that runs along with related system services and other resources. Resources often include other programs, including the capture of additional RAM cells for temporary storage of data. When a process makes a request to the system like “I need resources!”, it is assumed that the program is accessing the Win32 subsystem. This is how it appears flow data. A thread is a single, dedicated task (run or create a document, insert a picture from the clipboard, print a document on a printer, etc.). Schematically it looks like this:

As you can see, there can be several threads. This is called multithreading/multithreading: for example, browser windows can run in multiple tabs or multiple separate windows. Technically speaking, in both cases we are talking about several different processes browser.exe.
That's it for now. I wish you success.
Read: 294
1.Windows: copying, moving, deleting files and folders
1.1 Copy, move
First of all, we note that files and folders on your computer can be both moved and copied. Copy, move and delete operations are performed exactly the same for both files and folders with files. These operations are very similar, and now we will look at the general principles of their implementation.
In general, when performing these tasks, you first need to open the first folder. After this, you should open the second folder. Next, take the document from the first folder and put it in the second. Now both folders can be closed. However, there is another way to perform this operation. It consists in the fact that you must open the first folder and remove the document from it, leaving it in your hands. After this you can close the first folder. Now you open the second folder and put the document in it. With the latter method, you don't need to have both folders on hand at the same time, but you do need to have a place where the document will remain while you close the first folder and open the second. These methods differ especially greatly when the folders are located far from each other. When working with Conductor You can use both of the described methods. If there is a list of folders on the left side of the program window, the problem is solved very simply. You select the source file on the right side and drag it to the new destination, which is selected from the list of all folders. Once you have identified the location in the folder list where you want to move the file, move your mouse pointer over the file icon in the right pane. Press and hold the mouse button, move the mouse pointer to the selected location in the left area of the window, and then release the mouse button. When you move the highlighted icon to the location where the list is located, the destination folder will be highlighted. After you release the mouse button, the corresponding operation will begin. When copying and moving files, a dialog appears illustrating this process (Fig. 1). If you copied a small file, the dialog will close very quickly or even not appear at all. When working with large files, the gradually increasing bar at the bottom of the dialog illustrates the percentage of the operation completed. By pressing the button Cancel(Cancel), you can abort the operation. When the copy or move procedure is completed, the dialog will close.
Figure 1 – File copy dialog
Now let's figure it out, what happens when you move an icon - copying or moving a file? Windows has a number of rules that determine the specific operation to be performed. If you move an icon from one folder to another on the same drive as the original folder, the operation will move the file associated with the icon to the new folder. This will delete the file in the old folder. If you do not want to move, but copy a file to a folder on the same disk, you must press and hold a key on the keyboard when performing the operation of moving the icon.
If you move an icon to a folder located on another drive, the corresponding file will be copied. To move a file to a folder on another drive, hold down the key while moving it. Sometimes when dragging icons; programs, the programs associated with them are not copied, but only a link to them is created in a new location. When copying or moving programs, you should always press the corresponding or key. If you press a key while dragging any file, the file will remain in the old location, and a shortcut pointing to it will be created in the new location.
It is possible to copy or move not just one, but a group of files or folders. In this case, you should first select a group of icons, and then drag them to the desired location.
Although drag-and-drop moving and copying is very convenient, this method does not work when there is no list of folders in the Explorer window. If you right-click on any icon or group of selected icons, an auxiliary menu will appear next to it (Fig. 2). You can also call up the auxiliary menu for the selected element using a key found on many keyboards.

Figure 2 – Auxiliary menu
The number of menu commands and their composition depends on the programs installed on your computer, however, the copy, delete and rename commands will always be in this menu. To copy a file or group of files, you must select the command Copy(Soru) of this menu. Next, you need to go to the destination folder and again display the auxiliary menu by right-clicking on an empty space in the program workspace. You need to select a command from the menu Insert(Insert) to copy the files. With this method, the so-called Windows clipboard is used as a temporary storage location for moved and copied files. To move a file you need instead of the command Copy(Soru) auxiliary menu select command Cut(Cut). This will remove the file from the current folder and place it on the Windows clipboard. If you don't paste the file into another folder after doing this, it will be lost. There is another, very convenient way to copy and move files. The taskbar contains various commands that allow you to perform the necessary actions with the selected file. To do this, expand the top list of the taskbar by clicking the button if the list is collapsed. In the list, all actions are indicated by buttons with inscriptions. Select a file or group of files and click the button located on the taskbar in the middle part of the program window. Next to the button it says Copy this file(Copy this file). A dialog will appear on the screen asking you to select a copy location (Fig. 3).

Figure 3 - Selecting a copy location
In the list you can find all the drives and folders on your computer. You can also create a new folder by selecting the folder in which it will be located and clicking the button Create a folder(Create folder). Working with a list of folders is no different from similar actions described earlier. By selecting the desired location and pressing the button Copy(Soru), you will start the file copying process. Above the button there is a button designed to move files. Working with her is exactly the same. Once you select a file or group of files, you press a button. In the dialog that appears, select a new location for the files, and then press the button Move(Move) to move files.
There is another way to copy and move files. It is very easy to use two explorer windows to do this. To do this, you should run two copies of this program and place their windows side by side on the desktop. In one window, make the source folder current, and in the other, make the one to which you want to copy the files. Next, simply drag and drop the desired files from one window to another.
1.2 Deleting and restoring files
You can very easily remove unnecessary files and folders from your computer using File Explorer. First, you should select the object to delete by clicking on it with the mouse in the right area of the program window. This could be a file, a folder, or a group of them. After this, click the button in the top list on the taskbar located in the center of the program window. You can also select the menu command File Delete(File Delete) or press a key on the keyboard. You can also drag the icon of the file you want to delete from the Explorer window to the Trash icon located on the Windows desktop. When using any method of calling the deletion operation, except the last one, a dialog will appear on the computer screen to confirm the deletion (Fig. 4). With this dialog, Windows XP tries to prevent the necessary information from being deleted.

If you click Yes, the selected files will be deleted and their icons will disappear from the list of files in the current folder. Clicking No will cancel the delete operation. You have the opportunity to restore them, and there are several ways to do this. Be careful when deleting files. Unfortunately, not all deleted files can be recovered. The ability to recover depends on Windows settings, the size of the files being deleted, and the available disk space on the computer. In addition, files deleted from a floppy disk cannot be recovered.
What if you need the deleted files again? First of all, Explorer has the ability to undo the last operation performed. By successively pressing this key combination several times, you can cancel any of your previous actions when working with Explorer, including canceling the deletion of folders and files. The system remembers the last few actions and gives you the opportunity to undo them. Remember this when critical situations arise. However, the number of undo actions is limited, and a long-deleted file cannot be recovered in this way.
If using the undo function does not give the desired result, do not despair. In case you need previously deleted files again, Windows XP has taken some measures. Files you delete are moved to a special folder called Basket(Recycle Bin). The appearance of the Explorer window when working with the Recycle Bin is almost no different from the window of this program when working with any other folder on your computer (Fig. 5).

Figure 5 – Deleted files in the Recycle Bin
Deleted files remain in the Recycle Bin as long as there is space in the Recycle Bin. If there is not enough space for the new file being deleted, long-deleted files will be lost forever. To view, restore, or permanently delete previously deleted files from the system, you must open the Recycle Bin by clicking on the icon located on the Windows desktop, or click on the Recycle Bin icon in Windows Explorer. To restore previously deleted files, you need to open the Recycle Bin, select the required file or group of files, and then click the button in the taskbar.