How to properly partition a hard drive. How to partition a disk Partitioning a hard drive
When installing Windows, the hard drive is traditionally divided into at least two partitions - a smaller system partition with the letter C and a larger user partition with the letter D. This division was not just invented because of someone’s whim, it has important practical value. Firstly, partitioning the hard drive in Windows 7/10 allows you to save the user’s personal files when reinstalling the system, otherwise they would be destroyed during formatting; secondly, it’s just more convenient to work with data, not to mention the fact that This significantly reduces the risk of accidentally deleting system files.
However, some computers and laptops with a pre-installed system have only one partition - the system one, not counting the “System Reserved” area. In such cases, the user has to create additional volumes on the disk himself. This procedure is very simple, however, for beginners it can still cause certain difficulties, especially when it comes to partitioning the partition with the installed system. So how to properly partition a hard drive without losing data?
There are three main ways to partition a hard drive into volumes: using the standard disk management snap-in, using a command line utility Diskpart and with the help of third-party programs created specifically for these purposes. The first method has a number of limitations, the second may seem complicated, the most convenient is the third, using third-party software, but not all such programs are free. Let's consider all three options.
Using Disk Management
So, you have a computer that has only one volume on its disk, not counting the reserved area. First, let's look at how to split a hard drive into two partitions using the built-in Disk Management snap-in. By pressing Win + X Call the context menu of the Start button and select “Disk Management” from it.
In the window that opens, right-click on the area of the system partition with the letter C and select the “Shrink Volume” option from the menu.

After the volume is polled for allocated space, specify the size of the new partition in megabytes in the “Size of compressed space” field and click “Compress”.

As a result, you will get unallocated space highlighted in black. Right-click on it, select “Create simple volume” and follow the wizard’s instructions.

During the creation of the partition, you will be asked to specify the volume size, assign a letter, select a file system (NTFS is needed) and assign a label, that is, the name of the volume displayed in Explorer.


After clicking the “Finish” button, the section will be created.


Partitioning a hard drive in Diskpart
Now let's look at how to divide a hard drive into 2 parts in Windows 7/10 using another standard tool - a console utility Diskpart. Unlike the Disk Management tool, which has a graphical interface, it has a large set of functionality; in addition, you can partition a disk into partitions in Diskpart from under the bootable media, even in a non-working system. So, open a command prompt or PowerShell console as an administrator and run the following commands:
diskpart
list volume
select volume 1
shrink desired=102600
list disk
select disk 0
The first command launches the Diskpart utility itself, the second command displays a list of partitions available on the physical disk, the third selects the partition number corresponding to drive C, the fourth compresses it to the specified size in megabytes. The fifth command displays a list of all physical disks, the sixth command selects the disk to be partitioned (if there is only one on the PC, its ID will be 0).

Let's continue.
create partition primary
format fs=ntfs quick
assign letter=G
exit
The seventh command creates a new partition, the eighth command formats it into the NTFS file system, the ninth command assigns the specified letter to the new volume, and the tenth command terminates Diskpart.

As you can see, the algorithm of actions has much in common with how the partition was created through the built-in Disk Management snap-in. Now, if you go to the “This PC” section, you will see a new logical partition there.
Dividing a disk into parts in Acronis Disk Director
You can also use third-party tools to create custom disk volumes. One of them is Acronis Disk Director– a powerful program for partitioning your hard drive and more. The procedure for partitioning a hard drive in this program is very simple. After launching the application, select the disk to be shared with the mouse and select “Split Volume” from the operations menu on the left.

A dialog box will open in which, using the slider, set the size of the new partition.

If there are user files on the source disk, you can transfer them to the new volume being created, however, this can be done later in Explorer. But system files cannot be transferred, otherwise Windows may not boot. After setting the procedure parameters, click first “OK” and then “Apply pending operations”.


If the system asks you to reboot, give it permission. The program will do the rest itself, you just need to wait for the operation to complete.
How to partition a hard drive in Paragon Hard Disk Manager
Another powerful program for working with disks and partitions. It also has its own wizard for disk partitioning. After launching the application, switch to the “Partition Operations” tab in the main menu and click on the “Partition Wizard” link.


At the next stage, the program will ask you to decide on the size of the new partition. Use the marking slider or enter the desired size manually. Assign a letter to the volume, click Next and confirm the operation.


Clicking “Finish” completes the wizard.

Now, to apply the planned action, click on the button of the same name on the left side of the Paragon Hard Disk Manager window and once again confirm your intentions to partition the disk.

After this, the re-partitioning procedure will start. If the disk is a system disk, you will need to restart the computer.

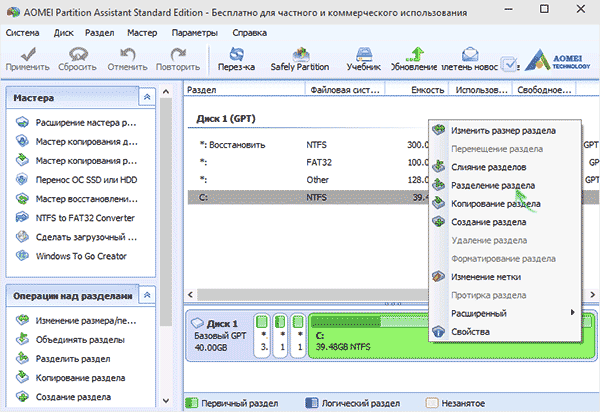
Disk partitioning in AOMEI Partition Assistant Standard Edition
And finally, let's see how to partition a hard drive in a free program AOMEI Partition Assistant Standard Edition. There is no separate partitioning wizard in this program; repartitioning is performed in two stages. First you need to get some free space. Right-click on the shared disk and select “Change partition size” from the menu.

Drag the slider to set the new partition size and click OK.

As a result, unoccupied space will be created. Select it with the mouse and select the “Create section” option in the menu on the left.

In the window that opens, if necessary, adjust the layout parameters (you can change the size, letter, file system type and partition type) and click “OK”.

Now, to start the staking procedure, click the “Apply” button.

Since you are working with the system disk, you will need to restart the computer.

All of the above methods allow you to partition a hard drive without losing data, however, when performing this procedure, especially using third-party software, you should be careful, since the risk of losing information, although very small, is still present.
When purchasing a computer or installing Windows or another OS, many users want to split the hard drive into two or, more precisely, into several partitions (for example, drive C into two drives). This procedure makes it possible to store system files and personal data separately, i.e. allows you to save your files in case of a sudden system crash and improve the performance of the OS by reducing fragmentation of the system partition.
Update 2016: new ways to split a disk (hard or SSD) into two or more have been added, a video has also been added on how to split a disk in Windows without programs and in the AOMEI Partition Assistant program. Corrections have been made to the manual. Separate instructions: .
You can split a hard drive or SSD into several partitions not only in Disk Management, but also using the command line in Windows 10, 8 and Windows 7.
Be careful: the example shown below will work without problems only in cases where you have a single system partition (and possibly a couple of hidden ones) that needs to be divided into two partitions - for the system and data. In some other situations (MBR disk and already have 4 partitions, when shrinking the disk, there is another disk "after" it) this may work unexpectedly if you are a novice user.
The following steps show how to split the C drive into two parts at the command prompt.

Done, now you can close the command line: in Windows Explorer you will see the newly created disk, or rather, the disk partition with the letter you specified.
How to partition a disk in Minitool Partition Wizard Free
Minitool Partition Wizard Free is an excellent free program that allows you to manage partitions on disks, including dividing one partition into two or more. One of the advantages of the program is that a bootable ISO image with it is available on the official website, which can be used to create a bootable flash drive (the developers recommend doing this using Rufus) or to burn a disc.
This makes it easy to perform disk partitioning in cases where this cannot be done on a running system.
After loading into Partition Wizard, you just need to right-click on the disk you want to split and select “Split”.

The next steps are simple: adjust the partition sizes, click OK, and then click the “Apply” button at the top left to apply your changes.

You can download the Minitool Partition Wizard Free bootable ISO image for free from the official website https://www.partitionwizard.com/partition-wizard-bootable-cd.html
Video instruction
I also recorded a video on how to partition a disk in Windows. It shows the process of creating partitions using standard system tools, as described above, and using a simple, free and convenient program for these tasks.
How to partition a disk during installation of Windows 10, 8 and Windows 7
The advantages of this method include its simplicity and convenience. Partitioning will also take relatively little time, and the process itself is very clear. The main disadvantage is that the method can only be applied when installing or reinstalling the operating system, which in itself is not very convenient; in addition, there is no possibility of editing partitions and their sizes without formatting the HDD (for example, in the case when the space of the system partition has run out and the user wants add some space from another hard drive partition). Creating disk partitions when installing Windows 10 is described in more detail in the article.
If these shortcomings are not critical, consider the process of disk partitioning during OS installation. These instructions are fully applicable when installing Windows 10, 8 and Windows 7.

Attention! When you delete disk partitions, all data located on them will be deleted.

Partitioning a hard drive when installing Windows XP
During the development of Windows XP, no intuitive graphical interface was created. But although control occurs through the console, partitioning the hard drive when installing Windows XP is as easy as when installing any other operating system.
Step 1. Delete existing partitions.
You can repartition the disk while defining the system partition. You need to split the section into two. Unfortunately, Windows XP does not allow this operation without formatting the hard drive. Therefore, the sequence of actions is as follows:

Step 2. Create new partitions.
Now you need to create the necessary hard disk partitions from the unallocated area. This is done quite simply:

Step 3. Determine the file system format.
After the partitions are created, select the partition that should be system and press Enter. You will be prompted to select a file system format. FAT format is more outdated. With it you will not have problems with compatibility, for example, Windows 9.x, however, due to the fact that systems older than XP are rare today, this advantage does not play a special role. If you also consider that NTFS is faster and more reliable and allows you to work with files of any size (FAT - up to 4GB), the choice is obvious. Select the desired format and press Enter.
Then the installation will proceed in standard mode - after formatting the partition, the installation of the system will begin on it. You will only be required to enter user parameters at the end of the installation (computer name, date and time, time zone, etc.). As a rule, this is done in a convenient graphical mode, so it is not difficult.
Free AOMEI Partition Assistant
AOMEI Partition Assistant is one of the best free programs for changing the structure of partitions on a disk, transferring a system from HDD to SSD, and, among other things, you can use it to split a disk into two or more. At the same time, the program interface is in Russian, unlike another good similar product - MiniTool Partition Wizard.
Note: despite the fact that the program claims to support Windows 10, on my system it did not partition for some reason, but no failures occurred (I think it should be fixed by July 29, 2015). Works without problems in Windows 8.1 and Windows 7.
After launching AOMEI Partition Assistant, in the main program window you will see the connected hard drives and SSDs, as well as the partitions on them.
To partition a disk, right-click on it (in my case on C), and select the “Partition Partition” menu item.
At the next step, you will need to specify the size of the partition to be created - this can be done by entering a number, or by moving the separator between the two disks.

After you click OK, the program will display that the disk has already been partitioned. In fact, this is not the case yet - to apply all the changes made, you must click the “Apply” button. You may then be warned that your computer will restart to complete the operation.

And after the reboot, you will be able to observe the result of disk separation in your Explorer.
Other programs for creating partitions on your hard drive
There is a huge amount of different software for partitioning a hard drive. These are both commercial products, for example, from Acronis or Paragon, and distributed under a free license - Partition Magic, MiniTool Partition Wizard. Let's look at dividing a hard drive using one of them - the Acronis Disk Director program.

How to partition a hard drive in MacOS X using standard means
You can partition your hard drive without reinstalling the operating system or installing additional software on your computer. In Windows Vista and higher, the disk utility is built into the system, and this is also the case in Linux systems and MacOS.
To partition a disk on Mac OS, do the following:

After this, after a short (for SSD anyway) partition creation process, it will be created and available in the Finder.
I hope the information is useful, and if something doesn't work as expected or you have questions, please leave a comment.
This article will talk about how to properly partition a computer’s hard drive into partitions, as well as how to fix an incorrectly partitioned disk without losing information. Methods for partitioning a hard drive for Windows XP and Windows 7 are somewhat different due to the peculiarities of the operation of these operating systems, so I will talk about them separately.
At first glance, it may seem that partitioning is not a particularly important process and does not require much attention. But an incorrectly partitioned disk can cause a lot of inconvenience in the future.
Pros of partitioning hard drives
Why do you need division into sections? Firstly, this will allow a clear distinction between the system and the user’s files. That is, Windows will live, for example, on the C: drive, and documents, movies and music on D:. Thanks to this, it will be possible to back up the entire system partition, and in case of failure, simply restore it all. If the backup process, along with the Windows operating system, also duplicates your files, which often include music and movies that occupy hundreds of gigabytes, then there will not be enough space. And so you will always have an image of the system partition at hand, ten to one and a half gigabytes in size. And your own documents can be copied to a spare drive at any time.
In addition, after a failure, checking a disk containing only the operating system will take much less time than checking all the files on the computer (sometimes the number of files reaches hundreds of thousands or even millions). For erased file recovery programs to work, you will also need a second partition to which the saved information will be copied.

This is what partitioning a hard drive into logical partitions looks like
A fly in the ointment or without some drawbacks
The main disadvantage is that only the disk space of the current partition can be used, even if other partitions are completely free. That is, if the disk is divided into three partitions, and each of them has, say, 50 gigabytes free, then it will not be possible to write a file of 120 gigabytes in size, although the total free space will be 150 gigabytes. In this case, you will have to transfer files from partition to partition until enough space is freed up on one of them. In relation to this example, if there was only one partition on the disk, then a file of 120 gigabytes could be written to it without any manipulation. Since disks usually do not become completely clogged, the more partitions there are, the greater the “wasted space” will be.
For small hard drives, this “lost space” as a percentage will be a decent amount. Therefore, the answer to the question of whether division into sections is necessary is not entirely unambiguous. But I can absolutely clearly say that to work in a modern system, partitioning a disk with a capacity of less than 80-160 gigabytes, with rare exceptions, does not make any sense.
In what proportions to split? Windows XP vs Windows 7
If you still decided to partition the disk, then it is necessary to allocate a certain space in gigabytes for Windows, and not divide it proportionally “in half” or “one to two”. First you need to decide how much space the operating system requires.
Windows XP is enough for 30-40 gigabytes. This size is taken with a small margin when taking into account the large number of installed programs. Of course, you can put it on a 10 GB partition, but the space may run out at the most unexpected moment. All other data should be copied only to the second partition.
Windows 7 itself requires a lot more disk space. In addition, hidden in its depths is the “magic” winsxs folder, which is growing by leaps and bounds. In this regard, it is recommended to allocate at least 70-80, and preferably 100 gigabytes for the “Seven”. For the last reason, it is better not to use SSD drives that have a small capacity (less than 64 gigabytes). We leave the remaining space on the hard drive for the second partition.

Windows Disk Manager. You have to work very carefully.
How to partition a disk
Dividing into sections is not difficult. To do this, you can use the “disk manager” built into Windows (Right-click on the “My Computer” shortcut and select Manage, then select Disk Management).
A list of disks installed on your computer will appear in the window that opens. Now you can create and delete partitions. Please note that you will not be allowed to work with the partition on which the system is installed. To do this, you will have to use specialized software, which is discussed in the next chapter. The system partition itself is partitioned when installing Windows.
In addition, perform all operations in the above-described disk manager with extreme caution, since any actions in it destroy the hard drive data, and it will not be easy to restore them later.
How to fix incorrect hard drive partitioning
The most common situation is when too little space was allocated for the first (system) partition. As a result, we have a completely clogged system partition while the second one is empty. The simplest way is to reduce the second partition and, due to the resulting empty space, increase the system partition. However, the built-in tools in Windows will not allow you to do this.

Everything is very clear.
In such a situation, it is better to use auxiliary tools. For example, Disk Director Suite from Acronis. This package will allow you to create a boot disk with which you can repartition the partitions of your hard drive at your discretion. All data on the hard drive will not go anywhere. However, it is recommended to save important data in a safe place before any manipulation. In addition, the Acronis boot disk will help you convert the file system to another format, delete and create partitions, check disks for errors, and much more.
But it’s better to correctly plan the size and number of partitions right away than to spend a lot of time later correcting errors at the most inopportune moment.
conclusions
My opinion, based on many years of experience, is this. There is no need to partition the disk. If it is inconvenient to store files on one partition, then instead of partitioning it is better to buy a second hard drive. On the one hand, this will allow you to separate the system and personal files, and on the other hand, it will divide the load on two devices. That is, system files will be opened from one hard drive, and user files from another, which will ultimately speed up the operation of the operating system and documents will open noticeably faster.
Partitioning is required only when organizing a RAID array, when a huge single space is created from two or more hard drives. It will still have to be broken.
If you are determined to partition your disks, use the above recommendations for choosing their volume. Incorrect partitioning can then backfire. And remember the main truth - perform any manipulations only if you have a backup copy of important information. One wrong move and your entire life's work will be sent to electronic Valhalla.
UPD. With the advent of SSD, the issue of division resolved itself. The system is installed on a solid-state drive, and data that does not require high speeds is installed on a traditional hard drive. In such a situation, as you understand, there is no need to divide the hard drive into partitions. At the same time, large amounts of RAM make it possible to completely disable swapping. Thus, the most optimal scheme is SSD + HDD, each of which has only one partition.
The computer hard drive is a means of storing system and user data in particular. Sometimes, it is necessary to divide information into some large sections to avoid confusion. It is recommended to install the system on one partition, and user files, programs, etc. save to others. When purchasing a new PC, most often the hard drive is not divided into local disks (partitions), so you need to carry out this operation yourself. Let's look at how to properly partition a hard drive. For example, we will use Windows 7, which is the most stable among current versions (Windows 8, 10).
Before you begin the process of partitioning your disk, we recommend that you familiarize yourself with the following tips:
- For the OS, allocate at least 50-60 GB of free space, otherwise you will not see normal system operation. Of course, if you have a hard drive of 100-200 GB, then allocating that much space is too troublesome, but for systems starting from the “seven” you need enough memory.
- It is also better to take care of the path for saving files for the browser and torrent client; it is better to set the path for uploading files for them not on the system drive (by default), but on another more capacious partition. You should also understand that desktop content takes up space on the system disk.
- If you have a hard drive up to 1 TB, divide it into 3 partitions, if from 1 TB to 2 TB, divide it into 4 partitions, and more than 4 TB into 5 partitions. This is explained by the fact that when downloading large files to the hard drive, optimal division will allow it to be written correctly.
- Do not use all available memory on your hard drive. It is necessary to leave some space “in reserve” to restore damaged clusters.
If you follow these tips, you can set up hard drive partitioning once and not worry about it again until you decide to expand the memory on your computer.
How to partition a hard drive in Windows 7?
To partition the hard drive, we will use a standard tool in the Windows operating system. It's called "Disk Management". To open this utility, you need to do the following:
Now let's move on to how to partition a hard drive in Windows 7. The instructions are as follows:

How to partition a hard drive in Windows 8, 10
Using Windows 7 as an example, we looked at the partitioning process. There will be nothing fundamentally new in the “eight” and “ten”, so you can use this procedure for this system as well. The only exception is that we will slightly adjust the tips to complete the task correctly:
- For the system disk, leave (add) at least 70-80 GB of information. Starting with “seven”, the system writes information about the current state to the local disk so that you can use system recovery if necessary. In addition, after many updates (including up to 8.1, 10), large files are formed that are protected by the system;
- Divide the disk into several partitions, do not leave 2 partitions. This will make it more convenient for you to handle files that are recorded on your hard drive, logically structuring them into sections.
How to partition a hard drive in Windows 7, 8, 10 using third-party programs
What to do if you don’t trust the standard tool for working with local disks? We suggest using a third-party application Partition Wizard. This application is free, does not require much space and is stable. Of course, its functionality is far from Acronis Disk Director, but it will be just right for partitioning a hard drive.
So, first, download it and then install it in a convenient location on your computer. When the program is installed, run it and wait until it loads the necessary information about your system and hard drive.
An unallocated partition will be designated as "Unallocated". Right-click on it and click "Create".
When you run this command, you will need to provide the following information in the next window:
- Section title;
- Partition type (for example, logical);
- Drive letter;
- File system type;
- Volume.
Please note that in the case of the program that is built into the system - “Disk Management”, these operations are performed in different windows, but here, for convenience, everything happens in one window. For example, we created a new “Test” section with 400 GB on board. Once created, the file system looks like this:

This process can be repeated as many times as you like until you run out of free unallocated space. Please note that it is very important to leave very little free space so as not to damage the hard drive. To create another new partition, simply repeat the instructions. Don't forget to save your progress using the Apply button.
As you can see, the process of dividing a disk into partitions is not complicated, but very simple if you approach the issue with instructions from our website.
Partitions are separate volumes that, after formatting, become disks like C or D, for example. I always take this issue seriously, because I do it rarely and for a long time. I am not a fan of reinstalling Windows because of every little thing or when some problems and errors start to appear.
Almost always, errors can be corrected, the problem can be eliminated, and even the system can be made better. In addition, when a hard drive is partitioned, you need to put all the information somewhere, and finding where and transferring 1 Terabyte of information is not such a fun task. Therefore, it is better to do everything correctly right away.
How to properly partition a disk
First, we need to decide how many sections we will divide it into. This depends on the size of the hard drive. For sizes between 250 and 500 GB (the most common), I recommend splitting it into two sections. The first will house the system and main programs, and the second will contain data (music, movies, games). A separate first partition for the system makes it possible to easily reinstall Windows by formatting the disk without deleting the main data that will be on the D: drive.
Disk “C:” with a capacity of 30 GB is sufficient for Windows XP/7 and all necessary programs. For Windows 8/8.1/10, it is advisable to have at least 50GB in order to avoid problems with temporary files in the future. Of course, it is possible to redefine partition sizes without losing data, but this is a risky and time-consuming process, so we will do it right away. However, the volumes of disks D: and E: are easier to redistribute among themselves.
It is not advisable to have disks larger than 500-700 GB because if problems arise with one disk, the data is saved on the second, i.e. if anything, we won’t lose everything at once. Of course, it is advisable to backup your data.
It is assumed that you have a second hard drive and a system to boot from. If you have a new hard drive on which you want to install the system, then the disk is partitioned using.
We will use the Paragon PM program. You need to download and install the x32 or x64 version in accordance with .