How to install from disk. AMI BIOS – setting for booting from disk
There will inevitably come a time when the operating system will need to be reinstalled. For most users, this situation is not a very favorable moment. Some people treat the problem calmly, while others, on the contrary, are horrified because they do not know how to reinstall Windows via BIOS. As a rule, the unlucky person settles on the option that saves the situation: “Hello, this is the service computer help? As a result, he loses time, patience and money. From now on everything will be different. Right now you will learn the “great secret” that Windows OS installs itself. The user only needs attention and a few confident presses on the appropriate buttons. Are you interested? Then go ahead!
Meet the chief PC manager - Mr. Bios!
Incredibly, the Bios firmware, the abbreviation of which stands for “basic input/output system,” is primarily responsible for the functionality of the computer. If any of you, dear reader, thought that Windows was responsible for the “omnipotence” of the PC, then you were mistaken. Accept the paragraph title as an important fact of reality. You will soon understand that resolving the question of how to install Windows will first of all require turning to some motherboard pre-installed by the manufacturer Bios program. Moreover, you should be aware that the underlying system may have different versions, since competing companies in the IT industry each have their own idea of the beauty, convenience and efficiency of the ROM (read-only memory) chip, the “micro-monster” Bios, activated by a chip. Yet, despite the individuality graphical shell each separately existing program for hardware control computer, the functioning of hardware-level embedded systems becomes intuitive when direct entry into their environment, since they all use the same designations in the form of standard terminology.
How to reinstall Windows via BIOS: thumbs up!
We won’t rush, because you know that “rush is only needed when fishing...”. Before you get into the PC, that is, when the Bios interface opens in front of you, know: carelessness in actions, which is expressed in mindlessly pressing keys and changing “incomprehensible” parameters, is critical, and in poetic language it’s even like death!

However, you still have to do some “editing” yourself.
The only correct choice: one among many
You can activate the BIOS firmware when you turn on or restart your computer. In order to do this, you need to press the corresponding button on the keyboard several times at short intervals. As a rule, this is the “Delete” or “F2” key. If it doesn't work, the user can always see on home screen loading name of the “responsible” button (lower part of the display or upper left corner).
Why “boot”?

The most common method of installing an OS is a practical solution to the question: “How to install Windows from disk?” However, the method of implementing the system via a flash drive is becoming increasingly popular, but more on that later.
- Depending on the Bios version, the tab responsible for boot priority may have different names. However, the English word "Boot" will mean that you are on the right track.
- Having opened the above menu or activated the “Advanced BIOS Features” item, pay attention to the “Boot Device Priority” item. Or lines that indicate the order in which devices are loaded. Typically these are Floppy, HDD and CDROM (DVD R/RW).
- Set the boot priority to your disk drive (drive).
- You can save your changes by clicking hotkey F10 or just agree: “Yes” (if you used the “Esc” button).
We reboot and proceed to the next stage of the project “How to reinstall Windows via BIOS.”
Where does Windows come from?
Perhaps some of you will feel that this point should have been placed at the beginning of the process being described. Meanwhile, this “discrepancy” in the presentation of the material does not in any way disrupt the sequence of actions; moreover, it is the most acceptable option to learn how to do everything according to the rules. Now insert the disk with Windows distribution. If you are using licensed software, and the disk with the system image you purchased is original, then you have nothing to worry about. When you have free Windows, downloaded from a dubious Internet resource, the chances of long-term and fruitful “cooperation” with the OS are negligible.

However, there are exceptions. Perhaps you will be one of the lucky ones, and the “cracked” system will turn out to be quite suitable for work. But do not forget that from correctness changes made depends on the BIOS settings final result— OS installation success. It is the microprogram that monitors the “fairness of the game” of the user. Therefore, often installing a system distribution from Windows environment is fraught software glitches and, as a rule, it goes wrong. As a result of using a “treacherous” method when solving the question: “How to reinstall Windows XP?” the efforts of an uninitiated user simply become wasted time. Moral: install Windows from DOS, that is, through BIOS!
When the disc “whispers” - the user is drinking coffee
Once you've designated the drive as boot device #1, then inserted the Windows disc and restarted the computer using the Alt+Ctrl+Delete key combination, it's time to observe. As promised, the system will “become” automatically.
- When the message “Press any key...” appears, press any button.
- After the initialization process, a window will open in which you need to assign the OS installation directory.
Attention: do not mindlessly press “Enter” on an inoperable Windows OS, which usually takes up space in system partition HDD and is designated by the letter “C”. “How to reinstall Windows XP?”, you ask, if the required disk area is occupied old copy? Easily! To do this, simply format the partition, first erasing the old data.

- On the highlighted OS, press “D”, which means delete.
- Then use the "L" button to confirm your intentions.
- After the unallocated area appears, press “Enter” and format the created partition to the NTFS file system.
You don't have to do anything else, except at the end of the installation to make some adjustments regarding system language for using the operating system, as well as user data. As you have probably already seen, everything is quite simple and transparent, and the solution to the question “How to install Windows through BIOS?” - not a labor-intensive process at all.
Spectacular Windows 7 and royal flush download
Now the time has come to enlighten the attentive reader about the method of installing the operating system using a flash drive. The promised installation method is something more practical, since it does not require participation. However, the feasibility of this method greatly prevails over the traditionally used boot from a CD or DVD. Especially today, in our age of compactness, when modern electronics takes on ultra-thin features, and technology gets rid of devices that unnecessarily “devour” time and energy.
Modern solution to the problem: via BIOS?

First of all, it is necessary. This is not difficult to do; it is worth considering that the capacity of the compact storage medium must be at least 4 GB. "Why?" - you ask. The thing is that the standard distribution kit of the seventh OS “weighs” almost 3 GB, so the minimum size of the flash drive must correspond to the above value.
From words to deeds
- Format Flash media using standard means Windows. File system you should select NTFS.
- Then you need to prepare the system distribution for recording. That is, if setup files are located on optical disk- insert it into the drive, when the data is in the form of an image - load it onto a virtual device.
- The next step is to use the “WinSetupFromUSB” program. This software is freely distributed on the Internet, you should not have any difficulties downloading it. After installing and launching the specified program, you will be literally two steps away from the moment when you can consider yourself a professional in solving the question: “How to install Windows?”
- In the top checkbox, select the flash drive installed on your PC.
- Check the corresponding box (Windows 7) and, by clicking the button, specify the path to the OS distribution next to it.
- After activating the “GO” toolbox, all you have to do is wait a few minutes. Upon completion of the process, the program will display a corresponding message.
It's time to start practical solution how to install Windows via BIOS!
Flash start!

Setting up boot parameters is done in almost the same way as in the case described at the beginning of the article. The only difference is the choice of media. At this method installations your choice - USB Drive, that is, a flash drive. There is another way to boot from the desired data source, bypassing the main thing. This scenario of action is possible when the user presses “F8” to call up the Boot menu, so to speak, hot option basic system. Of course, on different PCs this option can be activated using a different key.
After reboot, follow the instructions:

You must now understand that the previously described method of installing Windows from a disk is somewhat outdated. Flash drives are an incredibly convenient invention of mankind!
Finally
The article described two main methods Windows family. It's up to you to decide which one is optimal. However, there are a lot of programs that allow you to do backups working systems, that is, in the event of an OS crash, the user has the opportunity in a matter of minutes to restore a clean copy (duplicate) of the OS with working programs and previously made settings. Incredible convenience, since the user does not need to install the software again and remember forgotten passwords. However, it will appear new question: “How to “start Windows through BIOS?” Which, in principle, can be solved just as easily as in the case when reinstallation is necessary. But this is a topic for another article. Don't learn from your own mistakes...
Like
Like
Tweet
Let's say you have a boot disk with Windows in your hands. Or the Dr.Web LiveCD anti-virus disk. Or maybe you want to install Linux. You insert the disk into the computer, but suddenly the question arises: “What to do next?” If you are an inexperienced (yet) computer user, this question will be one of the first to arise. Experienced users also sometimes need to know the boot order in different versions BIOS. So my instructions are suitable for everyone.
So, we are faced with a task: we need to tell the computer which disk it should boot from first. To do this you need to go into the BIOS settings. How to do this - read on.
Which button should I press?
The very first question that arises for an unprepared user. How to boot from boot disk or flash drives?
Two solutions:
- Open the boot menu with a list of connected boot devices and select the one you need from the list.
- Configure the motherboard BIOS so that the operating system boots first from desired device, not with hard drive.
Option 1 simple, but not all BIOS support such a menu. In any case, it's worth a try. Typically, the boot menu appears when you press F11 or F12 immediately after turning on the computer. Less often - Esc, F8 or other buttons. Sometimes it is supported but disabled. In this case, read the instructions for your computer's motherboard.
Option 2 It always works - there are boot settings in almost every BIOS. I will tell you about the setup.
We need to get into the BIOS settings. BIOS (or its improved UEFI equivalent) - special system, which loads immediately after turning on the computer. The BIOS does not depend on Windows or anything else because it is located on a memory chip soldered into the motherboard. You can read more about terminology.
Typically, to enter the BIOS settings you need to press Delete button, F2 or Esc 1-3 seconds after turning on the computer. How to find out which button to press: after turning on the PC, look for the line Press Del to enter Setup on the screen (where instead of Del there may be F2 or another key). This will be the inscription about which button to press. Example:
Another example:

Instead of a black screen with diagnostic text, the logo of the laptop or motherboard manufacturer may be displayed, then the prompt will look like this:

By the way, in the last two screenshots there are hints for the button boot menu(which cause easier) - on the first it is Esc, on the second F12. Let me remind you that this option is preferable, but is not always available.
There is no inscription on the boot screens of some laptops, then look at the keymap
Press the desired button and get into the BIOS. If you press the wrong button, nothing bad will happen, because... the computer will simply ignore your actions or show some other BIOS add-on that will not contain what you need. Then you need to press Reset (reboot button on system unit) or Ctrl Alt Del to restart your computer.
After clicking the desired button and the appearance of the BIOS screen, an ambush awaits us - there are many versions of BIOS, their settings look different. There are also good news- they all most often have the same points, so you can figure out what’s what. There are two BIOS version, very different from each other, we will look at them below.
Please note that similar tips can be found in the instructions for your laptop or motherboard. desktop computer. If you do not have instructions in paper form, you can always download it from the model page on the manufacturer’s official website.
After reading this article and looking at the explanatory illustrations, you will be able to configure booting from the Windows installation disk on any computer.
Popular BIOS version. It is, in particular, on many Acer laptops:

We need to get to the Boot section. Press the right arrow three times:

Here is a list of devices from which you can boot. The line names are different on each computer, but the first two words always tell you what kind of device it is:
- IDE CD – CD/DVD drive
- IDE HDD - HDD
- USB HDD portable hard disk
- USB KEY – flash drive.
To set the disk drive first (line starting with IDE CD), i.e. change the boot priority, use the up/down arrows to highlight this item, then press F5/F6(on some versions of this BIOS you need to press – or), put it first in the list. It will be something like this:

To save settings made, click right arrow to get to the menu Exit(Exit), select menu item Exit Saving Changes(Exit and save changes) and press Enter twice in a row.
Note: The Exit Discarding Changes menu option allows you to exit the BIOS without saving the settings you have made.

The computer will restart and instead of loading Windows, it should start booting from the selected drive. That is, for example, the installation of Windows will begin. Mission Complete!
The main menu of this BIOS looks like this:
 To change the boot order on AWARD BIOS, go to the menu Advanced BIOS Features:
 Select a menu item First Boot Device(First boot device), click Enter and put a dot opposite CDROM (Removable, if you need to boot from a flash drive or portable hard disk):

Press Enter, return to the previous settings page, go to Second Boot Device(Second boot device) and set it there Hard Disk – this will allow your computer to boot normally when removed DVD disc or flash drive.

Press Y on the keyboard, then Enter - the settings will be saved and the computer will restart.
Ready! Now, when a boot disk is inserted, the computer will boot from it first, and not from the hard drive. If the disk is not inserted, it will boot from the next device in the list.
Old version of AWARD BIOS
I've only seen this on old computers before 2003. The main menu looks like this:

To configure the boot order, you need to go to BIOS menu FEATURES SETUP:  Paragraph Boot Sequence is responsible for the loading order. Buttons PageUp And PageDown(or Enter and arrows - unfortunately, I have no way to check) you need to set CDROM first, C second (this is the hard drive), third is not important - set any.
Similar to the aforementioned AWARD BIOS. It most often contains the inscription BIOS Setup Utility without any explanatory names.
Use the “right arrow” button on the keyboard to move to the tab Boot:

On the Boot page you need to go to Boot Device Priority:

There are points here 1st Drive, 2nd Drive– “First boot device”, “Second boot device”. You need to open 1st Drive and specify CDROM (for a disk drive) or USB (for booting from a flash drive) there; in 2nd Drive specify SATA or IDE, depending on what kind of hard drive you have and which item will be available in the menu.
Another AMI BIOS
Everything is clear here, look at the picture:

Buttons and – You can cycle through menu items by pressing a button F10 will call up the option to save settings.
Questions and answers
IN: I can't get into the BIOS settings. What to do?
ABOUT: Make sure you're doing everything right. 99% of problems are due to inattentive reading of the instructions. Everything can be solved if you ask the almighty Google the right question: “motherboard/laptop model, boot settings.”
IN: I configured it as it should, but the error “NTLDR is missing” appears or the cursor blinks at the top left of the screen.
ABOUT: You wrote the boot disk or flash drive incorrectly.
IN: How to boot from a flash drive (or portable hard drive) rather than from a DVD?
O1: You must specify USB-HDD, USB-ZIP or Removable in the boot settings. The item name may vary. In case of problems, read the instructions for the motherboard.
O2: If the BIOS does not support booting from USB devices, you can do bootable DVD with Plop Boot Manager and when booting from it, select the “USB” item in the menu that appears. The advantage of this method is that even on old computers, where USB operates in slow USB 1.1 mode when booting, the speed will be fast - it will turn on USB mode 2.0. Minus - again, it is not always supported by some motherboards. Read more about Plop
IN:How to do bootable USB flash drive?
ABOUT: If you need a flash drive with installation of Windows 7 or 8, then go to the section
IN:The article does not contain instructions for setting up my BIOS. Please write!!111
ABOUT: With the advent motherboards, where UEFI is used instead of BIOS, arose a large number of different in appearance, but essentially identical screens with settings. Since the settings need to be the same everywhere, either read the article above carefully and find similar items in your BIOS, or read the instructions for your motherboard/laptop.
IN: I configured the BIOS, now nothing loads at all. Help!
ABOUT: In 10 cases out of 10, the problem is inattention or an incorrectly made bootable flash drive/disk. Reset the BIOS settings either by removing the battery for half an hour from turned off computer, or the Load Default Settings menu item. Then do everything again, carefully reading all instructions.
IN: When booting from a flash drive, a blue screen appears.
ABOUT: You made a mistake somewhere when creating a bootable USB flash drive. Read the instructions more carefully or look for another way to create bootable flash drives a lot of.
IN: I made a boot disk/flash drive, configured the BIOS, but it still boots from the hard drive.
ABOUT: Either you prepared the boot disk/flash drive incorrectly, or you configured the boot incorrectly. If you are unable to read the instructions carefully, consider whether you will do everything else correctly? Maybe it’s better to contact experienced people (service center)?
Conclusion
With the help of the information in this article, you will be able to run bootable disks on any computer or laptop - any LiveCD, installation disk from Windows or Linux, any bootable USB flash drive (if the BIOS supports booting from USB devices).
On modern computers there are BIOS (or UEFI) versions with mouse support, beautiful menu and other, other things. Despite the other appearance, everything is configured according to the same principle as I gave above.
Don't forget after installation (or why else are you setting up the BIOS) to return the boot settings back so that the computer boots normally from the hard drive!
In this publication we will look at how it is done. WITH using bios You can change the order and priority of loading the OS. BIOS settings allow you to change the boot order of a previously installed OS, which is performed automatically when you turn on the computer. Using the same settings, you can create a command with which the Windows 7 installation program will begin to run automatically when you turn on or restart the computer and the previously installed OS will not interfere with its operation.
Preparing your computer for OS reinstallation
Need to save important files on removable media, personal data and passwords. You need to prepare a list of everyone in advance electronic components and computer devices. If some component or device does not work correctly after installing Windows 7, then most likely it will be necessary to install a driver for this device designed to work with Windows 7. After installing the new OS, it will be necessary to install all important and necessary programs again. Can be saved important information and on the computer itself, using a pre-prepared hard drive partition, which does not need to be defragmented and formatted when reinstalling the OS.

Data that you do not want to lose when reinstalling the system can be saved on another logical drive, for example, as in in this example- on disk I:
Preparing media with the Windows 7 installer
Before installation, you will need to enter into the bios an indication of the boot priority of the device from which Windows 7 will be installed. This can be any removable media, hard drive, memory device or disk where the installation program is located.
How to enter BIOS
To do this, you need to press a certain key when turning on, or restarting the computer before the old OS starts loading. The right combination keys must be specified in the documentation related to the computer's motherboard. Often there are options with F keys (F1, F12, F4, or other F).
Finding settings responsible for boot priority in bios
After you have managed to enter the bios, you need to find the settings that are responsible for boot priority. These settings may be located in the Advanced, BIOS FEATURES SETUP, Advanced BIOS FEATURES, Boot sections, depending on the bios itself, since computer manufacturers may use bios with different interfaces. You need to find the item First Boot Device, or Boot Device Priority, which contains settings for controlling the boot priority of the 1st Boot Device and 2nd Boot Device. 
Setting boot priority
In order for the device hosting the Windows 7 installer to have priority when booting the computer, you must designate this device in the 1st Boot Device section. The second boot priority can be set to the hard drive. Now you need to save the changes bios settings. To do this, you can use the corresponding key located in the bottom line of bios, or call the panel for saving settings using the Esc key, and then confirm the changes with the Y key. You can not change the settings in the bios and force the program to work before starting the old OS by pressing the F9 key during the reboot.
Reboot the computer and confirm that installation has started from the media
After changes were made to the BIOS about the priority of booting from media containing installation program for windows 7, you can restart the computer and give the command to start loading from required media. This will be possible to do within a few seconds, after a prompt appears on the screen to press any key and confirm permission to start loading from the desired media. 
Hello! Today I will write about the most sacred thing that can be in the computer business, this is about how to install Windows 7. I think that everyone at least once had such a problem as “Windows crashed”, and only specialists can reinstall it and charge you a considerable amount of money.
But you think so, today I will write how to install Windows 7 yourself and completely free. I've been meaning to write this article for a long time, but never got around to it. Until I myself needed to reinstall Windows 7 on my computer. I quickly figured it out and took photos for this article. I apologize in advance for the quality of the photo, I took the photo with a video camera. And then I will describe point by point what is needed for Windows installations 7 and how to actually install it.
This article describes in detail the installation process of Windows 7. But I wrote another article in which I collected. Take a look, I think you will find it useful.
What do you need to install Windows 7?
1. Naturally, we will need a disk with Windows 7. You can buy it in a store or download it on the Internet. After you download it, it will most likely be in .iso format; I wrote about how to burn a disc in the article.
2. Before installation, we need to “save” your files that are located on the disk on which you have installed operating system. Usually this is drive “C”, the fact is that during the installation process we will format it and all files from it will be deleted. If you have new computer(only from the store) then this does not concern you, but in another case you need to transfer all the files from drive “C” to another drive. Data stored on the desktop and in a folder "My Documents" will also be deleted!
3. And the last thing you need to prepare is to put it in BIOS booting from a CD/DVD drive, so that we can boot from it first (By default, the computer boots from the hard drive). I wrote about what BIOS is and how to enter it here and. You can check how your computer is configured; you may already have boot from the drive installed. Just insert the Windows 7 disk into the drive and restart the computer; if the computer boots from the disk, then everything is OK (you will see the white text and dots). Well, if the PC did not boot at all, or went Windows boot, then you need to configure the BIOS. Preparations for installation are completed, let's move on to installation. I already wrote about that.
Installing Windows 7
1. Place the disc in the drive and restart the computer. If you did everything correctly during preparation, then you should see a white inscription with dots. You need to quickly press any key. Next you should see this picture:


3. After this, we see this picture, on which we click “Install”


5. At the next stage, click “Full installation”

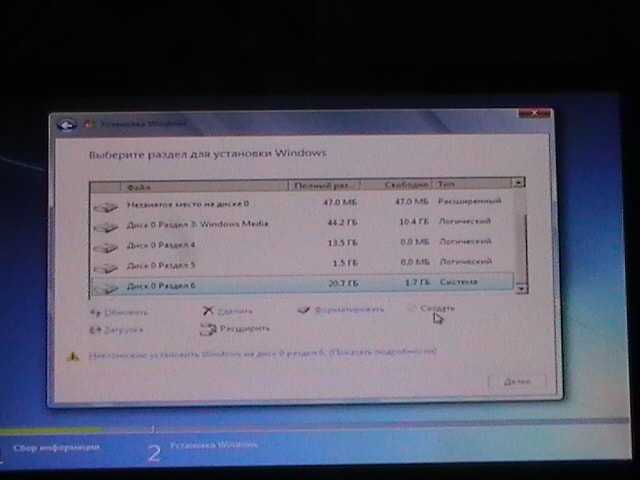
6. Now comes the fun part. If you already had an operating system, and your hard drive is already broken, then do this: We look in the list for the partition that we need (we need drive “C”), opposite it should be written “System”. The names may differ from what I have. For example, I have “Disk 0 Partition 6”, yours may be different. If you are sure of your choice, then click “Disk Settings” and “Format”, confirm, wait for completion, see that our disk is selected (Remains selected) and only after checking everything again, click “Next”. When formatting, all data from the partition you selected will be deleted!
If you have a new computer, then you will need to partition the disk. In your case, you will only have an unmarked area. I described in detail the process of partitioning a new hard drive in the article. Do this: Select it (the unmarked area), click “Disk Settings” and “Create” and enter the size of the first partition. The first partition that you will create will be a partition for the system (drive “C”), I advise you to allocate 50-100 GB for this partition. The remaining unmarked area needs to be divided, preferably twice. Let's create again and enter, for example, 200 GB, and with what remains we create another partition and you should get a picture similar to mine:

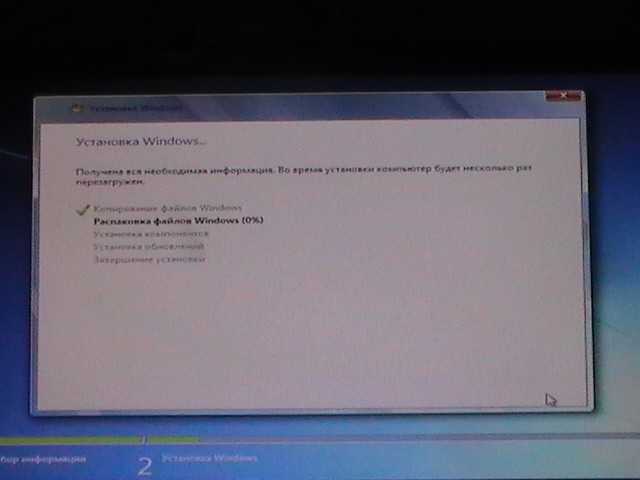
7. After clicking on the “Next” button in the previous paragraph, the process of copying files and installing Windows 7 will begin.

8. Now let's move on to the actual Windows setup 7. Enter your username and click “Next”

9. Enter the password, or not, as desired and click “Next”

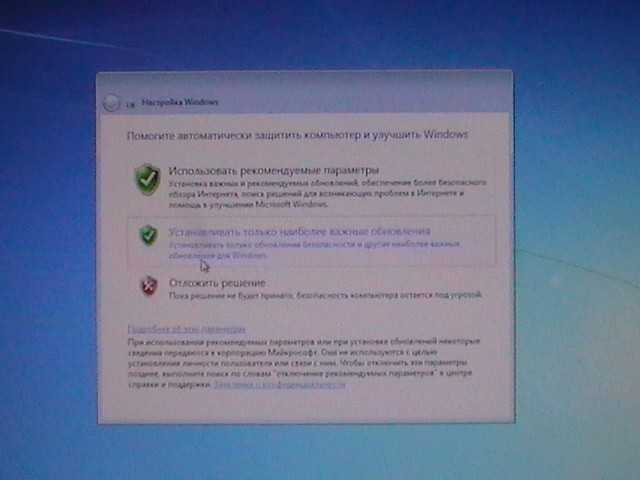
10. If you have a key, then write it down, and if not, then uncheck the “Activate when connected to the Internet” and click “Next”

12. Last stage. Specify time zone, time and date. And of course, click “Next” :)

13. That's it, I congratulate you! Windows 7 installed, a couple more beautiful pictures and the desktop in front of you.


Updated: January 11, 2013 by: admin
“We read the article, then watch the video lesson”
In this video tutorial and in its description in this article, I decided to show you how to reinstall the Windows operating system in one of several BIOS or BIOS. First of all, I would like to immediately warn you that there are many types of BIOS or BIOS, and they differ, but the principle of operation still remains almost the same, but the difference depends on the manufacturers. For example Motherboard BIOS ASUS boards are based on AMI code and BIOS menus blue symbols on gray background, and other manufacturers use Award/Phoenix firmware, so it has a blue background and yellow letters. Therefore, if your BIOS or BIOS is slightly different from the one on which I will show you the entire installation, and you suddenly did not understand something when entering the BIOS or BIOS, then you can always exit the BIOS with the cancel button last action Esc if installation has not already started. Convert to Google translator those words that you did not understand, then return to the BIOS or BIOS and continue the reinstallation.
And so let's get down to business.
To reinstall the operating system, you need to insert a boot disk with the operating Windows system and enable reboot. When we press the Delete button, or in some cases F2, we get to the BIOS or BIOS. Next, select the BOOT tab (in boot translation) and select Boot Device Priority there and press Enter, here is the picture:
Next, select the first line Boot Device (in translation boot device) and press Enter. We will have a window to select from which device we will load the operating system, we select CDROM in the window that opens or you can have DVDROM and press Enter here is the picture:
After we have selected the CDROM boot device in the first line, we must save the boot action by pressing the F10 button and you will see a confirmation window in which we press OK, here is the picture:
Next we will watch the actions in the video lesson. But I would also like to tell you right away that in many cases in Main menu The BIOS settings are set so that you don’t even need to perform the above steps. And immediately after you inserted the boot disk and rebooted without performing any actions, you will see a menu similar to the one in my case in the video tutorial. So watch and remember.
NOTE: if we perform all the above steps, then after watching the video, below will show how to save the boot steps from the hard drive without removing the boot disk from the DVD drive.
Watch the video lesson
The video tutorial shows the installation of Windows via BIOS and basic initial settings.
After successfully installing Windows, in our first case described above, you need to save the operating system boot on the HDD, or you can also say the hard drive of your computer. When saving to HDD, your operating system will boot from the hard drive rather than the DVD drive. So, let's begin. We reboot again and press the Delete button or in some cases F2, select in BOOT menu, select Boot Device Priority, and press back in the same first line Enter, in the window that appears, now instead of the CDROM line, select HDD, that is, hard drive and press Enter. The HDD should appear in the first line, then press F10 and confirm by pressing OK. Here are the next two saving pictures.