How to use the k lite codec pack program. Video splitters and audio parsers
In this lesson we will install k- codecs on your computer. lite codec.
I think that everyone has had this situation when you open a video or try to do something in a program, and a message pops up that says this or that codec is not installed on your computer. Today we will solve this problem.
Now codecs are distributed mainly in the form of packages. The most common in in this case is a package called K-Lite Codec Pack . In order to download this package, go to the website and go to the "Download" section.
Depending on the set of codecs and utilities, there are several versions of the package: Basic, Standard, Full and Mega. I think that the Standard package is enough for us, so on the page that opens, follow the “Download Standard” link. It is also recommended by the site itself.

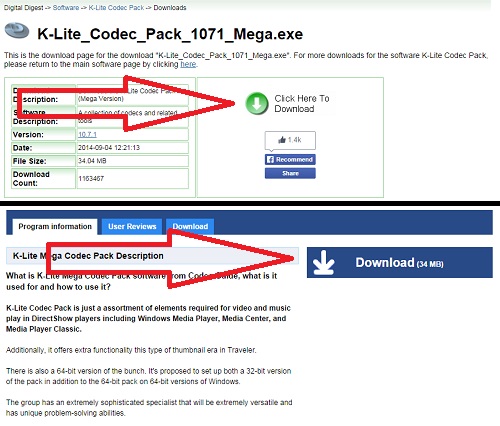
On the next page we select the hosting from which we will download codecs. Let's download the file from digital-digest.com. Follow the link to the left of this hosting as in the picture below.

On the website that opens, you need to follow the “Click Here To Download” link.

Now all you have to do is save the file to your computer. Once the download is complete, run the codec installation. To do this, go to the folder with the file and double-click on it with the left mouse button. Let's walk through the installation steps a little. We will click on the Next button everywhere and focus only on some settings. At the "Installation Mode" step, select "Normal mode" - install codecs in normal mode, which does not require additional knowledge or settings from you.

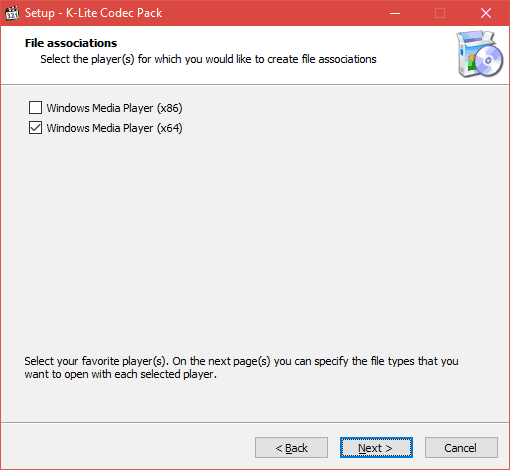
On the "File Associations" page you need to select which player the association will be made with, i.e. through which player the file formats selected in the next step will automatically open. Can choose Media Player Classic, which is included in the k-lite codec pack or leave the regular one Windows Media Player.


Since the ultimate goal is to install codecs, the remaining installation items, which do not play a very important role, can, in principle, be skipped by pressing the Next button. Upon completion of all installations, press the "Install" button to begin the installation.

The K-Lite codec pack also includes 2 useful utilities: MediaInfo and Codec Tweak Tool.
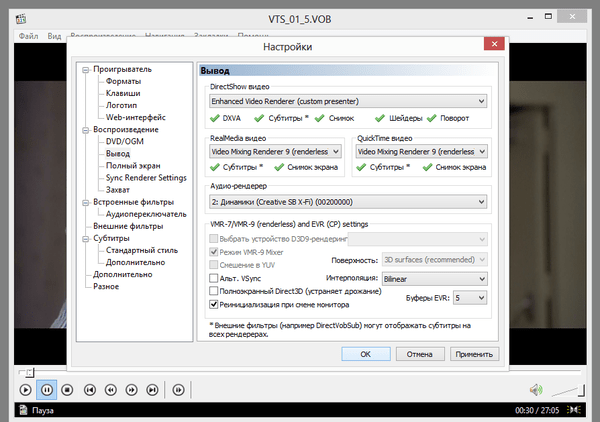
Codec Tweak tool- This utility manages the package. Through it, you can update the codec package itself, as well as correct errors that may arise when working with audio and video files. To check for updates, select the “KLCP update check” item, and in order to correct errors, click the “Fixes” button.

MediaInfo- a utility that allows you to find out information on video and audio files. Simply select the file by clicking on the special line.

And we get information about the file. Perhaps it will be very useful for you.

You can find these utilities on your computer by searching in the Start menu. Open the menu and type the name of the required utility in the line.

You don't need to expect anything more from installing codecs. The principle works here - set it and forget it.
If you still have questions or have difficulties installing codecs, then below you can watch a video lesson on the topic of this lesson.
The local network(LAN, Local Area Network) is computer network, allowing multiple computers (at home, in the office) to connect to each other and/or to the Internet through a single access point.
If you need to change your monitor resolution in Windows 7, but you don't know where the Windows 7 screen control function is, then you've come to the right place.
Regardless of the version of Windows, the problem is the same: to watch a movie you need codecs that are not included operating system. Therefore, the package, on the one hand, needs no introduction: many users download it immediately after installing Windows in order to improve support in one fell swoop popular formats multimedia.
On the other hand, rarely does anyone bother to study the contents of this package (the principle “if only everything works”) works, although there are reasons for this. Thus, K-Lite includes utilities that can be used to diagnose and solve specific problems related to the operation of codecs.
In addition, K-Lite not only adds broad support for media formats, but also allows complete control over the processing process. During the installation phase, you can select the components you need, as well as specify your preferred filters and decoders. The quality of playback and processing speed depend on their correct settings.
All these points will be touched upon in this review.
Key benefits of K-Lite Codec Pack
K-Lite Codec Pack has many strengths, we will limit ourselves to listing the key points:
Internal component compatibility
The K-Lite distribution is always tested for compatibility by specialists. At self-installation codecs, it’s easy to end up in a “Codec hell” situation, since many filters don’t get along with each other. To eliminate conflicts, you need to look for the cause of the “evil” and use special utilities to remove one or another component.
Good compatibility with Windows
Apart from the aforementioned lack of conflicts, the package is easy to completely remove from the system without leaving a trace. During installation, K-Lite checks for other codecs on the system and suggests using them during installation, among other options. Also at the installation stage, a search is made for faulty codecs and it is proposed to fix them.
Flexible setup
There are 5 package options available for download with different configurations; 3 installation modes and profiles are also offered.
For each multimedia format, you can select the appropriate decoder from available options, by default K-Lite selects the most optimal one. For Windows 7 and 8 users special utility Preferred Filter Tweaker for Windows 7 and 8 to configure preferred codecs bypassing the OS.
Regular updates
The user does not need to monitor the update of each audio or video codec or other components: K-Lite always contains the latest versions.
K-Lite builds
There are 6 package options available on the download page:
- Basic - provides the most support known formats multimedia: AVI, MKV, MP4, OGM, FLV. Minimum set that does not include a video player. It will be optimal if you prefer to use another player, and a minimum set of codecs is sufficient for playback.
- Standard - also includes Media Player Player Classic HomeCinema, DVD MPEG-2 decoder (opens up more options when playing DVDs), MediaInfo Lite utility, which displays detailed information about the media file.
- Full - compared to standard version, this includes madVR - a high-quality renderer, the GraphStudioNext diagnostic utility and additional DirectShow filters.
- Mega - contains ACM and VFW codecs, DirectShow filters, additional utilities. During installation, you will be offered a video player to choose from: Media Player Classic HomeCinema or Media Player Classic Regular. You can read about the differences between them below.
- 64-bit build - recommended for installing over the 32-bit version if you plan to play videos in a 64-bit environment. It is worth emphasizing that this package will be in addition to, and not in replacement of, the above options, since not all applications support 64-bit codecs.
There is another way to view information on assemblies, available on the K-Lite package website in the form of comparison tables: and. Essentially, if you are interested in a specific function or format, then there is no need to compare anything.
Installation
Three installation modes are possible - simple, normal and advanced, depending on which the number of settings for the components included in the package changes.
The next step is to select an installation profile. It affects not only the number of components, but also the preferred settings. For example, “LAV for everything” implies that video decoding will be done using LAV Video whenever possible. “Lot of stuff” - installation of the maximum number of components.
You cannot install multiple codecs or filters to play the same format, as this would inevitably cause conflict. The “Use system default” option means that the installer has already detected a codec that is not part of K-Lite: for example, included in the OS or installed previously.
On last step(“Hardware Acceleration”) - hardware video acceleration settings. It is highly advisable to familiarize yourself with a small reference document according to the description of the settings (the “Help” button at the bottom of the window).
So, according to the help, on a fast processor we set standard settings(“Use software decoding”), on NVIDIA video cards - CUVID or LAV DXVA2, on AMD - LAV DXVA2, when using media player Player Classic HomeCinema - DXVA decoder.

K-Lite Composition
The codec package includes:
- DirectShow splitters
- DirectShow video decoding filters
- DirectShow audio decoding filters
- DirectShow audio parsers
- DirectShow subtitle filter
- other codecs and filters
- Media Player Classic / HomeCinema player and additional utilities
In order to “decipher” this list, it is necessary to clarify the meaning of some terms (see below). The work of the splitter, filters and parsers can be more clearly displayed by the GraphStudioNext program, which is included in K-Lite. For example, the easiest way is to open any media file using the “File - Render Media File...” command. The file processing process will be demonstrated in the diagram.

DirectShow is a framework from Microsoft that runs on Windows and is an environment for playing audio and video formats and input/output to devices. Some formats are supported natively by DirectShow, and the list changes with each version of Windows. On this moment DirectShow is being replaced by the Media Foundation framework, which is integrated into Windows 7 and Windows 8.
Splitters(English “source filters”, literally - source filters) audio and video are separated from the container for further processing by decoders. You need to understand that the playback file is a container that is often mistakenly called a video format.
Decoding filters DirectShow video and audio, or conversion filters, add support for additional file formats that can be played by any video player.
An example of filters is the popular ffdshow decoder, which works based on open libraries. It allows you to play Xvid, DivX and H.264 - which is probably the majority of cases you have to deal with. ffdshow includes filters (not to be confused with DirectShow filters) that allow you to control playback in real time: apply filters, change sizes, colors, etc.
The developers of K-Lite directly advise choosing the LAV decoder due to its greater performance and stability, and ffdshow - only if extra functionality is needed.
Along with LAV Video, included in all packages, other filters are optional and can be replaced.
Similarly, audio filters decode audio formats separated from the container by a splitter. These include the popular AC3Filter library, which adds support for AC3 and DTS along with tools for tuning multi-channel audio.
Task parser- output the signal to the device after it is decoded.
Media Player Classic
Of course, when installing K-Lite, almost any player (GOM Player, LightAlloy, Zoom Player, etc.) will work with the required formats. However, in the case of K-Lite, it is still preferable to use Media Player Classic, which is not included only in the Basic assembly. This video player is best optimized for this package; moreover, it is included in K-Lite in a modified form.
There are two players: Media Player Classic Home Cinema and Media Player Classic Regular, which is an offshoot of the Home Cinema project. Despite the fact that they are based on the same platform, there are differences.
Regarding the Classic Regular player, we can only say that it is less functional in comparison with Home Cinema. To get acquainted with it, you need to install the Mega assembly and during installation specify Media Player Classic Regular as your preferred player.
Among others nice additions Media Player Home Cinema: displaying images on multiple monitors, H.264 hardware decoding, support for multiple subtitle formats, localization, including Russian. The original Home Cinema distribution, which can be downloaded from, already includes decoders (so the player can work standalone, without installing K-Lite). IN description of K-Lite It is also indicated that the codecs built into the player have been replaced with more efficient ones - those that are available to choose from when installing K-Lite.
Utilities
After installing K-Lite, it becomes necessary to fine tuning codecs. Find auxiliary utilities possible in the directory with installed package K-Lite, Tools folder.
Codec Tweak Tool
Basic K-Lite settings collected in the Codec Tweak Tool shell. In the settings, you can remove broken codecs and filters (which were installed incorrectly or left traces in the registry), re-register filters, reset settings to their original ones, generate a log from the contents of the package, sometimes this is required for diagnostics.
The most interesting section is “Configuration”; the settings of all installed filters (audio, video, source filters (splitters)) are collected here. In principle, it is not difficult to do the same thing through the video player parameters, but this would not be the most convenient way.
Codec and Filter Management allows you to activate and deactivate unnecessary filters and codecs, including those included in the OS. Additionally, similar to installing K-Lite, you can specify your preferred splitters for each format.
Preferred Filter Tweaker for Windows 7 and 8
Windows 7 and Windows 8 users should pay attention to the Win7DSFilterTweaker utility. Its necessity is manifested in the fact that these operating systems have their own audio and video decoding system - Media Foundation. The built-in capabilities of this framework cannot be overridden by third-party filters without making changes to the registry. This is, in fact, what this utility is intended for. With its help, you can not only specify your preferred decoders, but also disable unused ones, even deactivating Media Foundation.
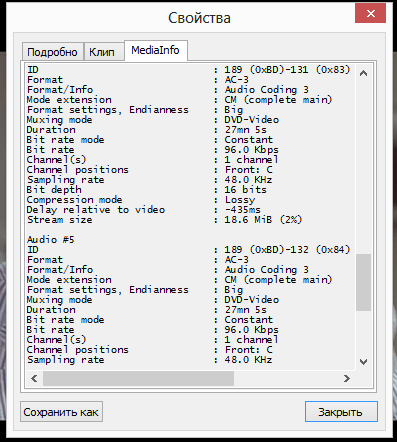
MediaInfo
A utility with which you can find out detailed information about a file: bitrate, resolution, container, audio and video formats, compression. Technical data will be useful if you need to reconfigure filters or install a missing codec. This program built into Media Player Classic and available as the “Mediainfo” tab, “Properties” item in the context menu.
GraphStudioNext
A very informative utility for analyzing audio and media files. After processing the content, GraphStudioNext diagrams the processing the file goes through before being output to the screen and dynamics. This all depends on the specific codec configuration in the package. Therefore, GraphStudioNext will be useful for diagnostics when problems arise with file playback. In addition, each component in the diagram is clickable and opens the codec or splitter settings.
VobSubStrip
Editing subtitles in IDX format - you can remove unnecessary streams from the list and resave.
Computer users, and especially movie buffs who like to watch movies, TV series, cartoons, etc. - encounter a problem when video files of a certain format cannot be played. The video player may play sound and not play video, or vice versa, play video without sound, and sometimes even give an error when opening files of certain formats. This situation may also occur with some audio files.
The problem is that the player and system are not supported this encoding video. Most often this happens when playing files of the format: *mkv, *mka, *flv, *mp4, *vob, *aac, etc. This can all be solved by installing a codec package.
If you cannot play a video, its image or sound, then you should use our instructions for installing codecs, which we will present to your attention below.
First, we need to download the codec installer to your computer or laptop. We recommend using the K-Lite Codec Pack as a codec package - this is the best universal set of decompressors and utilities for playing special video and audio formats.
K-Lite also has competitors, the most famous of which are Vista Codec Package and Codecs. However, they did not win the love of users, and they are inferior in quality to K-Lite. K-Lite can be installed on any generation of operating room Windows systems. In addition, there are other, less well-known codec packages; they are mostly collected by amateurs on software resources (websites, portals, forums and communities)..
It is worth noting that starting with the 10th version of K-Lite, it includes both a version for 32-Bit systems and for 64-Bit. In previous versions, codecs for the 64-Bit system were a separate add-on and were installed on top of the installed 32-Bit version.
To download a codec package to your computer device, you need to visit the official website of K-Lite - Codec Guide. There you will see that this installation package has several options:
- Basic;
- Standard;
- Full;
- Mega.
Having opened the K-Lite website, opposite the Mega version, on the right, click on “Download Mega”.

On the next page, click “Mirror 1” or “Mirror 2”, you can select any of the two file-sharing resources on which the codec package is loaded.

Depending on the selected link, you will need to start downloading the file, how to do this in the first and second cases is indicated in the picture.
Next, the browser will either start downloading the file to the default folder, or prompt you to select a location to save it.
Installing a codec pack
Now let's directly touch on the process of installing the codec package. We launch the downloaded file, and the installer window opens in front of us. In it we need to click the “Next” button to continue the installation.

Then you will need to select an installation mode, of which three will be offered:
- Simple mode – Simple mode;
- Normal mode – Normal mode;
- Advanced mode - Advanced mode.

Next, you will be asked to select the installation directory for the codec package. The default is: system disk C, Program Files application folder (if the system is 64-Bit, then codecs are installed in the folder labeled “x86”), in which the K-Lite Codec Pack folder will be created. We recommend leaving the installation address unchanged and not changing anything. To continue the installation, click “Next”.

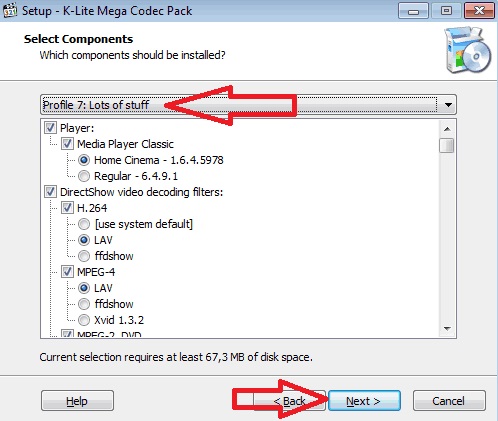
The installer will now prompt you to select an option to configure the settings. Here you need to select profile No. 7 – “Lots of stuff”. When editing your profile, we recommend setting checkboxes on the ffdshow parameter wherever possible, if you are not particularly knowledgeable about this. If you understand more or less, you can choose between ffdshow and LAV. For other files (Other audio formats) set the value to “Prefer ffdshow over LAV”.
It is especially worth noting the AVI and Matroska settings, where it is recommended to select the “Haali” parameter. For AAC, select “LAV”, for FLAC – “madFLAC”. In general, setting up codecs is a separate topic, so we won’t write a long manual on setting up each individual decoder; we only mentioned the main points.
When you have made the settings, click on “Next”.
If necessary, you can install the "K-Lite Codec Pack" folder in the Start menu. If you don’t need it or there are already a lot of them, then check the box “Don"t create a Start menu folder”, then click “Next”.

In the next window you can select settings additional tasks and options. You can check the box next to “Reset all settings to their defaults”. In other cases, if you understand what this or that item means, adjust it to your preferences. Having checked the necessary boxes, go to the next window by clicking the “Next” button.

In the hardware acceleration settings window, leave the default values. This mode allows you to configure hardware acceleration of the video decoding process by reducing the load on the central processor at the expense of the graphics processor (the one located on the video card). To continue the installation, click on “Next”.

Now the installer will offer to associate certain files with installed players. To get started, we recommend checking the box next to Media Player Classic, which is installed along with codecs. Also check the box next to Windows Media Player, which...
If you already have other players installed on your computer, and you want to give them the ability to open files of a certain format, then check the box next to them as well. Having selected the players you are interested in, move on by clicking on “Next”.

In the following windows (and there will be as many of them as there are players you want to configure), you will need to associate file formats with each player separately. We check the boxes next to each file format to assign it to a specific player to launch it. This binding can always be changed by clicking on the file of the format you need right click mouse, and in the properties change the application that opens this format media file.
It's best to associate video formats with one video player, but if you have your own preferences, you can differentiate between them. It is better to entrust audio formats to the audio player; if there is none, assign them to Windows Media Player, or install a separate player for music (Winamp, Aimp, iTunes, etc.) in this case, you need to uncheck all the boxes from the audio section. To proceed to setting up the audio device, click “Next”.

In this window you need to select the configuration of your audio device. If you have a laptop or 2 simple stereo speakers, choose 2.0; if you have 2 speakers and a subwoofer, choose 2.1; when you have an audio system, count the number of speakers + subwoofer and select the appropriate value. Click on “Next” to move on.

Since this package of codecs was compiled by specialists and is constantly updated, you cannot survive on enthusiasm alone, which is why the creators have built-in advertising into the installer. The latest version suggests installing add-ons for the Yahoo! service. To avoid installing anything unnecessary, check the “No thanks” box, the checkboxes will automatically be removed from the top items and the add-on will not be installed. Then we move on by pressing the usual button.

A list of the settings you have selected will be shown here. You can go back by clicking “Back” to make adjustments, or continue the process by clicking the “Install” button to install.

After all the actions performed, of which there are quite a lot, the installation process itself will begin.

After the installation of the codec package is complete, a window will appear in which you can click the checkboxes to view the decoder configuration, as well as launch the settings manager (Tweaker tool), which was during the installation process, when selecting decoding parameters various formats video.

If you want to run the settings, check the last box and click the “Finish” button. If you launched Tweaker, then you will see a settings window, as in the photo below. After you make the adjustments, click on the “Apply” button, then on “Exit”.
If you did not check the boxes, then after clicking the “Finish” button, the settings window will immediately close.
Then we recommend restarting your computer for the new settings to take effect. After this, the main video and audio file formats will run on your computer without problems, taking into account the settings you have made.
This completes our instructions. Before we wish you success in the process of installing codecs, we would like to remind you that before installing the codecs you need, those necessary for the operation of the system as a whole (especially for the video card and sound card). Good luck!
If, when installing a codec, you found a window with a choice of profiles, and you want to customize it as conveniently as possible “for yourself,” then you will have to thoroughly understand all the extensions offered to you.
From the drop down menu select Profile 7: Lots of stuff and at the bottom you will find great amount switches and checkboxes. You, of course, can leave everything there as it is and continue installing your codec, or you can change some settings.
Here is a description of some of them that are most important to users.
- Player - in case you use other players. Do not uncheck this sub-item, you will then be able to associate the files during installation with any of your favorite players.
- Flash Video - FLV is a special bit stream that is special option well-known video standard. This format is supported by most codecs. Select it in order to play these files.
- VP7 - but it’s better not to uncheck this codec. It is used by many sites to play videos on the Internet.
- Process raw video - this option is usually disabled. This format supports raw video that is taken directly from the sensor, or video that has not yet been fully processed (usually to avoid loss of information). In this form, you receive video from some types of video cameras, recorders, and so on.
- In the DirectShow audio decoding filters sub-item you will select audio filters. In almost all cases, ffdshow is preferable.
- MP1, MP2, MP3 are familiar compressed audio files. Leave it unchanged.
- AAC is a special audio format for YouTube, iPhone, iPod, iPad, Nintendo DSi, iTunes and so on.
- Other audio formats - in this column we select preferences for other audio formats.
- Process uncompressed audio (PCM) is uncompressed audio processing and is disabled by default.
- For avi formats, matroska, mp4 and flac use standard settings, they are the best by default.
- The Tools column contains all the tools. Check the boxes next to all the tools, you will figure it out as you go, many of them may be needed completely unexpectedly. The set of tools will not burden the program or your computer at all.
A familiar situation: you installed a clean, fresh Windows on your computer, downloaded the drivers, got comfortable, looking forward to watching an interesting movie, but it doesn’t play? The same thing happens with music: the driver is set to sound, but there is silence in the headphones. Where can glitches come from if the system is completely new? Let me tell you a secret: this is not the problem at all and can be solved very simply.
The cause of the problem is the lack of codecs - small but extremely important programs that are used to decode (and reverse encode) compressed digital audio and video of certain formats. Today we’ll talk about how to install and update codecs in Windows so that we can listen and watch everything we want.
When should you install codecs?
Do I need to install codecs on my computer immediately after installing Windows and drivers? For some, yes, but for others, no. The fact is that codecs for many common video and audio formats are present in the system initially. And if you have no problems opening the desired content, you can leave everything as is.If, when you try to play a video or music recording, you see the message “ An error occurred while opening one or more files" or " The file cannot be opened", installing the missing codec will correct the situation.

The bulk of audio and video codecs are universal, that is, they can interact with different applications. For example, it is enough to install the codec into the system once MPEG Layer III, and that's all music players will be able to normally play audio content in the format mp3.
There are codecs that are used by a single program. Usually they are installed in Windows along with it, but in some cases the mission of searching and installing the missing components is assigned to the user.
There are also situations when a multimedia file of a certain type is played only in one application, and the others do not recognize it, although they should. The reason again lies in the absence the required codec in system. It’s just that the program that reads this file has a codec inside itself, and “competitors” have no way to get to it.
Where can I get the necessary codecs?
There are only two main sources for replenishing the stock of Windows codecs:
- Official websites of the developers of the compression standard for a specific data type. This is a suitable option when the system lacks one or two rarely used codecs.
- Batch builds of all major video and audio codecs. This option is more suitable when the computer does not recognize many file formats.
The most popular source of the second type is batch assembly K-Lite Codec Pack. More precisely, it is an application that not only installs, but also monitors codec updates and automatically downloads them as they are released.
K-Lite Codec Pack is free. Latest Issues, available on the official website, contain components for 32- and 64-bit systems and support all versions of Windows, from XP to Windows 10. In addition, the packages (except for the minimum – basic) include universal media player for playing video and music files.
Today, 4 releases of the application are available on the Russian-language resource K-Lite Codec Pack:
- Basic – a basic package that includes only the most commonly used codecs.
- Standard is a regular package that is enough to play most common multimedia files.
- Full – full package audio and video codecs with additional tools.
- Mega – the maximum package with additional tools.
How to install K-Lite Codec Pack
The application supports several installation methods - from automatic to manual, where the user can configure almost every parameter.Let's consider the installation basic package K-Lite Codec Pack in Expert mode (manual), because it allows you to load only the components you need into the system and customize them according to your preferences.
Mode " Expert"select in the first window of the installation program.

Next, the installer prompts you to specify decoders for video and audio and preferred player applications for playing movies and music. And also - express consent to bind multimedia files to these applications (create associations).

Next we determine the installation location of the program.

The fourth step is to select the required assembly components. Don't mark anything you don't plan to use.

After selecting components, the program offers to configure their configuration.

Then - the hardware acceleration method.


At the eighth stage, we select one of Windows versions Media Player, which one will be used.
We specify the file types that will open in Windows Media Player by default.

We determine the configuration of the playback device.

We mark the file extensions for which a thumbnail will be created in Windows Explorer.

Check the selected settings and click " Install" to start installing codecs.

If you do not understand the essence of any parameter, leave it as default or follow the program's recommendations.
The selection of options in other K-Lite Codec Packs is somewhat more extensive, but the differences are not so global that they need to be discussed separately. We were faced with the task of installing codecs into the system, and we successfully completed it, and very few additional functions were needed.
For Windows to start using the installed codecs according to your preferences, simply restart your computer.
Also on the site:
How to install and update codecs in Windows OS updated: October 19, 2017 by: Johnny Mnemonic