How to connect a regular hard drive to a laptop. What types of hard drive connectors are there? Using an old OS
I recently received a question by mail:
Hello Maxim. Your subscriber writes to you with a proposal - a request. Tell us how to properly connect a 2nd hard drive and 2 DVD writers. I think this is of interest to many ordinary users PC.
The fact is that it is impossible to describe all connection methods and options in one note, due to the variety of connection interfaces and their combinations on motherboards from different manufacturers.
On the one hand, now only two interfaces are most common connecting hard disks and optical drives: IDE (IDE) And SATA (SATA), and it seems that connecting everything is simple.
On the other hand, motherboard manufacturers have done very a large number of boards with a variety of configurations of these interfaces: ranging from 2/4 IDE and 1 SATA at the moment the SATA interface enters the market before 1 IDE and 6/8 SATA V currently(hereinafter the number in front of the interface means the maximum possible number of devices that can be connected via the interface to motherboard).
At the same time, there are motherboards in which simultaneous operation of all interfaces is impossible, i.e. for example, when connecting one drive via SATA switched off 3rd and 4th IDE.
With a gradual transition to the interface SATA everything will become easier - one device - one connector.
This means that each device is connected to its own connector, and the user does not need to additionally configure the device and think about which side of the cable to connect to the motherboard and which to the device. And in case of problems, it is better to tell in detail about the option where the problems arose.
On my home PC (GigaByte GA-P35-DS3L motherboard) there are two hard drives SATA, one DVD-RW SATA and one DVD IDE. I will show how they are connected in the following picture:
The figure shows approximately 1/6 of the motherboard. Green– this is a connector for IDE devices, I have an IDE DVD connected to it. Yellow– these are connectors for SATA devices; I have two SATA hard drives and one SATA DVD-RV connected to them.
Radiator south bridge and PCI-Express slot latch are shown for quicker slot locating. In most motherboards, the IDE and SATA connectors are located next to the south bridge.
The following pictures show the cables for connecting IDE devices. These cables have 80 cores and can be designated as "cable IDE-100/133" or "ATA-100/133 cable". There are also options for 40 cores, but they are practically no longer used.


The following figure shows the connection cables SATA devices. Manufacturer GIGABYTE does not make simple cables for connection SATA, but “with amenities.”
The first is a metal retainer at both ends of the cable. This lock prevents the cable from accidentally disconnecting, for example, when you insert or remove a video card from the system unit and accidentally touch the cable.
The second is an angled connector at one end of the cable. This cable is convenient to use for short cases, in cases where the cable needs to be led directly down from the DVD or hard drive. I recommend using these cables.
At the moment, other manufacturers have begun to equip their motherboards with cables with such “options”. You can also try purchasing them separately.

If you purchased new hard disk or DVD with a SATA connector, and your PC is not older than 2 years, then connecting via SATA is very simple.
First– install the device in the housing. DVD - as convenient for you, and hard drive - preferably so that there is a small amount above and below it empty space for better ventilation.
Second– connect the information connector of the device and a free connector on the motherboard.
Third - connect power to the device. The device may have a new type of power connector (for SATA), it may have an old type (Molex), or there may be both connectors.
The following picture shows, as an example, the back side of the hard drive and the connectors are labeled: SATA power, SATA data, Molex power.

If there is only one connector, then connect it.
With the advent of SATA devices, power supply manufacturers began to equip their units with special connectors power supply for connecting such devices.
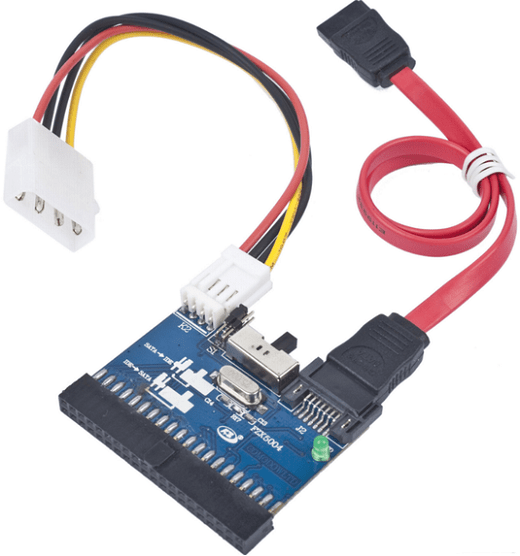
Most new devices are already released without a Molex connector. If there are no connectors for SATA in the power supply of your PC or they are already occupied, then you can use a special power adapter, which is shown in the following picture.

The white connector with 4 pins is the connector Molex. Two black flat connectors are connectors for SATA devices.
If the power connector two, then you need to connect any one of them, but not both at once! I recommend using the power connector for SATA devices.
After this, you can turn on the PC, go into the BIOS and check that the device is visible. If it is not visible, you need to switch all SATA connectors to AUTO mode. Then you need to save the changes in the BIOS and exit. After this you can work with the device
If you are not sure how to connect the device correctly or are having problems connecting, then watch the video tutorial below or take our step-by-step video course "Assembling a computer from A to Z."
The article uses materials from the site www.nix.ru

This question might interest you for several reasons. First: Do you want to bet on laptop hard more memory or your old one simply burned out. Second: You want to transfer information from your computer’s hard drive to your laptop.
Replacing the device
To replace the hard drive in a laptop, you need to perform a few simple steps.
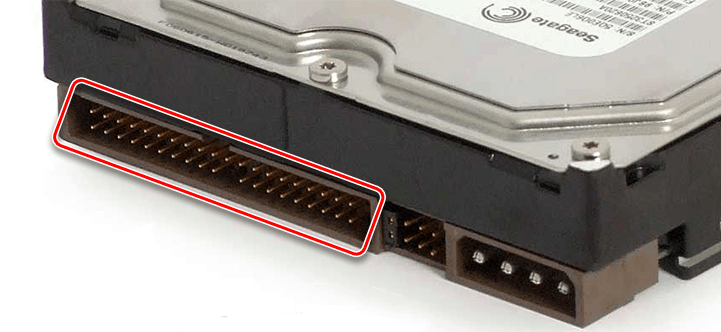
First of all, you need to buy it. At the same time, remember that it differs from a computer one, since its size is not 3.5”, but 2.5”. Interface for hard drives in laptops manufactured in Lately, SATA. But it’s better to make sure of this, because the IDE interface may be outdated.
Extraction
Turn off the laptop and turn it upside down towards you. Then remove the battery by sliding the latches away.
Now remove the plastic cover that covers the hard one. We unscrew all the screws that secure it.

We unscrew the screws that hold the hard drive itself.

To remove the hard one, you need to slide it down from the contacts. To do this, grab the grooves near the contacts with your fingers, do not touch them so as not to damage them, and slide them in the direction of the arrow, as shown in the figure.

Remove the device by holding the same recesses.

After removing the hard drive, you will see that it is located in a sled - a metal case. It must be carefully removed from there. To do this, unscrew the screws: two on one side and two on the other.

Installation
We insert the new hard drive into the metal case and screw the screws back.

We put the device in place and move it towards the contacts to connect it.

We fasten the disk to the case with screws.

Reinstall the plastic cover and insert the battery. This completes the replacement of the hard drive on the laptop.
Connecting a hard drive from a computer
If you have a problem with how to transfer information from a computer to a laptop, then you can use several methods to do this.
1. You can connect your computer and laptop via network cable. You can read more about how to do this in the article: how to connect a laptop to a computer.
3. But if you need to transfer hundreds of gigabytes of information from a computer to a laptop, it is better to use the third method: connect the computer’s hard drive to the laptop. Also note that the laptop must be turned off.
What you need
Domestic hard disks usually connected via an IDE or SATA interface. IDE is an outdated interface, provides a connection speed of 133 Mb/s. SATA is a hard drive connection interface that has been used since 2003. Connection speed: SATA 1.0 – 150 Mb/s, SATA 2.0 – 300 Mb/s, SATA 3.0 – 600 Mb/s. Connectors and cables for interfaces vary in width; for SATA they are much smaller.

It should also be noted that most laptop models do not have external interfaces for connecting hard drives. In this case, you can connect a hard drive to it only through a USB port. To do this, you will need to purchase a special adapter from IDE to USB, or from SATA to USB. The adapters usually come with a power supply. It will also be necessary since the power supplied through the USB interface may not be enough for the hard drive.

How to connect
Methods connecting hard disk for different interfaces shown below. The adapter is connected to the hard drive, the USB plug at the other end is connected to the laptop. The power supply can be connected in different ways: either to an adapter, or directly to the hard drive.

If you purchased an IDE/SATA to USB adapter, then when you connect the hard drive via the SATA interface, the power supply is connected to hard drive through an adapter.

In case you plan to use the hard drive connected to a laptop long time, it is better to purchase an external container with an adapter for it. In this way, accidental damage to the device can be avoided. Moreover, now you can use it as usual external hard disk. The container looks like a hard case, and is equipped with an IDE/SATA – USB adapter; you can also connect external power to it.

To avoid damage to the hard drive, do not turn off the external power when working with it. You can turn off the device only if you have completed safe removal devices on a laptop.
I hope the article will be useful to you, and you will be able to connect the hard drive to your laptop without problems.
Rate this article:Instructions
A standard SATA drive will be considered as an example, since IDE drives are already leaving the market modern technologies, although on this moment There are universal tools for connecting both types of drives. Connecting hard disk To laptop carried out via a USB container.
First of all, you need to open the container and insert the desired hard drive into it (do not forget about different sizes containers and media - 2.5 and 3.5). Then the container interface is connected to the hard drive, and after that to laptop computer. The presence of the new USB 3.0 interface will significantly increase the speed of file transfer between devices.
Depending on the type of container, make the appropriate power connection. Now you need to turn on the laptop itself or. After loading the operating room hard system The drive should be automatically detected and appear in " Windows Explorer" If this does not happen, install special drivers from disk, which came with the container. In some cases, you need to connect to the Internet, for example, when the current driver is outdated and it has been released a new version.
Sometimes you may encounter the following problem: after booting the system, the disk does not appear in Windows Explorer, but its icon is in the Device Manager applet. The solution to this problem is to change the priorities of the connected disk, because current disk () and external have one "Primary" option disk».
Restart your laptop. While reading device information, press Delete key, F2 or another that activates loading BIOS menu SETUP. Go to the Boot section, select the new media and check the box next to Secondary Master.
Press F10 to save settings and reboot computer. Once the Welcome screen appears, launch My Computer and wait for the new media to appear. Most likely, after installing it, the system will request another reboot. All that remains is to perform this action and use the additional free disk space.
A purchased new hard drive requires installation in a computer. This procedure involves mechanical work– screw, attach, install drivers and format the disk.
You will need
- Connecting wires, screwdriver, driver disk
Instructions
Let's look at the model of the purchased hard drive and the connection method. On older models, you need to install a special switch (jumper) between the hard drive terminals so that the operating system understands which one needs to be accessed first. Modern Sata-connected hard drives in such manual setting dont need.
Video on the topic
note
Connecting the hard drive must be done with the computer completely turned off. After unplugging it, touch the computer case to remove static voltage.
When choosing a driver source, insert the disk that came with your hard drive and specify the path to it. Drivers from the manufacturer may differ from the drivers available in the operating system. You can later update the drivers via the Internet.
Sources:
- Methods installing hard disk in a computer case in 2019
Usually new ones are hard disks connected in order to increase the capabilities of their PC, in particular, to increase the storage space for information. In order to connect an additional hard drive, it is not at all necessary to call a specialist - you can do it yourself.

Video on the topic
note
It will be good if you put an antistatic bracelet on your wrist before working with the computer. Such bracelets are sold in electronics stores.
Helpful advice
Once you have installed the new female drive and checked that the PC is working well, you can format old disk. This way, you will remove unnecessary data and free up space for storing new files.
Connecting a SATA drive involves mounting this drive into the case. But in the case of a laptop, it won’t be possible to mount it in a case. Therefore, it is necessary to find alternative connection paths. The connection operation will take no more than 10 minutes. If you know all the details, you can connect a hard drive much faster. About all the nuances of connecting such kind of hard disks you will find out further.

You will need
- Set of SATA disk, USB container, laptop.
Instructions
The SATA cable has the same connectors. One connector leads to the motherboard, the second – directly to the hard drive. Incorrect connection SATA disks - impossible operation;
SATA drives do not have jumpers - the connection is very simple;
Place the disk in this container and connect it with internal wires;
Connect the connecting cable leading to the USB connector in .
In order for your operating system to see the new disk, you need to set the operating mode of this disk. Connect all wires. The signal light on the adapter should light up.
BIOS Setup will appear on the screen - go to the options tab installed devices– look at all available devices - HDD SATA should be among them.
When installing any operating system, additional drivers for your disk are required. However, some versions of operating systems are already equipped with such drivers.
After loading the operating system, some containers are automatically detected by the system. A message will appear on the screen indicating that a reboot is required. Click Yes. At next drive will be installed. Go to "My Computer" and make sure it appears.
Sources:
- laptop hard drive connectors
Tip 5: How to connect a hard drive from a computer to a laptop
It may happen that you someday need to connect a hard drive from a regular desktop computer to a laptop, for example, to transfer a large amount of information. Luckily, you'll already know how to do this.

Instructions
Purchase a special adapter () that allows you to transfer information from regular hard drive via USB connection. Modern adapters support both the transition from SATA to USB and from IDE to USB, but they may have small network adapters For additional food hard drive, as well as support hard drives of 2.5 and 3.5 inch form factors.
After you have selected the adapter you need, connect it to the hard drive using the required connector. Accordingly, for IDE interface you need a wide connector, and for SATA interface- small plug.
Connect the USB connector coming from the adapter to the USB controller. In this case, the hard drive will work as regular USB flash drive. If your adapter has an LED indicator, make sure it gives positive signals.
If you have a hard drive with a SATA interface, and the adapter provides power only for hard drives with an IDE interface (four thick pins), then purchase a special adapter from power for IDE to power for SATA, but in no case vice versa (it happens that in This adapter may not be included in the configuration). Make sure the IDE power connector on the adapter is a male connector and not a female connector.
Don't worry about what operating system is installed on yours. modern adapters Work with systems from Win98 to Vista and Mac.
Just in case, it would be best to additionally consult with the seller in the store computer components. Tell him which hard drive you are going to connect to and which one you are going to connect to. He will definitely pick you up best option for your purposes and will probably give additional recommendations.
Video on the topic
Recently, in the assortment of computer products you can find various media: optical And, flash drives, memory cards and external hard disks. The latter, although not as miniature as memory cards or flash drives, are the most profitable acquisition in terms of price/volume ratio. To plug external hard drive To laptop or the computer is easy.

You will need
- - computer.
Instructions
Open the package external hard disk and remove the media. Find the instructions for the device, as well as the cable connecting the hard drive to the computer. If you purchased a 3.5" form factor hard drive, then the package will contain, in addition to what is specified, a power adapter.
Connect the power adapter to the hard drive if it requires additional power supply - usually this is needed for hard drives with a 3.5" form factor. Connect the power adapter to a power outlet and the cable to the USB port. You can use any USB that is convenient for you.
Wait for the laptop to detect external media. Typically the operating system issues sound signal when connecting any media. If you have autorun from media active, an action selection window will appear. If not, then after installing the drivers (which happens automatically), the contents of the hard drive will be available to you through any file manager.
You should not connect unverified media to your computer without antivirus program. Modern viruses use autorun from the device to copy themselves into operating system. On first launch portable media the viruses they contain are automatically launched and integrated into the computer’s registry, so do not disable your antivirus software.
The word "hard drive" is often used to refer to a computer's hard drive. It may seem that this device received a second name after the name of its developer. However, this is not at all true.

What is another name for hard drives?
Hard drives have received a lot of different names, and hard drive is far from the only one among them. Thus, in old textbooks the abbreviation HDD appeared, which stood for “hard magnetic disk drive.” The price tags of computer stores contain another abbreviation - HDD (Hard Disc Drive). It is also used in computer memory. A shortened name is also possible - Hard Drive. But users still hear the word “hard drive”, as well as its derivatives - “screw” and “vinch”.
The true answer to the word "Winchester"
In fact, a Winchester was an American rifle used during the Wild West. This information will seem surprising to many, because a metal box with magnetic disks can hardly be compared in any way with firearms.
The drive was called a hard drive thanks to the American company IBM, which released a hard drive in 1973. The company's specialists, who worked on similar products, created the 3340 model. It was the first to contain disk platters and read heads in a single housing. They did not touch each other thanks to a layer of incoming air flow formed during rapid rotation. While working on the device, engineers used the internal name - “30-30”. These figures indicated the presence of 30 sectors and tracks.
In those days, Winchester hunting rifles were produced in the USA. It was loaded with cartridges of 7.62 mm caliber. The markings of this cartridge were as follows: Winchester 30-30. The numbers contained in this marking coincided with the working name that was given to the hard drive. Continuing the analogy, engineers also began to call their development a hard drive.
As for the rifle itself, it was called Winchester model 94. At the same time, other companies also produced such weapons, in particular Remington. In most cases, the rifle was used when hunting large game. Then the US authorities limited the use of cartridges from these weapons for hunting purposes. As a result, the demand for guns fell sharply. Currently, it is purchased mainly by collectors.
In Europe and the USA, the word “hard drive” is no longer used in relation to a hard drive. In the language, the name remains semi-official, and in slang the words “vint”, “vinch” and even “broom” are usually used.
Video on the topic
Tip 8: How to connect another hard drive to your computer
The need to connect a second hard drive to your computer may arise when there is not enough free space for storing files on a standard hard drive, and also if you need to quickly transfer information from one device to another. This operation has its own characteristics.

How to connect a hard drive to a computer
You can connect another hard drive of any size and capacity to your computer, for example, a regular 3.5-inch, using a special Mobile Rack adapter. The connection is made via a USB cable, as well as a cable with a 220V adapter, which are sold in one set in stores computer equipment. Simply insert the hard drive into the adapter, close it, and connect it to a power outlet and computer.
Most often, it is enough to connect a second hard drive to the computer, and it will be immediately detected by the system. However, in some cases, the device must first be formatted in order to update file system. To do this, open the “My Computer” folder, click right click on the icon of the connected drive and select the “Format” action. Specify file NTFS system in the window that appears, and also activate the “quick format” function.
How to connect a hard drive from a computer to a laptop
Try connecting the hard drive from your computer to your laptop using a special USB container, which can be purchased at one of the computer hardware stores. The device must be suitable for the hard drive format - 2.5 or 3.5. Open the container and insert the disc into it. Using the cables supplied with the container, connect the hard drive to the laptop and electrical outlet at 220V. The data transfer speed between media will depend on the type of interface - USB 1.0, 2.0 or 3.0. The new USB 3.0 interface will significantly increase the speed of file transfer between devices.
Turn on your laptop and boot into the operating system. If a new device does not appear in the “My Computer” folder, you need to complete connecting the hard drive to the laptop via BIOS. Reboot laptop and press several times the F2, Delete or other key that launches BIOS settings. In the Boot section, check Secondary Master, then save the settings and reboot. Please note that for normal functioning device may also need to update its driver via system service"Device Manager".
There are situations when it is necessary to transfer information stored on a hard drive. disk laptop to a desktop computer. Some difficulties may arise due to incompatible connectors. But they can be easily eliminated with the help of special adapters.

Instructions
Use an adapter to connect the hard drive to your PC. Why is this necessary? If yours is over 3 years old, then there is a risk that the hard drive may fail. To avoid total loss necessary information, you need to do it backup copy, which will be contained on the hard disk your personal computer.
Buy an adapter at any computer store. Then to connect the hard drive laptop To the computer, connect the adapter with the wide side to the IDE cable of the motherboard of the desktop computer. Connect the hard drive connector to the narrow part of the adapter laptop. Before performing these manipulations, do not forget to turn off the power from the computer.
Power up your desktop computer after connecting the hard drive laptop to the computer. The new device will be detected during boot. Please note that you can transfer all the necessary data to the hard drive of your personal computer only after reboot again. It does not matter what version of Service Pack the operating system you are using is in. It will not be possible to avoid re-downloading.
Use a special HDD container if you don’t want to bother with adapters and if the process of transferring data from a hard drive laptop on PC will be repeated quite often. This container connects to a computer using a USB cable. This imposes certain restrictions on the data transfer speed, but at the same time makes the process more convenient. The HDD container can be purchased at any computer store. There are several versions, among which there is a container, which itself is an adapter with IDE motherboard desktop computer boards. Those. when using it, the data exchange speed does not suffer, as is the case with a USB container.
DVD players are gradually becoming a thing of the past, giving way to media players and TVs with a USB interface. Indeed, why accumulate piles disks at a time when you can keep all your movies on a hard drive connected to TV.

Instructions
A hard drive can be either an independent device with a cable for connecting to USB, or a component or. And if in the first case you do not need any additional devices to connect to, then in the second you will have to purchase an external enclosure for the hard drive. Such cases are sold in computer stores and fit any hard drive to a computer, TV, music center and other technology.
If yours is not equipped USB interface, this does not mean that you cannot connect a hard drive to it. It is enough to purchase a media player to play multimedia files from any USB devices and use it as an adapter between hard and . Some have built-in hard drives or connectors for connecting such disks.
Modern technologies are developing more and more every year. The time has long come when one hard drive in a computer is not enough. Great amount people connects a second HDD to a personal computer. The connection procedure is nothing fancy and even a beginner can figure it out. Let's look at everything more carefully and in detail.
Connecting a second HDD to a laptop or Personal Computer
There are two options for adding an additional hard drive:
- To the PC system unit. This method Great for standard desktop computers;
- Addition, in the form external storage. This is very easy way, which is suitable for all devices.
Method 1: Adding to the system unit
The process of adding additional media to the system unit can be divided into several small stages. Let's look at each of them in more detail.
Type Definition
At the very first stage, you need to decide on the type of interface with which the hard drive interacts. It is worth noting the important fact that the majority of computers have a SATA interface, therefore, it is advisable that the second hard drive be of a similar type. The motherboard may not have an IDE bus because it is considered very old, which may cause some problems when installing older hard drives.
The best way to determine the standard is to carefully consider the contacts.
Example of a SATA connector

Example of an IDE connector
Adding a second SATA drive to the system unit
Addition additional disk – simplest process which happens like this:

Boot priority for SATA drives
By default, there are four holes on the motherboard for adding SATA drives. It is worth understanding that their numbering starts from zero. Namely, the priority of the hard drive directly depends on the connector number. For independent task priority, you must use the BIOS. Each has a certain BIOS type, its own special controls, as well as a special interface.
In the most early version you need to go to the “Advanced BIOS Features” menu and start working with items such as “First/Second Boot Device”. IN modern versions the path looks like this: “Boot/Boot Sequence – 1st/2nd Boot Priority”.
Adding an additional IDE drive
There are also cases when you need to connect old IDE disk. Step-by-step instruction The process looks like this:

Connecting the second IDE to the first SATA
If necessary this procedure, then you will need an appropriate IDE-SATA adapter. An example of an adapter can be seen below:
Step-by-step instruction:
- First you need to put the jumper in the Master position.
- The IDE plug is connected to the hard drive.
- Take a red SATA cable and connect one side to the motherboard and the other to the adapter.
- The power cable is connected to the power supply and adapter.
About possible display problems
Sometimes it happens that after an additional hard drive has been connected, the system cannot recognize it. Don't panic, because most likely you did everything right. Just for proper operation the second hard drive needs to be initialized.
Method 2: Connecting an external hard drive
Connection external HDD convenient if the stored files are needed not only at home, but also outside of it. In addition, this method is the only correct one for laptop owners, since they simply do not have a special additional connector for a new hard drive.
In fact, everything is easy here, because the external hard drive is connected via USB, just like any other devices (mouse, keyboard, flash drive, webcam and much, much more).

Hard drives that are installed in system unit, can also be connected via a USB connector. Here you will need an external hard drive enclosure or a special adapter. The bottom line is this: the required voltage is supplied to the HDD through the adapter, and communication with Personal Computer happens via USB. Different hard drives have their own wires, so you should always check Special attention to the standard that specifies the dimensions.
The process of connecting a hard drive seems complicated for those who have never done it. In fact, connecting a hard drive to a computer is not at all difficult if it has a SATA and IDE interface. Let's consider both connection options.
To connect to motherboard board hard drive with an IDE connector, you need a special wide cable. However, please note that IDE cables gray less productive than loops yellow color. With the latter, your hard drive will work much faster. Now we connect one end of the IDE cable to the motherboard (usually it is colored) by selecting the appropriate connector on it.


When connecting the hard drive to the motherboard, do not worry about the correct connection of the plugs and connectors. For both the SATA and IDE interfaces, device manufacturers have provided special locks on the plugs and notches on the connectors that will prevent you from inserting the end of the cable into the connector incorrectly.