How to reinstall xp from disk. Step-by-step instructions for installing Windows XP
Constant installation and removal of programs that gradually litter the computer, infection with viruses, replacement hard drive, motherboard and many other factors sooner or later confront the user with the task of reinstalling the Operating System.
Many people think that this is a rather complicated procedure and take the computer to a workshop or call a technician to their home. However, in reality everything is not so complicated. Almost any user can do this on their own, saving a decent amount of money.
Preparing for reinstallation
First, what you need to do before reinstalling Windows XP is to find and prepare all the device drivers for your computer. Find driver discs or download them from the Internet.
You can also use the DriverMax program, which will create a copy of your drivers. When the system is installed, you just need to run the program and specify the path to the saved drivers.
These are your documents, photos, videos and music stored on system disk(usually this is drive C). If you have logical disk partitions (C and D), you can transfer all the information to disk D. If there is only one hard disk partition or disk D is not enough, write the information to a CD and DVDs or use flash drives.
Reinstalling Windows XP
Step 1. To begin the installation, you need to make sure that the computer boots not from the hard drive, but from the CD/DVD drive. To do this you need to log in BIOS settings. When turned on, press Delete key or F2.
The keys may differ on different motherboards, but when you turn it on, a message like “press F2/delete to run SETUP” briefly appears at the bottom of the screen. By pressing the corresponding key, you get to the BIOS. Another option is this: when booting, press F12 and select boot from DVD.
BIOS settings on different computers different, but basically all the same. Look for labels like Boot (boot) or Boot Device Priority (device boot order) or Boot Sequence (boot sequence)

Set boot priority to 1st Boot Device and 2st Boot Device.

Step 2. Insert the disk with the Operating System into the CD/DVD drive and boot from it. Wait for the files to download and accept license agreement with the F8 key.
In the list of logical partitions (if there are two or more), you need to select where you will install Windows. This is usually drive C.
If you need to mark up the hard drive, delete all previously created partitions with the D key. Then use the C key to create new section for the Operating System and programs (for example, half the capacity of the entire hard drive).
Selecting “unallocated area” again, create a partition for all the remaining space.
To continue installation, select partition “C”. Select "Format partition as" NTFS system».

Wait while the installer copies the files.

Step 3. After copying the files, restart your computer and boot from drive C. The installation process will begin.

During the installation process, you will need to enter a key, specify the region and other parameters. In about 30 minutes you will receive a “virgin” clean Operating System.

Step 4. Now our task “how to reinstall Windows XP” has been solved and the system is installed, but for it to be fully operational, it is necessary to install all device drivers and necessary programs.
Finally helpful advice: after installing drivers, programs and completely setting up the system, do a full image of a tough disk, for example, with AcronisTrue Image. In this case, subsequent reinstallation will not require any effort from you other than booting from the image.
Preparing a disk with a distribution kit - the first stage Windows installations XP. If you already have such a disk in your hands, you can skip this point, but if you downloaded a system image from the Internet in ISO format– will need help special programs(Nero Burning ROM, UltraISO and analogues) burn it to CD or DVD.
The Windows XP bootable ISO file is finished image system containing full set installation data. It doesn't require any preliminary preparation, but is transferred to the CD unchanged.
Let's look at the process of burning a Windows distribution to DVD using UltraISO as an example.
- Launch the application.
- Press the key combination “Ctrl” + “O” and open Windows ISO image, which you have prepared to transfer to disk.
- Click on the “Burn CD image” icon in the toolbar at the top or press the F7 key.

- Place a blank or rewritable DVD in the optical drive.
- Make sure that the distribution you need is selected in the “Burn Image” window. Check the “Check” option if you want the disc quality to be checked after burning. Select the appropriate recording speed. Even if your laser drive can write on maximum speed, we recommend choosing medium or low. This will ensure good readability of your disk by any drive, including old ones.
- A rewritable disc must first be erased by clicking on the button of the same name, and you can immediately start writing to a blank disc by clicking “Record”.

After 20 - 30 minutes, depending on the speed of the drive, the preparation of the installation disk will be completed. You can move on to the next stage.
How to install Windows XP from a disc the traditional way
Traditional installation is a conventional system installation process that requires active user participation. Most often, Windows XP is installed in the traditional way.
At this stage, we have already prepared everything we need. In order to install Windows from a disk, we only need the disk itself and a computer with optical drive, on which the system will be installed. If you don’t have a drive, you can use an external one that connects to a USB port.

BIOS setup
To boot your computer from a CD or DVD, you need to assign first in the BIOS Setup settings boot device CD drive. To do this, enter the settings menu by pressing the designated key (Del, F2 - F12, etc.) immediately after starting the computer. Which one you can read at the bottom of the motherboard splash screen (displayed on the screen almost immediately after turning on the PC).
Once in the settings, go to the “Boot” or “Advanced BIOS Features” tab - in older versions Award BIOS. Use the arrow keys to navigate to select the laser drive from the list of devices. In our example it is listed as CD-ROM Drive, but sometimes this list only lists hardware models.

After selection desired device press F10 (exit option BIOS menu with saving settings).
Booting from disk and the Windows XP installation process
- Place laser disc into the drive and restart the PC. System installation begins with boot Windows files XP in computer RAM.

- Next, Windows will greet you and offer you the option to continue the installation, exit the program, or restore itself using the recovery console. The second and third points do not suit us.

- By pressing Enter you will continue the installation. The next step will ask you to accept the Microsoft license agreement for using Windows XP.

- Next, select a location on the hard drive for the system partition. Click “C”, which means “Create partition”.

- Let's determine the size of the future drive C. In our example, it is maximum, but you can set anything, preferably at least 10 Gb.

- Now let's look at the list of hard drive partitions and agree to install Windows in one of them by pressing Enter.

- Let's format the new partition in NTFS ( quick formatting will suit us quite well).

- And wait until the installer copies the distribution files to the disk.

- Once the copying is complete, the computer will restart.
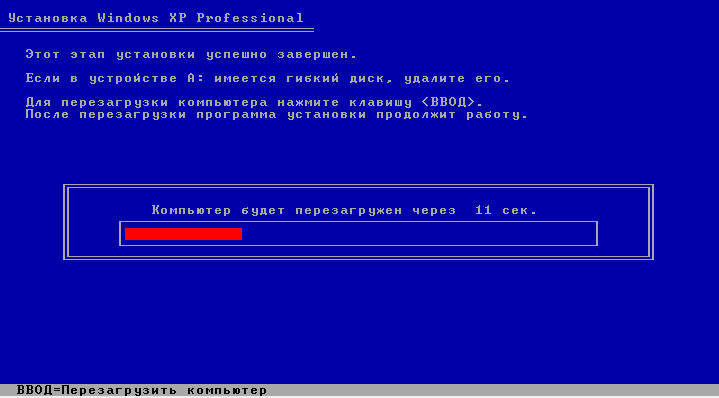
- Next Windows boot XP will no longer be run from a CD or DVD, but from a hard drive. This means that the system bootloader has been successfully created and is working correctly.

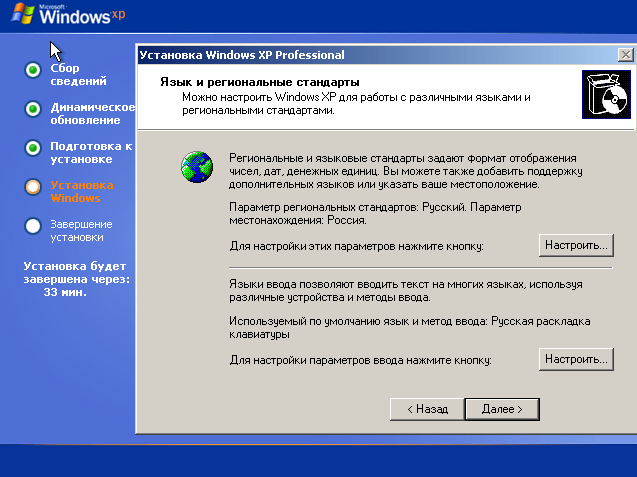
- From now on, our participation will be required again. Here we will have to specify the default system language, our location and additional languages if needed (although language packs can be installed later).
- Next – your name and organization. The name is required, the organization can be skipped.

- Entering the serial number of the Windows distribution during the installation process is voluntary. You can always enter it later.

- The computer name and administrator password also need to be specified now. The name will be suggested by default, but you can change it. The password can be left blank.

- The date, time and time zone are also set at this stage.

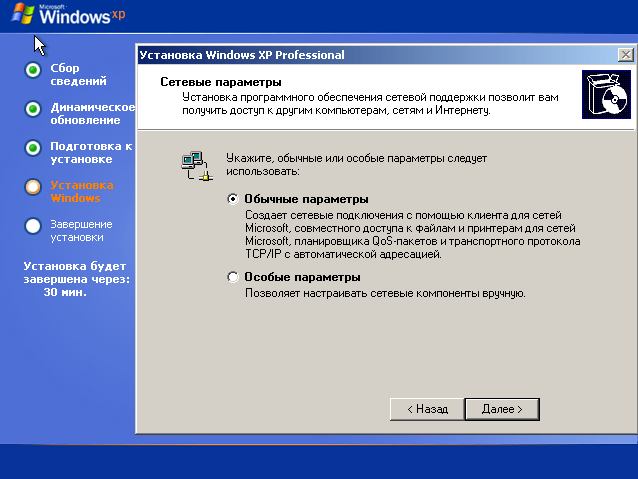
- We will not assign special network parameters; let them remain by default.
- Name working group let it remain as it is. You can always change it after installation.

- The installation is almost complete. Next, the screen will be configured and one or more user accounts will be created, the first of which will be designated as the computer administrator. You will also be prompted to activate Windows XP right now.

But now it’s really almost everything. There are a minimum of settings left - and the system is ready to work.
Automatic installation of Windows XP
Creating a response file using Windows tools
Agree, installing the system for about an hour without leaving the computer and constantly clicking “Next” will get boring for anyone. To simplify this work for those who have to do this often and for a long time, they came up with a way to install Windows without user intervention. To do this, a script is created in advance - a response file, which contains all the information necessary for the installer program.
The time has come for you and me to figure out how to create such scenarios. Part Windows distribution XP included utility Setupmgr.exe, which is in the archive deploy.cab, stored in the SUPPORTTOOLS folder on the installation disk. Let's extract this utility from the disk and run it.
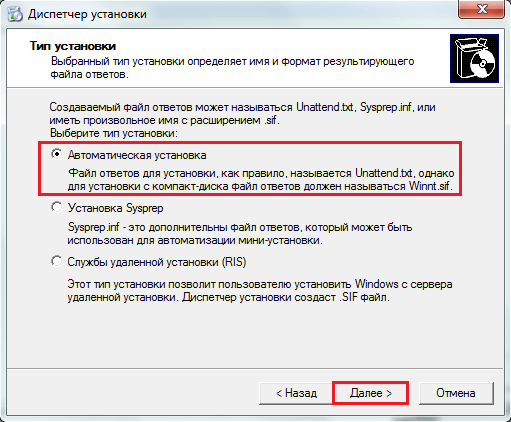
- The “Installation Manager” wizard will help us create the answer file. With its help, we can either create a new or change an existing script. Since we don’t have any preparations, we’ll select “Create”.

- We will leave the installation type as default – “ automatic installation”.
- Product version – Windows XP Professional.

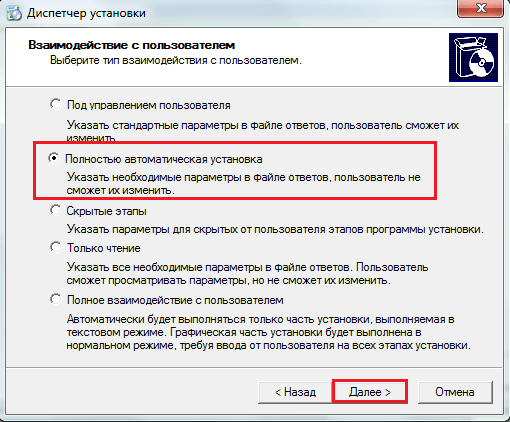
- User experience – “Fully silent installation” (if we do not plan to change the parameters in the answer file).
- Next, select “Install from CD”.

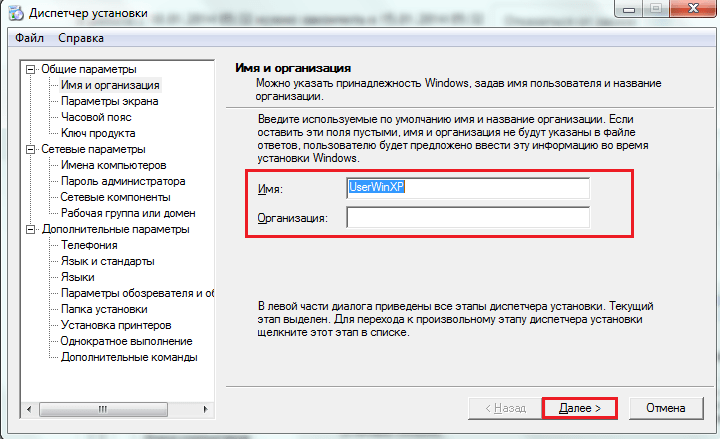
- Let's accept the license agreement and proceed to filling out the same forms and fields that we filled out when installing Windows from disk. First window: “Name and Organization”.
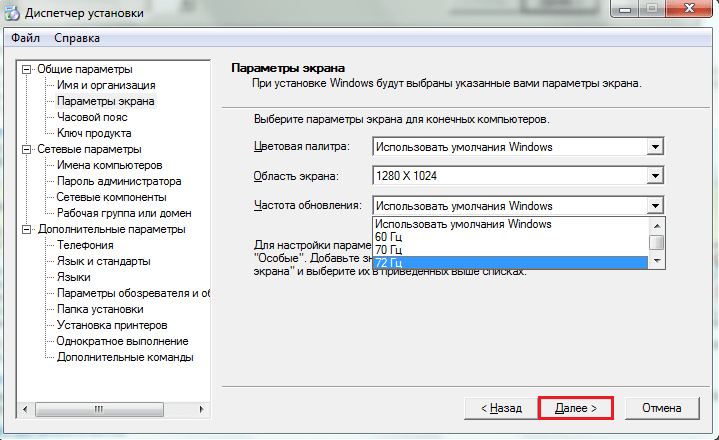
- Screen options. They can be left as default (use Windows defaults).
- Timezone.

- Serial number (required!). Without entering serial number here, you will not be able to continue creating the answer file and installing the system.

- The names of the computers on which Windows XP will be automatically installed using this scenario.

- And also: administrator password, network components, the name of the workgroup or domain where this PC will belong, telephone code countries and cities, locale standards, language support, initial settings Internet Explorer, Windows installation folder, printers and a number of other settings - in separate windows programs.
Upon completion of the wizard, a file will be created unattend.txt- this is our script, thanks to which we can install Windows XP completely automatically.
If you install the system from a CD, you need to rename unattend.txt to winnt.sif.
After creating the answer file, you can add to it own teams, information about which can be found in this article.
That's probably all. As you can see, there is nothing difficult about installing Windows XP according to a script without your own active participation. All that remains is to save the resulting file in the i386 folder of the distribution disk - in the same place where winnt32.exe - the Windows installer - is located.
If your PC has a floppy drive, you can place the answer file in the root directory of a floppy disk and insert it into the computer during system installation. In this case, the installer will prioritize executing the script from the floppy disk, even if there is another one on the CD, in the i386 folder.
Automation of installation by alternative means
Windows' own tools are not the only tool that allows you to install it “in one click.” There are apps for this too third party developers, For example, Advanced Windows Unattended Installer. Create scripts with this simple and free program much faster and easier than using Windows. The only drawback of Advanced Windows Unattended Installer is the lack of a Russian-language interface.
To use this tool to create a disk that allows you to automatically install on Windows computer XP, you only need to do three steps:
- Copy the contents of the Windows distribution to separate folder or mount its ISO image into a virtual drive.
Windows XP users are increasingly experiencing problems launching new games, programs, and support for certain components due to the lack of suitable drivers. Therefore, almost everyone is now switching to newer ones Windows editions, some choose the seventh version. Today we will take a detailed look at the process of how to upgrade Windows XP to Windows 7.
This task is not difficult and does not require any additional knowledge or skills from the user; you just need to follow the instructions in the installer window. However, there are certain nuances that need to be dealt with.
Checking Windows 7 compatibility with your computer
Most often, owners of old weak computers XP version is installed, it is not demanding on the system, loads minimally RAM and processor, which cannot be said about Windows 7, because its minimum system requirements a bit higher. Therefore, we first recommend that you find out the characteristics of your PC and compare them with the requirements operating system, and then proceed to installation. If you do not have information about your components, then special programs will help you find it out.
Step 1: Prepare a bootable USB flash drive
If you are going to install from disk, then you do not need to prepare anything, feel free to proceed to the third step. License holders copies of Windows on a flash drive they can also skip this step and move on to the second. If you have a flash drive and an OS image, then you need to make presets. Read more about this in our articles.
Step 2: BIOS and UEFI settings for installation from a flash drive
Owners of old motherboards will have to perform several simple actions in the BIOS, namely, you need to check the support of USB devices and set the boot priority from a flash drive. The whole process is described in detail in our article, just find your BIOS version and follow the instructions.

If the motherboard is equipped with a UEFI interface, the setup principle will be slightly different. It is described in detail in our article on installing Windows on UEFI laptops. Pay attention to the first step and follow each step one by one.

Step 3: Reinstall Windows XP on Windows 7
All preliminary settings have been made, the drive is prepared, now all you have to do is follow the installer’s instructions and the OS will be installed on your computer. You need:


The installation process will now begin. The screen will show the progress and what process is running on this moment. The PC will reboot several times, after which the installation will continue, and last step The desktop will be configured and shortcuts will be created.
Step 4: Preparing the OS for comfortable use
You currently have it installed clean Windows 7, without many programs, antivirus and drivers. All this must be downloaded and installed manually. We recommend preparing offline driver installation software in advance, download network driver or use the included disc to supply everything you need.

Often, after the actions of ill-fated viruses, the system stops working properly, or refuses to work at all - it constantly reboots or something else. And often, it is necessary to re- Windows installation A. In this article we’ll figure it out how to reinstall Windows XP from scratch? The Windows installation procedure is very simple, it is no more difficult than installing any program, and in fact, the Windows operating system is a program. The main thing is to read what the installer program writes and follow my recommendations.
So, you have decided that you need to reinstall Winows XP. Naturally you need to acquire installation disk with the operating system. And the disk must be bootable.
Installing Windows Step by step instructions
Step 1: Before installing Windows, be sure to transfer all your important data another logical drive(D,E,...) or to another medium altogether. If, however, all the data you need can be copied using systems such as Live CD.
Live CD is an operating system that boots from removable media(CD, DVD, USB drive, etc.), which does not require installation on a hard drive to function. That is, in essence it is the same Windows, but running from removable media.
Step 2. Next, insert a disk with Windows XP into the DVD-ROM; when you boot the computer, you must select boot from CD-ROM. To do this, you can go into the BIOS and set the device from which to boot, or you can do it simpler, as soon as the computer turns on, press the F8 or F12 key (when booting, it is usually written which key you need to press to select the device from which to boot first) and when the selection window appears, select your DVD drive.
Step 3. The installer program will automatically launch, check the system, etc. (procedure for 5-10 minutes), then something like this window will appear:
Press Enter, in the next window you accept the license agreement, press F8, and then the installer will prompt you to select the disk (partition) for installation. Something like the picture below:

Your window may be slightly different. If you have HDD is divided into several sections, then accordingly they will all be here. In this case, select “Disk C” and press “Enter”. If the installation takes place on new hard disk, it will be approximately the same as in the screenshot above. In this case, simply press “Enter”.
Step 4. In the next step, you will be asked to format the disk on which the system will be installed:

I strongly recommend that you always format the partition before installation (just remember to save all your important data before doing this, otherwise they will be irretrievably lost). Select Format in NTFS system, it's quick, it's not that important. If the disk is new, then there are no options; it will need to be formatted in any case. Selected - pressed "Enter" - the program will format the partition and begin copying files to the hard drive.
Step 5. Once the files are copied, the computer will automatically restart and the Windows installation will continue. After some time, a window will appear:

Click the Next button, then enter the Administrator Name - license key product - Computer name - Set the time and time zone and that's it, Windows installation will continue on its own. If any appear additional windows, just click “Next” and that’s it.
Step 6. Conclusion. After about half an hour, the Windows installation will complete and the computer will reboot. Next you will need to enter your name account and activate your copy of Windows, and that is all.
Now you know how to reinstall Windows XP and that it is available to every PC user. All that remains is to install the drivers and necessary programs.
Sooner or later, every PC user encounters problems that can be solved by one single method - reinstalling the OS. Knowledge and skill correct installation Windows XP operating systems will be useful if you purchase a new PC, especially if the computer is not supplied assembled, but piece by piece, without an operating system.
This method is especially popular in our country due to the lower cost of the final device. This article provides instructions for reinstalling the Windows XP operating system. To understand how to correctly reinstall the Windows XP operating system, you need to remember that the installation process is divided into several simple steps. The user who knows how to reinstall Windows XP will be able to safely install any other version of the operating system Windows family. All installation steps for these operating systems are almost the same.
Instructions for reinstalling Windows XP
- It is necessary to transfer all valuable information from the system partition to removable media or to a logical partition that is designed to store data.
- You need to find a bootable CD or any other media that contains WindowsXP. You can make up legends about how to find such a medium. But how the system was obtained has nothing to do with the installation process. It is only necessary to note that installing WindowsXP from drives other than CDs is becoming more popular today. In any case, the installation process is the same for any media. Only the method of preparing the media differs. But this is a topic for another day. IN in this case we believe that the corresponding media is already ready for use.
- The most difficult step for a novice user is setting up the BIOS to boot from disk. Calling up BIOS settings in most modern motherboards is done by pressing the Del or F2 keys when the PC starts. There are also other options. They can be described in the instructions for motherboard. When the BIOS settings screen appears, you must select AdvancedSetup by pressing the arrow keys. Then you need to go to this item by clicking on Enter key. After this, you need to find the item called Bootdevices and set the boot priority in it. It is necessary that the first place here be a CD-ROM or other medium from which the operating system is supposed to be installed. Detailed information How to correctly set the installation priority and which settings to choose can be found in the instructions for the motherboard. Once the boot priority is selected, you must save the BIOS settings and exit the setup program. Most often, the F key is used for this purpose. After this, you need to restart the PC. If the CD is inserted into the drive, the operating system installation program will begin loading.
- After the files necessary for installation have been copied, the user will be given the opportunity to choose an installation scenario: installation over an existing OS with saving settings, programs and files, restoring the operating system and “clean installation”. The last option is the most preferable, although it involves the loss of all user data stored on the system partition. The problem is that in case clean install Data stored on the system partition will be completely deleted. However, this also removes all errors that arose during the work process, and also guarantees the removal of viruses that have settled in the system partition.
- After the installation script has been selected, a window will appear with the option to select hard section installation disk. When choosing a clean install system partition needs to be formatted.
- After selecting and formatting the partition, the process of copying operating system files from the removable media to the computer’s hard drive will begin. This is the installation process itself. Usually it lasts no more than an hour. This process does not require user intervention and is accompanied by a PC reboot. Upon completion of the installation process, the system will ask the user to enter personal data, as well as select a language and enter information about geographic location and time zone.
- When the installation process is complete, the computer will restart again. The interface of a freshly installed operating system will appear before the user's eyes.