How to disable the Web Camera - three simple ways. Connecting the camera through other resources
Webcams, built-in and external, differ in resolution, but all are designed to transmit video and voice using special messenger programs such as Skype or ooVoo. In this case, it does not matter whether the USB camera is used on a regular PC under Windows control 7 or more later versions, or built-in webcam on macbooks and laptops from popular manufacturers: Samsung, Lenovo, HP, Asus and the like.
Step-by-step instructions for enabling the webcam in Windows 7
Overwhelming majority modern web cameras connect to PC using standard USB interface 2.0 (or 3.0). They come with a CD containing drivers and special program to control the video image. However, additional software is not always necessary. Most devices, thanks to PnP (Plug-and-Play) technology, are able to independently identify themselves as the operating system and operate successfully within a few seconds after the first connection. But in some cases it may be necessary step-by-step instruction to turn on the webcam on a laptop or personal computer running Windows 7.
The simplest and quick way- Click on the “Start” menu, enter the word “webcam” in the search bar that appears and press “Enter”. After which the user will be presented with a list from which to select the most suitable result.
If you couldn’t find your webcam this way, you need to follow a few simple steps one by one.

You can get here in other ways, for example: “Start” → right click Click on “My Computer” → Properties. In the window that appears (on the left side), one of the items will be “Device Manager”.
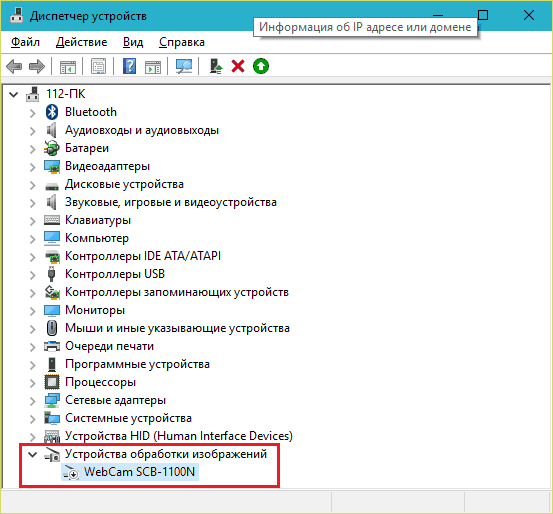
Depending on the type of webcam (built into a laptop or external), it can be located in different groups:
- "Image processing devices";
- "Sound, video and gaming devices."
At the same time, its name may contain the name of the manufacturer and model, or general characteristics, for example - “USB video device”. Double-clicking the mouse will open a window that will contain information about whether the device is working normally. If there are problems, then you need to go to the “Driver” tab, insert the CD from the kit and click the “Update” button. Then in the dialog that appears, specify the path to the folder with the webcam drivers on the CD.

You can also turn on the built-in webcam on your laptop by installing the selected communication program - Skype, mail.ru agent or any other. After installation and registration, the system will become available check all features, including a built-in microphone, if available, and selecting your preferred device from a suggested list of detected ones.

Features of checking the operation of the webcam in Windows 8 (8.1)
operating room Microsoft system Windows 8 (8.1) same as previous version, does not have utilities for checking built-in laptop or connected via USB webcams. In the vast majority of cases, in order to turn on the webcam, you will need to launch a program that will work with it. For this you can use the services third party developers. One of the simple, convenient and free programs for working with built-in webcams in laptops and USB models for desktop computers called "Live Webcam". You can download it on the author's website.
How to connect the built-in webcam in a laptop
The vast majority of laptop models do not have fundamental design and software differences; they can be divided into two categories:
- under managed by Microsoft Windows or Linux (Samsung, Dell, Lenovo, HP, Asus, Sony and so on);
- Macbook, products Apple with iOS operating system.
Enabling the webcam on laptops different brands may vary. Sometimes this becomes quite a difficult problem if you don't know everything possible ways turning on webcams on laptops and netbooks.
ASUS laptops (Asus)
Almost everything Asus laptops are equipped with built-in web cameras, which can be turned on by simultaneously pressing two buttons on the keyboard. These are Fn (bottom left) and the keys that display the camera icon, usually located in the topmost horizontal row.
Some Asus netbook models have a special mechanical switch, which is easy to spot at the top of the screen. It has two positions (ON and OFF), with which you can turn on and off the broadcast of video images.
The disk that comes with the device contains the Life Frame utility, which was created to control the web camera. If you don't have it, download it and that's it necessary drivers can be found on the company's official website.
HP laptops (Hewlett Packard)
Possible inclusion methods:
- Press Fn + key with the camera icon.
- Automatic activation by any program, Skype or similar
- Click "Start", then search bar type “QuickPlay”, then “Video”
- By using standard program, which is called "HP MediaSmart".
Lenovo laptops (Lenovo)
The entire line of this brand is equipped with built-in web cameras; this device is even available in budget model for home and office B590, not to mention such multimedia-oriented laptops as the G500 or G580. Turning on the camera on a Lenovo laptop is very simple, there are three ways to do this. The first has already been described above, through the “Control Panel”, and the second is universal for almost all such devices - the Fn button + the key with the camera icon. The third one is also not very original; it involves setting all the camera parameters in Skype or a similar program.
Samsung laptops (Samsung)
The main problem that users of Samsung laptops and netbooks face is the blurred image produced by the built-in webcam. This happens if the device has Windows drivers 7 or 8 (8.1), not “native”, from Samsung. In this case, you need to go to the official website in the “Support” section and download software for your model.
Laptops Toshiba (Toshiba)
In order to enable the built-in camera on any Toshiba laptop model, you will definitely need “native” drivers and a special program. Usually all this comes included on a CD, but if not, they can always be downloaded from the company’s official website.
MSI laptops (MSI)
MSI products in this regard are practically no different from Toshiba - to enable you will need a driver package and small program. All this can be taken on a proprietary disk from the kit.
Dell laptops (Dell)
A specific feature of Dell laptops is the lack of separate software for each of the integrated devices. You will need to download from the site or run from disk single package For specific model, and then select in it to install drivers for the built-in webcam.
Sony laptops
With laptops of this brand, advice at the level: “enter the control panel” or “enable the camera in the device manager” does not make sense. If you purchased your device with pre-installed Windows 7 or 8, then everything will work initially. Otherwise, you will have to visit the Sony technical support website and download everything you need there, focusing on your model.
Acer laptops
As a rule, problems with setting up and turning on the webcam in portable Acer computers does not arise. Almost all models are equipped with an LED next to the peephole, which allows you to monitor its activity and turn off the camera if it is not needed. Control is carried out by pressing Fn + V.

Required software.
Laptops DNS (DNS)
According to data published on the website of this manufacturer, there is no need to download special drivers. Standard ones that you can install yourself will be enough. operating system. You can turn the webcam on and off using the combination Fn + F11.
Mac laptops
MacBooks, like all other Apple products, are different high level reliability. The webcam on a Macbook rarely breaks down, but occasionally problems may arise that prevent it from working properly. This usually manifests itself in the following:
- users don't see your image;
- While loading the application, an error window pops up;
- the program freezes when you try to close it;
- the image contains stripes or multi-colored tints;
- appears system message that the device is disabled.
If we exclude the possibility mechanical damage MacBook, then all other problems with the webcam can be solved quite easily. The first thing you need to do is open the task manager window and check if there are two processes running simultaneously that have the word “Camera” in their name. If so, closing one of them will eliminate the conflict in the system.
Second possible reason- incorrect name in the registry (for example, CameraApps instead of Camera), all such processes must be renamed. If this does not help, then you need to turn off the device and remove the battery from it. Turning it on after 10-15 minutes should fix all errors and get the computer working normally.
Checking your webcam using Skype
The easiest way to check that the webcam is working correctly on a desktop computer or laptop is to launch Skype. At the top of the program window, select “Tools” and go to “Settings”. Clicking on “Video Settings” will allow you to see your image on the right side of the window. Below it there is a button “Webcam Settings”, which will allow you to set various parameters(brightness, contrast, saturation and others) to your liking.

Attention, one of two points for automatically receiving and demonstrating video must be enabled - “anyone” or “only people from my contact”
Online services for verification
There are quite a few on the Internet a large number of resources (for example), which allow you to quickly check the quality of your webcam and microphone. Before you begin, you will need to enable media transfer in the pop-up window of a standard flash player. You will then be able to test the picture and sound. On the same page is detailed instructions how to use it correctly.
How to turn on and off a USB camera on a computer
On desktop computers USB cameras are used, which need to be purchased separately, but their installation and configuration is even easier than on laptops. In the vast majority of cases, it is enough to connect the device to the connector and wait a few seconds until the operating system detects it and installs it necessary drivers. After which you can start using the gadget. If this method does not work, then you will need to go to the control panel, as described above, and manual installation Software from CD included.
Currently on the market great amount manufacturers who offer devices with different resolutions, including high-quality HD mode. The most popular webcams are: famous brands, like Logitech and Microsoft, thanks high quality and the absence of problems with their determination by the system. They have proven themselves quite well and budget options: Gembird, Sven and Genius. There is no single algorithm that allows you to quickly turn on the camera and start using it, but searching for drivers on the manufacturer’s official website almost always helps.
Remotely turn on the webcam
Quite often, users need to turn on their webcam on their computer remotely. This problem can be solved using both built-in Windows tools 7 and 8 (remote assistance), and using third-party software: Radmin, TeamViewer, etc. similar programs. The only limitation that exists for remote activation webcams - no need for one physical connection to USB or use mechanical switches. Visually, this process occurs in exactly the same way as when directly present near the computer.
Dangers. How Hackers Can See You Through a Webcam
In the field of cyber crimes, a new term has increasingly begun to be used - ratting. It sounds like the English version of the word “rat”, but has a slightly different meaning, since it comes from the abbreviation RAT (Remote Administrator Tools). Such tools are intended for remote administration, are often used by hackers who take control not only of someone else’s computer, but also of the gadgets connected to it: webcams, printers and other equipment.
Typically, hacker software gets onto the victim’s computer after visiting a malicious site or through an invitation from a spam mailing. After this, the attacker receives full control over all of his victim's equipment: he can download confidential data, turn the webcam on and off, take his own pictures and even record videos using it.
There is no guaranteed way to protect against such an intrusion, but a number of steps can be taken effective measures and follow a few simple rules:
- use latest versions operating systems and related software: browsers, flash player, etc.;
- install upcoming updates in a timely manner;
- use a reliable antivirus and install a good firewall;
- do not follow links found in your mailbox, if the sender is unknown to you;
- do not access sites on the Internet that seem suspicious or violate the law.
How to turn off (disable) your webcam
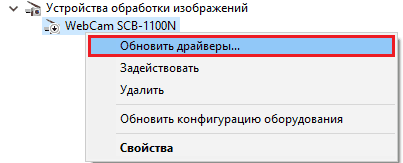
Turning off a regular webcam is very simple - just disconnect it from USB port, for built-in models this process will be a little more complicated, but also will not require any special skills. To do this, you need to find it in the list of device manager, right-click on it and in the menu that appears, click on “Disable”. This is the simplest, fastest and most reliable method if there is no mechanical switch on the case. To reverse the process, you need to repeat this procedure by selecting the “Enable” menu item. The current status of the camera can be determined by the indicator (LED) located next to it.

Service maintenance
Repair and setup of web cameras for personal computers, laptops and netbooks can be produced in our service center. It’s very easy to get to it using this route map:

Now, almost all laptop models, from any manufacturer, are equipped with a built-in webcam. But there are also older models where there were no cameras, or perhaps there was a glitch in the operating system and the webcam does not work. What to do in such cases? How to launch the camera, where to click?
Today there are several ways to start a video camera. Moreover, the user must immediately determine for himself why he needs a camera on his laptop:
- for communication;
- for shooting videos or photos.
There are small nuances in choosing programs for a particular type of camera use. I would like to immediately make a reservation that any camera on a laptop should work by default. None additional actions no need to produce. Any video chat app should activate the camera without any additional movement.
How to turn on the camera via Skype
For start this application, first of all, you need to download and install it on your laptop. It is better to do this on the official website of the developer using the link - skype.
All the user needs to do is click the download button. Moreover, below there are buttons that allow you to download the application for other operating systems.
After this, the site itself will tell the user step by step what to do to connect the program and start communicating with friends.
So, the application is downloaded to the laptop. How to turn on the camera when working with Skype? It is important to note here that this application is intended primarily for free videos and audio calls. That is, the user can not only take photos and record video greetings.
After double click By Skype icon, the user types the password and login of his account. If he did not log out of his account before closing Skype, then it will load without additional questions.
To check the operation of the webcam, just perform the following sequence of actions - click calls, select video, and right-click and select configure video.
After this, the camera will automatically connect and in the window that opens, the user will automatically see himself or whatever is in front of the camera at that moment. There is also an option to change your avatar, which will help you take several photos directly from the camera, and video settings will help you adjust the video signal. Nothing special was needed to connect the camera.
Connecting the camera through other resources
Built-in utility for connecting a web camera, software at least 7, at least 8 Windows versions does not have. You just need to download the application. In addition to Skype, you can use other third party application, for example, Live web cam.
To download just click boot file, and then unpack it. After this, the program asks the user if he wants to allow the downloaded program to change settings on the computer. The answer should be yes.
After this, the user should click the button to accept the license agreements.
After this, the user selects what he is going to do with the program and where to save it, and then clicks next.
After this, the program will prompt you to select a location where pictures and videos will be saved. The user will only need to specify the path to the folder. After this it will open simplest interface, in which you can change the settings, take a photo and start self-recording.
Turn on the camera - reinstall the drivers
The second most common reason Laptop webcam not turning on, missing drivers. The problem here is that after the system crashed as a result of a breakdown or virus attack, and someone I knew restored the operating system to the user, half of the drivers were simply not installed. The operating system could have been installed old or unfinished.
To check the completeness and correct operation of the drivers, you need to launch the device manager. To do this, just press the Win and R keys simultaneously. And in the window that appears, type devmgmt.msc. As shown in the picture.
After this, a dialog box will open for all devices for operating systems 7 and 8. After this, the user should view all devices in the window that opens. There should be no devices with yellow exclamation point.
If there are no such icons, then all the drivers are present on the laptop and nothing needs to be updated. But if there is, then you need to select this element, right-click, and select the command - update drivers.
If the drivers are not updated, then you need to go to the laptop manufacturer’s website and in the support section, download the necessary drivers.
For the most popular laptops, drivers can be downloaded from the links:
- Asus - link (you need to enter the model);
After downloading the drivers, it will be enough to restart the laptop, the camera should work.
Another variant of the problem is that the web is not enabled, i.e. disabled. If in Device Manager there is an arrow pointing down next to the webcam model, then the camera is not connected to this device.
This means you need to select the webcam and right-click to bring up a dialog box and in it the user selects the command - enable. After this, the webcam should work.
Launch a webcam during the operating room Windows system 10 is possible using the Camera application. The user can learn how to do this, where, what to click, and also ask his question using these links to the office. website of the software manufacturer - Camera.
Webcam launch commands on the keyboard
There is a certain set of keys that help you quickly launch the webcam on different laptops. This is one of the most simple options activate and test the operation of the webcam without third-party services.
Each manufacturer has its own combinations, but sometimes they can coincide:
- FN and V, or through the start menu - Acer Crystal Eye (the software must be licensed and installed on the laptop by the manufacturer);
- FN and V or 3 simple programs that come with the software for the Asus laptop - ECap Camera, etc.;
- FN+button with camera - for HP laptops or a standard combination of buttons, or through the default program - HP Camera;
- Fn and Ecs for Lenovo laptops.
If none of the above methods to start the camera work, then you should have your laptop checked by a specialist. There may be something wrong with the equipment itself and will require repairs. Or you need to check for virus attacks.
A webcam (webcam) is an integral part of the vast majority of laptops. By default, after the first start of the device, it is immediately ready for use. But what if you are trying to get an image from the camera, but there is none?
The main thing is not to panic. Situations when mobile computer the webcam does not work, most often due to the fact that it is simply turned off or not installed in the operating system (breakdowns of this device, fortunately, are rare). Read below to learn how to turn on the camera on a laptop and troubleshoot related problems.
How to quickly check if the camera is working
To find out if your webcam works at all (perhaps it doesn’t work in only one program, since it’s disabled in the settings), go to the service and click “ Check webcam».

If you see a request to allow access to the device for Adobe Flash Player, then everything is in order: the camera is working. Check " Allow» and check if the image appears on the screen.

If you see a message like in the screenshot below, it means the camera really isn’t working. We’ll figure out what to do in this case further.

Checking the status of the webcam in the system
We begin diagnosing any hardware problems by checking how it appears in Device Manager. To open the manager, press hot Windows keys+ R (this will launch the “Run” application), enter the command in the “Open” field devmgmt.msc and click OK. The method is convenient because it works in all versions of Windows.

In the dispatcher window, expand the list “ Imaging devices» and see if our webcam is there. The following options are possible:
- The web camera is not in the list of equipment - the computer does not see it. This happens because hardware shutdown or physical breakdown.
- There is no camera, but there is an unknown device, which most likely is it. This means that the computer sees it, but cannot recognize it. The reason is the lack of a driver.
- There is a camera in the list, but next to it there is a yellow triangle with an exclamation mark or a black arrow in a circle. The first indicates a malfunction, the second indicates a shutdown in the operating system.
Turn on the webcam from the keyboard
The function of turning on/off the webcam from the keyboard is not implemented on all laptop models. Where there is one, a miniature image of a camera is applied to one of the keys. Most often this is the “V” key, sometimes “Escape” or others from F1-F12.

To turn on the web camera, press this key simultaneously with “Fn”. After this, the webcam should appear in the device manager. If it's still not there, you probably have that rare case where it's physically faulty or not connected.
Installing the driver
If after hardware enable something unidentified has appeared in the device manager, install the driver for it. It is best to download it from the website of the laptop manufacturer or the webcam itself, if you know exactly its model. Or install from a disk, if one was included with your device.
If you do not know the exact name of the laptop model, turn it over. There is a sticker on the bottom cover of every laptop stating this.
This is what a company label looks like MSI laptop MS-1757:

Having determined the model, find it on the manufacturer’s website and download the driver for your operating system in the “Support” section. Install as normal application, after installation, reboot the machine.
By the way , there may not be a separate webcam driver for some OS versions, since it is included inWindows (USB Video Class Driver). Problems with this group of drivers can be resolved by installing updates or .
Fixing webcam recognition errors in the system
If the webcam is marked with a black arrow in Device Manager (disabled in Windows), right-click on it and click “ Engage».

When disabled in the operating system (by the user or programs), this is enough for it to work.
If the webcam is marked with an exclamation mark on a yellow triangle, which means: “the device is not working properly,” click on the same context menu command " Delete" and restart your computer. The system will recognize it again and automatically reinstall the driver.
If it doesn’t help, click “ Update drivers»:
Specify the search location as the Internet (if you are not sure that the correct driver is present in the system) or this computer (if the camera worked properly with the old driver before the problem occurred or you have a recent version).

No matter how strong firewall ( firewall) no matter what you have installed, there is always a possibility that hackers will be able to bypass it and, by connecting to the webcam, turn you into a YouTube star, parading in front of the computer in shorts (or without them).
Today I want to tell you how to disable webcam(temporarily until you use it for video communication with friends and relatives) in three simple and reliable ways (which one to use is up to you).
So, two ways to disable the webcam will be physical, and one will be software (WebCam On-Off). Each of them has its own pros and cons.
The most reliable way to disable a webcam
I won’t open America by saying that it’s the most reliable way To turn off the webcam, unplug its cable from the computer’s USB port. This way, no hacker will be able to connect to it (unless he comes to your home).
We talked with relatives from Brazil and turned off the webcam. If you wanted to talk to someone else, they connected. Everything is simple and 100% reliable.
You can also buy a special webcam with a closing lens...


...but there will still be a problem with the microphone, which is often built into these devices out of the box (and is usually very sensitive).
The only problem - this method suitable only for owners external web cameras. There is no way to protect yourself on a laptop.
How to disable the webcam on a laptop
To cover the webcam lens on a laptop, there are special curtains that can be found and purchased on the Internet...

Some laptop models come with such curtains...

...but you won’t change your computer because of a curtain, right?
You can also cover up the webcam with a plaster or tape, but firstly, this is a “collective farm”, and secondly, there is still a problem with the microphone being turned on.
How to disable a webcam programmatically
Here we come to the very in an interesting way temporarily disabling the webcam - using a free portable computer program, which is capable of managing the driver of this device.
The program is called WebCam On-Off. It does not need to be installed on your computer - it works directly from the folder. The interface is in English, unfortunately, but there are only three buttons and it’s very easy to figure out.
You launch WebCam On-Off by clicking on the shortcut and in the main (only) program window you see the status of your webcam driver in this moment time...

Enable means ENABLED.
Attention! Please do not confuse a working driver with a turned on camera - these are completely different things!
There are three buttons on the left. Click on “Disable” and your webcam driver will turn off (along with the microphone) - the operating system will “lose sight” of this device...

The most bottom button“Webcam” - will show you the image from the webcam (if the driver is active) in separate window. If it is disabled, you will be shown the following message...

You can close the program after turning off the webcam - it will continue to be disabled until you run the program again and enable (run) the driver.
A small nuance - the webcam should be turned off only when it is not used in any program. Close Skype or Viber and only then turn off the webcam using Webcam programs On-Off.
If you can’t disable it and the following message pops up...

...then the camera is being used by some process - terminate it or reboot the system.
Download WebCam On-Off

The program size is only 381 kb. There are no viruses.
Skeptics will say that this is just a program and that it can also be hacked or bypassed, that an experienced hacker can easily enable the camera driver remotely... but guys, then everything is very bad with your computer protection. Need to do something or turn it off and hide it in the closet and forget about it forever.