How to determine the status of your hard drive. Lifetime of your hard drive
Good day!
How many things could be corrected if we knew in advance what awaits us...
And if in life it is almost impossible to predict some events, then in the case of hard drive- some of the problems can still be predicted and foreseen!
For this there are special utilities who can find out and analyze SMART readings* disk (show them to you, if necessary), and based on this data, assess the health of your disk, simultaneously calculating how many years it can still serve.
The information is extremely useful, and similar utilities can monitor your disk online, and as soon as the first signs appear unstable work- notify you immediately. Accordingly, you will have time to make a backup in time and take action (although backups should always be done, even when everything is fine ☺).
And so, in the article I will consider several methods (and several utilities) of analysis HDD status and SSD.
*Note:
S.M.A.R.T. (Self-Monitoring, Analysis and Reporting Technology) - a special technology for assessing the condition of a hard drive with an integrated hardware self-diagnosis/self-monitoring system. The main task is to determine the likelihood of device failure, preventing data loss.
Perhaps this is one of the most popular questions asked by all users who are encountering problems with their hard drive for the first time (or who are thinking about the safety of storing their data). Everyone is interested in the time it takes for the disk to work until it completely stops. Let's try to predict...
Therefore, in the first part of the article, I decided to show a couple of utilities that can receive all the readings from the disk and analyze them independently, and give you only the finished result (in the second part of the article, I will provide utilities for viewing SMART readings for independent analysis).
Method No. 1 - using Hard Disk Sentinel
One of best utilities to monitor the status of computer disks (as hard drives(HDD) and “newfangled” SSD). What is most captivating about the program is that it will independently analyze all the data received about the state of the disk and show you the finished result (very convenient for novice users).
In order not to be unfounded, I will immediately show the main window of the program, which appears after the first launch (the disk analysis will be done immediately automatically). The health and performance of the disk is assessed as 100% (ideally, this is how it should be), the time that the disk will still work in normal mode estimated by the program at approximately 1000 days (~3 years).
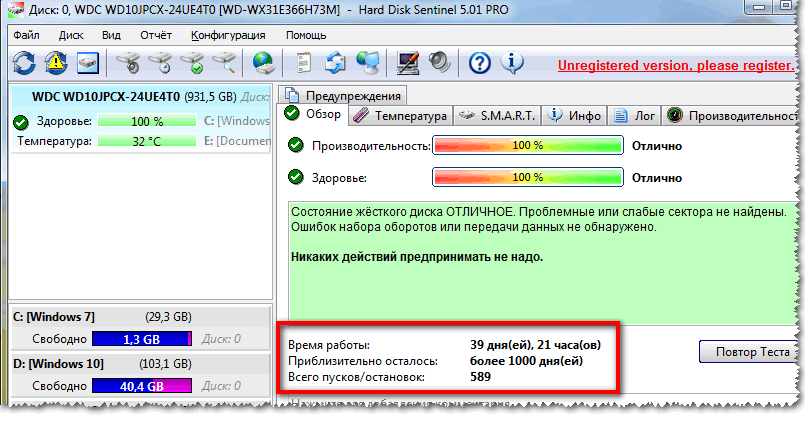
What about the disk version? Hard Disk Sentinel
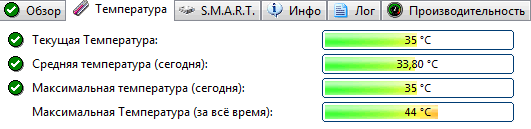
In addition, the program allows you to monitor the temperature: both current, average and maximum during the day, week, month. If the temperature goes beyond the “normal” limits, the program will warn you about this (which is also very convenient).
Hard Disk Sentinel also allows you to view SMART readings (however, to evaluate them, you need to have a good understanding of disks), get full information about the hard drive (model, serial number, manufacturer, etc.), see what HDD loaded (i.e. get performance information).
In general, in my humble opinion, Hard Disk Sentinel is one of the best utilities for monitoring the status of disks in the system. It is worth adding that there are several versions of the programs: professional and standard (for the professional version with extended functionality, there is a portable version of the program that does not require installation (for example, it can even be run from a flash drive)).
Hard Disk Sentinel works in all popular Windows(7, 8, 10 - 32|64 bits), supports the Russian language in full.
Method number 2 - using HDDlife
This program is similar to the first one; it also clearly shows the current state of the disk: its health and performance (in percentage terms), its temperature, the amount of time worked (in months). At the top of the window, based on all this data, HDDlife shows a summary of your disk, for example, in my case, “ALL RIGHT” (which means that everything is fine with the disk).
By the way, the program can work online, monitoring the state of your disk, and if something goes wrong (when the first signs of problems appear) it will immediately notify you about it.

As an example, the screenshot below shows an SSD disk has received a warning: its condition is still within acceptable limits, but reliability and performance are below average. In this case, you should not trust the disk with any important data, and if possible, you should prepare to replace it.

By the way, in the main window of the program, next to the amount of disk time worked, there is a link "Disk settings" (allows you to change some necessary parameters). By opening it, you can control the balance between noise/performance (very useful with drives that make a lot of noise), and adjust power consumption settings (relevant for laptops that quickly run out of battery).

Addition: HDDlife works on both PCs and laptops. Supports HDD and SSD drives. In stock portable versions programs that do not require installation. You can configure the program to run alongside your Windows. HDDlife works on Windows: XP, 7, 8, 10 (32|64 bits).
How to view SMART readings
If previous utilities independently assessed the disk status, based on SMART data, then the utilities below will give you more freedom and data for independent analysis. In the reports you will be able to find a fairly large set of parameters, on the basis of which it will be possible to roughly assess the condition of the disk and make a forecast for its further operation.
Method No. 1 - using CrystalDiskInfo
СrystalDiskInfo
Excellent free utility to view status and SMART readings hard drive(SSD drives are also supported). What’s so attractive about the utility is that it provides you with complete information about the temperature, technical condition of the disk, its characteristics, etc., and some of the data comes with notes (i.e., the utility is relevant for experienced users who themselves know “what-is- what" and for beginners who need a hint).
For example, if there is something wrong with the temperature, you will see a red indicator on it, i.e. СrystalDiskInfo will inform you about this.

The main window of the program can be roughly divided into 4 zones (see screenshot above):
- "1" - all your physical disks installed in your computer (laptop) are listed here. Next to each one is shown its temperature, technical condition, and the number of sections on it (for example, “C: D: E: F:”);
- "2" - the current temperature of the disk and its technical condition are shown here (the program performs an analysis based on all data received from the disk);
- "3" - disk data: serial number, manufacturer, interface, rotation speed, etc.;
- "4" - SMART readings. By the way, what’s so attractive about the program is that you don’t have to know what this or that parameter means - if something is wrong with any item, the program will mark it in yellow or red and notify you about it.
As an example to the above, I will give a screenshot that shows two disks: on the left - with which everything is fine, on the right - with which there are problems with reassigned sectors (technical condition - alarm!).

As a reference (about reassigned sectors):
when the hard drive detects, for example, a write error, it transfers the data to a specially designated spare area (and this sector will be considered “reassigned”). Therefore, on modern hard drives you cannot see bad blocks - they are hidden in reassigned sectors. This process is called remapping, and the reassigned sector is remap.
The higher the value of reassigned sectors, the worse the condition of the disk surface. Field "raw value" contains the total number of remapped sectors.
By the way, for many disk manufacturers, even one reassigned sector is already a warranty case!
To utility CrystalDiskInfo monitored the status of your hard drive online - in the "Service" menu, check two boxes: "Agent launch" and "Autostart"(see screenshot below).

Then you will see the temperature program icon next to the clock in the tray. In general, you can now be more confident about the condition of the disk ☺...
Method number 2 - using Victoria
Victoria- one of the most famous programs for working with hard drives. The main purpose of the program is to evaluate technical condition drive and replace bad sectors for reserve workers.
The utility is free and allows you to work both under Windows and under DOS (which in many cases shows much more accurate data about the state of the disk).
Of the minuses: working with Victoria is quite difficult, but at least, I highly do not recommend pressing buttons in it at random (you can easily destroy all the data on the disk). I have one fairly large article on my blog that explains in detail how to check a disk using Victoria (including finding out the SMART readings - example in the screenshot below (in which Victoria pointed to possible problem with temperature)).
Instructions for working with Victoria:

SMART Tab || Victoria utility
I'll call it a day, good luck to everyone!
Additions on the topic are welcome ☺
If there is something to break, it will definitely break. The question is rhetorical - when? Everything is very simple. This will happen, as always, at the most inopportune moment. The result is a spoiled mood and unexpected expenses. Special case- failure of the hard drive on which we store gigabytes personal information, work materials, etc., etc. It’s good if you already had such experience and took care of backup in advance. But what if this is not the case? The answer is simple. Don't repeat other people's mistakes.
According to the company BackBlaze, which was one of the first to develop a cloud backup service without volume limitations. They organized their data storage center using ordinary consumer hard drives because it was the cheapest way to do it. As a result, they ended up with more than 27,000 hard drives, which were represented mainly by three manufacturers: Seagate, Western Digital Hitachi. They are also the world leaders in the production and sale of hard drives.
After four years of operation of the BackBlaze service, an article appeared on their blog in which they shared some interesting facts regarding the survivability of hard drives and their reliability under active conditions.
It turned out that in the first year of operation, 5.1% of hard drives fail, then this figure gradually increases, and by four years, every fifth hard drive is dead.
If we try to further extrapolate this graph into the fifth and sixth years, it turns out that only half of the hard drives will survive to their sixth birthday. Apparently, it’s not for nothing that the longest warranty period that can be found on hard disks, is 5 years, and most manufacturers now only give a warranty for 1-2 years. But here you need to understand that the warranty period does not mean that the disk will work exactly that long, but it guarantees you free replacement in the event that the hard drive fails during this period of time.
But what an interesting picture they got regarding the failure of hard drives by to different manufacturers during the first 36 months.

And here is the data on the number of failures per year for disks of different capacities for each manufacturer:

Judging by these data, the most reliable drives were from Hitachi, but Seagate, on the contrary, was a noticeable failure. It is also worth noting that after receiving this data, Western Digital acquired Hitachi Global Storage Technologies, a division of Hitachi for the production of hard drives, and this moment WD and Hitachi drives are actually drives from the same manufacturer under different brands.
“The question is not whether you will lose your data or not. The question is when exactly this will happen." Is this fair for you? Do you have automatic backup all your data?
If yes, then super, you are a wise person and you don’t have to read further this article. If not, then I advise you to think hard and not wait for the moment when it is too late, but set up the backup of important data today.
Previously, an article was published on the site about how to determine a possible hard drive malfunction discs on which he can publish. In this article we will look at simple ways how to view S.M.A.R.T. (Self-Monitoring, Analysis, and Reporting Technology) of your hard drive to find out its current state of “health” and identify possible future malfunctions.
S.M.A.R.T. is a set of software and hardware that monitors the state of the hard drive, its physical and electronic parameters and generates a corresponding report that allows you to determine its current performance or possible malfunctions in future. Since the technology is not new for a long time, most hard ones already have this opportunity. Just like any other function, this technology can be disabled, but it is not recommended to disable it, and there is no particular need for it.
To get started, you can view state of hard by using standard means Windows. This method is good only because it does not require installing a third-party software. But it has a significant disadvantage - it only shows the general status of the disk without detailed description the points.
To quickly view S.M.A.R.T. First you need to launch the command line: press the key with Windows icon on your keyboard, then in the search box (if it's Windows 7) type " Command line"("Command Prompt") and press the "Enter" key. Next, in the Windows terminal, type two following commands, after each press the “Enter” key:
wmic
diskdrive get status

If everything is fine with your hard drive and everything works fine, then the terminal should return the “OK” status to you. Otherwise, errors or problems that were received from the S.M.A.R.T. diagnostics should be displayed.
Using CrystalDiskInfo
CrystalDiskInfo is a free, easy-to-use application that can quickly and easily display the results of S.M.A.R.T. diagnostics in Windows. The program has a Russified interface, just this description The English version was used. You can download and use it for free from the official website. Just remember to uncheck the box in the browser widget window if the program installer gives you such a window.

Immediately after installation, you can launch and use the program’s capabilities to view S.M.A.R.T. statistics. for all your hard drives. If everything works well, then you should see the status “ Fine» (« Good" - as shown in the figure below).
CrystalDiskInfo also displays other useful information about the device, such as the current hard temperature and different hardware specification. This information can be useful if you need to determine the cause of failures.

This program also has the following additional features like startup at system startup (in the English menu: Function –> Resident) and minimizing to the system tray (Function –> Startup). This way it will work in the background and you will always be able to actively monitor the status of all your hard drives, and if any self-diagnosis parameters change, the program will display a warning message.
Using HD Tune
HD Tune is a multi-test application that will give you complete information about your hard drive. This utility exists in two versions: free - HD Tune and paid - HD Tune Pro. Differences between versions, as well as cost paid version can be viewed on the official website, where they can also be downloaded. But since we are interested free version program and it completely has the properties we need, then we will continue our further consideration of HD Tune.
Installing the program should not be difficult even for inexperienced users, since it is from the “Next - Next” category. Immediately after installation, the utility should determine the entire list of your media. On the first tab of the program window (Benchmark), you can perform a performance test. The test is carried out on reading speed for various operating modes of the device. I can also add here that the Pro version also includes the ability to test recording speed, in addition, the list of tests themselves is larger and more detailed reports on them.

On the second tab (Info) you can also get detailed information about the device under test, supported functions, current temperature, number and size of partitions, firmware version, serial number.

It is on the third tab (Health) that you can read the information stored in S.M.A.R.T. The resulting verdict on the status of the drive is displayed at the bottom of the tab.

Pwer On Time is the time (in hours) how long the hard drive has worked since leaving the factory, and the parameter Health Status reports its current status.
It will also be useful last tab(Error Scan). Using it you can perform superficial hard check disk for the presence of bad blocks. The program checks the access time to sectors and, depending on it, classifies the latter as bad or good.

In general, this program is quite easy to use, quite informative and has a minimal set of tests to determine the status of your hard drives, even though this is a “budget” version.
Using Victoria (MHDD)
Speaking about determining the status of hard drives, one cannot help but say a few words about such a popular and very useful program like Victoria (MHDD). Describing all its capabilities, tests and reports is a lot of material for a series of articles, so you will have to make do with only a couple of phrases that relate to the topic of the article. Full documentation on use can always be found on the Internet, but here it is presented only introductory information for those who have not heard about this program.
Victoria, like its “big brother” MHDD, can be found in both the Windows version of the program and can be launched from under finished system, or as a separate utility on different boot disks or flash drives (for example, Hiren’s Boot CD, Windows nimiPE). In any of the options, this utility has its own full set functions and tests, and of course it is more convenient to use from Windows, but in some cases it is better to run it from a bootable flash drive or Live-CD. This is due to the fact that Victoria (MHDD) directly works with hard controller and if it is loaded from a Live-CD, there is no operating system influence factor.
Immediately after booting, Victoria should initialize all hard drives on board. Having selected the desired hard one to check, obtain S.M.A.R.T. information. can be found on the corresponding program page.

Victoria, like all previously described utilities, will give you full list all supported items that are being checked, and will evaluate the hard condition of them. For this utility, S.M.A.R.T information. is not its main function, but is very useful and informative. Victoria is specialized utility which is used in service centers to check the hard surface for errors (bads), as well as mark them and remove them from use. Victoria can also be used to completely erase the surface of a disk, which can be useful in some cases.

Generally this utility one of the best free ones in its class. Using it, you can carry out a normal home test of your hard drive, as well as restore its functionality in the event of bad problems.
If you have completed hard test any of the utilities described above, or any other analogue, and received a negative response, that is, the utility displays that the status is S.M.A.R.T. If the disk is bad, this does not mean that it has already stopped working. This means that irreversible breakdown of hard may occur in a few minutes, or in a few days, or even in a few years... You just shouldn’t trust this device and store valuable information on it now. If some malfunctions or bad sectors have already arisen, this means that they will occur in the future. And there is no certainty that this event will not occur in the place on the disk surface where, for example, your photos are stored. In such cases, it is recommended to move important information to another hard drive or DVD, as well as perform various system backups.
Of course, all devices do not work perfectly and the hard drive can fail immediately and without warning messages in S.M.A.R.T. However, correct analysis of the results of S.M.A.R.T. diagnostics usually helps in preventing possible equipment failures and thereby can save your information.
In this article, we will look at simple ways to view S.M.A.R.T. (Self-Monitoring, Analysis, and Reporting Technology) of your hard drive to find out its current state of “health” and identify possible future malfunctions.
S.M.A.R.T. is a set of software and hardware that monitors the condition of the hard drive, its physical and electronic parameters and generates a corresponding report that allows you to determine its current performance or possible malfunctions in the future. Since the technology is not new for a long time, most hard ones already have this opportunity. Just like any other function, this technology can be disabled, but it is not recommended to disable it, and there is no particular need for it.
To begin with, you can view the status of the hard drive using standard Windows tools. This method is good only because it does not require the installation of third-party software. But it has a significant disadvantage - it shows only the general status of the disk without a detailed description point by point.
To quickly view S.M.A.R.T. First you need to launch the command line: press the key with the Windows icon on your keyboard, then in the search window (if it’s Windows 7) type “Command Prompt” and press the “Enter” key. Next, in the Windows terminal, type the following two commands in turn, and after each press the Enter key:
If everything is fine with your hard drive and everything works fine, then the terminal should return the “OK” status to you. Otherwise, errors or problems that were received from the S.M.A.R.T. diagnostics should be displayed.
Using CrystalDiskInfo
CrystalDiskInfo is a free, easy-to-use application that can quickly and easily display the results of S.M.A.R.T. diagnostics in Windows. The program has a Russified interface, but in this description the English version was used. You can download and use it for free from the official website. Just remember to uncheck the box in the browser widget window if the program installer gives you such a window.
Immediately after installation, you can launch and use the program’s capabilities to view S.M.A.R.T. statistics. for all your hard drives. If everything works well, then you should see the status “ Fine» (« Good" - as shown in the figure below).
CrystalDiskInfo also displays other useful information about the device, such as the current hard drive temperature and various hardware specifications. This information can be useful if you need to determine the cause of failures.
This program also has additional features such as autoloading at system startup (in the English menu: Function –> Resident) and minimizing to the system tray (Function –> Startup). This way it will work in the background and you will always be able to actively monitor the status of all your hard drives, and if any self-diagnosis parameters change, the program will display a warning message.
Using HD Tune
HD Tune is an application with many tests that will give you complete information about your hard drive. This utility exists in two versions: free - HD Tune and paid - HD Tune Pro. The differences between the versions, as well as the cost of the paid version, can be viewed on the official website, where they can also be downloaded. But since we are interested in the free version of the program and it has the properties we need, we will continue our further consideration of HD Tune.
Installing the program should not be difficult even for inexperienced users, since it is from the “Next - Next” category. Immediately after installation, the utility should determine the entire list of your media. On the first tab of the program window (Benchmark), you can perform a performance test. The test is carried out on reading speed for various operating modes of the device. I can also add here that the Pro version also includes the ability to test recording speed, in addition, the list of tests themselves is larger and the reports on them are more detailed.
On the second tab (Info) you can also get detailed information about the device under test, supported functions, current temperature, number and size of partitions, firmware version, serial number.
It is on the third tab (Health) that you can read the information stored in S.M.A.R.T. The resulting verdict on the status of the drive is displayed at the bottom of the tab.
Pwer On Time is the time (in hours) how long the hard drive has worked since leaving the factory, and the Health Status parameter reports its current state.
The last tab (Error Scan) will also be useful. Using it, you can perform a superficial check of your hard drive for the presence of bad blocks. The program checks the access time to sectors and, depending on it, classifies the latter as bad or good.
In general, this program is quite easy to use, quite informative and has a minimal set of tests to determine the status of your hard drives, even though this is a “budget” version.
Using Victoria (MHDD)
Speaking about determining the status of hard drives, one cannot fail to say a few words about such a popular and very useful program as Victoria (MHDD). Describing all its capabilities, tests and reports is a lot of material for a series of articles, so you will have to make do with only a couple of phrases that relate to the topic of the article. Full documentation on use can always be found on the Internet, but here is only informational information for those who have not heard of this program.
Victoria, like its “big brother” MHDD, can be found either in the program version for Windows and run it from a ready-made system, or as a separate utility on various boot disks or flash drives (for example, Hiren’s Boot CD, Windows nimiPE). In any of the options, this utility has its own full set of functions and tests, and of course it is more convenient to use from Windows, but in some cases it is better to run it from a bootable flash drive or Live-CD. This is due to the fact that Victoria (MHDD) works directly with the hard drive controller and if it is loaded from a Live-CD, there is no operating system influence.
Immediately after booting, Victoria should initialize all hard drives on board. Having selected the desired hard one to check, obtain S.M.A.R.T. information. can be found on the corresponding program page.
Victoria, like all previously described utilities, will give you a complete list of all supported items that are being checked, and will evaluate the status of the hard drive based on them. For this utility, S.M.A.R.T information. is not its main function, but is very useful and informative. Victoria is a specialized utility that is used in service centers to check the surface of a hard drive for errors (bads), as well as mark them and remove them from use. Victoria can also be used to completely erase the surface of a disk, which can be useful in some cases.
Overall, this utility is one of the best free ones in its class. Using it, you can carry out a normal home test of your hard drive, as well as restore its functionality in the event of bad problems.
If you performed a hard test with any of the utilities described above, or with any other analogue, and received a negative answer, that is, the utility displays that the status is S.M.A.R.T. If the disk is bad, this does not mean that it has already stopped working. This means that irreversible damage to the hard drive can occur in a few minutes, or in a few days, or even in a few years... You just shouldn’t trust this device and store valuable information on it. If some malfunctions or bad sectors have already arisen, this means that they will occur in the future. And there is no certainty that this event will not occur in the place on the disk surface where, for example, your photos are stored. In such cases, it is recommended to move important information to another hard drive or DVD, as well as perform various system backups.
Of course, all devices do not work perfectly and the hard drive can fail immediately and without warning messages in S.M.A.R.T. However, correct analysis of the results of S.M.A.R.T. diagnostics usually helps in preventing possible equipment failures and thereby can save your information.
Why do you have to buy new hard disk? Everyone may have their own reasons, but basically this means that the speed of work and loading of programs has noticeably decreased, or there is not enough space to record new information on the computer.
Hard drives are either internal, which are installed in a computer, or external. Internal ones come in regular sizes (3.5" for computers) and for laptops (2.5" form factor). This article will focus specifically on internal drives. Let's sort it out real example disk selection. After all, a sudden and rash decision can lead to new HDD will not satisfy your needs.
Hard disk capacity
Disks with 40 or 80GB of memory are a thing of the past. Now on the market, hard drive capacity is measured in hundreds of gigabytes and terabytes. What disk size should I choose? A lot depends on what kind of work is being done on the computer and how much space you actually need. You have to pay for more volume. It is better to proceed from real needs with a 20-50% margin.
Considering that hard drives with a capacity of less than 500GB can no longer be found in stores, we will assume that this is the minimum sufficient volume. So much space is enough for an ordinary home use, for work and leisure. If you need to download large amounts of information from the Internet, such as torrents, and if you install heavy games, then take a disk with a capacity of 1TB or more. Even larger disks will be useful for those who store data archives. Well, in general, they themselves know why they need such a disk
People sometimes ask me how many megabytes are in 1 gigabyte, or how many gigabytes are in a terabyte. Everything here is simple, but with a joke. In fact, there are 1024 bytes in one kilobyte, i.e. 1K=1024B. There are 1024 kilobytes in one megabyte, 1024 megabytes in one gigabyte, and 1024 gigabytes in one terabyte. But hard drive manufacturers went to a little trick and took the number 1000 rather than 1024 as a multiplier, supposedly so that buyers would not be confused
Yeah, cool! Only now, having installed a drive with a capacity of, say, 500GB, we will see only 465GB available! Because the computer still counts gigabytes as expected!

This is such an embarrassment, so there is no need to rush to give the hard drive back to the store. I would like to warn you against purchasing a disk with a capacity larger than 2TB. If you have an old motherboard running a regular BIOS, then you still won’t see more than 2TB! Such models require UEFI instead of BIOS. To check this, carefully read its interface and settings in the “Boot” menu. If you see the word “UEFI”, then consider yourself lucky. Or just read the instructions for motherboard computer.
But is everything limited by disk space? No, there's another one important point- speed.
Hard disk speed
A disk with a large capacity does not guarantee fast loading programs. It just allows you to accommodate more information. Although, in principle, capacity also indirectly affects speed. Because how more volume, the higher the recording density, and, accordingly, it takes less time to read a data block. Simply put, a large disk will almost always be faster than a smaller disk, all other things being equal.
Disk performance is measured by read/write speed in megabytes per second and data access time. Today you can find hard drives with speeds of 150-200MB/sec or more. Before choosing a hard drive, it is better to immediately decide on the issue of sufficient speed, because how to work with a disk on high speed very comfortable. Programs such as video or image editors, e.g. heavy enough for the system, if the disk speed is insufficient, they will work slowly, and the response to each operation will increase.
You can check the speed of an existing disk yourself. HD Tune Pro is a good program for this. For example, here is my old man's test

As a rule, the real read/write speed in megabytes per second is not written in stores. This parameter can be determined by tests on the Internet. Just search in Yandex or Google keywords with the disk model and the word “testing” or “review”. Among the search results you need to find tests, reviews or comparative analyzes this model with other hard drives. But they publish data access times, but I don’t recommend relying on information from manufacturers; it’s better to still look real reviews in the Internet.