How to set up a connection between a router and a computer. Wi-Fi router for dummies: purpose, operating principle, device connection
The question of how to connect a wi-fi router to a computer is asked by users when they want to use the Internet throughout the apartment and have free access to the wi-fi network from several devices. In addition, they are interested in how many computers can be connected.
Installing and connecting a router is a simple process, which, however, requires careful adherence to the algorithm of actions.
Router installation
Installing a router can be done in two ways:
- via wireless network;
- using a twisted pair (a special wire that usually comes with the device).
The second method is less preferable. In order to make a connection, three main components are required:
- Actually a wi-fi router;
- A desktop computer or laptop with an installed network card;
- Network cable.
Before purchasing a router, it is recommended to study the parameters of your own computers and other devices, since not all routers are compatible with all computers. Moreover, the older the laptop and/or software, the more difficult it is to find a compatible router.
ASUS routers are considered one of the most universal. ZyXEL also has good characteristics. Also, before purchasing, check the signal range of the device.
If you only need a Wi-Fi router to use the Internet from a phone or tablet at home, then inexpensive router models designed for 4–6 devices are quite suitable for you.
However, still pay attention to how many computers can be connected to the network at the same time.
Advice! Special requirements for the device should be made if you plan to create a powerful local home network for storing data. Also, when choosing, it is worth checking what speeds the device supports; they must be gigabyte. Otherwise, working on the Internet will become very difficult.
Wired connection
Connecting a router using twisted pair is quite simple, but with such a connection its operation becomes much more complicated.
In particular, you will not be able to move the computer away from it more than a certain distance. Therefore, this option is not applicable for laptops. But it may be a good solution if you have a desktop computer.
This wi-fi connection has its advantages. For example, it is believed that in this way the Internet causes fewer interruptions during operation.
- First, connect an Internet cable to the router.
Find the WAN port on the back of the device and plug the cable into it. Then take the network cable and connect it to the router into the Ethernet port, and the other end into the corresponding port on the computer.
- Set up your router.
Open any browser and enter the device's IP address in the address bar. The address must be in the format http://192.168.0.1/. The true IP of the router can be found on the sticker on its bottom or in the technical documentation for the equipment.
After the IP is registered, the setup program will require you to enter your login and password. Then you can change the password for convenience. After this, the main wired network settings menu opens.
Important! If you are using a wired connection, then pay attention to the number of connectors in the router. How many there are - so many computers you can connect to the device.
Wireless connection
If you intend to connect your Wi-Fi router wirelessly, you will have to set up the connection in two stages. The first of them is the actual settings, and the second is work on network security.
- In the router menu, open the “Wi-Fi” tab, and there find a tab called “Manual settings settings”. The names of the tabs may vary depending on the type of router, but their meaning is usually obvious.
- In the main settings we find the SSID field. We write the network name in it. This is the name that you will see when connecting to the Internet from any device. Set the correct region in which the wi-fi network will work.
Next, you need to select a channel for data transmission. It is better to leave the one indicated initially. However, over time it can be changed if problems arise with access to the Internet.
- Choose wi-fi standards. It is advisable to leave the mixed ones installed by default. Now choose how many network users can connect several computers to it at the same time.
If the number of users should not be limited, select “0”.
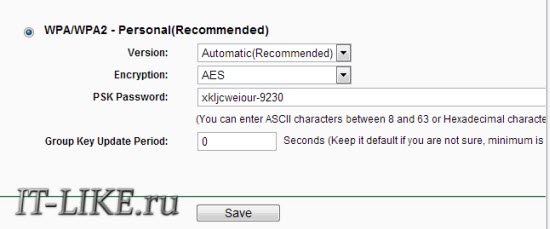
- Go to the “Security” or “Security Settings” tab. In the field at the top, select the type of protection. WPA2-PSK will do. Enter the password in the “Key” field. Such measures will protect you from hacking and from those who like to use the Internet at someone else’s expense.
Only someone who knows the password can connect the device to the network.
The advantage of this method is that you can use the Internet throughout the apartment. And, in addition, only with this type can you connect a second, third, or more computers located far from the device to the network.
Connecting a wired network is a little easier; it requires not so much additional work with security parameters as entering data that is not always at hand. Go to the “Network” tab in the router menu, and from there to the “Connections” tab.
Fill in the blank fields, if any. If all fields are filled in, confirm your selection.
Go to the “IP Settings” tab. Here you need to specify the LAN network address and subnet mask. This data must be specified in the contract for the provision of services by the provider. However, sometimes this data is not provided. In this case, you can call the provider's customer support.
There you will be required to provide this information. Confirm your selection by clicking the “Save” or “OK” button.
A wired network, although more secure, is not very convenient and does not allow you to connect the Internet to a second or even several computers. However, the choice of connection type depends solely on the user's needs.
How to connect a router to a computer
In order to connect the router to the computer, you need to connect a blue cable to one of the four blue sections. In the computer settings, the connection is configured in the Network and Sharing Center.
To have wireless Internet or a Wi-Fi access point at home. In fact, there is nothing complicated here, but you will need a little care and, perhaps, the phone number of your Internet provider :) The whole process can be divided into three stages: physical connection, setting up the router and setting up the computer.
Connecting the router to the computer
After you have taken the router out of the box, you need to connect it to your computer or laptop. By default, I will mean that you have a regular wired Internet.

- We take out and screw the antennas
- Insert the Internet cable into the port labeled “WAN”. Usually the WAN is highlighted in a different color or stands separately from the other 4 or 8 ports
- We connect the cable that comes with the router with one end to any of the numbered ports of the router (1, 2, 3, 4...), and the other end to the Ethernet port of a computer or laptop. It will only be needed for configuration, then you can disable it.
- Don't forget to connect the power :)

How to enter the router settings
After turning on the router, it needs time to boot and get itself in order. At this time, the lights on the front panel may light up and go out, wait 1 minute. To log into the admin panel of the router you need to write in the address bar of the browser:
192.168.1.1
login: admin
password: admin

A small note: the address 192.168.1.1 is used in most routers. If you receive a “Page not found” or “Page cannot open” error, then try using a different address, for example: 192.168.0.1
If there is an error again, look at the correct address on the sticker on the back of the device:

If it’s not there, then you need to look at the instructions, which may be on the included disk, or search the Internet from your phone. The same applies to the login (username) and password (password), i.e. not everyone has admin/admin. If the device is used, then maybe someone changed the default settings. In this case it is necessary. To do this, you need to find the “Reset” hole on the router and press the button inside with a match.
Network cable is not connected
Let’s say the login address and login/password are known, but you still can’t log into the admin panel due to a network error. Then you need to check the network card settings in Windows 7/8/10:
- Let's go “Start -> Control Panel -> Network and Internet -> Network and Sharing Center”
- On the left we find “Change adapter settings”
- The “Local Area Connection” connection should NOT be in the “Network cable not connected” status:

If this is so, then most likely this is the problem, i.e. The cable is not connected, is connected in the wrong place or is faulty.
Also, the status should not be “Disabled”. If this is the case, then right-click on the icon and select “Enable”.
Incorrect TCP/IP settings
If you still can’t log into the admin area, then:
- right-click on the connection icon and select “Properties”
- find “Internet Protocol version 4 (TCP / IPv4)” and double-click on it
- In the protocol properties, you need to check that the “Obtain an IP address automatically” and “Obtain DNS server address automatically” checkboxes are checked.
- Click “OK” twice
- Now wait 10 seconds and you can check.

How to quickly set up Wi-Fi
It's more complicated here, because... All routers are different and the interface may vary greatly. Yes, and Internet settings among providers can also differ dramatically. If you have a TP-Link router or another with the ability to quickly set up, then you are in luck, everything can end very quickly :) Find the “Quick Setup” item in the menu on the left or top and follow the instructions of the wizard:
On the first screen just click “Next”

I have a 3G router, so I'm prompted to select my preferred connection type: 3G or cable. I don't have a 3G modem so I select "WAN only"


If you don’t know what to choose, then try the automatic mode; the router itself will try to determine the type of connection. If it succeeds, the wizard will proceed to the next configuration step, but you may need to enter your login and password (in the case of a PPPoE connection)

or network settings (in case of “Static IP” connection type)

The provider should have given you all this information; look carefully in the contract. If the technician is unable to determine the connection automatically, then he will have to call the provider and ask, or try at random; there don’t seem to be many options :)
At the next step, the wizard prompts us to enable the Wi-Fi module:

- “Wireless Radio” - this is Wi-Fi, must be in the “Enabled” position
- In the “Wireless Network Name” field, enter any name of the point in English
- Parameters: “Channel”, “Mode”, “Channel Width”, “Max Tx Rate” set as in the screenshot or leave it as default.
- , safety. Don't leave Wi-Fi without a password! Not only will everyone around you use your Internet and download the channel, it will be such a huge, huge hole in your security! Virtually anyone will be able to access all of your personal data. Set the switch to WPA/WPA2 and enter a complex password.
A small digression: when everything works, if it turns out that the Internet is too slow or will be, then try selecting “Channel” not “Auto”, but some number from 1 to 13 and saving the settings. You can go through all the numbers to find the right one. The fact is that now there is a lot of equipment around, and each device needs its own channel to work. As a result, devices operating on the same channel interfere with each other.
It’s good if you don’t have the cheapest router and it can operate at a frequency of 5 MHz. In this case, there will be a corresponding option to select a frequency of 2.4 or 5 MHz. There are much fewer devices operating at this frequency, and therefore the likelihood that someone will interfere is reduced significantly.
Manual setting
Well, if there was no automatic setup, then you will have to go through the items manually. We find the “Network” section and there is an item with the word “WAN”:

There should be similar settings items. Here everything is the same as for automatic setup, only we ourselves must select the type of Internet connection and enter the login/password.
- “Secondary Connection” leave “Disabled” or “Dynamic IP”, this is only needed to access the provider’s internal network.
- “Connection Mode” set to “Connect Automatically” so that the router connects to the Internet automatically after each reboot.
If the provider requires you to specify the IP address and DNS server, then this can be done in the Advanced settings, but usually this is not necessary:

But I have a provider with problematic DNS servers and I register the Google server: 8.8.4.4 , which always works! How does a problematic DNS server manifest itself? This is when not a single site or website, but Skype or torrents work without problems! However, if you install the server on Google, then the internal sites of some providers may not open, for example, such as account replenishment and statistics.
It is here, in the manual settings, that you can specify the connection type - VPN, if you have one. To do this, select “L2TP”, enter the name/password and VPN server address (provided by the provider). If an IP address, mask, gateway and DNS are provided, then select “Static IP” and enter all the data. Don't forget to check the automatic connection box at the bottom.

That’s it, save the settings and look for the “Wireless Settings” menu section:

All settings have been described above. For Wi-Fi to work, the checkbox must be checked. "Enable Wireless Router Radio".
Next point, here we enable encryption, i.e. configure security as already above:
The router setup is complete! I advise you to save all parameters from the menu "System Tools -> Backup & Restore". Button “Backup” - saves, “Restore” - restores from a saved file. This will be useful in case everything suddenly goes to hell and all settings are lost. You can easily restore them from a file 😉
Oh yes, I almost forgot, change the default password for logging into the admin area. This is done in the section “System tools -> Password”.
How to connect a laptop to WiFi
In Windows 8/10, you need to click on the icon at the bottom of the screen:

A panel will appear on the right where you need to select the desired wireless network. Remember when we gave the name of the network in English? This is where you need to find it. If this is a public institution and you don’t know which network to connect to, then choose any one with a higher signal level. When you hover over a network, a hint appears whether a password is required or not. If, when you hover, you see something like WPA/WPA2, this means that you need a password to connect to the Wi-Fi network.

You can leave the “Connect automatically” checkbox. Next, the system will connect to the router and ask for the Wi-Fi password that we set earlier. If your device supports QSS technology, then you don’t have to enter a password, but simply press the button labeled “QSS” on the router. In this case, the password will be filled in without our participation!

When the system asks about file sharing, I advise you to select “No, do not enable sharing” if you do not know why it is needed:

I made a short video tutorial on how to do this:
In Windows 7, everything is the same, only the icon and the window with found networks look “Semerovsky”

Here you also find the desired connection, click on it and voila.
No Wi-Fi icon or not connecting
First, check whether the wireless module is turned on using the switch on the laptop body. Many Asus, Toshiba, Sony and Acer models have this switch. On some laptops, WiFi can be activated using hot buttons, for example “Fn+F2” (look for the antenna icon on the F1-F12 buttons). In any case, the method works through the “Network Control Center”, the same way when we “turned on” the network interface to connect to the router via wire.
In more severe cases, please study.
I hope everything worked out for you! Most likely, questions will arise regarding setting up the router, because... The interface and parameter names are different for everyone. To receive an answer in the comments, immediately send a link to a screenshot of the window.
It often happens that the Wi-Fi range is sorely lacking. Users find strange solutions - buying a more powerful router or placing a weak one somewhere under the ceiling, but this does not always help, unless we are talking about Cisco or Zyxel equipment. To solve this problem, this article has been created, which will tell you how to connect a router to a router via a cable in order to significantly increase the Wi-Fi coverage area for ease of use.
Preparing for work
To create a network where a wired router is used, it is recommended to use the same devices, and it’s not just a matter of compatibility of available technologies. Setting up and connecting identical routers is very convenient. For those wishing to save on purchases, experts recommend purchasing a router and the cheapest access point without routing capabilities, because the latter’s task is to relay the signal.
The router-to-router network is available in two versions - wired and wireless. Naturally, a cable connection is not only more reliable, but also allows you to significantly expand the coverage range, up to 100 meters. The wireless channel is limited by signal strength and wall ceilings - no more than 10 meters for a high-quality signal. Therefore, to organize the connection you will need a twisted pair cable, crimped on both sides with connectors of the required length.
Knowledge is never superfluous
Very often, even advanced users have a number of problems related to setting up a network device. The whole problem is due to inconsistency between router manufacturers. Therefore, many IT specialists recommend studying the operating instructions in detail before making any equipment settings. You should not rely on the setup wizard to help you make changes to the router; sometimes the information is not enough to put the equipment into operation correctly.

Before connecting TP-LINK or D-Link to a computer or laptop for setup, it is recommended that you first apply power to them and wait for them to fully boot (20-45 seconds), otherwise, as often happens, the equipment may not notice that what is connected to it -device to the LAN port.
Organization of access to settings
Addressing the question: “How to connect a router to a router via cable?” - Many users may face a problem when connecting to the router to make changes from a computer or laptop. Regardless of the operating system or equipment manufacturer, there is only one requirement - for configuration, the connected devices must be on the same network. There are only two solutions:
- By default, the router has a DHCP server enabled. An ideal option for all users, which only requires instructing the computer to obtain an IP address automatically.
- But a disabled DHCP server in some router models will force the user to work with his hands and head. There is nothing complicated about this, but detailed instructions on how to log into the router with an authorized account would not hurt.

Setting a dynamic address for a computer
If the DHCP server is enabled on the router and it is impossible to enter the settings of the access point, you need to give the computer a command to obtain a dynamic network address. To do this, you need to perform the following algorithm of actions on your PC:
- “Control Panel” - “Network Main Control Center”. On some systems, this sequence of actions includes the “Network and Internet” item.
- "Change adapter settings".
- Click the alternative mouse button on the active connection and select “Properties”.
- Find the line containing TCP/IPv4 characters and click "Properties".
- Check the two boxes opposite the “Receive automatically” lines. Save and exit.
Before changing the settings in the fifth paragraph, it is recommended to save the set values in a notepad or take a screenshot - perhaps there are settings for Internet operation that need to be restored after the two routers are configured.

Setting static conditions for the computer to connect to the router
A home router may be disabled. Therefore, you will have to study the instructions that come with the device and find the IP address of the router. For example, the found address is 100.333.24.15, and the mask is 255.255.248.0. The user must configure the appropriate network settings on the computer. The difference should only be in the last digit of the IP address; instead of 15, set 16, for example. Having completed the algorithm of actions described in the previous chapter, the settings are made manually at the fifth point.
- Check the boxes next to the “Use” lines.
- IP address 100.333.24.16.
- Mask 255.255.248.0.
- Gateway 100.333.24.15.
- Preferred DNS 100.333.24.15.
- Alternative DNS can be left blank.
- Save and exit.
Physical connection
Before connecting your router to the Internet, you need to decide which device will be a router and which will be a repeater. connects one connector to the LAN port of the router, and the second connector to the WAN (Internet) of the repeater. For ease of setup, both devices must be located next to each other, plugged into the electrical network and reset to factory settings, unless the router is configured to work with the provider.

Very often, administrators from the provider, when setting up a router, protect their own settings with a password. There is nothing wrong with this, the main thing is that the Internet is supplied unhindered through the LAN port on the router, otherwise you cannot do without a complete reset.
Related Settings
Having figured out how to connect a router to a router via a cable at the physical level, you need to fine-tune the software part. The router must have a DHCP server enabled - this is a setting that automatically assigns a network address to a new device when connected. If a laptop or smartphone can easily connect to the router, it means that the IP address distribution server is working. Otherwise, you need to go to the menu, find and open the tab labeled DHCP and check the box next to “Enable”. After completing the setup, reboot the router.
But the repeater in any case requires user intervention. You need to go to its settings and find the “Network” tab. Once in the WAN menu, you need to select the connection type “Dynamic IP address”. Then you can start setting up your Wi-Fi network.

Another option with a wired interface
This option is relevant only in cases where the WAN (Internet) login to the router on one of the devices is inoperative. Then the cable connection is made between the LAN ports of two routers. The problem with such a connection is that there will be two devices on the network with the same network address, which will conflict with each other. Therefore, you need to disable the DHCP server on the repeater by going to the router menu of the same name. After that, without leaving the settings, you need to find the LAN tab and set a static address for the repeater in the same range in which the router operates, but with a difference in the final numbers. Many experts recommend changing the subnet altogether to increase connections from 250 devices to 500, but a home router is unlikely to get more than ten connections.
Example for setting up routers
In addition to the cable, to make it easier for the user to understand how to configure, we suggest that you familiarize yourself with the example.
Settings for a router that is connected directly to the Internet:
- IP address 192.168.1.1.
- Netmask 255.255.255.0.
- DHCP server “Enable”.
- SSID - Glavnaya.
- Wireless Channel = 12.
- Cipher Type AES.
- PSK/EAP -PSK.
Repeater settings:
- IP address 192.168.1.254.
- Netmask 255.255.255.0.
- DHCP server “Disable”.
- SSID - Retranslator.
- Wireless Channel = 1.
- Wireless Security Mode - WPA2.
- Cipher Type AES.
- PSK/EAP - PSK.
These settings have different broadcast channels. This is done so that the access points do not interfere with each other. Such settings will be useful for users who need Internet in different places of the organized network, for example in different rooms. While moving, the mobile device will automatically switch between routers, and this will not noticeably affect the operation of the Internet.

TP-LINK to help
But the owners of TP-LINK routers are very lucky, because the manufacturer took care of the end consumer and equipped all its devices with coverage extension technology called WDS. All that remains is to explain how to connect a TP-LINK router to a similar device via Wi-Fi. On the repeater, you need to go to the “Wireless Mode” setup menu and find the “Enable WDS” item in the list of suggested settings. Next, you can enter the SSID name of the router or use the “Search” button if the exact name of the router is unknown. The repeater will find all Wi-Fi devices within range and provide a complete list with names, MAC addresses and encryption type. All you have to do is select the required router and click the “Connect” button. The connection will automatically transfer the user to where it will be asked to enter a name for the access point when detected, as well as set a password and encryption type.
Finally
As you can see from the review, the router-to-router network is not as simple as it seems at first glance. There are a lot of settings and all sorts of pitfalls that a network equipment manufacturer or provider can prepare. In any case, before organizing a wireless network at home or at work, you should begin completing the task by reading all the instructions. Understanding the material part and operating principle of devices will greatly simplify setup for any user, and this article will only help determine the type of connection.
There is no need to neglect the cable connection, because this class of data transmission in terms of reliability, durability and compatibility with other equipment is much higher than the wireless interface. And in terms of data transfer speed, Wi-Fi still lags behind Ethernet.
Routers are combined into networks of any coverage area with an unlimited number of devices and on any of them they can have a common high-speed Internet, which is distributed by the previous model. Thus, we can easily connect and configure one of them through the other or even others.
Essence of the question
It often happens that in an apartment or country house one router is not able to reliably cover the entire territory. The question becomes even more pressing in private companies, where the office, store and warehouse are located in the same building, and wireless Internet is needed throughout the company. Combining Wi-Fi routers into a single network with only one Internet access will help here.
How to connect and combine routers into a common network
There are several of them - different methods via cable and Wi-Fi. The last method is the most popular and has variations: bridge mode, repeater mode, client mode (like a simple Wi-Fi module) without distribution (distribution only via LAN cables), etc.
Some commands for step-by-step instructions have been translated into Russian.
Creating a WDS-based bridge
WDS technology allows you to deploy local networks of any coverage area without a LAN cable, consisting exclusively of routers with Wi-Fi. Such a device simultaneously receives data and distributes it further to other routers. You can create a wireless line or “tree” of routers of any length, allowing you to enter the settings of any of the previous routers through a connection to any next one.
As an example - TP-Link routers. This is one of the most popular brands. Almost every second user has D-Link routers and distribution points.
Free exchange of data between routers and network clients
For example, the IP address 192.168.1.1 is taken from the TP-Link 11n device, and 192.168.1.2 from the access point (Root AP). Each device in the wireless network is assigned its own address - otherwise there will be a conflict of IP addresses and communication will be disrupted. IP is changed by going to the router settings and entering the desired IP address.
Changing IP on the router
To change the IP address, do the following.
 If there is no connection to the router’s local network, the TP-Link stub page will be displayed
 Upon successful login to tplinkwifi.net or via local IP, the router will request a login and password
 Go to LAN Settings
 Enter the desired address and click the save button
Connected devices must be reconnected. The connection settings on the PC or gadget from which the IP was changed on the router also need to be changed.
Setting up a WDS network on a TP-Link router
Depending on the router firmware version, options and lists in the settings are arranged in different orders. The functionality remains the same, not taking into account innovations when updating the device’s firmware or replacing it with another model.
 Recommended Wi-Fi settings on TP-Link routers
 Enable WDS for Wi-Fi Bridged Networking
 Selecting channel number, technology and connection speed
 Find the SSID from the second router and connect to it
 Protection recommended
 Automatic IP selection (DHCP) often prevents connection
 Click Reboot to restart
The creation of the WDS network bridge is complete! To check the network, do the following.
 Run Command Prompt under an administrator account
 If the instructions are followed to the smallest detail, the network bridge should work
You can use your network bridge. Routers from other manufacturers are configured in a similar way - they all support WDS, and the menus and submenus in the settings are not much different.