How to set up an Internet connection via a wifi router. How to install and configure a WiFi router - from A to Z
How to connect the Internet through a router?


Using a router, or, as it is also called, a router, you can create a local network in your apartment that will distribute the Internet to all technical devices connected to it.
Today we will look at how to connect the Internet via a router yourself.
Equipment and device of the router
Router equipment
Open the box and check the contents. The router package should include the following: the device itself, an adapter (power supply), network cable Ethernet (RJ-45 connector), disk with drivers and installation program, router setup guide. Installation disk us in in this case will not be needed, since we will set all the settings ourselves.
Router device
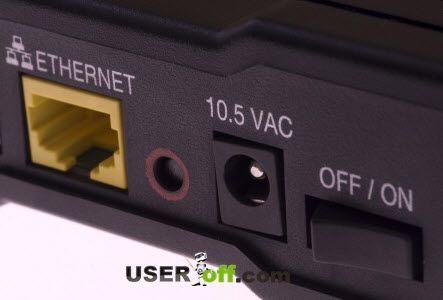
Turn the router over so the back panel is facing you and look at the ports. Typically the device contains five connectors, four of which are the same color. These inputs are called LAN ports and are intended for connecting equipment with which you want to go online. global network. The fifth connector is different in color and is called WAN or Internet port. This connector is intended for connecting the Internet cable that was provided to you by the specialists of your Provider.
To the right of the Internet connector is the input for connecting the power supply. And the panel closes with a small button called “Reset”. The button is used to reset settings and reboot the router. To restart the device, you need to press the button (with a thin tip, such as a toothpick, etc.) and hold it for five seconds. When you press the "Reset" button, all installed settings and the default parameters are set.
Installation, connection and configuration of the router
Installation and connection
- First you need to call the operator technical support your Provider. Tell the specialist that you want to register the router and tell the specialist the MAC address of the device (the number is on a sticker on the router itself and is also written in the instructions).
- Determine the location of the device: the router can be installed directly in the room where the computer is located, or hung on the wall, for example, in the hallway. When installing the router, make sure that there is a 220-volt power outlet nearby.
- Then connect the power supply to the router and plug the device into a power outlet.
- Connect the Internet cable to the WAN connector.
- Connect the network cable to one of the LAN ports on the router, and on the other side to the corresponding input on the computer or laptop.
- After connecting the device, we proceed to setting it up.
Settings
- Click "Start", go to "Control Panel", select the "Network Connections" tab and go to "Wireless Connections" local network".
- Click right click mouse on the connection icon and select "Properties".
- Then click on "Internet Protocol (TCP/IP)" and click on the "Properties" button.
- Check the appropriate boxes to automatic settings IP and DNS addresses.
- Depending on the operating system The progress of setting up IP and DNS may vary. (Click the Start button and select View network connections". Next, select your connection type and go to the "Local Area Connection" section. Go to "Properties" and select "Internet Protocol Version 4". Then, through the "Properties" button, go to the next window and check the appropriate boxes for automatic configuration of IP and DNS addresses).
- Next, find the device’s IP address in the router’s instructions. For most manufacturers, the router has an IP address of 192.168.0.1 or 192.168.1.1.
- Enter IP in address bar browser and press the "Enter" key.
- In the window that appears, you must enter your username and password. The data also needs to be found in the manual for using the router. For most models, the username is admin, the password is admin, or an empty string (that is, the password field remains empty).
- Then again you need to dial the Provider operator and find out the following settings characteristics: connection type, server, username and password. Also find out if there are additional settings available.
- After entering the default username and password, you need to go to the “Setup” section and select the “Internet Setup” tab.
- Then click on the “Manual Internet Connection Setup” button and write down all the settings that the specialist dictated to you.
- After entering the settings, click the "Save" button.
Check out the articles as well.
It is extremely difficult to imagine a modern computer, smartphone or tablet without the Internet. Since the number of devices requiring demon wired connection To World Wide Web, increases every year, it is advisable to take care of convenience and connect a Wi-Fi router. It will not be difficult for you to independently connect the equipment at home to provide wireless Internet access.
Choosing the best place for equipment
Before connecting a Wi-Fi router in your apartment, you will need to decide on a place in the apartment or house. On at this stage Pay attention to the following characteristics of the room:
- Housing layout
- Location of service provider modem or cables
- Location of the desktop computer (if available)
Depending on the equipment manufacturer, wireless router may have a low data transfer rate. Also various models Coverage area may vary. All this must be taken into account when choosing a place in an apartment or house where the device is supposed to be placed. In a specific case optimal solution The router will be placed in the central part of the room. If there is a need to install the device as close as possible to the computer to connect to the cable, take this task as a priority.

The signal in the rooms behind the crossbar will be significantly worse than in front of it. You should not fix the equipment without checking the signal quality in different parts of the apartment or house. If the signal quality varies noticeably in different areas of your home, it is advisable to immediately select the best place to place the router. When choosing a place to place the router, you should take into account the materials from which the walls are made: brick, expanded clay blocks, foam concrete and aerated concrete and other materials can interfere with the signal.
Video - step-by-step connection:
Connecting the router to a computer (laptop)
Connecting Wi-Fi in an apartment to a computer is easy. The user may experience some difficulties only at the stage of setting up the equipment. Below we will look at how to properly connect a computer using wireless network, as well as using a network cable. It is worth noting that in the case of a laptop, the procedure will be identical.
It is important to know! Before buying equipment, it is worth remembering that the modern market offers customers router models without Wi-Fi distribution. Such devices play the role of a kind of adapter.
First of all, you need to connect the wires to the equipment. At this stage, there are no procedural features, since the main market players produce equipment with the same connection diagram.
Here is the sequence of actions in case of connecting the router to a computer:
- First you need to unpack the device, and then plug the cable into the outlet. Back panel The device often contains a power button that must be pressed. The lights came on - you did everything right
- The sockets are located at the back of the device. On the edge is the socket we need (yellow or blue) and is marked WAN. Connect the wire coming from the equipment to this socket. If you do everything correctly, you should hear a characteristic click.
- If you need to connect the cable to your computer, you will need to insert it into any empty slot nearby. Next, stretch the cable to the computer’s network card, where you connect it to the appropriate connector. When right actions The light should light up, serving as a signal indicator
- If interested wireless way connecting the router, you will need to go to the computer settings

To plug wired Internet easy, just like getting one wireless access to the network.
Wireless router connection
With a laptop connected to wireless Internet There should be no difficulties or controversial issues, and you will most likely be able to achieve the desired result yourself the first time. The laptop is equipped with a built-in module that serves to receive a signal from Wi-Fi router. In the case of connecting a desktop computer, you need additional actions– purchase of an adapter for accessing the network. You can buy two types of adapters for computers in the store - external and internal. The first equipment option involves the use of a USB cable. The device is placed on the table. Internal adapters require mounting on motherboard via PCI connector.
Both types of equipment are capable of functioning perfectly, but external adapters may be disconnected and connected to another device. Internal adapter requires a lot free space on the table. The device kit contains drivers and software. After completing the connection procedure to the computer, the device is configured like a laptop. To connect a computer to the device, you need to find a suitable connection from the proposed list, and then enter the password. When you connect for the first time, the equipment may require you to specify settings that were provided by your service provider.
Twisted pair and connection installation
Is it possible to connect to desktop computer router? Of course yes! Previously, users had only one method available, which involved using a cord. Later, other options and methods became available with which you can connect your computer to the Internet and your TV to cable channels. And yet, what is needed to connect a computer to a router via cable? Here is the algorithm of actions:
- First, the service provider wire is connected to the router, for which the WAN socket is used
- The power cord is inserted into one of the LAN connectors
- The other end of the cord goes to the Ethernet port
- A working light serves as a connection indicator

Router won't connect
After completing all the steps, it may happen that there is no connection to the Internet (if active signal wired connection). If the wireless network does not transmit data, but is visible in the list of connections, you should unplug the equipment from the outlet, then wait a few minutes and turn the equipment back on.
Video - Connection from A to Z:
If these steps do not help solve the problem, you will need to check the settings. Right-click on the connection and select the “Network Center” section. Next, click on the connection image and go to the “Details” tab. Are DNS or IPs represented by empty fields? The problem lies with them. Contact your provider's technical support center and ask for information to make changes.
In our daily activities, we often use devices with Internet access via wireless channels, for example, Cell phones, tablets, laptops, even modern televisions have access to the Internet. Therefore use WiFi router and in our house it is very convenient, it allows you to connect everything necessary devices to the Internet without special problems. Before I start talking about how to connect a WiFi router to a computer or laptop, you must make sure that your router has WiFi (look at the labels and antennas on the router or check out the characteristics of this model on the Internet.)
So, we have an Internet provider cable (telephone or any other), a router and desktop computer. Usually in modern computers There are network devices built into the motherboard for connecting to local networks. Make sure your computer is also equipped with this module. Find such a connector on the back of the computer. It's called RJ-45.
If it is, then you can connect a cable to connect to the router. If you do not find such a connector, then the network card will need to be purchased separately at any computer store and installed.
By the way, if you buy a cable and connector separately, you will have to crimp it. So it’s better to buy a ready-made cable! Just in case, here is an article for you: “”, from which you will understand how cables are crimped.
Turning on the router and a few nuances
Now let's move directly to the connection. We power the router from the included power supply into the socket WAN connect the cable from the Internet provider, and into the computer and to one of the sockets LAN router(usually they are indicated by numbers) connect the network cable (purchased separately, calculate in advance how long you will need).
You should end up with something like this:

Turn on the router by pressing the power button on it. Most often, network cards in computers and laptops are equipped with connection indicators in the form of yellow or green LEDs. If everything is connected correctly, the LED should light up (it may blink - there’s nothing wrong with that).
Attention! If the router has been configured, the “Internet” indicator will light or blink. This is a sign that the router has Internet and then all that remains is to configure the computer.
If someone has already used your router before you, then do not forget to reset the settings installed on it. Usually there is a “Reset” button for this, which is specially difficult to reach so as not to accidentally press it. It is usually located at the bottom of the router; to reset the settings to factory settings, you need to press it with a needle or pin and hold it for 5-10 seconds. You may not need these items since this button may be in an accessible location.
On the computer connected to the router, click “Start” - “Control Panel” - “Network and Sharing Center” shared access" Find the Local Area Network Connection icon and right-click on it. Select Status.

In the window that opens, click the “Details...” button. Find the line “Default gateway IP...”. Opposite it will be written the IP address of the router itself. Write it down. Perhaps there will be no data here, then read the article further.
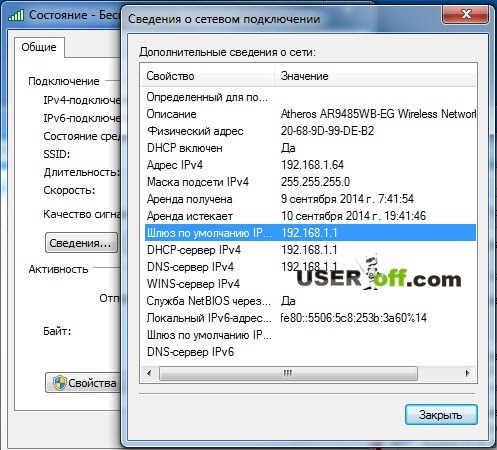
Pay attention to the line “DHCP enabled”. If “Yes” is written on the right, then an IP address is assigned to your computer automatically and you do not need to configure it.
If DHCP is disabled, you will have to enter the IP address yourself. Decide in advance how you would like your router to distribute addresses: automatically or manually.
Close the “Network connection information” window and open window“Status – Local Area Connection” click the “Properties” button. Next, in the “Network” tab, find “Internet Protocol Version 4 (TCP/IPv4), left-click once, and then click the “Properties” button. If you decide that your router will distribute addresses automatically, then check the “Obtain an IP address automatically” checkbox; if you do not need the DHCP function, then check the “Use the following IP address” checkbox. And on the right, enter the IP address from the desired range, for example, 192.168.1.2.
However, you can choose any last three digits from the range from 0 to 254, the main thing is that it is not the same as the router’s IP address (we wrote down its address a little earlier). Then click in the field opposite the “Subnet Mask” column. The numbers 255.255.255.0 will appear automatically. Opposite the “Default gateway” column, enter the router’s IP address in the field. Below, mark the line “Use the following DNS server addresses” with a marker. Next to the “Preferred DNS server” line, enter the router’s IP address again. For convenience, write down all the addresses, masks, etc. - they may be useful to you later.
For example:

Let's move on to setting up the router. In the address bar of your browser, enter the address of the router and go to it. By the way, you can also find it out from the instructions for the router, and it is also sometimes written directly on the router case. There is an example in this article: "".
Setting up the router
Above, using examples, we figured out how to connect a WiFi router to a computer or laptop; now all that remains is to configure it to receive the Internet on your device. An authorization window will appear in which you must enter your login and password. They are also written in the manual or on the router case. The router settings panel opens. Please check your provider's connection type and settings in advance. The type of connection may be specified in the contract for the provision of Internet access services.
Go to the WAN section. In this section we need to specify the connection type and provider settings. All of them are most often specified in the contract. These settings are the IP address or server name of your provider (serverIP/Name), your account (account) and the password to access it (password). Save the changes.
We are looking for the Wireless section. The main thing we need to do in it is: enable wireless channel(Wireless – Enabled or check the box), come up with any name for your network (SSID), security type (Authentification Method) – choose WPA2, and Password – come up with a more complex password if you don’t want anyone else to use your Internet. Let's save the changes again.
Reboot the router by turning it off and on. Ready! The computer has access to the Internet and a wireless access point has been created!
Now let's look at how to connect a laptop to the created access point.
Make sure the router is turned on and configured correctly. . The system will automatically search possible connections. A signal strength icon will appear in the taskbar tray. Click on it and in the drop-down list, select the access point you want to connect to by name. Click “Connect” and, if necessary, enter the access point password. Ready! The laptop is connected to the Internet via a router. All other wireless devices are connected in the same way.
If you still have not received Internet access, then you should check how you configured the router, and also make sure that you entered correct login and password. Of course, I talked about the main points of connecting the router to a computer or laptop, but you may encounter some difficulties that I did not describe in the article. In this case, ask a detailed question (it is advisable to tell what measures were taken) and perhaps I can help you in the comments after this article.
Note: I didn’t take screenshots to configure the router, since there are a lot of models, and this is not the main topic of the article.
I found a video for you that tells you about setting up and connecting the router to your computer:
How to set up a wifi router
Router is network device, designed to create a wireless network between various devices: stationary and laptop computers, smartphones, tablets, etc. In addition, it can be used as an Ethernet router and wireless point access.
Setting up a WiFi router is possible both to access the global network and to work via an internal network. Our instructions will help you set up most router models, but we still recommend checking the instructions for details.
How to set up Wi-Fi at home?
To set up the Internet and internal network through a router, you need: the router itself, a computer with a working network card, Internet connection provided by the provider and a network cable with a “straight” crimp.
Typically, a router interface has one external port (WAN) and four internal ports (LAN). The external port is intended for connecting to the Internet, and the internal ports are for connecting computers to the internal network.
How to connect a WiFi router to a computer?
The first thing you need to do is connect the router to your computer.
- Connect the router and PC using a network cable.
- If the connection is successful, you will see the new connection in the list of network connections on your computer. Right-click on it and select “Properties”. You will see a window for editing the properties of your connection.
- In properties, select the item called “Internet Protocol (TCP/IP)” and click the “Properties” button.
- In the window that opens, select “Use the following IP address” to set the IP address settings manually.
- Enter the following information in the fields:
- IP address: 192.168.0.2 (or 192.168.1.2) - local IP address computer.
- Subnet mask: 255.255.255.0
- Default gateway: 192.168.0.1 (or 192.168.1.1) - local IP address assigned to the WiFi router.
- DNS: 192.168.0.1 (or 192.168.1.1)
 How to set up a Wi-Fi router
 Note! The router manufacturer may have specified other settings, in which case you should use them.
ping 192.168.x.1
How to set up a WiFi router?
If the IP address is pinged, then it is specified correctly, and you can proceed to the next step - setting up the router using the web interface. In most cases, the router manual will provide information on how to access the settings management interface. If such information is missing, try entering the following address into the browser address bar: http://192.168.x.1.
On the page that opens, you will see a request to enter your username and password in the appropriate fields. This data should also be indicated in the instructions (or on the panel of the router itself). If you do not find your login and password, try entering the combination “admin” - “admin” or entering the login “admin” and leaving the password blank. For most routers, one of these options will work.
When you log in, the administration panel becomes available. Next step - Wi-Fi setup networks.
 How to set up Wi-Fi
 How to properly configure a WiFi router? In the settings, select the WiFi section (it may be called “wireless”). Then create a new or select the current user profile and enter the following data in the settings:
- SSID: network name
- Channel:auto
- Wireless Mode: auto
- Authentication Method: WPA-PSK
- WEP Encrypting:TKIP
- WPA Pre-Shared Key: enter the password to access the network
All settings not listed above can be left as default.
Now restart the router via the web interface and you can start setting up Wi-Fi mobile devices: smartphone, laptop and so on.
How to set up WiFi to connect to other devices?
Go to Settings wireless connection and manually enter the IP address, subnet mask and gateway. They must have the following values:
- Mask: 255.255.255.0
- Default gateway: 192.168.(0/1).1
- The IP address should be selected from the free range (192.168.1/0-255)
Save your settings. Then specify authentication using WPA-PSK and TKIP and WEP encryption in the authorization settings. Now all that remains to connect is to enter the network password.
If you need to “distribute” the Internet over an internal network, connect the network cable from your provider to the external port located on the router. After this, you need to specify the login and password provided to you by your provider in the settings.
Now you know how to set up a Wi-Fi access point yourself.
As noted above, in different models Router settings may differ, so be sure to read the instructions for the device before starting setup. It is quite possible that when setting up modern model router you will have to spend much less time and effort.
Greetings, our dear readers. IN modern world Almost everyone encounters Wi-Fi routers. The Internet is firmly established in our lives. Sometimes you have to connect and configure it yourself, let's find out how to set up a Wi-Fi router yourself.
First of all, we need this:
- availability of a wired connection to the Internet;
- PC or laptop;
- wireless router;
- cable connecting to the network card.
Setting up a Wi-Fi router.
How to properly set up the Internet via a Wi-Fi router for your home? Initially, you need to connect the equipment. It is the same for all routers; for clarity, everything is clear in the photo.
And sometimes manufacturers simply draw a diagram on the modem itself. Very convenient and understandable.

Here's what we need to do:
- To do this, insert the power supply cord into the router.
- Next, the provider cable should be inserted until a characteristic click is heard into one of the ports on the device, which is a different color from the others.
- We connect our laptop or desktop computer to any of the remaining LAN ports.
Connection via web interface.
Now almost everything network routers controlled using a web interface. Therefore, it is worth considering the question of how to set up a Wi-Fi router at home through a computer browser. To use the program, you must first log in to it.
To this end, we do the following:

Setting up basic parameters.
In the Wan/Basic Settings/Main Settings (or something similar) tab, you need to set the following parameters:
- connection type
- username and password
- IP parameters
- connection mode
Currently, in most cases the type is used PPPoE connections, to clarify it, you can find it out from the contract with the provider or from the support service.

Sometimes there is no such parameter, more often it is automatically connected there desired type connections, if not found, skip.
We enter the username and password from the documents provided when concluding the agreement.
We leave the IP parameters Disable or Dinamic IP, depending on the conditions that the operator provides you.
We set the connection mode to Auto so that devices can connect to it automatically and at any time. And don't forget to save your settings! =)
After this, we proceed to setting up the WiFi connection.
Open the Wireless Networks/WiFI tab or something similar. In the basic wireless network settings tab, we need to specify:
- Connection type
- Network mode
- Wireless name network SSID
- Channel
We set the type of connection based on the data in the contract, most often as “Access Point”. Sometimes this parameter simply no.

Set the network mode as b/g/n or g/n mixed. The bottom line is that, depending on the network mode, devices with different WiFi standards. So if you have old phone or a laptop, then it will not be able to connect to Wi-Fi modern standard. If you have modern device then it is capable of working in most standards.
We set the name of the wireless network as desired - this is the name of your wifi for connection, for example, “My_WiFi”.

The channel can be left on auto.
However, if in this mode devices will not connect, you should change it manually to 7 or any other selection method. This is due to the fact that nowadays there may be several routers nearby, for example in a multi-storey building, and they can operate in the same range, which causes difficulties.
And at the final stage of setting up Wi-Fi on the router, we move on to the security settings. Here you need to do the following:

After that, we try to connect to WiFi from a phone or tablet and check the functionality. Next, you need to correctly change the network card settings in order to connect the laptop to the network.
Setting up the network card
To fully answer the question, how to set up a Wi-Fi router, we still need to correctly configure the network card. You can carry out manipulations in the “Network Connections” menu.
- The easiest way to get into it is to enter the parameters network adapter through command line, using the Win+R key combination, then executing the command ncpa.cpl.

- Or just go to the network settings;


- Next, we should open the properties of the connection that interests us;

- After this, you need to go to “Internet Protocol Version 4 (TCP/IPv4)”;

- Where should you put a checkmark next to the IP and DNS items, thus allowing their automatic receipt.

- After this, we connect to the configured WiFi network of our modem as usual!
So we figured out how to set up a Wi-Fi router (Wi-Fi) without a disk using the web interface. That's all for me, leave your comments or questions below, subscribe to our group, bye everyone.
Updated: January 9, 2018 by: Subbotin Pavel