How to clone acronis hard drive partitions. Cloning a system disk acronis true image
Albeit not often, but sometimes many users are faced with a situation where an outdated hard drive fails, or installed programs simply disappear on the existing hard drive. At the same time, most users prefer buying a new HDD or a faster SSD. But then you need to reinstall the operating system or some important programs on the new disk, and this can take quite a lot of time. Therefore, in order not to waste time and not engage in such actions, the easiest way out is to clone the hard drive in order to use the old system and installed applications. This can be done in several ways, each of which will be discussed in as much detail as possible.
initial information
First of all, it is worth paying attention to the fact that the standard process of copying absolutely all folders and files involved in Windows operation will lead to nothing, and if you try to boot from a new media, there will be no result. This is only due to the fact that the new device does not have boot sectors and records that are responsible for starting the system.
To get a fully functional OS, the hard drive will have to be cloned. Data must be transferred from a hard drive to another drive (HDD or SSD) using specially developed methods. There are some nuances here.
Tools used
To carry out operations to create a copy of the hard drive, several options are used to transfer the system to another location. For this, you can use your own Windows tools or special programs that make the whole process somewhat simpler.
The technique mainly involves creating backup copies and images and then restoring the system from them on new media. In this case, you can make a copy of only the system, or you can transfer installed programs. In addition, the issue of pre-saving the cloned data (in a partition of the old disk or direct transfer to a new hard drive) is important. Sometimes it can be useful to create a copy of the “Desktop”, but more on that later.
How to clone a hard drive with Windows 7: preliminary steps
First, let's look at the issues of using the system's own funds. Before using the system's built-in tools directly to create a copy of the hard drive, you should complete several preliminary steps. The question of how to clone a hard drive with Windows 7 or any other system is not so difficult to understand if you take into account some nuances.

The first action will be to call the command line and run it with administrator rights (the “Run” menu, which is called by the combination Win + R). In the console you need to enter the line %windir%\System32\Sysprep\Sysprep.exe, after which the system preparation window will open. Here, in the cleanup actions, you select to go to the OOBE welcome window, check the box next to the prepare for use line, and use the shutdown option in the next menu. This step allows you to delete all controllers, system registry events and prepare the system for cloning.
Saving a copy on an old hard drive
The second stage is related to the issue of using a copy of a working system by saving it on an old hard drive. Most often, this approach is used when replacing some equipment, for example, a motherboard on which an existing hard drive is supposed to be used, or in the case when the old hard drive will be installed on another computer.
Next, the question of how to clone a Windows 8, 7 or 10 hard drive (it makes no difference) involves starting the computer in normal mode, after which the installer will update the registry settings, install the necessary hardware and configuration parameters in order to prepare the computer for the first start.

This will be followed by standard settings for regional standards and language, and then you will be asked to enter your account login and password. The most crucial moment is coming. There is no need to enter your data, since it is already used by the system. Instead, you should create a temporary account with a password and confirmation (you can delete it later). This is followed by the selection of recommended parameters, the location, date and time, network settings, etc. are checked. Upon completion of the process, we reboot the system, log in with our account and delete the temporary one.
Transferring the system to a new drive
Now let's see how to clone Windows 7 to another hard drive (this technique also applies to systems of a higher rank). This option is suitable when you need to transfer the system to a new hard drive or another computer without using the old hard drive.
First, all the steps described above are performed, after which a backup is created in the appropriate section of the Control Panel. As a place to save it, we select another hard drive connected with an appropriate cable directly to the motherboard or at least instead of an optical drive. Next, click the archiving button, and after you are prompted to create a recovery disk on a DVD, we agree (this is not necessary, but recommended).

Once the process is complete, turn off the computer, remove the old hard drive and boot the system from the installation or created recovery disk. After the first settings, we first select system recovery, and then restore from a previously created image, after which we confirm all further actions. Upon completion, the system will replace all data with information from the image and reboot automatically.
How to clone a hard drive (Windows 10)?
For the tenth version of the system, the methodology is identical. Again, you can clone Windows 10 (another hard drive must be immediately connected to the computer) from the same backup section, but, as practice shows, after creating and saving the image to another medium and starting recovery from a pre-recorded or existing optical medium , it is better to disconnect the old hard drive to avoid troubles. It is still unclear why, but such a problem exists.
Creating a copy of the “Desktop”
We figured out how to clone a Windows hard drive using built-in tools. Let's consider creating a copy of the “Desktop” and saving it in a non-system partition.

To do this, first, in a partition other than the system one, create a folder where the “Desktop” data will be stored, using any file manager (even “Explorer”). Next, go to the user directory (c:\Users\Username) and right-click on the “Desktop” folder to open a menu where we use the properties line. Next, select the location tab and click the “Move” button. When choosing a location, indicate the new folder created earlier in another section and click the “OK” button. Then we agree to the transfer. A reboot will be required for the changes to take effect.
The most suitable cloning utilities
For many, the question of how to clone a hard drive using the operating system’s own tools may seem too abstruse. Therefore, in order not to complicate your task, it is better to use specialized utilities that are specifically designed for this. Among the most popular are the following:
- Acronis True Image.
- ESEUS Disk Copy.
- Paragon Drive Backup Personal.
- Macrium Reflect.
- Farstone RestorIT Pro.
- Seagate DiscWizard.
- AOMEI Backupper Standard.
- Samsung Data Migration, etc.
Of course, cloning a hard disk partition or an entire disk with their help is much easier, since each such program has its own “Wizard”, which will carry out most processes automatically, without requiring much user intervention. But here it is worth considering the specifics of such utilities, since some of them are narrowly focused and can only work with certain types of hard drives or support devices from only a limited number of manufacturers.
Acronis True Image
This program is the undisputed leader among everything that is presented on the market. Acronis True Image can clone a hard drive in several directions.

It is this software product that offers some features that are not available in other applications. With its help, you can clone not only the contents of hard drives or virtual partitions, but also edit the contents of the clone, excluding writing individual unnecessary files to the copy. In addition, the program has a fairly high operating speed.
The only thing worth paying attention to is some terms. The target is the disk to which the copy will be made, and the source is the disk whose clone is being created. There are two options for creating a copy - automatic and manual. The first method is faster, but with manual cloning you can set more flexible settings. Once the process is complete, you can view all files and folders, which will be presented in a tree structure. What is not needed can be checked off and simply deleted. When the restart begins, you will need to change the boot priority in the BIOS, selecting the new hard drive as the main device.
ESEUS Disk Copy
This is another free utility that allows you to clone the hard drive of any computer device. Its main advantage is not only the complete automation of copying processes, but also the fact that it can even be launched from removable media such as USB flash drives or

The interface is quite simple, the speed of work is on par, however, as noted, the only and main drawback of the utility is the lack of a Russian-language interface.
Paragon Drive Backup Personal
This program is a multifunctional tool for all occasions and allows you to clone a hard drive or partition as easily as previous utilities.

A huge plus is that it supports almost all file systems and types of hard drives known today. However, due to the high cost ($39.68), it has not received particularly strong distribution in our country (although many people use hacked versions of the application).
Macrium Reflect
This program is distinguished by the fact that it is capable of creating images, as they say, “on the fly”, eliminating the need to reboot the system. It also provides a system for checking created images with the possibility of multi-level data encryption.

The interface is in English. And the saddest thing is that during the installation process of the application, many unnecessary advertising modules are spontaneously installed.
Farstone RestorIT Pro
This program does not clone hard drives, but it can be very useful when creating backups and system images. It has two modes: full and cumulative. The second mode allows you to save even changing data to a copy.

A few final words
That's all for cloning hard drives and partitions. As can be seen from everything presented above, the main emphasis was placed exclusively on the tools of Windows operating systems, and specialized programs and methods of working with them were mentioned only superficially. This is only due to the fact that in such utilities almost all processes are completely automated, and user participation is reduced only to pressing buttons and selecting the source disk or partition, and the final location where the data will be transferred. On the other hand, even in the absence of the above programs, cloning can be done using the OS’s own tools. It may take more time or seem somewhat complicated, however, just in case, you must have such knowledge.
Hard drive cloning is a procedure for completely copying and transferring files contained on the HDD. This operation is mainly resorted to when replacing the source of information storage with a more capacious one.
Data cloning allows you to get a new hard drive that is completely identical to the previous one. The procedure can be carried out manually, but depending on the size of the storage medium, it may take several days. To speed up the process, you can use specialized programs that allow you to create an exact copy of your hard drive.
Programs for cloning a hard drive can be universal, which work with all types of media, or specialized (created to work with drives from a specific manufacturer). Among them are the following utilities for automatically copying information:
EASEUS Disk Copy
EASEUS is offered free of charge. The program clones the hdd by sector and works with any file system. EASEUS developers pay attention to the following advantages that their product has:
- the ability to clone the entire disk or its individual parts, including deleted, hidden and protected files;
- launch is carried out from a boot disk or flash drive;
- works with all operating systems;
- supports dynamic disks, Firewire, SAS, USB, SCSI and SATA l-ll;
- copies up to 1 TB of information;
- simple interface.
Among the main disadvantages of EASEUS are:
- not Russified, and therefore some users may have problems working with the program;
- When working with Windows, many adware programs are installed.
The latter is offset by the fact that there is no charge for using EASEUS Disk Copy.
Paragon Drive Backup Personal
What sets Paragon Drive Backup Personal apart is its ease of use. The program runs under Windows or from a boot disk. All actions performed during the process of creating a disk copy are constantly accompanied by pop-up tips. The main advantages of the program are as follows:
- several operating modes;
- supports all file systems and hard drives;
- provides the ability to copy individual files and entire sections;
- provides fast copying speed;
- Russified interface.
The program is available for a fee. You will have to pay $39.95 for the right to use it.
Macrium Reflect
Macrium Reflect not only clones data, but also creates images of individual partitions or disks, which, after restoring the system, can be embedded directly in Windows Explorer. Features of the program are as follows:
- copies the entire hard drive or individual files;
- does not require a system reboot after creating images;
- checks the identity of the received images;
- works at high speed;
- provides a high level of security for stored information through the use of multi-level encryption.
Among the disadvantages are:
- interface in English;
- Advertising products are installed along with the program.
Macrium Reflect is a completely free product.
FarStone RestolerIT Pro
The program is mainly used to recover user data lost in cases of system failure, computer failure and other situations. Essentially, Farstone RestolerIT Pro does not clone information, but creates backups, in this case a hard drive backup. The advantages of the product include:
- ability to configure the frequency of data saving;
- information is restored after pressing one button;
- data is restored even if the bootloader fails;
- depending on the selected mode, backs up all information or saves changed data;
- allows you to configure monitoring modes (the entire disk or its individual parts);
- saves the entire file modification history.
In addition to the fact that the program is unable to clone a disk, the developer requires a payment of $24.95 for its use.
Acronis True Image
Acronis True Image is one of the most popular products used for hard drive cloning today. The program is capable of copying information from various drives and file systems.
Acronis True Image supports most versions of Windows, including older editions. The user is asked to select several cloning modes: individual partitions, files or the entire disk. Acronis True Image has a number of significant features that determine the program’s popularity:
- loaded from a DVD or flash drive;
- is distinguished by its multifunctionality and high speed of operation;
- interface in Russian;
- ease of use due to intuitive settings;
- the product operates in manual or automatic modes;
- the user can specify what data needs to be copied;
- transfers any information, including hidden files.
Using Acronis True Image will cost 1,700 rubles.
Cloning example
As an example of how information is cloned from a hard drive, below is work with Acronis True Image. Although this product has an intuitive interface, you need to pay attention to the following terms:
- Original hard drive. This term refers to the medium from which data is copied.
- Target hard drive. Indicates the medium on which information is recorded.
To copy information using Acronis True Image, after launching the program and logging in to it, you need to perform a number of actions:
- Select the “Tools” tab (located on the left side of the window). In the menu that appears, click on “Clone disk”.
- The Disk Clone Wizard appears in the program window. Having selected automatic mode, you need to click on the “Next” button at the bottom of the screen.
- The third step involves selecting the hard drive from which the information will be copied. It is important to note that the program names the media differently than “Explorer”.
- In the next window, the program provides the opportunity to select the disk on which the information will be written. If any data is saved on the media, Acronis True Image will warn you about the possible loss of the latter after cloning is complete.
- In the window that allows you to select a recovery method, it is recommended to leave the “Copy partitions without changes” checkbox.
- If complete cloning of information is intended, then in the window that appears, you must click on the “Proceed” button. Otherwise, when you need to select specific files to copy, you should go to the "Exclude Files" menu (in the lower left corner). In it, you should select the data that is to be copied by placing the appropriate mark next to it.
After completing all actions, Acronis True Image prompts you to reboot the system. Before it is re-downloaded, the program will clone the information.
The next time you start the computer, the BIOS opens, in which you must select the priority for loading the operating system (from a hard drive or a cloned drive).
Copying information from HDD to SSD
Modern operating systems allow you to transfer information from a hard drive to faster SSDs. Before starting the process, you need to prepare the last drive, which will require you to perform a number of steps:
- Through the “Control Panel”, select the “Backup computer data” menu.
- Next, you need to click on “Create a system image”, specifying the new drive as the source for copying information.
The system will copy all data to the SSD in a few minutes. To avoid conflicts between pre-installed operating systems, it is recommended to remove it from your hard drive.
You can create a backup copy of information stored on your computer yourself. However, specialized programs (Acronis True Image, EASEUS Disk Copy and others) will perform this procedure faster and more efficiently, transferring even hidden files to the new drive. Cloning a hard drive allows you to eliminate in advance the possibility of losing information in the event of a computer failure, system damage, or hacker attacks.
26.06.2017
Acronis True Image is a tool for creating backup copies of entire disks and individual files. Thanks to this program, you can install Windows not in 2-3 hours with all programs and drivers, but in 20 minutes, for example. In addition, you can restore absolutely all files that were on the system before removal and reinstallation. Using Acronis True Image after a system crash, you don’t have to worry about documents that you’ve been working on for a long time.
Acronis has free versions of the program for owners of Seagate and WD drives. Application functionality is limited.
Free versions of programs
- Bootable media for Windows 10 PE with programs and Acronis True Image 2017
The cloud is paid in Acronis. A Premium subscription with a 1 TB cloud costs 3,400 rubles per year. Another option is to rent or buy a server or other cheaper cloud storage (only it will not be as convenient as with the Acronis cloud).
Free data protection method
I use a free cloud and copy files there. For greater reliability, I delete the backup copies from the computer, while copying the files to a folder that I disconnect from synchronization. Open your cloud settings and find Selective sync or Set up sync. And disable synchronization of folders where your backup files are stored. Pros - free, cons - you need fast Internet and a large amount of memory in the cloud for copying. For example, if you managed to receive 1 TB as a gift in the Mail Cloud, then use it. No, then register several accounts in Yandex Disk for example.
The best option for the reliability of your data is to copy backups to an external drive that is not connected over the network. This way, viruses and other infections will not get to the backup copy. By the way, this is relevant after an attack by a ransomware virus.
As an option, you can set up a backup to the network.
The advantage of your own server over the cloud is that the access speed over the network is many times higher than the access speed to the cloud (1 GB per second versus 100 MB per second, for example, this is in the best case). The files will be immediately available for recovery at high speed. But in this case, you can spend more than those 3,400 rubles on electricity in a year, so you need to think about whether you will need to save at all. Access speed is of course a plus, electricity costs are a minus. This is if you need to make backups at home for yourself; for companies, energy costs do not play such an important role. If the possibility of fast backup and minimal backup access time is preferable, then naturally your own server or external drive will be the best choice.
Backup encryption
Before you back up your data, you should know about some important features. The first is encryption. Before creating a backup, you can set encryption parameters and set a password for the archive so that no one but you can open the archives. To encrypt your data, click on Encrypt backup. Enter your password in the appropriate field and click Save.
The second method is more detailed; here you can already set the encryption method, and not just a password. Before creating a backup, click on Options and open the Advanced tab, open the line Backup protection. Here we enter the password and select the encryption method. The larger the number after AES, the more difficult it will be to crack the password.

Copy Schedule
Another great option for backing up your data. Decide how often you will backup data, determine which data needs to be archived often, and which once a month. And create different copies in the program. To configure the schedule, click Options and the Schedule option will open in the first tab. All parameters, except one, I think, do not require attention, everything is clear here, I think. But what is Continuous copy mode? This is a frequent backup mode; a backup of data will be created every five minutes. Therefore, do not use this mode to backup your entire computer, as backups will take up a lot of memory. Enable continuous backup only for very important data.

Spoiler - Using Acronis Nonstop Backup - Acronis Help
Using Acronis Nonstop Backup
Acronis Nonstop Backup makes it easy to protect your disks and files. With its help you can restore disks, files and their versions.
The main purpose of Acronis Nonstop Backup is to always protect your data (files, folders, contacts, etc.), but it can also protect partitions. If you choose to protect an entire partition, you can recover the entire partition by performing an image recovery procedure.
It is not recommended to use this feature as the primary method of protecting your system. To protect your system, use any other schedule. For examples and more information, see Custom Schema Examples.
Limitations of Nonstop Backup
- Only one continuous copy can be created.
- Windows libraries (Documents, Music, etc.) can only be protected using continuous disk-level backup.
- It is not possible to protect data on external hard drives.
- Continuous protection and Try&Decide mode cannot operate simultaneously.
Principle of operation
After running Acronis Nonstop Backup, the program will create an initial full backup of the data selected for protection. Acronis Nonstop Backup will then continuously monitor protected files (including open ones). If a change is detected, a backup copy of the modified data is created. The shortest interval between incremental backup operations is five minutes. This allows you to restore the system to any point in time.
Acronis Nonstop Backup checks for file changes on disk, not in memory. If, for example, you are working in the Word editor, if a save operation is not performed for a long time, a backup copy of the current changes to the Word document will not be created.
You'd think that with backup speeds like this, the storage would fill up immediately. There is no need to worry, since Acronis True Image 2017 New Generation only backs up so-called “deltas”. This means that only the differences between the old and new versions are saved in the backup, and not the entire changed files. For example, when using Microsoft Outlook or Windows Mail, the resulting PST file may be very large. Moreover, it changes with every email message received or sent. Backing up a full PST file after each change can take up too much storage space, so Acronis True Image 2017 New Generation only backs up the changed parts of the file in addition to the original backup file.
Storage rules
Acronis Continuous Protection saves all backups from the last 24 hours. The consolidation of older backups will be done so that Nonstop Backup will keep daily backups for the last 30 days and weekly backups until all the free space in the continuous backup storage is used.
The merge occurs every day between midnight and 1 am. The first merger will be performed after Continuous Protection has been running for at least 24 hours. For example, Non-stop protection was turned on at 10 am on July 12th. In this case, the first merge will occur between midnight and 1 am on July 14th. The program will then merge the data every day at the same time. If the computer was turned off between midnight and 1 a.m., merging will begin when the computer is turned on. If Nonstop Backup has been disabled for some time, merging will begin when it is enabled again.
[collapse]
Copy method
If you are really concerned about the safety of your data, you need to decide how often you will make backups. If you select Continuous copy mode, you do not need to configure a schedule.
Full copy – a full copy of all selected folders and files is created each time.
Incremental backup - each backup saves only changes that occurred since the previous copy was created. The disadvantage of this method is that to restore files you need to keep all backup copies. If you delete one copy, you cannot restore the files.
Differential Copy – Here, each of the following copies retains the changed data after a full backup is created.
Spoiler - Full, incremental and differential backups - Acronis Help
Full, incremental and differential backups
Acronis True Image 2017 New Generation offers three backup methods.
Full backup
The result of a full backup operation (also called a full backup version) contains all the data that existed at the time the backup was created. Example: Every day you write one page of a document and you back up that document using the full backup method. Acronis True Image saves the entire document every time you perform a backup.
1.tib, 2.tib, 3.tib, 4.tib are full versions of the backup.  Additional Information
The full version of the backup forms the basis for subsequent incremental and differential backups. and it can also be used to create an offline backup. Creating an offline full backup may be the best solution if you often restore your system to its original state or do not want to manage different versions of backups.
Incremental backup
The result of an incremental backup operation (also called an incremental version of a backup) contains only those files that have changed since the LAST BACKUP OPERATION. Example: Every day you write one page of a document and create a backup using the incremental backup method. Acronis True Image saves a new page every time you perform a backup. Note: The full version of the backup is always created first.
- 2.tib, 3.tib, 4.tib are incremental backup versions.
 Additional Information
Incremental backups are most useful if you want to frequently create backup versions and be able to return to a point in time. As a rule, incremental backup versions are significantly smaller than full or differential ones. On the other hand, incremental backup versions require more work from the program when restoring. In the example above, to restore all work from a 4.tib file, Acronis True Image reads data from all versions of the backup. If an incremental version of a backup is lost or damaged, all subsequent incremental versions of the backup are useless.
Differential Backup
The result of a differential backup operation (also called a differential version of a backup) contains only those files that have changed since the LAST FULL BACKUP CREATE. Example: Every day you write one page of a document and create a backup using the differential backup method. Acronis True Image saves the entire document except the first page, which is stored in the full backup version. Note. The full version of the backup is always created first.
- 1.tib is the full version of the backup.
- 2.tib, 3.tib, 4.tib are differential versions of the backup.
 Additional Information
The differential method is intermediate between the two previous ones. This approach requires less time and storage space than a full backup, but more than an incremental backup. To restore data from a differential backup version of Acronis True Image, only the differential version and the latest full version are required. Therefore, restoring from a differential version will be easier and more reliable than from an incremental one. An incremental or differential backup created after disk defragmentation can be significantly larger than a regular one. This is because the defragmentation program changes the location of files on the disk and these changes are reflected in the backup. Therefore, after defragmenting the disk, it is recommended to create a full backup again. To select a backup method, you must set a custom backup scheme.
[collapse]
How to make a system backup
By default, when you start the wizard, a full backup is configured, so in the first window you only need to select the location to save the backup.
Ideally, it is better to use an external drive for saving, since even if the computer is infected, the data will not be deleted from the external drive. In this case, recovering from an external drive will not be difficult. When selecting a FOLDER to copy, copy all backup files either to an external drive or to the cloud. Otherwise, if the system disk fails, all files will be lost, including the saved backup.

After entering all the necessary parameters (encryption, maximum file size, compression ratio, enabling image verification, etc.), click on Create a copy.

Depending on the size of the files, the time it takes to create a backup will depend.
How to backup files
Backing up your files is very easy. We do the same as for a system backup, only instead of the entire disk, we select the required folder and files.
Hard drive cloning

To completely copy the disk, in the backup parameters, check the Archive in sector-by-sector mode checkbox. Also, if you need to create a more exact copy of the disk, and not just the files on it, check the Archive unallocated space checkbox.

Next, click on Create a copy. In general, to make a copy of all files and the hard drive in Acronis True Image 2017, no more steps are required. To restore a disk or individual data from a backup, you will have to perform a couple more steps, which, of course, is unlikely to affect the speed of data recovery. Everything will be restored quickly, in any case, you will spend 2-3 times less time than on a standard Windows installation.
How to restore the system completely
To restore the system, you need to burn the True Image bootable media image to a flash drive or ISO disk - download the image from this link - https://yadi.sk/d/UYKGvGZe3JVPKa
Or go to Tools - Boot Image Wizard. Select image parameters and save method - ISO image or write directly to a USB flash drive.
To restore from a backup, use the computer from which the backup was made - otherwise the system may not start and there will definitely be problems with the drivers, or use exactly the same computer, with the same processor, mother memory and video card.
We insert the media into the computer and boot from it. To do this, when you turn on the computer, open the BIOS or UEFI program and configure the boot priority. Depending on the model of the motherboard in the system unit and the laptop model, this may be F1, F2, Del, F10, Esc, etc. Or simply press the keys immediately to select the boot source before loading Windows - F9, F11, F12. Depending on the motherboard manufacturer and laptop manufacturer, the hotkeys will differ. When checking all system devices - many different white letters when turning on the computer - there should be keys to open the BIOS settings and select the boot source.
After loading from the media, launch Acronis True Image. From a media with Windows 10 PE, look for Acronis in Start - All Programs - Backup and Restore - Acronis True Image 2017. From booting from Acronis media, simply click on the name Acronis True Image and wait for it to download.

Click on the Recovery - Disks option, since we need to restore the system disk. Accordingly, to restore individual files from the entire backup – Files and folders.
In the next window you need to select the backup file from which all data will be restored. To do this, click on the Browse button and look for the system backup file in the file explorer. Connect external media if you need to recover from an external hard drive, for example. Click Next after selecting the backup archive.

Here you need to select the volumes that will be restored. Be sure to check the box in front of the disk where Windows is installed and in front of the boot disk (area) - here it is usually signed Reserved by the system in parentheses. Be sure to uncheck the section where the backup is stored. Click Next.
Select the disk to which the recovery will be performed. Click Next.

After selecting a disk for recovery, all disk partitions that will be recovered will be checked. During setup, you can change their size, letter, and change the partition type. We will not do this, because we want to get exactly the system that we had before the breakdown, before the effects of viruses, for example. It is the parameters of the old system that are now set by default in the backup parameters. We won’t change anything here and in the next windows we simply click Next all the way to the Completion window.

Click Finish and begin system recovery. 
When restoring, do not change any parameters; the system will create a complete copy of the disk automatically. In most settings you only need to click Next.
It took me only 10 minutes to restore the system with all the files, settings and installed programs with drivers in the test bench. How much would I spend installing everything the standard way? 2-3 hours, this is a good program for system recovery.

Plus, a full backup of the system does not have to be done in a program installed in Windows; it is enough to boot from bootable media and make a backup. The only downside to using bootable media is that you cannot automate this process to copy the necessary files and documents.
Data recovery
To restore files from a backup, find the backup file made in Acronis True Image and double-click on it. The file will open in Explorer as a folder and you can drag and drop the necessary files onto your computer with your mouse. The main thing is that you have Acronis True Image installed on your system, otherwise the backup files will not be opened.

This was one of the file recovery options. Now open Acronis True Image, click on the copy from which you want to restore files, this can be either a complete copy of the system or a copy of individual files and folders. Click on the Recover files button.

In Acronis Explorer, select the necessary files and folders to restore. On the left side of the window we look for the folder that needs to be opened, on the right side we select folders and files to restore. After selecting the data, click Next.

Next, you can manually specify a folder to save the recovered data. By default, the folder is selected as in the created backup. To change the path, click Browse and select the desired folder. Click on Restore.

We wait a while for the files to be copied to the selected folder.

The same can be done using bootable media.
You purchased a new hard drive. What to do next? You can rearrange the system and all programs from scratch, then transfer the data to a new disk. But often there is simply no time or opportunity for this. Another option is to make a full copy of the disk.
We will consider two possible cases
- The original disk is fine.
- The original disk is not working well. Bad blocks appeared on it, it works slowly, poor S.M.A.R.T indicators
1. Copy a working hard drive.
There are many different programs designed to copy information disk-to-disk. For example, Acronis True Image, Paragon Drive Backup, Aomei Partition Assistant and many others.
We'll look at one of the oldest cloning programs, Symantec Ghost (formerly Nortn Ghost). To create a copy of a disk using Symantec Ghost, just boot your computer from the flash drive or CD on which the program is recorded and run the cloning wizard.
After starting the program, we need to choose what we are going to do. You can create an image of an entire disk, an image of a disk partition, burn from an image, or copy a disk to a disk. In this case, we need the latter. Choose:
Local -> Disk -> To Disk
Select the drive that we will copy. (Select local source drive by clicking on the drive number). In our case it is Kingston 120Gb.


Be careful! If you have several disks of the same size, to avoid errors, it is better to disable the extra ones. All information on this disk will be lost!
Click OK. If the new disk is larger than the old one, the program itself will proportionally increase the size of the partitions on the new one. You can change them if you wish.
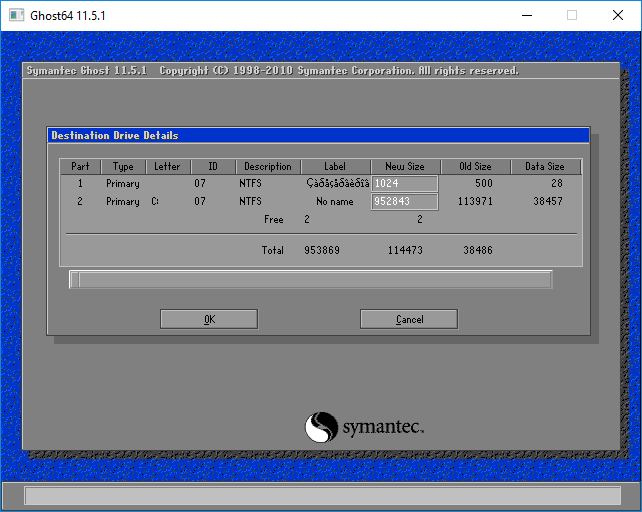
Click OK again and check that we have the correct disks selected. Source – where we copy from, Destination – where we copy.

After that, click OK and the cloning process will start. The program displays how much time has passed since the start of the program and shows approximately how much time is left until the end. Copying time depends on the speed of the disk and the amount of information.
When finished, you must turn off the computer and disconnect the source disk. Otherwise, at the first start, a situation may arise when Windows loses the paths to the temporary file directories or swap file and will not be able to boot.
We start from a new disk and make sure that everything works.
2. Copy a hard drive with read problems.
Often the purchase of a new hard drive is due to obvious problems with the old one. Programs like Symantec Ghost do not always cope with such disks. Copying from Linux OS will help us out.
First, download a disk image, for example, Ubuntu 16.04.
Let's burn the image to a DVD or USB drive and boot from it.
Let’s switch to Russian for convenience and click on the “Launch Ubuntu” button

In 2-3 minutes the system will boot

Press the Windows icon key on your keyboard or click the Ubuntu icon in the upper left corner of the screen.
Let's launch the terminal.

We will copy the disk using the program ddrescue. Let's install it first.
To download ddrescue enter the following command in the terminal:
Sudo wget http://www.hamishmb.altervista.org/files/Downloads/ddrescue-gui/1.7.1/Trusty/ddrescue-gui_1.7.1~trusty-0ubuntu1~ppa1_all.deb
Let's start the installation:
Sudo dpkg -i ddrescue-gui_1.7.1~trusty-0ubuntu1~ppa1_all.deb
Sudo fdisk -l

sda– a failed disk that we will copy, sdb– the disk to which we will copy, sdc– The USB drive from which we booted.
ddrescue[options] infile outfile[options]
infile And outfile can be devices, partitions or files. mapfile is a regular file that should be located in an existing directory. If the file does not exist, the program will create it.
Always use mapfile– this can save a lot of time since without it ddrescue will not be able to continue a stopped, frozen, incompletely completed copying, but will only be able to start it again.
-f or –force – coerces ddrescue rewrite the disc outfile. Necessary when as outfile device is being used.
-r n or –retry-passes=n – sets the number of retries to read damaged areas, default is 0.
You can view the launch parameters in more detail using the command ddrescue -h
Hard drive cloning.
Hard drive cloning is an operation that eliminates the hassle of installing Windows and software when transferring data to a new drive (SSD drive or regular hard drive). As part of this operation, the entire partition structure of the first hard drive, all the data on them, as well as a working activated Windows system with all settings and installed software are transferred to a second hard drive connected to the computer.
The hard drive cloning function is offered, in particular, by Acronis True Image data backup programs and Paragon Hard Disk Manager. All of them provide separate processes for transferring only Windows itself to another disk while maintaining its functionality, cloning individual non-system partitions, as well as cloning the entire disk with the ability to make changes to the partition structure of the clone hard disk.
A distinctive feature of Acronis True Image is the hard drive cloning function with the ability to exclude individual unnecessary files. We will look at this process in detail below - we will clone the hard drive using the Acronis True Image program, and during the cloning process we will exclude some data for transfer.
1. About Acronis True Image
True Image is a product from the master of the software market, Acronis, which offers, in particular, various solutions for disaster data recovery at a professional level. True Image is not only a panacea for all problems with Windows in the form of restoring it to the state from a once saved backup copy. The software package also contains a lot of other useful functions such as:
- bootable media and a utility implemented in system preboot mode for cases when Windows does not start;
- restoring Windows on a computer with other components;
- storing backups in Acronis cloud storage;
- system cleaning tool;
- Windows trial mode with the ability to cancel changes made;
- other useful utilities.
The current version of Acronis True Image 2016 can be purchased on the developer's official website.
The program has a free 30-day trial version designed to familiarize users with most of the functionality of True Image. However, the hard drive cloning function is blocked in the trial version. For these purposes, you need a fully activated Acronis True Image 2016. This is exactly what will be used in our case.
2. Source and destination hard drive
To define hard drives, we will use the terminology of Acronis True Image itself. The hard drive from which the data and partition structure will be copied is the source hard drive. The disk that will become a clone of the original one is the target hard disk. In our case, the disk management utility, a standard Windows tool, will help you to clearly see the original picture of the disks. Quick access to it in system versions 8.1 and 10 is implemented in the context menu on the “Start” button. The universal way to launch it is to call the “Run” function (keys + R), enter the command diskmgmt.msc and press Enter.

In our case, two hard drives are connected to the computer. The original hard drive is marked by the system as Disk 0. This is a working hard drive with Windows and data on non-system partitions. The newly connected hard drive is displayed as Disk 1 in the utility; it will be the target, that is, it will become a clone of Disk 0.

Target Disk 1, as we see, has a partition structure and some stored data. When a hard drive is cloned, all information on the target drive, as well as its original partition structure, are destroyed. Therefore, if there is any important information on it, it must be transferred to the original hard drive or external storage device.
As a rule, the cloning process does not require even an approximate matching of disks in volume. The target hard drive can be of any size and any size smaller than the source one, as long as there is enough space to accommodate the data that actually takes up space on the source disk. And in the case of Acronis True Image, this is not even necessary due to the ability to exclude individual folders and files.
3. Cloning process
Once launched, True Image 2016 will prompt you to sign in to your Acronis cloud storage account. We can close the login window.

Directly in the program interface, in the side menu ribbon on the left, select the “Tools” tab section, and in it, select the “Clone disk” item.

And follow the step-by-step disk cloning wizard. We need a preset automatic cloning mode. Click “Next”.

Window for selecting the source hard drive: here we click with the mouse, respectively, on the drive from which the data will be transferred. The numbering of disks in True Image differs from the numbering of the standard Windows utility, therefore it is better to navigate the designation of disks by their size or model. Click “Next”.

Window for selecting the target hard drive: here we click on the drive to which we want to transfer the partition structure, Windows and other data. Click “Next”.

Since in our case the target hard drive is not a new disk with unallocated space, but a disk with structure and stored data, Acronis True Image promptly warns us about the danger of losing information. Everything you need has been saved, so we can safely press “Ok”.

Window for selecting a recovery method: here you need to leave the preset option for copying partitions unchanged. Click “Next”.

Summary window: here you can already start the hard drive cloning process by clicking the “Proceed” button at the bottom if there is enough space on the target disk and there is no need to exclude individual files. Or, perhaps, there is plenty of space on the target disk, but you simply don’t want to transfer unnecessary data from the source disk to it, thereby increasing the duration of this process in time. To clone a hard drive not in full, in the data summary window, click the “Exclude files” button.

In the file exclusion menu we will see a tree structure of the contents of the source hard drive. You cannot exclude files and folders from the system partition C; we will only work with non-system ones. For example, in our case, we will exclude several video files on the second partition of drive E. The process of excluding files requires the completion of data processing, this will be indicated in the information line at the bottom of the window.

We will exclude the third partition of the source drive F from the cloning process entirely. After cloning as a partition, it will not cease to exist, but will be empty. Upon completion of all operations to exclude folders and files from the hard drive cloning process, we can begin to launch it. Click “Proceed.”

After the preparatory steps, Acronis True Image will ask you to reboot the system. The program will carry out the cloning process in Windows preload mode.

In preboot mode, in the Acronis True Image window you will see a preset option to turn off the computer after the cloning operation is completed. You can leave it on to get distracted by your own business, and then, when you turn on the computer, go straight to the BIOS and set the boot priority from the target hard drive.

Cloning is complete, we can boot from the target hard drive.

4. Working with target hard drive space after cloning
Having booted from the target hard drive and got into the Windows system, the first thing we will do is look at the partition structure. Launch the standard disk management utility. Since the target disk now comes first in the computer's boot priority, Windows identifies it as Disk 0. The latter has become a clone of Disk 1, once the original, with the same partition structure and proportionally allocated space, according to the structure of the original hard drive.

When excluding files, we completely removed all data from the third partition of the original hard drive. This partition now appears on the source disk as partition I and still contains data. Its clone on the target disk - now partition F - is, as expected, empty.

You can use it either to store data or attach its space to any other partition. For these purposes, there are software disk managers Disk Director from the same company Acronis, the no less effective Paragon Hard Disk Manager, free, or their analogues. You can resort to them if you already have experience working with this kind of software. Moreover, True Image 2016 provides the ability to simultaneously redistribute the target disk space during the cloning process. To do this, at the first stage of the cloning wizard, you must select not the automatic mode, but the manual one.

Naturally, such a move will complicate the operation and increase the chances of beginners making mistakes. In our case, the operation was already burdened with the work of excluding individual files, so we will entrust some simple operations to form the partition structure of the clone hard drive to the lite version of the disk manager - the standard Windows utility.
The disk management utility has a minimum of functionality and does not provide for overwriting hard disk sectors in order to combine partitions or borrow part of their volume from some for others. However, operations to expand partitions using the free space of adjacent partitions on the right can be carried out without overwriting data.
Let's add, for example, the space of the empty third partition of the target hard drive to its neighbor - the second non-system partition. To do this, the third section F must be deleted. In the utility window, click on it, call up the context menu and select “Delete Volume”. We confirm the action.

The third partition now appears as unallocated space.

Call the context menu on the adjacent partition E and select “Extend volume...”.

We follow the volume expansion wizard and give the second partition all the available space.


Now there are only two partitions on the target hard drive - the system partition and the enlarged non-system partition.

Using the same scheme, you can do it differently, leaving a third partition for storing data. You need to transfer the necessary files from the second partition to it, and delete the second partition. Using its unallocated space, you can then expand the system partition C.
Have a great day!