What you need to install Wi-Fi at home. How to connect and configure a Wi-Fi router? Step-by-step instructions for all models
Nowadays it is difficult to find a high-tech gadget, in particular a smartphone, laptop, etc., without support Wi-Fi technology . It is convenient, practical and has proven itself well. However, despite its increasing prevalence, support for Wi-Fi networks in desktop PCs has not yet become a default option: many computers are sold without it, not to mention older models. However install Wi-Fi on your computer It’s very simple, and there are several ways:
- purchasing a new motherboard with built-in Wi-Fi;
- PCI installation Wi-Fi cards;
- connection USB WiFi adapter.
Do you need Wi-Fi on your desktop computer?
Before installing a Wi-Fi module on your computer, you need to decide whether we need it at all?
Let's say the Internet is connected to your PC via Ethernet cable. If some kind of rearrangement is not planned in the foreseeable future, which may entail the need to move the computer and the occurrence of problems with the cable, then the rationale for switching to a Wi-Fi connection looks very doubtful. Still, so far familiar to everyone the cable provides a more stable and speedy connection. Not least because of the reduced susceptibility to various interferences. Therefore, it is still too early to categorically refuse an Ethernet cable, even if it looks somewhat archaic. In addition, such a connection can be useful if you want to turn a desktop PC or laptop into wireless point access.

The procedure is quite simple. The main thing is that it is present on the computer Wi-Fi module, and he himself, of course, was connected to the Internet via an Ethernet cable. All that remains is to configure the wireless access point. Sometimes built-in resources are enough for this operating system, but sometimes you will have to install specialized software. However, as a rule, no difficulties arise with this. Why turn your desktop into a hotspot at all? ? For convenience, because you can easily connect smartphones, tablets, laptops and other high-tech gadgets to the Internet without the need to purchase a separate Wi-Fi router. The role of the latter in this case is assigned to the computer. Well, now, let me tell you in detail how you can install Wi-Fi on your computer.
Methods for connecting Wi-Fi to a desktop PC
Buying a modern motherboard

As mentioned above, the simplest, but also most expensive, solution to the problem is computer upgrade. Currently easy to find on sale motherboards, which by default is present Wi-Fi support . If you still plan to purchase a new PC in the foreseeable future, then you should not waste your time on small things by buying USB adapters or PCI cards, but immediately take everything ready-made.
Buying a PCI card or USB adapter

In the case when a desktop upgrade is postponed indefinitely, there are two options left: USB adapter or appropriate PCI card. Both methods are about equally good, but each has its own nuances. For example, an internal Wi-Fi card means reliability and a stable, fast signal. On the other hand, you need a free slot to install it PCI Express, as well as the ability to easily penetrate inside the system unit. Considering the common practice of PC sellers installing a warranty seal on the cover system unit, to prevent unauthorized access, the option with a PCI card sometimes automatically disappears. Or you will have to sacrifice the guarantee, which is clearly not a far-sighted decision.
 USB adapter is more practical and convenient, as it allows you to easily connect Wi-Fi to any desktop PC. Outwardly it resembles regular flash drive, although some models are slightly more bulky due to built-in antennas. The connection speed will most likely be slightly lower than in the two previously listed options. Let us add that sometimes for correct operation USB Wi-Fi adapter needed
Good day!
Many users are scared self-configuration Wi-Fi router and when purchasing it, they also order a service for connecting and setting it up.
In my opinion, the price for this service in many stores is too high (sometimes up to half the cost of the router) - especially since many can cope with this operation on their own (you just need to figure it out a little).
I also want to immediately add that if in the future you need to change your password, settings for Internet access (or anything else), you will still have to go into the settings of the router and figure it out yourself...
That is why I wrote this small instruction article, with pictures and explanations of each step. I hope the step-by-step presentation of the material will help you figure out how and what to do.
And so, let's go in order ☺...
Addition! You can also read my other article on how to connect and configure from scratch Tenda router FH456 (N301, F3) -
Step-by-step instructions: connecting and setting up a Wi-Fi router
Selecting a location and placing the router
Many users make one mistake - namely, they place the router next to the computer (for example, on the system unit). No, for checking and initial setup- this is acceptable, but for permanent job devices are not good in all cases.
The fact is that depending on where your Wi-Fi router is placed, the level of network reception in different parts of your home will greatly depend. Significantly reduce the Wi-Fi signal: load-bearing thick walls, mirrors, metal doors, etc.
Therefore, you need to position the router so that it is approximately equidistant from all devices that will connect to its network (and also so that there are minimal obstacles to the network signal). An example of unsuccessful and successful placement of a router in a 2-room apartment is shown in the layout below.

On the issue of choosing and placing a router in an apartment
An article about how you can strengthen Wi-Fi signal -
In general, I think the message is clear: depending on the location of the router, the quality of the network signal, speed, errors, etc. will depend.
Connecting the router to the computer
A typical router delivery consists of (example in the picture below):
- the router itself;
- power supply;
- network cable (usually 1-2 m long). Used to connect the router to a PC (laptop) and configure it;
- operating instructions;
- antenna (there may not be an antenna - in some routers it is built into the device body).
Those. there is everything you need to start connecting and setting up the device.

The connection itself comes down to the following:
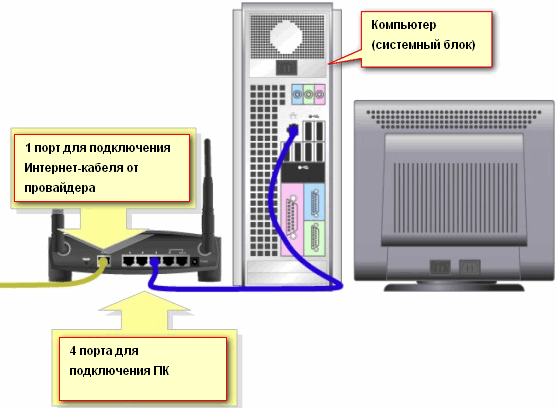
- connect the router network cable(which comes with the router) with a computer or laptop. By the way, please note that the router, as a rule, has 4 LAN ports for this (most often marked yellow). On some routers, the marking may be Ethernet instead of LAN;
- disconnect the Internet cable (coming from the provider) from the computer system unit and connect it to the router: to the WAN or Internet port (usually marked in blue);
- connect power to the router and turn on the device;
- If everything is done correctly, various LEDs on the device will begin to blink...

If shown schematically, the Wi-Fi router becomes like an intermediary between your computer and the Internet cable from the provider (see picture below).
Important! Connecting the router to a PC (laptop) using a network cable is necessary for the initial setup of the device. Subsequently, the cable can be disconnected and the router placed in a more convenient place.

Configuring network card settings
Before entering Wi-Fi settings router, you need to configure it correctly network card(especially if you previously had different default settings).
First you need to open a tab in the control panel - Control Panel\Network and Internet\Network Connections . The easiest way to do this is to press the Win+R button combination, enter the command ncpa.cpl and click OK.

How to open network connections || ncpa.cpl

Then you need to open select "Internet Protocol Version 4 (TCP/IPv4)" and open its properties.

In the "General" tab, set to obtain an IP address and DNS server automatically. Save settings.

Obtain IP address and DNS server automatically
Such settings are suitable in 99.9% of cases, because... at your Wi-Fi router in local network looks at the active DHCP server - which will give a free IP address to your computer/laptop.
Entering the router settings (device IP address)
To go into the Wi-Fi router settings, you need to know its IP address (which you just need to enter in address bar browser and navigate to it).
Each router has its own IP address for settings. In most cases he 192.168.1.1 , but there are exceptions:
- address at D-Link routers and NetGear: 192.168.0.1 ;
- address at TrendNet routers: 192.168.10.1
Important! Also pay attention to the stickers on the body of your Wi-Fi router - almost always the IP address is indicated on these stickers. By the way, on the same stickers you can find the login password for accessing the web interface.

After you enter correct IP address to enter the router settings and press Enter - you will see a window asking you to enter your login and password (example in the figure below).

As a rule, in most cases both the login and password will be admin. If you can't log in, try leaving the password field blank.
I discussed in more detail how to enter the router settings, what passwords and logins, IP addresses, and what to do if you can’t log in in this article:
Setting up a router (router)
If the password and login were entered correctly, then you should be taken to the web interface (with a bunch of various settings, links, etc.). Each manufacturer and different models routers - the interface is different.
But there is one thing in common: the menu is usually located on the side or on top. The basic settings in the menu are also identical and are set in a similar way. So, having looked at how one router is configured, you can configure another by analogy...
As an example, I’ll take such a popular brand of routers as TP-LINK (with “green” firmware in Russian).
Cloning the MAC address of an old network card
The fact is that many providers charge extra. protection that checks the MAC address. And if the MAC address does not match (or has been replaced) - access to the network is blocked.
To clone a MAC address, in TP-LINK routers you need to open the "MAC address cloning" link (in the "Network" section). If you have English version firmware - then look for a link like "MAC Clone".
Addition! Not long ago I appeared on my blog separate instructions for cloning MAC address -

MAC address cloning
Setting up Internet access
Setting up Internet access mainly depends on the network design of your Internet service provider. The necessary parameters for accessing the network must be specified in the contract for the provision of Internet connection services. Most often, PPPoE is used in Russia (note: issued dynamic IP address when connected. To access you must enter your login and password).
It is impossible to open the WAN (Internet) tab in the router and first specify the connection type (for example, PPPoE, see “2” in the figure below). It is also necessary to indicate username and password (see “3” in the figure below, data can be taken from the agreement with the Internet provider).
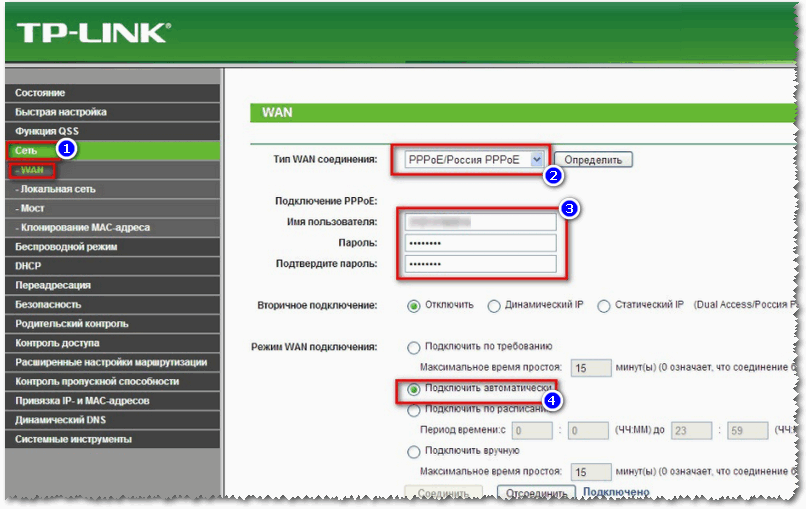
All that remains is to save the settings. In most cases, you do not need to enter anything else. Now the router can access the Internet - and the Internet should now appear on the computer that is connected to it with a network cable.
All that remains is to configure the wireless network...
Setting up a Wi-Fi network
For settings Wi-Fi networks, first you need to open the "Settings" tab wireless mode" (or in English "Wireless Settings"). In this tab you need to specify the network name - i.e. the name of the network that you will look for to connect on your gadgets: tablets, phones, etc. (in some cases, if there is bad signal, it makes sense to choose a channel. ).

Then you need to open the “Wireless Network Protection” tab (or in English "Wireless Security") and select the type of protection. Today one of best types encryption is WPA2-PSK, which is the first in the list (we select it).
PSK password is the password that you will need to enter when connecting to a Wi-Fi network.

Actually, after saving the settings, the router will reboot, and after that you can connect to the Wi-Fi network and use the Internet.
That's all the setup...
I understand that in this article I did not consider many subtleties that in particular cases can have a great impact on the operation of the network. But, probably, all of them cannot be provided for in one article.
As I work on the site, I will touch on this issue more than once...
You can receive services:
- Free house call computer technician
- Call a courier to your home for free to deliver equipment
- Arriving at our service center
Back call
We'll call you back in
1 minute
A WI-FI router is a device that provides Internet access in offices, apartments and public institutions. The main task of the device is to convert a wired signal into a wireless one. WIFI router for the home has compact size and medium range.
Having purchased a router for their home, many customers are faced with the problem of installing it. It is necessary to configure the device and network. Even if you follow the instructions from the router, it is not a fact that everything will work out. If you do not want to waste your time, then contact a professional. Remont-Gadget specialists will install a WI-FI router, providing you with secure Internet access. To do this you need:
- leave a request on the website by filling out the feedback form;
- order a service from a specialist;
- agree with the master about the time at which he will arrive.
Remont-Gadget specialists provide services at home and in offices throughout Moscow and the region. After installing the router, you can enjoy fast internet without annoying wires strung throughout the apartment. It will be possible to access the network not only from a computer or laptop, but also from a tablet, phone, TV or set-top box. In addition, you can use wireless printing.
Cost of installing a WI-FI router
The computer center provides a wide range of services for installing and configuring routers. Remont-Gadget offers affordable prices. The cost of installing a router for a home includes:
- setting up network access on the router;
- flashing the device to latest version(if necessary);
- installing protection on a WIFI network;
- connecting devices to the Internet.
Remont-Gadget specialists will also help you choose the optimal WI-FI router. The specialist can either advise you or purchase equipment and deliver it to your home. The price of this service starts from 500 rubles.
Professional configuration of any routers
Independent WI-FI installation router is not the most simple task. Available on the market great amount various devices, when choosing which it is important to remember that they must be supported by your provider. Remont-Gadget specialists recommend paying attention to routers from trusted manufacturers such as TP-Link or Zyxel. However, each model has its own specification. Installing a Wi-Fi router requires entering specific parameters.
Many users turn to providers for help. But even here success is not guaranteed. Providers usually give general recommendations, without delving into the features of the client router. If you want the WI-FI network in your home to function stably, then contact a specialist:
- the master will come to your home or office at any convenient time;
- will configure the wireless connection and access point;
- connects any devices to the Internet: computers, phones, set-top boxes;
- will configure the network so that it works simultaneously with several gadgets.
At the end of the work, the technician will advise you on how to use the router. Trust the installation to professionals and save your time and nerves.
Today, as we know, wireless networks (VLANs), or, as they are often called, private virtual VPN networks, firmly established in computer world. And when using a network connection or accessing the Internet, they are given preference. But, unfortunately, not everyone knows how to turn on WiFi on a computer, much less make it the main access point.
Wireless network
Let's start with the fact that connecting to virtual networks provides two main methods: infrastructure and connection in Ad-Hoc mode, which will be discussed later.
The first type of connection involves the use of standard network routers or ADSL modems that distribute packets of IP addresses to several devices connected in this moment to the virtual network.
In the second case, only one main computer terminal is connected, which will subsequently act as a gateway. In other words, all other computers, laptops or mobile gadgets will connect to it. Let's consider the question of how to enable WiFi on a computer. There are several ways here. Before you do this, you need to do some preliminary actions, without which creating a connection will be impossible, it simply will not work even if some parameters are successfully configured.
Basic WiFi Components for PC
It goes without saying that to establish a connection via WiFi module Some components will be required. In principle, everything is simple. This is a computer with installed (we will consider all processes based on Windows OS), a router and a little patience.

Please note, if you need to make the computer a point WiFi access, you should use the built-in WiFi modem (some USB devices can also be used).
Ad-Hoc connection
This connection option was developed specifically for cases where all other devices need to be connected through one main computer terminal. The advantages of this connection are that there are no restrictions on how many client terminals will connect through the main gateway.

Conventional cheap routers and ADSL modems installed in apartments provide a standard connection for 4-6 devices. Naturally, you can also purchase multi-channel routers, but they will cost much more. It is much easier to use a built-in device on the main computer that connects directly to (RJ-11 or RJ-45 connectors) and provides WiFi distribution for PC.
Installing the Router Driver
First you need to install the device driver itself (provided that it is not already installed). For this, as a rule, it is used standard disk with drivers supplied upon purchase. The installation itself usually does not cause problems, but in some cases additional settings will be required.
After installing the driver, you need to look at the status of the device. To do this, you can use the standard “Device Manager” (the device itself should not be highlighted in yellow as problematic).

But that's not all. In some computer systems modules that provide communication may be disabled by default. Here you will have to use the “Engage” command, after first going to the network adapter, called up by right-clicking.
Basic router settings
Now you need to configure the adapter (router) itself. This is done in any Internet browser by entering the line 192.168.1.1 in the address field (for some non-standard models 192.168.0.1). After authorization via login and password (they are indicated on the label of the device itself), you need to check the “Enable AP” parameter and assign a name network SSID and select the data encryption method (usually WPA).
After this procedure, in the “Wireless Networks” menu in the “Control Panel”, you need to uncheck the “Use to configure a wireless network” line, and then configure additional parameters.

For example, for D-Link devices will be needed D-Link program AirPlus G+ Wireless Adapter Utility. In the parameters you will need to enter the same SSID value, then in the Wireless Mode section set the value to Infrastructure and save the changes.
How to distribute WiFi from a computer
Let's look at the basic methodology. When solving a problem, you can do things differently. For this option in control wireless connections you need to select “Change network preference order” and add a new connection. Next, you need to enter the SSID connection name (arbitrary), select “Open” authentication and WEP encryption method. Don't forget to use the network access key (WiFi password on your computer) followed by confirmation.
At the bottom there is a line “This is a direct computer-to-computer connection; access points are not used." You need to check the box next to it. On the “Connection” tab, the “Connect if a network is within range” option must be enabled.

Next, you need to go to the “Network Setup Wizard” and after detecting new equipment, check the “Ignore disabled equipment” option. In the next window, select the connection method in the line “This computer has direct connection to the Internet. Other computers on the network connect to the Internet through this computer", after which in the new window you need to check the line "Wireless network connection" Followed by standard setting computer name, working group and public access. Once setup is complete, you will need to reboot the system.
Alternative method
To answer the question of how to turn on WiFi on a computer, you can use at least effective way, which, however, is suitable for experienced users. An ordinary user is unlikely to use this method, however, we will consider it.
How to set up WiFi on a computer in this case? First you need to make sure that the components "WLAN AutoConfig Service", " General access to connecting to the Internet" and "Routing and remote access" have the startup mode "Automatic" and are turned on. Now you need to launch the console with administrator rights, and then enter the line netsh wlan set hostednetwork mode=allow ssid="XXXX" key="YYYYYYYY" keyusage=persistent, (where XXXX is the computer name and YYYYYYYY is the minimum 8-digit password). It is better not to use Cyrillic when entering.

Now run ncpa.cpl, Microsoft Virtual Miniport Adapter should be specified in the properties on the “Network” tab. Here you can remove unnecessary protocols and rename the connection. In the “Access” tab, you can set permission to use the connection by other users and select your own connection. Now go to the console again and enable the connection using the line . This is the activation of the connection.

The connection status is checked using the line netsh wlan show hostednetwork, service stop - netsh wlan stop hostednetwork, complete shutdown and removal - netsh wlan set hostednetwork mode=disallow. For automatic start at system startup command line netsh wlan start hostednetwork you need to add (register) to the startup menu.
Conclusion
It is probably already clear that the question of how to enable WiFi on a computer has several basic solutions. Which one to use is up to everyone to decide for themselves. Actually, the question comes down, as is already clear, to installing drivers, configuring network adapters and making basic router settings and network connections in system.
As already mentioned, the first method should not cause any particular difficulties for anyone. An alternative method of creating a distribution and, as they say, “sharing” it is unlikely to suit an ordinary user, although it is simpler, since there is no need to delve into the system. Here, as they say, everything is at hand, although presets it still needs to be done. On the other hand, all methods are effective, and what to choose depends only on the preferences of the user or