Launching an ssd disk. Disabling system protection
Often, when working with a PC, we encounter problems that we did not expect. For example, we don't know how to connect an SSD drive to a computer. It would seem that the matter is not at all difficult, but it requires care and correct actions. Therefore, if you decide to carry components or assemble a PC yourself, then you will need to know everything about such minor difficulties.
For what?
Upgrading your computer is always a responsible matter. Not all users are ready to do this. Firstly, you need to have a good understanding of components and understand compatibility different devices, understand new products. Secondly, in addition to this, significant financial investments are needed, since what better product, the more expensive it is accordingly.
In this case, everyone will need to learn how to connect an SSD drive to a computer. This is also necessary for those who decided to assemble a PC themselves, or for those whose hard drive “passed away.” There are a lot of instructions on this issue on the Internet, so let’s get started.
Peculiarities
Before we begin to understand this issue, we need to tell those who do not know anything about SSDs.
It is a solid state drive, which is a non-mechanical storage device. It is based on a memory chip. The device arrived at HDD replacement. Although it is impossible to say so unequivocally, since many experienced users prefer to install both an HDD and a solid-state drive in their PC.
As a result, sometimes this device becomes the main one, replacing the place of the hard drive, sometimes auxiliary. In the second case, the system is loaded onto it, and personal information is stored on the hard drive.
Advantages
Now learn about how to connect an SSD drive to SATA computer, not everyone needs it, since most users still use this device in compact devices: tablets, etc.
However, in desktop computers it can also be installed since it brings additional benefits. Most importantly, it improves system performance. Compared to traditional hard drives, it is smaller in size and weight and has increased performance. Moreover, the speed turned out to be 6-7 times greater. Hence the high price for SSDs.
In addition, solid-state drives began to be integrated in pairs with HDDs to form hybrid hard drives. In this case, the flash memory became occupied by a buffer. Although, as mentioned earlier, sometimes it is used as a separate free space.

In addition, noiselessness has been added to the main advantages, since the device is non-mechanical and has no moving elements. Hence the high mechanical resistance. Files are read stably, without interruptions or jumps. Reading speed is close to the throughput of the interfaces.
Connection
So, how to connect an SSD to a computer? Installed using approximately the same method. Therefore, if you have ever encountered the work of a hard drive, then there will be no problems with a solid-state drive. The only difference is the dimensions. You will need to fit the smaller device into the correct slot.
Start
To start the procedure, of course, you need to turn off your PC. To be on the safe side, it is better to do it completely unplugged. Don't forget to turn off the power supply as well. Usually the button to turn it off is located on the back, on the case.
Now you need to do the following operation: press and hold the PC power button for several seconds. This is necessary so that all the current that remains on the board and in general in the entire case disappears. This way you will de-energize all circuits and ensure your safety.
Depending on your goals, the next steps may vary. But in general, the connection principle is always the same.
Let's act
To understand where to connect the SSD drive to the computer, you need to get to the case. First you need to open it. Usually it all depends on its design. But there are always small screws to remove left panel and get to the “insides” of the PC. There are cases that may have access to the ports from the other side, so here you need to act according to the situation.

If you are new to computer chassis design, you may have problems. But if you at least know what a hard drive looks like and can find it in a metal box, then half the battle is done.
Usually HDD placed in a special compartment. There may be several of them in the case. Made specifically for 3.5 inch HDD size. This is where you need to place the SSD.
Because the dimensions are a little different, being 2.5 inches, you'll have to bolt it down pretty well. They usually come with the device. Lately Slots for SSDs are becoming increasingly common in cases. Therefore, perhaps the task will be simplified.
When the drive is secured and well fixed, you will need to figure out how to connect the SSD drive to the computer, to the motherboard. Here the matter is somewhat more complicated, since you will have to google it or figure out the interfaces.
Compound
Next you need to take the cable that came with the drive. You will find an L-shaped port on it. This is SATA. In addition to this, you must have a power cable. It usually looks like a bunch of wires.
First you need to connect the power cable to the connector from the power supply. Then we take the SATA cable and look for the right place on the motherboard. Usually there are few options. If the board has SATA III, then it is better to use this port. If this option is not available, connect to SATA II.

Now these two wires will need to be connected directly to the SSD. A power cable is placed in the wider connector, and a SATA cable is placed in the narrow connector.
Other options
Not everyone knows, but they have been releasing SSDs of the M.2 form factor for a couple of years now. Now these models are not uncommon. Many people prefer them. In addition, newfangled motherboard models began to be equipped with a special connector specifically for this form factor.
As a result, the situation led to the fact that we need to know how to connect an SSD M2 drive to a computer. It must be said right away that this model has many variations. Therefore, the connection may be slightly different. But the main point The point is that, unlike the previous option, we connect the solid-state drive to the motherboard not with wires, but with the device itself.
When you see the M.2 SSD in the photo, you will understand what the point is. It is not presented in a case, like the model described above. It's done small fee, which contains memory chips. This board has special slots for installing them on the motherboard.
It is impossible to describe the connection for all cases, since there are really many options. But when you buy an M.2 SSD drive, you will have instructions that will tell you how to do it correctly.

Settings
Once you have assembled and connected everything, you can turn on the PC. While loading it, you need to call up the BIOS. Here you should look for the AHCI mode, which is responsible for the operation of the solid-state drive.
For example, you are going to load an operating system onto an SSD. But in addition to the new drive, you already have connected hard disks. Then you will need to prioritize the devices. To do this, we put the solid-state drive first in the list. We install the ability to boot the OS from a disk or flash drive.
If you need an SSD as an additional tool, then it will be enough to check that the existing hard drive is first in line. Otherwise, the system may simply not boot. You might want to move your OS to an SSD. In this case, after you have learned how to connect an SSD drive to a computer, you will need to perform a very extensive operation. This is a topic for another article.

Laptops
When you try all the above operations using your own example, you will realize that you even know how to connect 2 SSD drives to a computer. The main thing is that there is enough space on your motherboard.
But speaking about PCs, we need to remember that initially solid-state drives began to be widely used in laptops because they are compact. Therefore, you can additionally learn how to connect an SSD to a laptop.
Of course, it is better to consider this issue with each device model, since the cases are different, and, accordingly, the placement of the disk slot is also different.
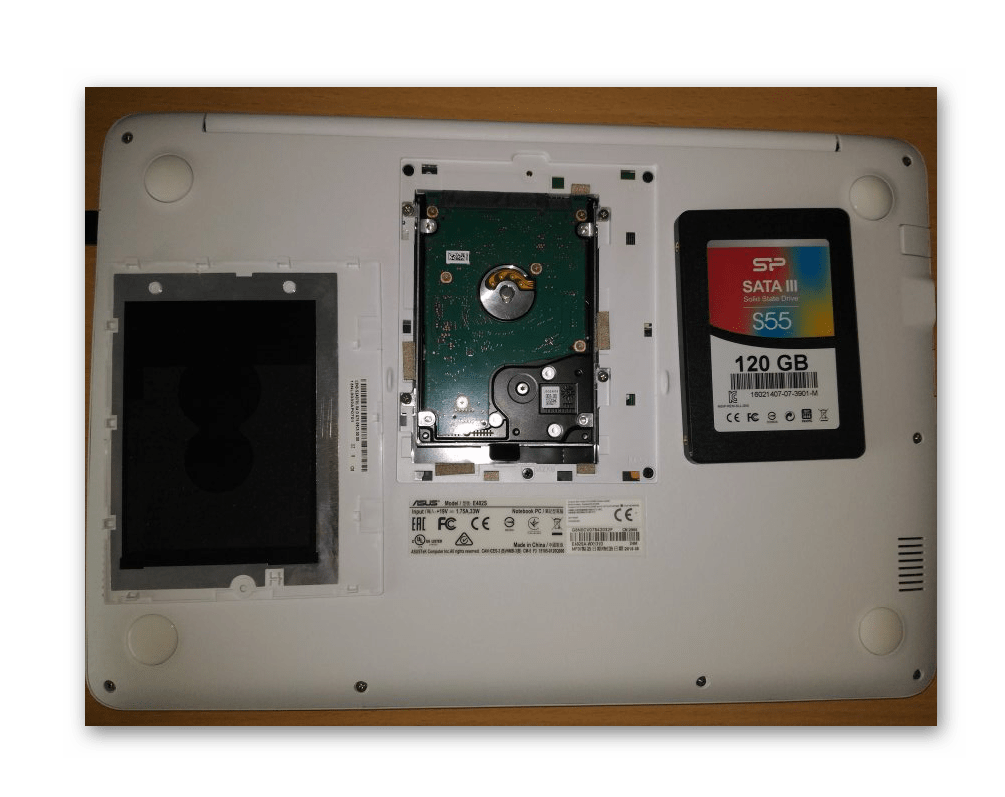
However, the main thing is to decide where the hard drive is located in your laptop. Usually, to do this you have to turn off the device and open the bottom cover. Sometimes it is completely removable, sometimes you can unscrew the compartment panels. The railway station is usually located in one of them. If you can't find it, check your laptop's manual.
It must be said right away that HDDs in laptops are the same size as SSDs - 2.5 inches. In order to remove the hard drive, you need to not just pull it out, but first pull it to the side. It is thus attached to the power and SATA connector.
Then it's a small matter - just install the solid-state drive. Don't forget to secure it with screws. Since laptops usually have one place for a hard drive, you will have to think in advance about how you will transfer the operating system: by cloning or a new installation.

conclusions
You need to find out how to connect an SSD drive to a computer in advance, and not when you have unscrewed, unscrewed and disconnected everything. Sometimes you have to do additional settings, think in advance about the location of the OS.
The easiest way to do this is when solid state drive you just need how auxiliary tool. Then you just need to connect it to another compartment and connector. If you want to make it your main one, then you need to read the instructions for cloning HDDs and SSDs, configure and think through everything in advance.
If you are assembling a PC from scratch and decided to simply instead hard drive install its fast “colleague”, do not forget to configure the connection in the BIOS. It is important to set the special mode and priority of the drives.
Although SSDs are many times faster than conventional hard drives, this does not mean that solid-state devices cannot be optimized - on the contrary. Of course, this is by no means mandatory, and even if you don't follow the advice in this article, your SSD will still provide you with much better performance than any magnetic hard drive. However, if you want to get the best of what it can do and don't mind achieving peak results, here are some interesting ideas on this topic.
Optimization in BIOS
After installing the SSD, check which SATA connector it is connected to. This information can be found in the BIOS menu, which can be accessed by pressing the Del or F2 key when turning on the computer - almost immediately after pressing the power button.
Go to the BIOS section responsible for managing disk devices. The title of this section may vary depending on the make and model of laptop/motherboard, and if you have difficulty finding it, try searching the manufacturer's website for the relevant information.
Inside this section, make sure that the SATA port that the SSD is connected to is configured to use AHCI mode. This is a special interface (Advanced Host Controller Interface) developed by Intel for communication between disk device and RAM. Unlike the older IDE mode, it allows the SSD to fully utilize the transmission power of the SATA channel to which it is connected. This is especially important if your laptop/computer has the latest edition of the standard (3.0) SATA ports, which provide peak data transfer speeds of up to 600 MB/s. Many modern SSD devices are quite capable of supporting such a serious throughput and under ideal conditions they will provide you with a read/write speed of about 500-550 MB/s.
Choosing a modern interface AHCI mode has another plus - the operation of some SSD models in IDE mode may lead to problems with the so-called TRIM support. This is a feature that is supported only by modern operating systems - Windows 7 and newer versions. Its goal is to take care of the “good health” of the solid-state drive. In reality, TRIM is a command with which the system periodically queries the device controller, which is responsible for distributing information throughout it. Speaking in simple words, TRIM improves efficiency SSD operation drive, but if it is configured in IDE mode, the TRIM function may not work properly.
Optimization at the Windows level
As mentioned above, to get maximum return from an SSD, it must have good support at the level operating system. The problem with versions of Windows released before Windows 7 is that they are simply not designed to work with drives like these, which have recently hit the market en masse. Therefore, my advice to you is that if you intend to upgrade from HDD to SSD, first think about upgrading to a modern Windows version(7 or higher), of course, if you haven't already done so.
After connecting the drive, be sure to make sure that the system SATA drivers are updated to the latest, most current version. To do this, your first stop should be the motherboard/laptop manufacturer's website.
Also make sure that the solid state drive uses current version firmware. All SSD manufacturers offer a special service tool for this purpose, which you can find and download on the official website. Many of these tools offer useful features, and not just checking that the firmware is up to date - they include parameters for general system optimization, such as disabling defragmentation, which not only does not improve the performance of the SSD, but can also seriously reduce its lifespan.
This, however, is not the only optimization at the operating system level that can and should be undertaken. Another Windows function, which is not necessary and it is advisable to disable it, is the so-called indexing of information on the disk. It is designed to speed up search when large volumes files, but on much slower hard drives, and in the case of SSD drives this function is completely unnecessary. Moreover, like defragmentation, the indexing process is accompanied by many disk accesses, which, as has already been mentioned several times, can shorten the life of the SSD.
To disable indexing, click right click mouse on your drive icon, select “Properties” and uncheck “Allow the contents of files on this drive to be indexed in addition to file properties.”

Another useful optimization is to reduce the so-called virtual memory (page file). It's about about the area on system disk, which Windows reserves for use if there is free RAM to boot custom applications will not be enough. In such cases, the system stores “excess” information from memory on disk, that is, data that is not currently required, but is loaded into the memory again upon user request. RAM.
You understand that this is due to multiple read/write cycles from the system partition, which in the case of an SSD once again shortens its service life. Therefore, it is recommended to either reduce the size of the paging file, or (which is preferable) move it to another partition - for example, to an additional hard drive, if you have one.
To do this, right-click on the Computer (or This PC) folder, select Properties, then Extra options systems." In the “Performance” section, click the “Options” button, select the “Advanced” tab and in the “ Virtual memory» click "Edit".
By default, the location and size of the paging file are determined automatically. To move this file to another location, disable the "Automatically select paging file size" option, then select a non-system drive/partition from the list below and click Set.

You can disable this feature completely if you have a really significant amount of RAM - say, 16 gigabytes or more. This will not only save you precious SSD space, but also improve overall system performance by forcing Windows to use RAM exclusively, which is even faster than an SSD.
Hibernate mode is another system function, which is not particularly necessary if you are using an SSD. If you have read our text on this topic, then you probably remember that hibernation provides quick start operating system and energy efficiency are two issues that can be solved quite effectively by using a solid-state drive. This makes hibernation unnecessary and it is better to disable it - active use Hibernation will depreciate your SSD by making unnecessary disk accesses.
To disable hibernation, press + R on your keyboard, type CMD and press Enter to bring up the window command line. Then enter the command powercfg -h off and press Enter. Done – hibernation is deactivated.
It's no secret that installing an operating system from scratch is fraught with many pitfalls that can seriously spoil your nerves. This is especially true for installing an OS from a flash drive onto an SSD. Both media must be properly prepared and formatted, and the computer's BIOS must be configured accordingly. Otherwise, annoying errors may occur: the installation program will not see the disk or will not start at all.
Installing Windows 10 on an SSD - sleight of hand and no fraud
From the point of view of the operating system and computer hardware, a solid-state drive (SSD) is no different from a classic hard drive with magnetic platters. Accordingly, installing an operating system on an SSD will be no different from installing it on a regular hard drive.
The only nuances will be in setting up the disk subsystem for maximum performance and in creating partitions on the disk before installing the system. Since the disk is new, a clean copy of the OS will be installed.
Installing an OS on a blank disk will always be more difficult than an update, which itself will download from the Internet and carry out all the manipulations in background, requiring literally a few mouse clicks from the user.
Installing a clean copy consists of several sequential steps that should go smoothly and without errors. Shall we get started?
Preparing bootable media (flash drive)
As practice shows, when installing Windows 10 on an SSD drive using boot DVD Errors often occur that prevent normal installation OS. This happens especially often on laptops, in which optical drive, and the hard drive are connected to one SATA controller: Accessing the optical drive causes the computer to not optimally configure the controller, and the SSD may not work properly.
Therefore, to install the system, you need to prepare a bootable USB flash drive, installation from which will allow you to carry out the process quickly and without errors.
To prepare bootable media with the OS distribution, you need to download the Windows 10 distribution image, format the flash drive and unpack the image onto it. And if there are no issues with downloading, then further preparation of the flash drive can be carried out by a dozen various programs, similar in function, but different in settings and interface.
We will focus on the official image deployment tool from Microsoft - Microsoft USB/DVD download tool. The program is so simple that it is impossible to make mistakes when using it.
- Search on the Internet Microsoft program USB/DVD download tool and download it.
- Connect to a free port USB flash drive, to which the system image will be deployed. Insert the USB flash drive into the USB port on which you want to record the boot boot. Windows image 10
- Open File Explorer and remember the letter logical drive flash drives. In our case this is the letter L.
 The connected flash drive was mounted in the file explorer as drive L:
 - Launch the Microsoft USB/DVD download tool.
- Using the Browse button, select the ISO image with the operating system distribution and click Next.
 Step 1: select the image that you will burn to the flash drive
 - Select media type - USB Device(flash drive).
 Select the type of media that you will make bootable via the USB/DVD download tool
 - Select the disk (flash drive) to deploy the media from the drop-down list and click the Begin copying button.
 Select your flash drive from the available devices and click the Begin copying button
 - When asked about erasing media, answer yes. The program will format the flash drive and start copying files to it.
- When the progress bar reaches 100% and a message appears about successful creation media - the program can be closed.
 The bootable USB flash drive has been successfully created, and the Windows 10 distribution files have been transferred to it.
 The bootable USB flash drive has been created, and you can begin installing the operating system using it.
The occurrence of any errors while the program is running indicates a faulty flash drive. Change the media to a known good one and repeat the process of creating a bootable disk.
Besides its simplicity this method The good thing is that using the official Microsoft tool instead of one of the "free" programs guarantees a secure installation. Using it, you will not infect your computer with keyloggers or annoying adware.
Video: creating a bootable USB flash drive with Rufus
Activating AHCI mode
In order not to find yourself in a situation where the OS installer does not see the disk on which Windows 10 should be installed (this applies not only to SSDs, but in general to all hard drives with a SATA interface), using BIOS settings you need to switch the SATA controller to AHCI mode.

Preparing an SSD disk for OS installation
To avoid problems when installing an operating system Windows systems 10, the disk on which the installation will be carried out must be completely cleared of partitions. If you do not do this, the system installation program may display a message stating that this disk cannot be used to install the OS. The reason will be the lack of space to create service partitions, invisible to the user, but vital for the operating system.
To prevent this from happening, remove all partitions from the SSD disk. You can do this using the console command diskpart:

All partitions from the SSD have been removed, and it is ready to install the Windows 10 operating system.
This method requires care and a lot of keystrokes, but it gives full control over the process. If you are a supporter of beauty and mouse clicks, you can find control programs hard drives with a graphical interface.
Video: how to manage disks using Minitool PartitionWizard
Installing Windows 10 OS - step by step instructions
The bootable USB flash drive has been created, Computer BIOS configured, the SSD is pristine. We start the operating system installation process:
- Boot the computer from the previously created flash drive with Windows distribution 10.
- Select your default interface language and input keyboard, then click Next.
 Selecting the default system language and keyboard when installing Windows 10
 - Click the Install button to start the Windows installation.
 Start installing Windows 10 using the “Install” button
 - “Read” and accept the terms of the license agreement. Without this, further installation will be impossible.
 Accept license agreement to continue installation
 - Select the installation type "Custom: only Windows installation" A clean copy of the system can only be installed in this way.
 Installation " clean system» only possible in custom installation mode
 - Since we have previously cleared the target disk (SSD) of partitions, in the dialog for selecting a partition for installation, you will need to click the “Create” button, and then set the maximum possible partition size (it will be this by default). Together with it, the system will also create service partitions for its needs. They will not be visible in File Explorer:
- Section #1: Recovery Environment. Contains a recovery environment necessary for “rolling back” the system after critical errors or damage by malware;
- section #2: system partition(EFI). Contains the boot configuration store (BCD) and files needed to boot the operating system;
- section #3: MSR (system reserved). Required for service operations of built-in and third-party software (for example, for converting simple disk to dynamic);
- section No. 4: operating system. This section will contain installed system. Space not occupied by the operating system will be available for installation application programs and file storage.
- After selecting the disk, OS installation will begin. During the installation process, the screen may flicker and go dark, and the computer will automatically restart several times. This is required to complete some installation steps.
 Copying files and installing updates is the longest stage of OS installation
 - Now we need to choose basic parameters personalization and location, as well as connectivity and error reporting. Option "Use standard parameters(default)" will be most preferred for inexperienced user. At this stage, it is advisable to have a working Internet connection.
 In this window, it is better to use the “Use standard settings” button
 - After entering the user password, the operating system is ready for use.
 The system waits for user actions on the lock screen
Video: Installing Windows 10
Proper preparation of two solid state media: bootable flash drive and an SSD drive is the key to trouble-free and quick installation Windows 10 OS. In conclusion, I would like to dwell on the choice of system distribution. We strongly do not recommend using homemade OS builds, which are stored in large numbers on torrent trackers. Their authors promise mountains of gold and extraordinary features, but in reality everything can result in viruses built into the system, pop-up ads and hardware failures. Use only original images from Microsoft, even if you install a “pirated” version of the OS.
Connection various devices connecting to a computer causes difficulty for many users, especially if the device must be installed inside the system unit. In such cases, the multitude of wires and various connectors is especially intimidating. Today we will talk about how to properly connect an SSD to a computer.
So, you purchased a solid-state drive and now the task is to connect it to your computer or laptop. First, we'll talk about how to connect the drive to a computer, since there are more different nuances here, and then we'll move on to the laptop.
Connecting the SSD to the computer
Before connecting the drive to the computer, you should make sure that there is still room for it and the necessary cables. Otherwise, you will have to disable some of the installed devices– hard drives or disk drives (which work with a SATA interface).
Connecting the disk will take place in several stages:
- Opening the system unit;
- Consolidation;
- Connection.
At the first stage, no difficulties should arise. You just need to unscrew the bolts and remove the side cover. Depending on the housing design, it is sometimes necessary to remove both covers.

For mounting hard drives in system unit there is a special compartment. In most cases, it is located closer to the front panel; it is almost impossible not to notice it. SSDs are usually smaller in size than magnetic disks. That is why they sometimes come with special slides that allow you to secure the SSD. If you don’t have such a sled, you can install it in the card reader compartment or come up with a more clever solution to fix the drive in the case.

Now comes the most difficult stage - directly connecting the disk to the computer. It takes some care to do it right. The fact is that in modern motherboards There are several SATA interfaces that differ in data transfer speed. And if you connect your drive to the wrong SATA, it will not work at full capacity.

In order to use the full potential of solid state drives, they must be connected to SATA interface III, which is capable of providing data transfer speeds of 600 Mbit/s. As a rule, such connectors (interfaces) are highlighted in color. We find such a connector and connect our drive to it.

Next, all that remains is to connect the power and that’s it, the SSD will be ready for use. If you are connecting the device for the first time, then do not be afraid of connecting it incorrectly. All connectors have special key, which will prevent you from inserting it incorrectly.

Connecting an SSD to a laptop
Installing a solid state drive in a laptop is somewhat easier than in a computer. The difficulty here is usually to open the laptop lid.

In most models, the hard drive bays have their own cover, so there is no need to completely disassemble the laptop.
We find the required compartment, unscrew the bolts and carefully disconnect the hard drive and insert the SSD in its place. As a rule, all the connectors here are rigidly fixed, so to disconnect the drive, you need to move it a little to the side. To connect, on the contrary, slightly move it towards the connectors. If you feel that the disc is not inserted, then you should not use excessive force; perhaps you are simply inserting it incorrectly.

Ultimately, having installed the drive, all that remains is to securely fix it, and then tighten the laptop case.
Conclusion
Now, guided by these small instructions, you can easily figure out how to connect drives not only to a computer, but also to a laptop. As you can see, this is done quite simply, which means that almost anyone can install a solid-state drive.
(speed of operation, fault tolerance, low energy consumption, etc.)
Our reader Mikhail Ivanovsky noticed that even if the selected laptop model does not have an SSD, you can easily install it yourself. At the request of the editors, Mikhail wrote a simple and understandable guide for installing an SSD for a laptop.
While Windows was loading, you managed to forget why you turned on the laptop in the first place? So it's time to change something. And this “something” is not necessarily the entire laptop.
Causes slow loading may vary, but they all affect the speed of the system and installed programs. Only one thing can be said for sure - a system installed on a good old hard drive (HDD) is, in principle, incapable of breaking records. But don’t despair and stock up on glycine!
If previously few could afford a laptop with an SSD drive, today such models are becoming more affordable. Alas, manufacturers are not yet in a hurry to install them on all laptop models, since such an option will still significantly affect the price. Not everyone is ready to overpay for a laptop with an SSD, especially if the purpose of use does not go beyond the usual scope.
Especially for those who want to enjoy all the benefits of the system on solid state drive, but at the same time does not have the desire or opportunity to purchase a top-end laptop, we have prepared this guide. With its help, you will be convinced that installing an SSD with your own hands is not at all difficult (easier than assembling a chest of drawers from IKEA).
Moreover, the increase in laptop performance and the pleasure from the work done are not comparable with the effort expended.
There may be several installation options. It all depends on your needs, as well as the size and configuration of the laptop. Let's consider the most common case, when an SSD is installed in the standard place of a native hard drive (HDD), and that, in turn, in place of an optical drive. This configuration is recommended, since the interface for connecting an optical drive is not always able to provide the SSD with the required data transfer speed.
Whether we like it or not, CD and DVD drives are laptop computers become an atavism and will probably soon disappear completely (as once happened with floppy disks and dinosaurs). Remember when you last time Have you inserted any disk into your laptop? But the drive takes up space, periodically hums, consumes electricity, and even gets hot.
So, here's what we need for the upgrade:
- SSD standard size 2,5”
- Adapter for HDD\SSD 2.5" for laptop drive
- Utility for transferring system and programs from HDD to SSD
Let us only note that it is reasonable to use an SSD first of all to host the operating system and programs on it, and only then to store data. Therefore, it is logical to determine the volume based on the current load of your C drive, and take into account that for efficient work SSD will need about 25% free space on disk, so it’s definitely not worth taking “back to back”. For most users, a capacity of 80 to 120 GB will be sufficient.
Having decided on the volume, budget and based on reviews in online stores, choosing an SSD will not be difficult.
With adapters the situation is even simpler. Their purpose is to ensure comfortable placement of the SSD in place of the optical drive. You can take any adapter that matches the size of our SSD (2.5”) and the thickness of the drive (usually 12.7 mm, but in thin laptops it can be 9.5 mm). From time-tested options, you can choose Espada adapters.

Adapter
The installation process in general looks like this:
- Turn the laptop over and remove the battery
- We find the cover with the disk storage marking, unscrew the screw securing it (it may be hidden by a plug), remove the cover and carefully remove the HDD, having first disconnected the cable with the wiring
- We install our SSD in place of the HDD, insert the cable, return the cover and tighten the screw
- We install the HDD into the adapter and secure it to it with the screws included in the package.
- We find the screw (may be hidden by a plug) with the drive marking and unscrew it. In most laptops, this is all that holds the optical drive.
- Open the tray using a needle (the hole next to the button) and, holding the laptop with one hand, carefully remove the optical drive with the other

We take out the drive
- We remove the front panel with the button from the tray and replace it with the adapter so that the surgical intervention does not affect the appearance laptop

Adapter with bracket

Everyone is here
- Insert the adapter from the HDD into the drive location and tighten the screw
- Don’t forget about the plugs, if there were any.
- Turn on the laptop
We install, follow its simple instructions and voila! Our SSD is ready to go. It's time to arm yourself with a stopwatch and, with bated breath, time the system boot time. Although the difference “before and after” will be noticeable to the naked eye. The system performance index will increase significantly, if not in the overall score, then in the “Main hard drive” column for sure - from 5.9 (the maximum possible index for an HDD) to 7.9 (the maximum performance index in principle).
In conclusion, one more thing is worth mentioning important point. Since the operating principle of an SSD has its own specifics, to extend its service life and greater reliability, it is recommended to perform several optional, but useful settings systems. Windows 7 will already make friends with an SSD without any problems, but by taking a few minutes to configure it, you are guaranteed to extend its life.
Tips for optimizing the system can be easily found, for example. To begin with, we simply wanted to convince you that SSD installation anyone can do it. We hope we succeeded.
Happy upgrades!
Mikhail Ivanovsky
Do you want to offer new topic or publish your text on “We are ESET”? Write to us: