Bootable USB flash drive with Linux Mint. Installing Ubuntu from a USB Flash Drive
Background
"Pocket distribution" is quite a convenient thing, because the vast majority of computers run on Windows control, and many people want to get a familiar work environment outside the home.
For a long time I used an SD card with SLAX. The distribution is convenient, customizable, can completely load into RAM and free up the port. However, the project has been frozen for 3 years and has outdated software. Lack of support for ext4 file systems and new hardware (especially video cards and WI-FI routers) forced me to abandon this system.
UPD: Slax has already been defrosted and released a new version. Details.
Next, I came up with the idea of installing the OS on a flash drive using built-in tools Ubuntu systems. But due to irrational preservation of changes, this system had to be abandoned. In the end, it was decided to use an installer called Ubiquity. It is this that is contained in the LiveCD and installs it onto the hard drive. Since this option requires much more space than the default CD image, I purchased a new 16 GB flash drive - Apacer AH325:
The distribution for installation was selected Linux Mint 12, which was already mentioned earlier. In general, you can use any Linux system, but it is better to opt for Ubuntu or ubuntu-based distributions.
Note: if you are going to make full use of the temporary partition (for example, watch videos big size on YouTube), then it is better to increase the 100 megabyte limit. I don’t recommend removing the limit, because a frozen application can crash the entire system, filling up the temporary folder with its copies.
First boot
...as always, it lasts a long time. The main thing is to wait until the download is complete and do not interrupt it, otherwise the file system of the flash drive may be damaged.You should then be greeted by the LightDM menu. After entering your password you will receive the full working system. You can begin further configuration and downloading packages. However, the best thing to do first is to open Update Manager and bring the system into current status. Everything else depends on your needs and tastes. But that is another story...
Results
So, in the end it turns out bootable flash drive, which is a full-fledged Linux desktop capable of handling almost any task.On my own behalf, I advise you to always produce backup important data "to the cloud" (Ubuntu One,
Almost no one uses disks to install Linux on a PC or laptop anymore. It is much easier to burn the image to a flash drive and quickly install a new OS. In this case, you don’t need to bother with a disk drive that may not exist at all, and you don’t have to worry about a scratched disk either. By following simple instructions, you can easily install Linux from a removable drive.
First of all, you will need a drive formatted in FAT32. Its volume must be at least 4 GB. Also, if you don’t yet have a Linux image, then internet with good speed will come in handy.
Our instructions will help you format the media in FAT32. In it we're talking about about formatting in NTFS, but the procedures will be the same, only you need to select the option everywhere "FAT32"
Please note that when installing Linux on a laptop or tablet, this device must be connected to power (to an outlet).
Download image from Ubuntu is better from the official website. You can always find it there current version OS without worrying about viruses. The ISO file weighs about 1.5 GB.

Step 2: Create a bootable USB flash drive
It is not enough to simply transfer the downloaded image to a flash drive; it must be written down correctly. For these purposes, you can use one of the special utilities. Let's take the program as an example. To complete the task, do this:


More details about creation bootable media with Ubuntu, read our instructions.
Step 3: BIOS Setup
In order for the computer to load the USB flash drive when turned on, you will need to configure something in the BIOS. You can access it by clicking "F2", "F10", "Delete" or "Esc". Then follow a series of simple steps:

This procedure is suitable for AMI BIOS; it may differ on other versions, but the principle is the same. Read more about this procedure in our article on setting up the BIOS.
Step 4: Preparing for Installation
The next time you restart your PC, the bootable flash drive will launch and you will see a window with a choice of language and OS boot mode. Then do the following:


Many Linux users know that Ubuntu is a “livable” operating system. After trying several distributions, you will understand what we are talking about. Ubuntu also gained recognition due to its “live” boot. Live-CD is an opportunity to fully work in an operating system without a hard drive.
It is enough to boot from the Ubuntu CD - and the operating system with basic capabilities works without installation. What can I say - a proven and very useful “lifesaver” if your computer fails.
At the same time, installed programs, network settings and many other changes are stored next to the portable operating system. Here you will find a language menu on the left, access to the test version in the center and an option to install the system on the right. It not only offers conditions for normal operation device, but also reduces the purchase price, since there is no need to pay a license for the installed system. System interface is user-friendly and increasingly beautiful, minimizing the shock of first use.
By taking the time to download and test it, you won't spend anything on it, and you can find an attractive alternative that meets all your needs. But instead, you can install a portable operating system that lets you run virtually any computer you work on.
However, a disk is not the best medium for booting an operating system. The speed of reading from a CD does not allow you to work comfortably in the OC. In addition, the drive will be constantly busy. All records are made to RAM and are stored only until rebooted. The alternative is obvious - a flash keychain.
We have used it more than once to work with portable (“portable”) programs and even wrote about installing Windows on a flash drive. Well, it's time to talk about Linux. In general, what are the additional “advantages” of an OS on flash media? Yes, there are many things. We get a complete system with installed applications and basic settings. If you use Linux to solve specialized problems and occasionally, it is not necessary to install it on your hard drive, especially if you later delete the OS anyway. And due to the widespread use of netbooks Aspire One and Eee PC ubuntu installation with flash has its undoubted advantages.
After installation operating system he'll explain where to find portable versions of your favorite programs and how to install them. Having this tool in the palm of your hand is very useful. It can be used especially if the host operating system on your desktop is hanging or when you are away from your computer.
After downloading, we open it and accept the license. Once the license is accepted, we will see the following. We choose the one that interests us. So far we see what we see in the picture above. You may appear with a different letter. Don't make mistakes, or you may lose something you didn't mean to erase. Having done all this we give "Create" and on the next screen that leaves us we give "Yes".
Few users know that with version 8.10 in Ubuntu, quite officially, a special installation wizard appeared on a USB drive.
Installing Linux on a flash drive: preparing tools
To install Ubuntu we need neither more nor less:
- Flash keychain. Volume, of course, matters. The more, the better, but it is advisable to start with 2 GB (this is the bare minimum) or more. The dependence of the price of a flash drive on the volume today is no longer so high, especially if you remember the prices two years ago... Theoretically, it is possible ubuntu installation with flash and 1 GB, but with a capacity of 4 GB, according to at least, you can use the flash keychain for purposes other than storing the distribution. In addition, you must understand that the operating system tends to grow. In the future, it can and will need to be updated and software installed.
- Ubuntu distribution. We take into account the latest release - version 8.10. You can get it in a variety of ways, we offer the following:
- download ISO image (size - about 700 MB). True, you will have to wait two or more weeks for the parcel;
- order a free distribution kit with free delivery;
- borrow from friends/acquaintances;
- buy.
Method number 1. Installing Ubuntu on a USB flash drive using OS tools
First of all, we will describe ubuntu installation with flash in the standard way. Starting from version 8.10, in Ubuntu this is possible without the help of various online guides and console commands. All actions are performed with just a few clicks in the Ubuntu menu. But before that, preparatory work needs to be done.
Now we just need to wait for the process to complete and we will get the following. If we only have one, the selection will be automatic, but that's not enough. . Many times we find the need to have a standalone operating system that we can use regardless of the machine we will be working on.
The interface of this application gives us five steps that we must follow to complete our installation. We observe that the traffic light in the lower right corner of the window is red because we have not completed the passage. We noticed that the first step traffic light is green. We can move on to the next stage.
Step 1. Burn the distribution to CD
If you downloaded the Ubuntu image from the Internet or local network, you will need to transfer it to a CD. To burn an image, the functionality of the package or any other burner that allows you to burn an ISO image is sufficient. The declared capacity of the “blank” should not be 650, but precisely 700 MB.
So, let's open Nero Express. The option you need to select from the list is Disk Image or Saved Project.
To develop this example, we will choose the first option. And once the check has been done, it indicates that we can continue to use this image. Checked by default following parameters. We click on the beam from step 5 and the installation begins.
Use the operating system when booting the computer
When you run the file, there are two windows of information about the ability of the virtual machine to capture the keyboard and changing the configuration parameters of the host machine. Select constant mode and press enter. Installing it is how you can enjoy customizing it, personalizing it and customizing it into a powerful and high-performance tool.
None additional options no need to activate, except for one. Since the Ubuntu 8.10 image size is 730 MB, burning requires the Disk-at-once overburning option to be checked. Although in the end the recorded data contains slightly less - 715 MB of data.
Step 2: Run Live-CD
Insert the Ubuntu Live-CD into the drive and select Try Ubuntu without any change to your computer when booting. By clicking, you can set Russian as the interface language. We wait a few minutes - and we find ourselves in the operating system interface.
Changing the boot sequence
To do this you need to do the following actions. If you have followed the above steps, the first screen you will find is the following. The next dialog box will ask you if you want. My recommendation is to confirm both options. In the first case, because when you finish the installation, you will have completely upgraded the hardware. And in the second case, it will depend on the hardware that you have on your computer and your needs.
Depending on what you want to have on your computer, you can choose one type of installation or another. If you don't have one, have your installer pick one for you. If you know what you're doing, without a doubt, choose " Extra options" This will allow you to create partitions, resize them, or select multiple partitions.
Correct installation of Ubuntu from a flash drive will provide the ability to work on a computer or laptop in an operating system that provides legal free use most programs and the platform itself, unlike Windows, which is distributed free of charge or through “pirated” distributions.
Linux also has other advantages that the user will receive after installing Ubuntu. And this will not take much time and following a few simple recommendations.
Benefits of installing from a USB drive
By installing the Ubuntu OS from a flash drive, the user receives a number of advantages compared to installing the distribution on a CD or DVD disc:
- The ability to install the system on a device without a disk drive (which may, for example, be broken or absent altogether, as in some modern PCs, almost all netubes or nettops);
- High speed installations, since USB 2.0 and 3.0 flash drives are much faster compared to disks;
- No problems accessing information due to scratched disk surfaces.
Creating a USB flash drive for installing Ubuntu
Before installing the operating system on your computer, you should first download its distribution kit from a reliable site and install it on a flash drive, converting it to a suitable ISO format.
If you already have a system image, you should burn it to media.
The distribution kit already available on the flash drive will further simplify the procedure, but, as a rule, only occupy it installation program ineffective - it's easier to store Ubuntu on your computer's hard drive.
Or on the same media, but configured not for loading, but for storing information - the distribution kit does not exceed 2 GB in size and can be freely located on media formatted in FAT32.
1. Download the distribution
Downloading the distribution kit will not take much time - you can find more or less modern versions on the websites Ubuntu.com or Ubuntu.ru.
Today one of the most current systems is Ubuntu 14.04.
You can also find older versions here, but the computer resource requirements for Linux are not so different for different options, as for Windows.
A latest platforms have greater functionality.
2. Create a boot disk in Windows
Then insert the device into the USB port, restart the computer and begin the installation.
Another option is to call boot menu when the computer boots (by pressing Esc, F2, F8 or one of the others function keys top row) and select boot from media.
Download Ubuntu Live
Ubuntu distribution Desktop is an operating system that boots in Live mode, that is, without the need for installation on a PC.
In this case, the functionality of the platform will be approximately the same.
However, it is more convenient to work in the system when the system files are still on the hard drive.
Immediately after the bootable flash drive automatically starts, a window will appear on the screen asking you to first select the language that the user prefers to work with, and then the appropriate launch or installation mode:

After selecting the second option and Russian (or English, if that is more convenient for some purposes, or any other) language, a new window opens called “Preparing to install Ubuntu.”

Here you will see how much space there is on the hard drive partitions where the system will be installed, and whether there is an Internet connection - usually it is turned off during installation, but all updates for Ubuntu can be downloaded later.
The menu also suggests installing a third-party software, if it is built into the distribution (codecs for sound playback, etc.).
The next step is to select an installation option. Among them there is the possibility:
- Install the system, leaving the platform already available on the computer (for example, Windows) operational;
- Replace old system new;
- Carry out an installation with the ability to encrypt records to increase the level of security of working on the computer;
- Label the disks yourself, completely changing their existing sizes.

Advice! In most cases, for users who have just started working with Linux Ubuntu, you should choose the first option. Experienced users are advised to select the second or last menu item.
Selecting the hard drive partition size
When choosing to install two operating systems simultaneously, the following window shows the dimensions HDD partitions. Here you can choose which part of them will be occupied by the new OS, and which will remain assigned to the old one.
And, although you can partition a disk using special partition editors, it is better to do this by moving the separator between volumes.

In the example shown, one of the disks has a size of 16 GB. At the same time, most of it (9.5 GB formatted in NTFS) will be given to the Windows OS, and 6.5 GB with the ext4 file system will be able to be used by Ubuntu.
Today the installation is complete and modern version(04/14) will take up relatively little, about 10 GB.
However, there is a condition - when installing on top of Windows, another 4–5 GB is required for the swap partition, where the contents of RAM will be temporarily written when Ubuntu work.
In addition, Linux, if a second system is left, should occupy 2 partitions.
But on a physical disk, already divided into 3-4 parts, there is no such possibility (number logical drives should not exceed 4).
In this case, to install the operating system you will have to create separate section.
Completing the operating system installation
After selecting “Install Now”, a warning about the creation of additional sections and changes in the size of old ones.
All this takes quite a lot of time - the more changes, the longer it will take to install the OS.
After installation is complete, the user is offered a choice of regional standards for new system, including language and layout, as well as time zone.
This completes the transfer of Ubuntu from a flash drive to a computer.

Selecting regional standards for the new system
Linux can be useful to you for many reasons. For example, your old computer can't update to new ones Windows versions or macOS, or you need Linux-specific applications, or you're just curious to try something new. Or maybe you just bought new computer without an operating system and want to save money by choosing free Linux.
Installing Linux is easy. Of course, there are distributions like Arch, which are quite difficult to install for a beginner. But most modern distributions are very easy to install. Perhaps even simpler and faster than Windows.
Before installing Linux on your main computer, make a copy of your important data. Working with sections of your hard drive, you may accidentally erase something important. Of course, if you follow the instructions and carefully read what you are doing, then nothing unexpected will happen. But it’s not superfluous in any case.
You can install Linux on computers running Windows and macOS or on an empty one HDD. You can choose Linux as your main system or use it in parallel with your old system.
1. Download Linux distribution
First of all, you need to choose a Linux distribution. The DistroWatch.com rating will help you decide.
Then you need to download the selected distribution. This is easy to do: open the website of the desired distribution, find the downloads section and select the one that suits the bit capacity of your processor.
Usually, Linux distributions The official websites offer two ways to download. The first method is a normal download. The second is via P2P using a torrent client. The second method is naturally faster. So choose it if you want to save time.

When the distribution is in ISO format downloaded, you need to burn it to a CD or a regular USB flash drive.
You can burn to CD standard means system: “Burn Disk Image” in Windows or “Disk Utility” in macOS. Just click on the downloaded image right click mouse and select the appropriate item in the menu.

For ISO recording on a flash drive you will need special utilities. For Windows is better select Rufus, and for macOS - UNetbootin. These programs have a very simple interface, it is quite difficult to get confused in them.
3. Prepare the disk partition
This step should be followed if you want to keep the system installed on you and use Linux at the same time as it. If you decide to switch your computer completely to Linux or are installing the OS on an empty hard drive, skip this paragraph.
Windows

Open Windows Disk Management. Select the drive or partition from which you plan to trim some space for Linux installations. For most distributions, 10 GB is more than enough. But if you plan to install a lot of apps, get more. Right-click on the partition and select Shrink Volume. Enter the size and click OK.
The process can take quite a long time, so be patient.
When Disk Management finishes resizing the partitions, there will be empty unallocated space on the disk, marked in black. We will install Linux there.
Later, if you don’t need Linux, you can delete the partitions with it and give the free space back to Windows using the same “Disk Management Tools”.
macOS

You can allocate space for installing Linux using " Disk Utility» macOS. Select your drive and click on the “+” icon to create a partition for Linux. Creating a new partition may take some time.
4. Prepare the bootloader
Windows
This item applies only to new computers running pre-installed Windows 10, 8.1 or 8. These computers use a UEFI bootloader, which will not allow you to boot into anything other than Windows.
To fix this, go to BIOS settings your computer and disable the option Secure Boot. Then reboot. Done, you can now download and install other systems next to your Windows.
macOS
Unlike most computers, Macs require a pair additional actions in order to install Linux on dual boot with macOS.
First of all, disable SIP. Restart your Mac and press Cmd + R. The Recovery menu. Select “Terminal” in it and enter csrutil disable .
Restart your Mac again. SIP is disabled.
Manual
Suitable if you want to set the sizes for your partitions yourself or, for example, create a separate partition for your files. To do this, select “Other option” and click “Continue”.
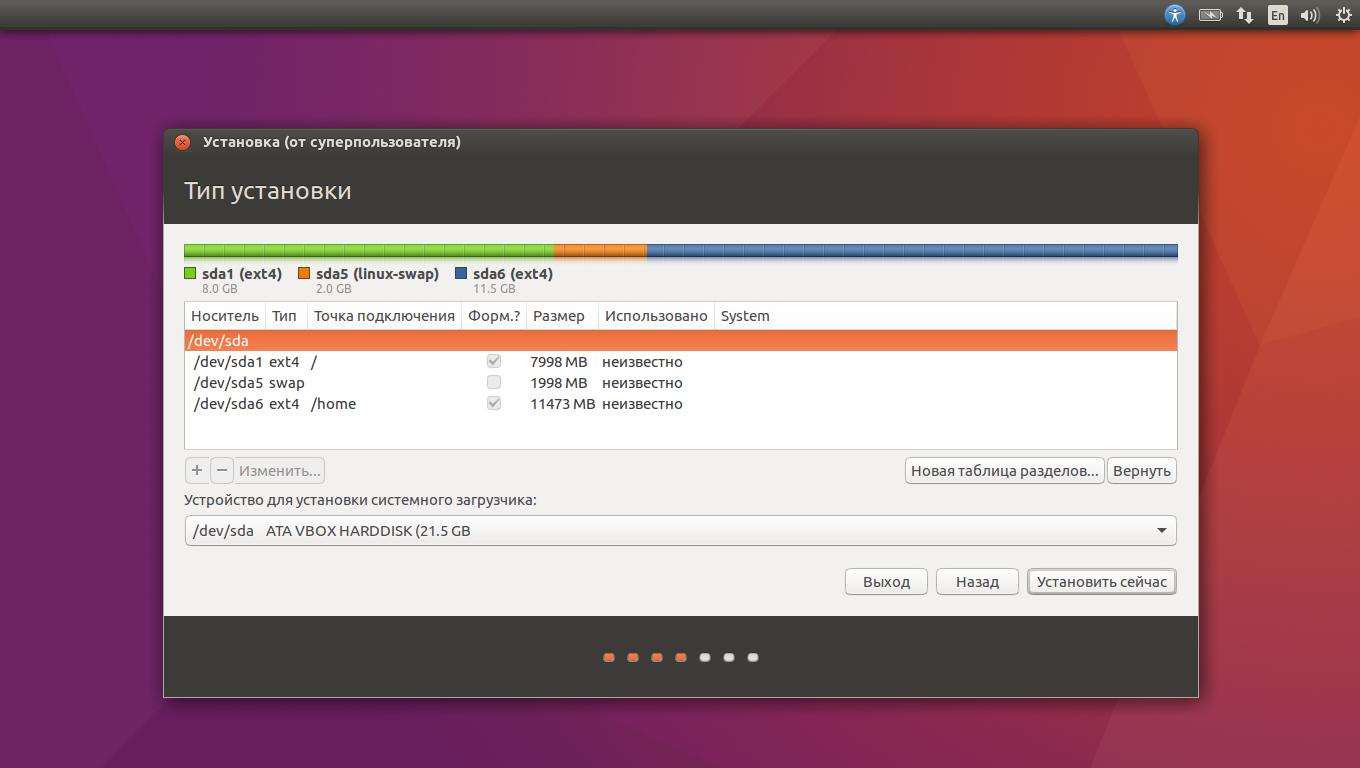
Linux will display what partitions you have on your computer. You can delete them, format them, or, conversely, leave the sections with the information you want to save intact.
To install Linux instead of your system, select a partition with installed system and delete it with the “–” button. Then create new partitions in the free space.

- Root partition for system files Linux. Select file system Ext4 and mount point /.
- A swap partition, or swap partition, is useful if you don't have enough random access memory, but a fast SSD drive. In the list of file systems, select "Swap Partition".
- Home partition where your files will be stored. Select the Ext4 file system and the /home mount point.
Click Continue and confirm the changes. The installer will erase the partitions you selected and create new ones in the free space.
How to install Linux next to your current system
Install Linux is nearby with your system there are two ways.
Auto

Most Linux installers will immediately detect the systems you have installed. If you haven't created a separate disk space for Linux, you can try selecting the "Install next to Windows" option. The installer will create the required sections, and you don't have to do anything manually.
Manual

If you want to determine for yourself how much space to allocate to the system, and followed the instructions in step 3, click “Other option” and click “Continue”. You will see your disk partitions and empty place, which we have prepared for Linux. Create a root partition there (mount point /) as described above. A home partition is not necessary in this case: you will be able to copy and modify files on your main system.
Click Continue. The installer will leave your files in place. It will simply create new partitions on free space. You will be able to choose which system you want to boot at startup.
8. Complete the Linux installation


You will then be asked to introduce yourself. Enter your name and create a password. Don't forget your password, as you will constantly need it to perform tasks on behalf of everyone. If you wish, you can encrypt your home folder.
Then just wait. When the installation is complete, you will be prompted to pull out installation disk and reboot. Don't forget to disable BIOS loading With external drives, if you turned it on.
What to do after installation
When you reboot and your Linux desktop appears in front of you, you can do everything you can do in Windows and macOS: surf the Internet, edit documents and listen to music. Don’t forget to update and look at the “App Store” (or its equivalent, depending on the distribution) to additionally install the applications you need.
Try Linux and you will see that in Everyday life it is no more complicated than Windows or macOS.