Wi-Fi router for dummies: purpose, principle of operation, device connection. How to connect and configure wired Internet via a router How to configure a router via cable Internet
To have wireless Internet at home, or a Wi-Fi access point. In fact, there is nothing complicated here, but it will take a little care and, perhaps, the phone of your Internet provider 🙂 The whole process can be broken down into three stages: physical connection, setting up the router and setting up the computer.
Connecting the router to the computer
After you take the router out of the box, you need to connect it to your computer or laptop. By default, I'll keep in mind that you have regular wired internet.

- We take out and fasten the antennas
- Insert the Internet cable into the port signed "WAN". Usually WAN is highlighted in a different color or stands apart from other 4 or 8 ports
- The cable that comes with the router is connected with one end to any of the numbered ports of the router (1, 2, 3, 4 ...), and the other end to the Ethernet port of a computer or laptop. It will only be needed for configuration, then you can turn it off.
- Remember to connect the power supply 🙂

How to enter the router settings
After turning on the router, he needs time to boot up and put himself in order. At this time, the front panel lamps may come on and off, wait 1 minute. To go to the admin panel of the router, you need to write in the address bar of the browser:
192.168.1.1
login: admin
password: admin

A small note: the address 192.168.1.1 is used in most routers. If you get the error "Page not found" or "The page does not open", then try using a different address, for example: 192.168.0.1
If there is an error again, check the sticker on the back of the device for the correct address:

If it is not there, then you need to look at the instructions, which may be on the complete disc, or search the Internet from your phone. The same applies to login (username) and password (password), i.e. not all of them have admin / admin. If the device is used, then maybe someone changed the default parameters. In this case, you need. To do this, you need to find the "Reset" hole on the router and press the button inside with a match.
Network cable not connected
Let's say the login address and username / password are known, but all the same, it is impossible to enter the admin panel due to a network error. Then you need to check the settings of the network card in Windows 7/8/10:
- Go in "Start -> Control Panel -> Network and Internet -> Network and Sharing Center"
- On the left we find "Change adapter parameters"
- The "Local Area Connection" connection should NOT be in the "Network cable not connected" status:

If so, then most likely this is the case, i.e. the cable is not connected, not connected there, or is faulty.
Also, the status should not be "Disabled". If so, then right-click on the icon and select "Enable".
Incorrect TCP / IP settings
If you still do not go to the admin panel, then:
- right-click on the connection icon and select "Properties"
- find "Internet Protocol version 4 (TCP / IPv4)" and double-click on it
- In the properties of the protocol, you need to check that the checkboxes were on "Obtain an IP address automatically" and "Obtain a DNS server address automatically"
- Click "OK" two times
- Now wait 10 seconds and you can check.

How to quickly set up Wi-Fi
It is more complicated here, because all routers are different and the interface can be very different. And the Internet settings for providers can also be strikingly different. If you have a TP-Link router or another with the ability to quickly configure, then you are in luck, everything can end very quickly 🙂 Find in the menu on the left or above the item "Quick Setup" and follow the instructions of the wizard:
On the first screen, just click "Next"

I have a 3G router, so I am asked to choose the preferred connection type: 3G or cable. I do not have a 3G modem, so I choose "WAN only"


If you do not know what to choose, then try the automatic mode, the router itself will try to determine the type of connection. If it succeeds, then the wizard will proceed to the next step of the configuration, but you may need to enter a username and password (in the case of a PPPoE connection)

or network settings (in case of "Static IP" connection)

All this information should have been given to you by the provider, look carefully in the contract. If the master cannot determine the connection automatically, then you have to call the provider and ask, or try by typing, there are not many options, as it were 🙂
In the next step, the wizard invites us to turn on the Wi-Fi module:

- "Wireless Radio" - this is Wi-Fi, should be in the "Enabled" position
- In the field "Wireless Network Name" enter any name of the point in English
- Parameters: "Channel", "Mode", "Channel Width", "Max Tx Rate" set as in the screenshot or leave by default.
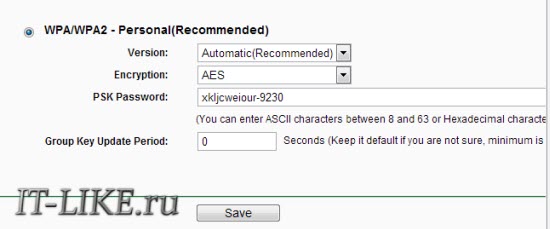
- , safety. Don't leave wi-fi without a password! Not only will everyone use your Internet and download the channel, it will be such a huge, huge hole in your safety! Virtually anyone can access all of your personal data. We put the switch in the WPA / WPA2 position and enter a complex password.
A small digression: when everything works, if it turns out that the Internet is working too slowly or will be, then try to select "Channel" not "Auto", but some number from 1 to 13 and save the settings. You can iterate over all the numbers in search of a suitable one. The fact is that now there is a lot of equipment around, and each device needs its own channel to work. As a result, devices operating on the same channel interfere with each other.
It's good if you don't have the cheapest router and it can operate at 5MHz. In this case, there will be a corresponding option to select a frequency of 2.4 or 5 MHz. Much fewer devices operate at this frequency, and therefore the likelihood that someone will interfere is significantly reduced.
Manual setting
Well, if there was no automatic setup, then you have to go through the points with the pens. We find the "Network" section and there is an item with the word "WAN":

There should be similar settings items. Here everything is the same as for automatic configuration, only we ourselves have to choose the type of Internet connection and enter the username / password.
- Leave "Secondary Connection" "Disabled" or "Dynamic IP", this is only needed to access the ISP's internal network.
- Set “Connection Mode” to “Connect Automatically” so that the router connects to the Internet automatically after every reboot.
If the provider requires you to specify the IP address and DNS servers, then this can be done in the Advanced settings, but usually you do not need to do this:

But I have a provider with problematic DNS servers and I register the google server: 8.8.4.4 that always works! How does a problematic DNS server manifest itself? This is when no site or, but Skype or torrents work without problems! However, if you install the server on Google, then the internal sites of some providers, for example, such as account replenishment and statistics, may not open.
It is here, in the manual settings, that you can specify the type of connection - VPN, if you have one. To do this, select "L2TP", enter the name / password and the address of the VPN server (given by the provider). If the IP address, mask, gateway and DNS are provided, then select "Static IP" and enter all the data. Do not forget to check the automatic connection checkbox below.

That's it, save the settings and look for the "Wireless Settings" menu section:
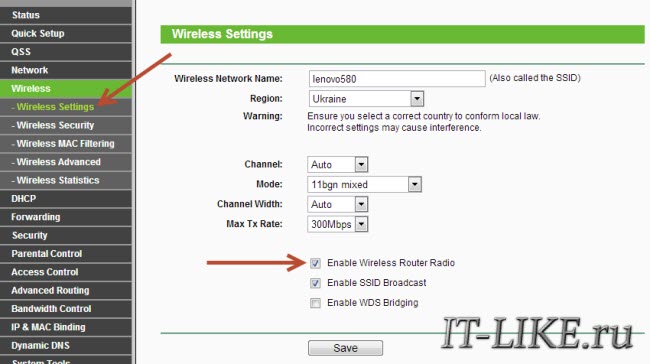
All settings have been described above. For Wi-Fi to work, there must be a check mark Enable Wireless Router Radio.
The next point, here we turn on encryption, i.e. set up security as it was already above:
Configuring the router is complete! I advise you to save all the parameters from the menu "System Tools -> Backup & Restore"... Button "Backup" - saves, "Restore" - restores from a saved file. This is useful in case everything suddenly goes to hell and all the settings go off. You can easily recover them from a file 😉
Oh yes, I almost forgot, change the default password for entering the admin panel. This is done in the "System tools -> Password" section.
How to connect laptop to WiFi
In Windows 8/10, you need to click on the icon at the bottom of the screen:

On the right, a panel will exit where you need to select the desired wireless network. Remember we gave the name of the network in English? Here you need to find it. If this is a public institution and you do not know which network to connect to, then choose any one with a higher signal level. When hovering over the network, a hint is displayed whether a password is required or not. If you see something like WPA / WPA2 when you hover, it means that you need a password to connect to a Wi-Fi network.

You can leave the "Connect automatically" checkbox. Next, the system will connect to the router and ask for the Wi-Fi password that we set earlier. If your device supports QSS technology, then you do not have to enter the password, but simply press the button on the router, signed as "QSS". In this case, the password will be filled in without our participation!

When the system asks about file sharing, I advise you to select "No, do not enable sharing" if you do not know why you need it:

I made a short video tutorial on how to do this:
In Windows 7, everything is the same, only the icon and the window with the found networks look "Semyorovski"

Here, too, find the connection you want, click on it and voila.
No wi-fi icon or won't connect
First, check if the wireless module is turned on using the switch on the laptop case. Many Asus, Toshiba, Sony and Acer models have this switch. On some laptops, WiFi can be activated using hot keys, for example "Fn + F2" (look for the antenna icon on the F1-F12 buttons). In any case, the method works through the "Network Control Center", the same way when we "turned on" the network interface to connect to the router via the wire.
In more severe cases, please study.
Hope you succeed! Most likely, questions will arise about setting up a router, tk. the interface and parameter names are different for everyone. To get an answer in the comments, send immediately the link to the screenshot of the window.
For many active users of the global network, a network device has taken root in the house, but in some cases it is necessary to configure the Internet on a computer via a LAN cable bypassing a router. That is, when the ISP cable is directly plugged into the computer's NIC. At the same time, if you are connected to your ISP via a modem configured in bridge mode, you will also find instructions on how to directly connect a computer running Windows 10 to the Internet.
Computers running Windows (7 and 8) of previous generations are configured in the same way. The conditionally provided access to the global network by providers can be divided into dynamic and static connections. In the first case, obtaining the "IP-address", "Subnet mask" and "Main gateway" is performed automatically, and in the second it is necessary to write in the appropriate fields the mentioned access parameters specified by your provider in the contract concluded with him.
Many companies provide dynamic and static access, but there are also large players (Rostelecom, TTK, MTS) using PPPoE connection with a username and password. Many ISPs direct a wizard to the client to configure the Internet on a computer, which will take all the necessary steps. However, not all providers promptly process applications, and not all masters are in a hurry to call, and in order not to wait for them for hours, and sometimes even days, you can configure the Internet connection yourself.
Dynamic and static Internet connection on the computer.
To set up direct access to the Internet on a computer, it is enough to insert earlier into the Ethernet port of the PC. Then right-click on the "Start" icon and select "Network Connections" in the context menu.
In the newly opened window, select the "Ethernet" adapter (since we are connecting via a cable), right-click on it and select "Properties" from the drop-down menu.
Dynamic IP. I have already mentioned above that if your Internet provider provides dynamic access to the global network, then you will receive all the necessary parameters for accessing the Internet automatically. For the connection to take place, it is necessary that the IP address and the address of the DNS server are in the mode - get it automatically. By default, these parameters are set this way and you do not need to change anything here.
Static IP. Configuring this type of connection involves manually setting the parameters specified in the provider's contract. That is, you need to enter the dedicated "IP address", "Subnet mask", "Default gateway" and "Preferred and alternate DNS server" in the appropriate fields. For example, filling in the fields might look like this:
- IP-address: we indicate the permanent IP-address;
- Subnet mask: automatically detected (255.255.255.0);
- Main gateway: specified in the contract. When connecting via a modem, we register its IP address (usually 192.168.1.1).
- Use the following DNS server addresses: specify the ones recommended by the provider. If they are not provided, then generic ones can be used. For example, on each line, the preferred DNS servers are listed first, and the alternate DNS servers second.
Google Public DNS: 8.8.8.8 and 8.8.4.4;
Yandex DNS (Antivirus, Safe): 77.88.88.88 and 77.88.8.2;
Yandex DNS (No pornography, Family): 77.88.8.7 and 77.88.8.3;
As you can imagine, it is the DNS servers that influence access to a particular site. So, if necessary, you can, for example, block access to adult sites by specifying the appropriate servers. After entering all the necessary parameters, click on the "Ok" button. After that, the "Internet Access" tray icon will be active, and you will be able to access the global network.
Setting up an Internet connection (PPPoE) on a Windows 10 computer.
If the provider's LAN cable is directly inserted into the Ethernet port of the computer and you need to enter a login and password to connect to the Internet, then you should create a PPPoE connection. To configure, you need to go to "Start" -> "Settings" -> "Network and Internet" -> "Ethernet" -> "Network and Sharing Center". Click on "Create and configure a new connection or network".
In the next window, you need to select the type of connection. Since we configure the Internet on a computer directly with an Internet provider (without the participation of network devices), we select "High-speed (with PPPoE)", and if we were configuring the Internet, for example, via a 3G / 4G modem, then we would have to select "Switched".
In the last window, enter the password and username given to you by the service provider and give a name to the connection being created. If you check the box next to "Allow other users to use this connection", then you will open access to the global network for other accounts, if you have them, of course.
That is, if an account was created on your computer, for example, for each family member, then you are free to allow or deny access to the Internet through the connection you created.
After filling in all the fields, click on the "Connect" button.
If the connection with the Internet provider is established, and you entered the correct username and password, then after a short check of the entered data, the connection will be created.
If you have any problems, let's discuss and solve them in the comments together. Till!
Setting up a router is not an easy procedure, but we are ready to help you understand all its intricacies. Just read the instructions below carefully, and then in just a few minutes you can easily set the desired parameters and get started!
#one. Connection
Before you independently configure the router through a computer, you need to connect it:
- Plug the internet cable into the WAN / Internet port;
- Install the end of the network wire to the LAN port of the device;
- Place the other end into the connector on the PC;
- Plug the model into a power outlet and press the power switch.
- Ready!
We hope that this short instruction helped you figure out the first steps, but for more details about the connection process, you can read on the website. Now you can safely go to the instructions, which tell you how to set up your WiFi router yourself.
# 2. Login to the web interface
We want to warn you that setting up a WiFi router online through a browser can only be done after turning on the device. When you activate the work, distribution of the wireless network with factory parameters (login, password) will begin. You can change the settings of the router in a special web interface that each device is equipped with.
Important! To open the configuration interface, you need to connect your computer to the device. Internet is not required.
To open the site for configuring the router, do the following:
- Open your browser;
- Enter the IP address in the address bar;
- In the window that opens, log in - enter your username and password.
- The address, network name and pin code for entering are indicated on a sticker located on the back of the router.
- Some devices do not have login information - you need to set it after logging into the interface.
Please note that some manufacturers set the parameters on their own - then nothing needs to be done during the initial start-up.
# 3. Setup Instructions
Most routers have a special wizard option that will help you quickly set the desired parameters. For example, here, the item is called "Quick Setup":
The most important thing you need to configure is:
- Internet connection;
- Wi-Fi is a network.
Let's tackle the first parameter first. Our main goal is, of course, the work of the Internet on devices:
- Open the general settings tab. Most often they are located in the WAN or Internet section;
- Specify the type of connection of the provider, username and password - you can see the information in the agreement;
- If the provider requires you to go through the binding of the MAC address, specify the necessary data (from the contract).
Important! If the provider uses (DHCP), then the connection to the network will occur automatically. Skip this section of the instructions, you do not need to reconfigure the router.
- Open the section called Wi-Fi. It may be called otherwise - Wireless / Wireless / Wireless mode;
- In the field "Network name" or "SSID" enter a new name (only in Latin);
- In the "Wireless network key" field, enter your invented identification code;
- Protection type - WPA2 - Personal;
- Change the region to the location on the appropriate line;
- Save your changes.
All of the above instructions apply if you need to set up a new router instead of the old one or install completely new equipment. By the way, we suggest you watch a general video on how to set up a router. It is perfect for those who are not confident in their abilities, because it shows the entire process step by step and in detail!
Now you know everything about how to set up the Internet on a Wi-Fi router through a computer - use our article to achieve the result. Just follow the instructions and in a few minutes you will be successfully online.
The Internet has become an integral part of life, and every computer must have access to the network. At home, a connection via a Wi-Fi router is suitable for this, which makes it possible to use both a wireless connection (for laptops, mobiles, tablets) and a cable connection (for stationary computers).
Where is the best place to install a Wi-Fi router
For those who are thinking about options for how to install a router, you should start by choosing a place to place the device. This is influenced by several factors:
- the location of the provider's modem or cables, if used;
- apartment layout;
- the location of the stationary computer (if any).
There are different models of wireless devices from Asus (Asus), TP Link, D-Link (D-Link), etc. They can have different data transfer rates, coverage area. This should be taken into account when choosing a location for the device, so that access is anywhere in your apartment. In this case, the best solution would be a central point if the cable, the location of the modem and the stationary PC allow. If you are obliged to install the device closer to the computer in order to stretch the cable to it, then you need to focus on this factor.
How to connect a router to a computer or laptop
It's easy to figure out how to connect a Wi-Fi router to a computer. The process itself is fast, but problems can arise with setting up the device. The option of connecting a stationary PC via a wireless network and using a network cable will be considered separately below. The option of how to connect a router to a laptop is practically no different. Before buying a receiver, you should take into account that there are models on the market that do not support Wi-Fi distribution and act as an adapter (for connecting multiple devices).
At the first stage, in order to get access to the Internet, you need to correctly connect the wires to the device. There are several major manufacturers of routers, but the connection scheme is always the same. Here is a step-by-step instruction on how to connect a wifi router to a computer:
- Unpack and install the device, plug it into a power outlet. On the back panel, as a rule, there is a power button for the device: press it. If a signal is received, the lamps on the router will light up.
- There are several jacks on the back panel. One of them is always located on the edge and tinted with a different color (blue, yellow) with the WAN signature. Connect a wire from a modem or an Internet cable to it. You should hear the latch click, indicating that the cord is secured correctly.
- If you need to lead a cable to the PC, then insert it into any of the empty slots nearby and stretch it to the connector on the network card. When connecting, the lamp should light up, which means there is a signal.
- With a wireless connection, you need to go to the network settings on the PC itself.

Wireless router connection
For most users, an interesting option is how to connect to a router wirelessly. In the case of a laptop, everything is much simpler, because it has a built-in module for receiving a Wi-Fi signal. When it comes to ordinary PCs, the situation is somewhat more complicated, because you will additionally need to purchase an adapter for a wi-fi network. They are easy to find in any hardware store and are often sold with modems.
There are two options for Wi-Fi adapters for PCs on the market - external and internal. The former are connected via a USB cable and stand on the table, outwardly similar to a docking station for a player from Apple. The latter are mounted on the motherboard via a PCI slot. They work equally well, but the external option can be disconnected and connected to another device, and the built-in one does not take up space on the table. A disc with drivers and software must come with the device.
After connecting to a computer, the setup takes place in exactly the same way as on a laptop. In most cases, to turn on Wi-Fi on your computer, you just need to find your connection in the list of networks and enter a password. If this is the first time you are connecting, you may need to specify the settings that were given to you when concluding a contract with the provider.
Twisted Pair Wired Connection
Previously, there was only one way to connect a wifi router to a stationary computer - a cord. At first, a cable from a telephone line was used (sometimes it is still used), then others appeared that provided not only a computer with Internet access, but also a TV with cable channels. This method of connection is still used today, as a rule, for stationary PCs. How to connect a computer to a router via a cable:
- connect the provider's wire to the wi-fi router to the socket marked WAN or Internet;
- the power cord must be plugged into one of the LAN connectors;
- the other end of the cable should be connected to the Ethernet port of the computer, after connecting the lamp should light up (blink).
What to do if the router does not connect to the Internet

Even if you know how to connect a wifi router to a computer, have done all the necessary manipulations, a situation may arise that the connection to the Internet is not established. At the same time, everything works correctly through the cable, and the wireless network does not transmit data, but is visible in the list of connections. If you call the provider's support service, the first thing the specialist will suggest is to disconnect the wi-fi device from the outlet, wait 3-10 minutes and then turn it on again. In many cases, this really helps.
If this method does not help, then it is highly likely that the computer cannot automatically obtain the IP or DNS address of the network. To check the settings, you need to right-click on your connection, select "Network Control Center", click on the image of the network connection and go to the "Details" tab. If the DNS or IP item is empty, then this is the problem. You need to call the support service and find out what values you need to register in the properties. After receiving them:
- Click on the connections and click on the "Properties" button.
- Find the item that ends with TCP / Ipv4. Click on it and click "Properties".
- Activate the items "Use the following IP-address", enter the data provided by your provider.
- Repeat the same for DNS gateways.
- Click "Ok" and close the rest of the tabs.
Video instruction: how to connect a router to a computer
Found a mistake in the text? Select it, press Ctrl + Enter and we'll fix it!Discuss
How to connect a wifi router to a computer
For a very long time, I was going to write this instruction, but it still didn't work out. And now, the long-awaited moment has finally come 🙂.
In this article, I will tell you, and I will show everything in detail in the pictures, how to set up a Wi-Fi router without a computer. Having only the router and tablet itself. Well, or a smartphone. Moreover, it doesn't matter what operating system your tablet (smartphone) is running on. It can be Android, iOS, or Windows Phone. Can be configured from iPad, or iPhone.
I was very often asked in the comments if it is possible to set up a router with only a phone or tablet. What to do if the house does not have a computer, laptop, netbook, etc. Yes, and it is not difficult to imagine a case when you do not have a computer, but on the other hand, there are many mobile devices that can connect to the Internet via Wi-Fi. And you decided to buy a router to distribute the Internet to your devices.
But, here a problem arises: “How can I set up this router if I do not have a laptop. And there is, for example, only a tablet. Where can I find instructions, and is it possible to do it at all? " Yes, you can. I'll tell you now. You can, of course, borrow a laptop, for example from friends, and carry out the setup according to this instruction. "". But, this is not at all necessary.
What do we need?
We need the router itself, and some kind of mobile device that can connect to a wireless network. From which we will carry out the setting. Well, and the Internet should be in your house, I think this is understandable.
I checked everything and everything works. The whole process, I will show using the example of the same router Tp-Link WR841N, and tablet ASUS MeMO Pad FHD 10 which runs on Android. You may have another device, such as a smartphone. It's just much more convenient on the tablet, due to the larger screen.
As for the router itself, it can be anything, not necessarily Tp-Link. If you have, for example, Asus, D-Link, ZyXEL, etc., then only the control panel will be different. And so, in general, everything will be the same as in this manual.
Preparation: connecting the router
First of all, I advise you to do a full factory reset on your router. It doesn't matter if it's new from the store, or has already worked somewhere, the settings need to be cleared. Perhaps it has already been configured, and we do not need any old settings. Because of them, many problems can arise. Therefore, we look at the article ““, and do as it says there. Made? Great, let's continue. If something did not work out, we continue in the same way, let's hope that there are no settings that we do not need.
We fasten the antennas to the router (if removable), then plug in the power cord and plug it in. We connect the network cable, the Internet to the blue WAN connector. Which provider has brought to your house (it would be nice to be sure that the Internet is working and paid for. Otherwise, during the setup process, problems may arise, and you will think that the router is to blame for everything, or the way of setting it up).
Plugged in, the indicators blinked, everything is fine. If, after plugging into the network, the indicators on the router did not light up, then it is possible that it is turned off by a button, which may be on the body of the router itself. Check it out.
Now we take in our hands a tablet, a smartphone, a phone (what do you have there), and move on to the next point of our instructions.
Getting started configuring the router from the tablet
By default, Wi-Fi protection is not set and your network is open. Now we will connect a tablet to it (this is in my case, when I continue to write a tablet, I will have to enter the device from which we are setting up).
We go into the settings of network connections (we need to turn on wifi).
Here, attention! It will have a standard name and will be open source. It is important to choose exactly our network. If in doubt, just unplug your router. (turn off and on wifi on the device itself) and see if the network goes down. If yes, then it means that this is your network, we choose it.
A window will appear. Just press Connect.
If all is well, the status will appear next to the network “ Connected“, And an icon with network divisions will appear at the top.
That's it, our tablet is connected to our wireless network. You can proceed with the settings.
Configuring the router through the browser on the tablet
We need to launch any browser. It definitely is on your device. It can be Google Chrome, or some other standard one.
In the browser, click with your finger on the address bar and enter the IP address of our router. Usually this 192.168.1.1 , or 192.168.0.1 ... You can see this address, and the standard username / password, on the bottom of your router. They must be indicated there.
So, we type this address in the browser, on the tablet, and press the button Go to(open, etc.).
A window will appear asking for a username and password. Enter the standard ones, usually admin and admin, and click To come in.
So we got into the settings of our new router. Half done, already done 🙂.
Setting parameters for connecting to the Internet
First of all, we need to configure the router to work with your ISP. So that he can connect to the Internet and distribute it via Wi-Fi. To do this, we need to know the parameters that your provider gave you. You need to know the technology he uses (Static IP, Dynamic IP, PPPoE, L2TP), and already depending on the technology, the required parameters. All these data, you can check with the provider's support. At the same time, check if the provider makes a binding by MAC address.
Attention! If the provider binds to the MAC address, then you need to call your provider's support and ask to bind the Internet to the MAC address of the router. You can see the MAC address of the router on the bottom, on the sticker.
This is the most important point. If you make a mistake here, then your devices will be.
These parameters must be set on the tab Network – WAN... Against WAN Connection Type choose the required technology. And already proceeding from a certain technology, we set all the necessary parameters: name, login, static IP, or DNS.
Then, when all the settings are specified and checked, press the button Save to save the settings.
Pay special attention to the settings I wrote about above. As I said, they are the most important.
Setting up a Wi-Fi network
Opposite point Wireless Network Name, set the name of your Wi-Fi network (write only in English letters, numbers are possible)... This name will be displayed on all devices.
Against Region, indicate the country where you live.
If a window appears, then just click Ok.
Installing protection on the wireless network
We open the item Wireless – Wireless security.
We choose WPA / WPA2 - Personal (Recommended).
Opposite point PSK Password create and write down a password. It will be used to connect to your Wi-Fi. Use English letters and numbers. Make a password of at least 8 characters. Stick to the case of the letters, it matters.
Be sure to write down the password on a piece of paper and put it in a safe place so as not to forget. Otherwise, you will have to reset all settings and configure again.
Changing the password for accessing the settings
We need to change the default admin and admin, which are used to enter the router settings. So that no one but us can access the settings.
Go to the tab System Tools – Password.
Set a standard username and password. And below, ask your new data. I left the username admin, here's the password, I came up with my own.
Also write down this password so as not to forget.
After pressing the button Save, a window will appear again asking for a username and password. It is necessary to indicate already new data (which you mentioned above), and press the button To come in.
We will get back to the control panel.
The setup is almost complete. All that remains is to reboot our router.
To do this, go to the menu item System Tools – Reboot, and click on the “ Reboot“.
The reboot status will go.
After the reboot process is over, an error will most likely appear on the tablet that it is impossible to open the address 192.168.1.1 ... This is normal. It's just that our tablet will disconnect from the router, but it will not be able to connect automatically. (in the future, it will connect automatically)... Since we installed protection on the network, and after the reboot, it has already started working.
It is necessary to reconnect the tablet to our network by entering the password. So that you can already use the Internet.
To do this, open the quick access panel to the settings again, and click on the network settings icon.
We turn on Wi-Fi, and select our network. It will already be with the name that we specified during the configuration process.
Enter the password for Wi-Fi (which we also indicated during the configuration process), and press 
You can connect other devices to the network!
For example, or may appear. I also wrote about this.
Afterword
It turned out to be a huge article, a lot of screenshots, but in no other way. I tried to make the article as clear and simple as possible.
As you can see, you can configure the router without a computer, but simply from a mobile phone or tablet. I think that even from the TV it can be set up. And this is not difficult. The main thing is to follow the instructions and check the settings that you specify, so that later there would be no different problems.
If you have any questions, comments, or wishes, I will gladly listen to them in the comments!