iOS 11 update start time.
iOS 11 will be released soon, how to prepare?
On Tuesday, September 19, around 20:00 Moscow time, Apple will release the final version. The long-awaited update will bring with it a lot of new features, starting from a redesigned Control Center and new App Store, ending with drag-and-drop functionality and Dock for iPad. How to prepare for the release of iOS 11? Five must-read tips are presented in this material.

1. Take your time installing iOS 11
This is the main advice for all users who are going to install iOS 11 on their iPhone, iPad or iPod touch. Take your time! Do not give in to temptation and do not start installing iOS 11, particularly over the air, on the evening of September 19th. Wait at least a day.

The fact is that when the final version of iOS 11 is released, there will be an incredible number of people willing to download and install the update. large number. On the evening of September 19th, the load on Apple servers will be at its highest, which is why problems may occur during firmware download.
These are not empty words. We see this picture every year, with the release of each new major version of iOS. Last year, when iOS 10 was released, the update installation failed for a huge number of users. Because of this iOS launch 10 was considered one of the most unsuccessful.
2. Perform a clean install of iOS 11
iOS 11, like any other major update mobile operating room Apple systems, it is best to install through iTunes. The so-called “clean” installation of the update will eliminate the possibility of errors occurring when downloading firmware from Apple servers.

In order to perform a “clean” installation of iOS 11 on your iPhone, iPad or iPod touch, you need to download the firmware file for a certain model device, and then use it for direct installation. The links to download iOS 11 for all supported devices will appear on our website on the evening of September 19 and in this article.
3. Make sure your device supports iOS 11
Not sure if your iPhone, iPad or iPod touch supports iOS 11? Below is full list mobile Apple devices, on which you can install iOS 11:
- iPhone 7
- iPhone 7 Plus
- iPhone 6
- iPhone 6 Plus
- iPhone 6s
- iPhone 6s Plus
- iPhone SE
- iPhone 5s
- iPad Pro 12.9″ first and second generation
- iPad Pro 10.5″
- iPad Pro 9.7″
- iPad Air 2
- iPad Air 1
- Fifth generation iPad
- iPad (2017)
- iPad mini 4
- iPad mini 3
- iPad mini 2
iPod touch
- iPod touch sixth generation
4. Make sure you have enough space to download iOS 11
Go to menu " Settings» → « Basic» → « About this device"and check how much free space available in the memory of your iPhone, iPad or iPod touch. If there is no free 4-5 GB in the device memory, then before installation it is recommended to remove some applications or, for example, unnecessary photos.
5. Make a fresh backup to iTunes or iCloud
And finally, the last (but first in importance) stage of preparation for the release of iOS 11. Be sure to have your iPhone, iPad or iPod touch via iTunes or iCloud. By having a fresh backup of your data, you won't be afraid of any errors that may occur when iOS installation 11.
After iOS release 11 is the time to start cleaning your phone of everything unnecessary to free up space and prepare for the update.
The disk space requirements during installation of iOS 11 have decreased significantly compared to iOS 8, which required 4.6 GB. However, it won't hurt to free up some space: it will make installing and working with iOS 11 much easier. You can find some tips on this in this article.
How much space does iOS 11 take up?
It depends on the device. iOS 11 update via wireless network requires 1.7-1.8 GB; another 1.5 GB is used temporarily during the installation process.
Therefore, it is advisable to have at least 4 GB of free disk space before updating. If you don't have that much, the instructions below will help you free up some disk space on your iPhone, iPad or iPod.
How to free up space on iPhone and iPad
1. Find out how much space is occupied
Before deleting your apps and photos, it's best to first see how much free space you have and what's occupied by the rest.
To do this, go to Settings > General > Storage & iCloud > Storage > Manage.
There you will find the complete list installed applications, along with things like photographs and Apple Music.
At the top of the list are the applications that take up the most disk space. They need to be dealt with first.
2. Remove unnecessary apps
If you don't remember what an app does, you probably don't need it. If you haven't used it for a month, too. Remember that you can always easily install it back (along with the data if you have it enabled backup in iCloud).
Through “Storage” you can see how much space application data takes up. You can delete them from there.

Some programs like Facebook can take up up to a gigabyte of space solely due to caching. In such cases the only way out- delete the application and install it again.
3. Delete downloaded files
If you listen to music through Apple Music or save YouTube videos in VLC, you can quickly run out of disk space.
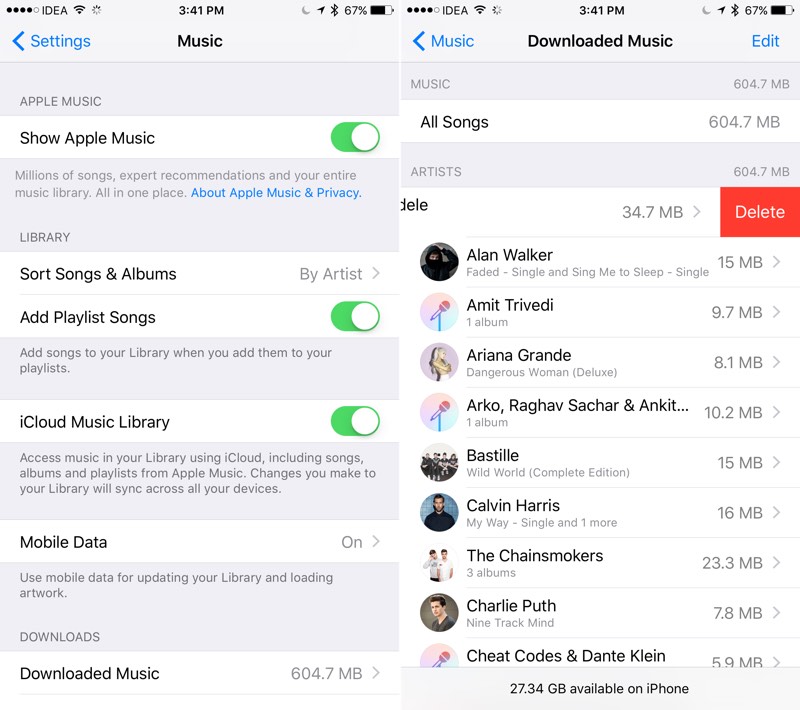
To see a list of tracks downloaded through Apple Music, go to Settings > Music > Downloaded Music. You will be able to view a list of albums or songs. To delete something, swipe it left.
4. Clear Safari Cache
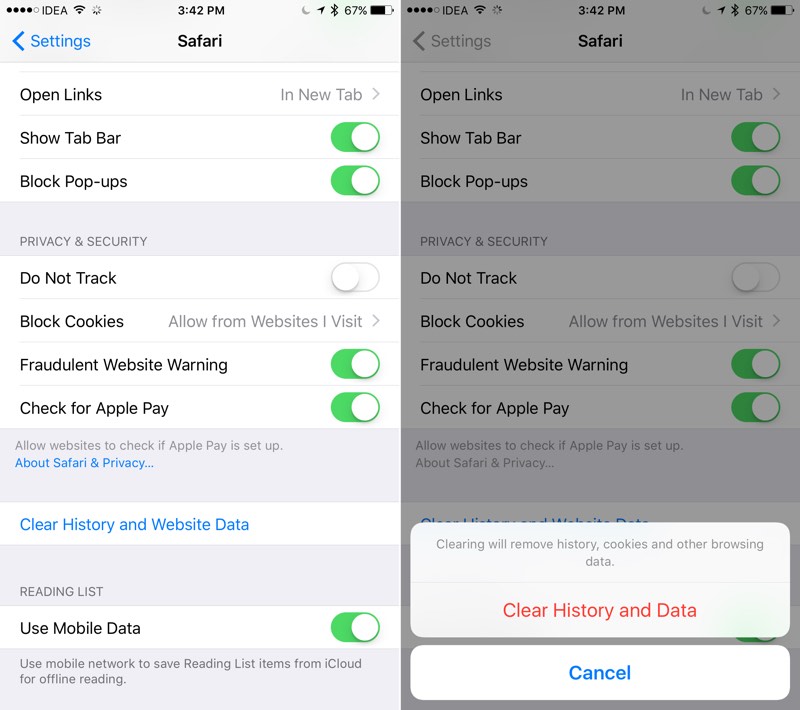
It's easy to clear Safari's cache at any time: go to Settings > Safari and select Clear History and Website Data.
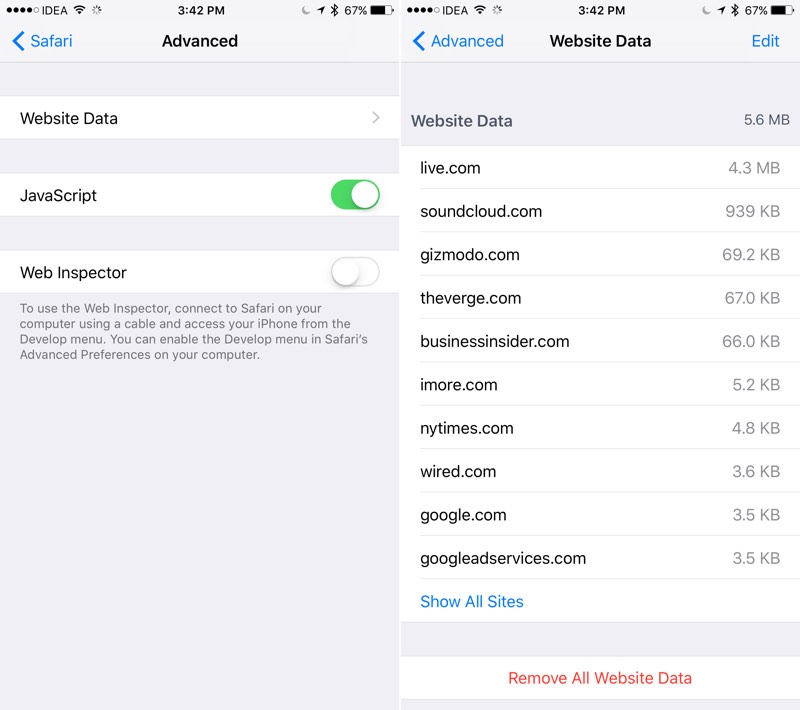
You can even delete the cache of a specific website through Settings > Safari > Add-ons > Site Data.
5. Delete podcast files
Whether you use the built-in app or a third-party one like Overcast, podcasts can take up a lot of space.
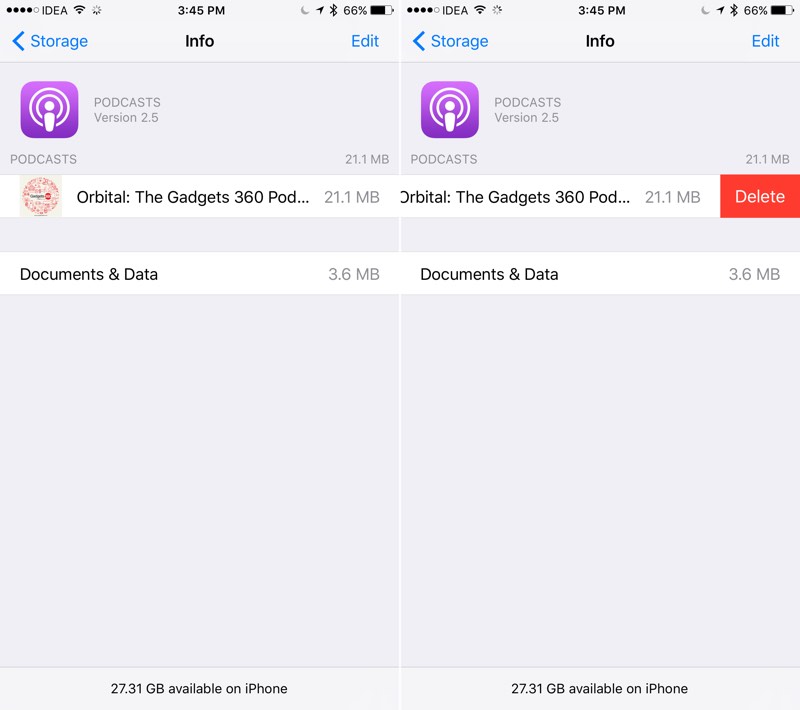
To remove old podcast episodes from standard application, go to Settings > General > Storage & iCloud > Storage > Manage > Podcasts.
If you use Overcast, just swipe the podcast you don't want to the left.
In addition, Overcast has useful option auto-delete podcasts. It can be set individually through the settings. Overcast will automatically delete saved episodes after the time you specify.
6. Use iCloud Library or Google Photos
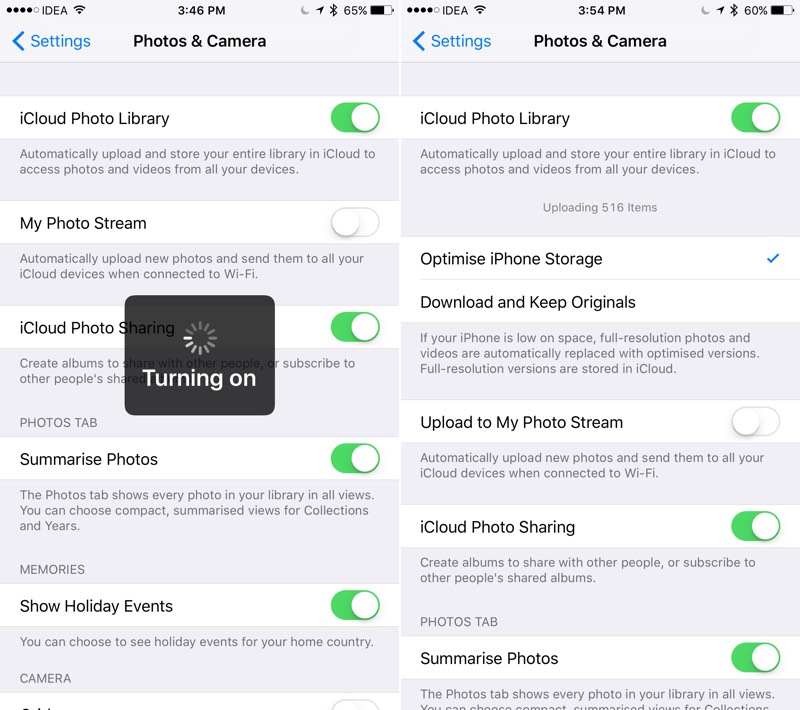
If you use iCloud Photo Library, all your photos will be automatically saved to iCloud. After that, you can safely delete them - they are safe in the cloud. Turn on automatic saving you can do it through Settings > Photos and Camera.
If you want the same thing completely free, try Google Photos. It makes it very easy to delete photos after copying.
7. Optimize photo storage
If you've enabled iCloud copying, your photos will still remain on your device unless you delete them.
However, there is an option called "Optimize storage on iPhone" which leaves only compressed photos for preview. When opened, they are downloaded from iCloud.
You can enable it through Settings > Photos & Camera > Optimize Storage on iPhone.
8. Shorten your Live Photo
Pictures Live Photo- a very useful thing. However, such photographs weigh two to three times more than usual.
Fortunately, there is an application that automatically removes the “live” part of the photos and leaves the static photos.
We tested the Lean app ($1.99) on four Live Photos. With its help, we managed to free up 12 megabytes of space. 3 megabytes in a photo is very good, especially if you have hundreds and thousands of them.

Alternatively, you can simply turn off Live Photo via the icon at the top in the Camera app.

9. Check recently deleted photos

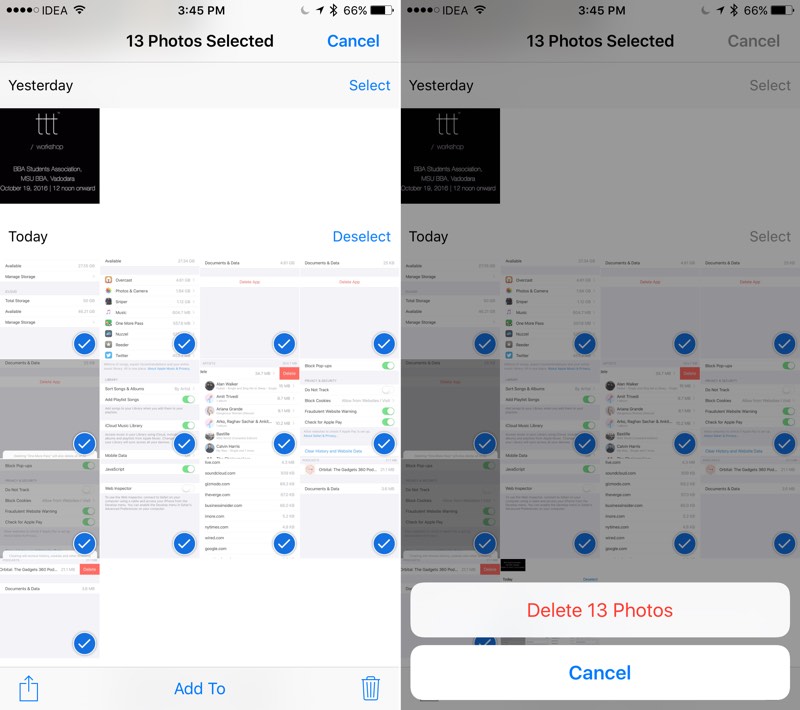
Once you delete photos, they don't actually disappear. They are stored in a special album for 30 days in case you decide to return them. To actually delete photos and free up space on your phone, open the Recently Deleted album in the Photos app, select the photos, and tap Delete.
10. Enable auto-delete messages
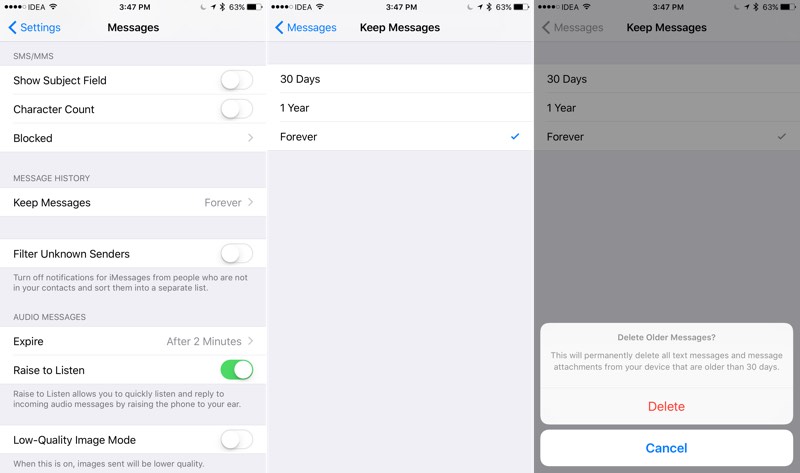
If you transfer a lot of files via iMessage, you may quickly run out of storage space. To avoid this, you can configure automatic removal iMessage messages after 30 days.
Go to Settings > Messages and select 1 year or 30 days for Leave Messages.
11. Delete messages manually
If you automatically save all attached files, this can seriously reduce the amount of free disk space without much benefit.
The easiest way to fix this is to open Messages, click Edit on the left top corner and start deleting old and long conversations.

Don't forget to watch what you delete so you don't lose it. important messages or files.
12. Clear third-party app cache
As you know, iOS does not allow you to clear the cache of third-party applications. You will have to do this with each of them separately if possible.
Some apps including Chrome, iCabMobile and Google Maps, make it easy to clear your cache.
If you find an application that is taking up a lot of temporary data space, open its settings and try to find the option to clear the cache.
If you are unable to find the option, all you have to do is reinstall the application.
13. Remove Siri voices
If you have multiple languages installed on iOS, you may find that Siri has a lot of voices preloaded as well. They take up a lot of space.
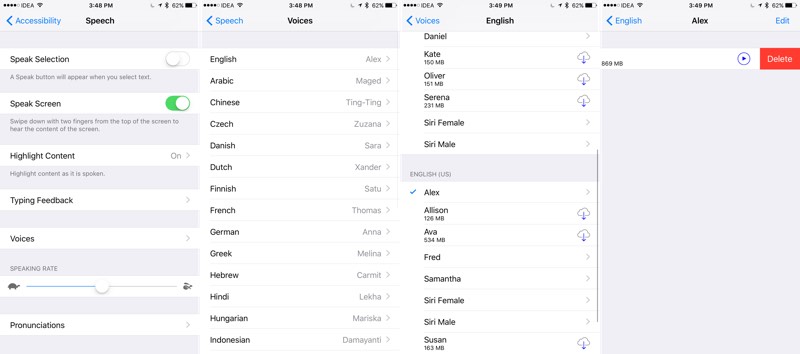
Click the "Edit" button and get rid of unnecessary votes by clicking on the red icon next to them.
14. Optimize your music storage
If you use Apple Music, go to Settings > Music > Storage Optimization. There you can enable optimization and set a limit for the amount of downloaded music.
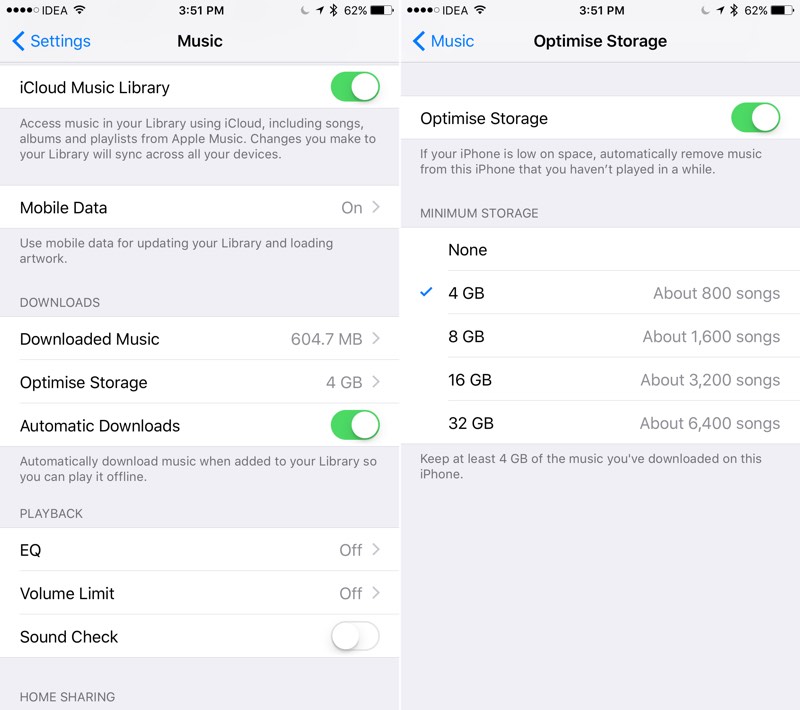
After going beyond this Apple limitation Music will begin to automatically delete the tracks you haven't listened to for the longest time.
15. Force iOS to clear cache
You can also start downloading some heavy application for which you do not have enough space (for example, Infinity Blade, which takes up three gigabytes). iOS will warn you when you're low on free space and start clearing the cache of apps like Instagram and Facebook. You can do the same with movies in iTunes, but don't provide a password or use unless you want to actually make a purchase.
Delete unnecessary photos and videos
This is quite tedious and, perhaps, can be considered last resort. If you've already done all of the above, try going through all your photos and videos and deleting the ones you don't need. You'll likely find quite a few like this: We often take ten photos when we need one, and forget about the rest.
Apple has worked hard to make using an iPhone or iPad with just 16 gigabytes of memory easy and convenient. The amount of space required for the update has dropped to only 1.8-2 GB. In addition, iOS can temporarily remove applications to free up space for it. iOS 11 makes this even easier: applications are automatically deleted from the phone's memory when there is not enough free space.
Therefore, after installing iOS 11, you will be able to manage even better disk space your phone.
Hi all! Every year Apple company updating the operating system for its mobile devices is good. And every year she fails to do this without making mistakes - this is bad. And although iOS 11 was released quite recently (and at the time of writing, it is still in the preliminary beta testing stage), every user can install it and “touch it” - what new thing has Apple prepared for us?
True, both at the installation stage and during use, with the iOS 11 update on iPhone and iPad, problems may arise. various problems. Some of them are serious, some are simpler.... In general, we need to understand and correct all this disgrace. How? And I'll tell you now. Let's go quickly and decisively!
Some useful information:
- Be sure to back up all data - or .
Devices that can install iOS 11
Not all gadgets support Apple's new operating system; the update is available for:
| iPad | iPod | |
| iPad Pro 12.9 inches | The iPod Touch 6th generation | |
| iPad Pro 9.7 inches | ||
| iPhone 8 Plus | iPad Air 2 | |
| iPhone 7 Plus | iPad Air | |
| iPad 4 | ||
| iPad mini 4 | ||
| iPhone 6S Plus | iPad mini 3 | |
| iPad mini 2 | ||
| iPhone 6 Plus | ||
If you don’t find a mention of your device in the table, then, unfortunately, iOS 11 is not available to you.
Error: "Checking for iOS 11 updates failed"
So, you haven’t installed the firmware yet (you just expressed a desire) - the problems are already at the very beginning. And they are that:
An error occurred while checking for a software update.
It turns out that the iPhone or iPad does not find the new firmware (although it is there!). How to fix this?
- Check your internet connection. Use another Wi-Fi network to download.
- If this is a beta version, then check for the presence of the corresponding profile. If the final result is the absence of any profiles.
- Try updating via iTunes.
You also need to remember that at the time of firmware release huge amount people are trying to download the new version software. Apple's servers cannot withstand this and malfunctions are possible (). IN in this case, we can’t do anything - we can only wait.
Error downloading update
So, the iPhone or iPad “saw” iOS 11 and started downloading it. However, even here a surprise may await us in the form of an update download error.

What are the reasons for this behavior?
- There is not enough memory on the device. If loading occurs “over the air”, then it is necessary to free up space under installation file software. Don't want to delete anything? Use iTunes.
- Unstable or weak Internet connection - interruptions during downloading.
- The notorious overload of Apple servers. We wait a while and try again.
Don't want to wait for the glitches to pass? You can always “deceive” Apple and download the firmware from third party resources(for example, w3bsit3-dns.com), and then “slip” it into iTunes. how to do it.
iOS 11 won't install
So, we have finally downloaded the new version of the software and everything is ready for installation. We begin to install and... two options are possible:

What can be done?
- Hard reboot the device.
- Check the battery charge - it should be more than 50%.
- Again, pay attention to your Internet connection.
Nothing helps? Is everything frozen and the bar does not move for a long time? and update via iTunes - this the only way“revive” the device.
Update to iOS 11 via iTunes - recovery failed
This error is especially relevant for those who constantly use beta versions of software. So, when trying to “roll back” to stable version firmware via iTunes, you may encounter the fact that the iPhone or iPad “gets stuck on the cord” and the recovery will fail.

What to do?
- Enter the device into DFU mode.
- Download the previous version of the firmware (if you have the 2nd beta installed, download the 1st).
- Connect to iTunes, press and hold Shift key(for Windows) or Alt (for Mac) and click the "Restore" button.
- Select the downloaded firmware.
After installation, connect to iTunes again and restore the device as usual.
Perhaps on at the moment this is all. Since iOS 11 is now in the testing stage, consider “glitches and bugs” in iPhone work or the iPad doesn't make sense - there are too many of them. But if they remain after the release of the final version, I will add to this article.
P.S. Be sure to write in the comments about the errors that you encountered - we’ll try to figure it out and find a suitable solution!
P.S.S. Secret way get rid of all malfunctions - put “likes” and click on the buttons social networks. Worth a try! :)
Yesterday Apple finally rolled out the final release new firmware. Thus, now all users have the opportunity to install iOS 11 on their iPhone, iPad and iPod Touch. Naturally, during the process of downloading and installing updates, you might experience problems - this is quite acceptable, since in the first few hours the servers usually hang. By tradition, we publish on our website the first reviews about iOS 11, the first impressions of the new firmware.
iOS 11 update
I can’t say that every year the situation with installing a global update somehow changes for the better. Quite the contrary. Users complain that installing the update takes a lot of nerves, especially at first, when you start downloading immediately after the release. To prevent this from happening, wait a while, or better yet, a few days, when the excitement subsides, and you will be happy. Well, now let's look at the reviews...
Reviews of iOS 11: is it worth installing?
Literally a few hours after the launch of the “final”, the editors began receiving reviews from regular readers:
iOS 11 installed quite quickly (2 hours after its official release) on both the iPhone and the tablet. I didn’t find any “brakes” in the system itself - neither on the phone nor on the tablet, except for one - switching between third party applications(game) on system notifications and other nonsense, I noticed a significant slowdown on the tablet (iPad Air), although there was no such problem on the iPhone 7... perhaps this is due to the hardware of the devices themselves or the games have not yet been “finished” to perfection... I don’t know, but the fact remains a fact... not critical of course, but still.
And so in general, general impression positive, switching between system applications very pleasant and fast))) apparently, the “guts” of the iPhone 7 provide such a perception effect))) regarding the battery... I’ll still test it, until I get the feeling that the iPhone worked longer on iOS 10.3.3..
If you disable wi-fi through this new panel control, then it will not turn off completely but goes into some kind of dormant mode, i.e. the phone will remain online. Take a closer look at the screenshots of the Wi-Fi icon. You have to put your phone in airplane mode or, alternatively, go into Settings every time. This bug is on iPhone 7 and iPad Air.


I’m writing to catch up... The battery began to “melt” its charge before our eyes, and without using geolocations, Wi-Fi or Bluetooth turned on. This did not happen with version 10.3.3, although when switching from iOS 9 to 10k, if my memory serves me correctly, there were also problems with fast discharge battery I hope they will fix it in future versions.
In my own way personal experience I want to note that there are no big complaints. In general, the system works quite stably at four plus. There are minimal bugs: for example, vibration is not always reproduced in silent mode upon arrival of notifications; Calendar alerts do not always work. I also noticed that the interface with the status bar froze after a call - the empty distance was too large. I also noticed that when calling audio FaceTime appeared new sound. Here are some more reviews:
I was very pleased new item management. This is truly what we have been waiting for for so long. But it still won’t be possible to fully customize it - there are still a number of restrictions.
A dock on an iPad is something. Since I don't have a Mac, I have to get used to the new panel. But I noticed that if you use it on an intuitive level, it makes it very easy.
I didn't have any problems with the installation. I did everything through tuna; I didn’t take any risks by air. So far everything seems to be fine with the battery, but we need to test it.
Updated iPad Air. So far the flight is normal. Everything works quickly, although I installed 10 on a clean iPad, it was a complete glitch and the system barely worked. A very cool keyboard, now you don’t have to change the layout, just pull the button with the letter down and voila, number or sign??????. Emoji looks old ((
Updated over the air on 6s, everything flies, amazing firmware.
Disappointed Bluetooth operation. You click on the icon in the control panel, Bt is turned on, my beats headphones x connected, click on the icon again, Bt does not disconnect, but simply breaks the connection. To turn off Bt, you have to go to Settings and turn it off there. It used to be the norm, I don’t understand why they did it now. But the saddest thing is that now the charge of my headphones is not displayed, it was convenient, I could see the charge level at any time, put the headphones on charge and not wait for them to die. Sadness. Well, there are still lags. iOS 11 is very crude.
Battery on iOS 11
The most painful topic for Apple users is how the battery behaves after installing iOS 11. So here the situation is ambiguous:
I installed iOS 11, it seemed to work fine, but the next day I noticed that the battery was quickly melting. It's possible that it will be fixed in the next builds.
The battery is discharging right before our eyes, until I realized what was going on and what was eating up the battery so much.
I didn’t notice anything unusual in the battery’s operation, but bugs remained in the system - the firmware would need to be improved.
There is no abnormal discharge of the iPhone, but it seems that the battery began to discharge a little faster.
A few more reviews that our editors received:
After installing iOS 11, the Weather widget stopped working for me. I went to Settings, turned off and turned on geolocation again, tried to change the city - it didn’t help. I can’t figure out what the problem is! Of course, this is not criminal, but I wouldn’t want to do a rollback.
The bluetooth and wifi buttons in my control center do not work. If I turn off Bluetooth, for example, the pair is completely broken. You have to go through the settings.
For developers or wait for the final version of the new operating system? Or maybe it’s not worth switching to iOS 11 at all? MacDigger offers to understand all the intricacies of the new software platform Apple.
How to install iOS 11 on iPhone and iPad
The first and probably the most basic rule when installing iOS 11 is to back up your data. Fulfill iPhone flashing and iPad preferably after performing a backup, then there will be no reason to worry about lost photos or deleted messages.
This is not at all difficult to do: you just need to go to iTunes on your PC, having previously connected it to mobile device. In the “Overview” tab in the “ Backups“You should click on the “Make a copy now” button, after which the backup will begin immediately. Now that all copies have been made, you can start flashing.

First you need to download special profile developer, without whom switch to development iOS version 11 will not work. You can get a profile, you should open it only in Safari browser. Immediately after this, a question will appear on the screen on which device the profile should be installed. Having selected the iPhone, the user is taken to the “Profile Installation” menu: here, of course, you need to click “Install” and agree with all subsequent requirements of the smartphone.

After reboot iPhone you need to go to the main “Settings” and select “Software Update”. If all previous steps have been completed correctly, the system will detect the presence new version iOS. By the way, downloading and installing the update will take about 30 minutes.
What's new in iOS 11?
Now that all installations are complete and the iPhone has received its long-awaited iOS 11, you can move on to the main features of the updated operating system. First of all, it’s worth mentioning the Control Center, because it is one of the first that greets users immediately after a reboot. In iOS 11, it has been completely updated: now all switches are available on one screen, and 3D Touch support has also appeared for calling up an expanded menu a certain point settings.

The key and already available innovation was App update Store, which significantly improves navigation among millions of applications, selection of the most convenient ones and their presentation in the store. The lock screen and notification bar have undergone almost imperceptible changes.

Became more personal Siri and now you can operate with data and work history in Safari, News, Mail, Messages and other applications. The possibilities for integrating a personal assistant into applications via SiriKit have expanded. New categories have appeared, including task lists, notes and reminders, bank transfers and invoices, as well as QR codes.

In the Camera app, new features include Loop and Bounce effects in Live Shots, allowing you to create looping videos, and a long exposure mode has been added. Memories are optimized for both portrait and landscape orientations, improved selection algorithms for automatic creation memories. A very popular step was the introduction of the new HEIF image format, which allows reducing file sizes without further degrading quality.

To prevent drivers from being distracted from the road and putting themselves and passengers in a dangerous situation, the Do Not Disturb feature will automatically turn on while driving. Favorite contacts You can send notifications that the user is driving and a response will follow upon arrival at the destination.

How to return old firmware?
Downgrading to "ten" is not much more difficult than updating to iOS 11. To do this, you will need to install the latest version iTunes programs on PC. After this, you need to connect your iPhone or iPad to your computer and put it in DFU mode. There is only one way to do this: turn off the iPhone, and then simultaneously hold down Home buttons and Power for about ten seconds. After this time Power button you need to release it and hold Home for about 15 seconds. After this, the message “iTunes has detected an iPhone in recovery mode” will appear on the computer screen. All that remains is to click on the “Restore iPhone” button, after which the device will return to iOS 10.3.2.
Is it worth upgrading?
There are a few things to note. Firstly, iOS 11 is still too crude, the beta status and the prefix “for developers” were not assigned in vain - the main goal of this build is to allow application and service developers to get acquainted with the new capabilities of the OS and adapt their products.
There are lags from time to time, and some applications close on their own for no reason. Besides, unlock iPhone It doesn’t always happen the first time, and the battery discharges noticeably faster.
If you want to receive stable firmware, which will be as well optimized as possible, then it is better to wait for the official release of iOS 11, which should take place in mid-September along with the anniversary iPhone 8.
However, if you can't wait to try out all the new features and see the modernized design in person. App Store and Control Center, you can safely upgrade to iOS 11. After all, in any case, the wait for the final version of iOS 11 is still quite long, and you can roll back to the previous version at any time.