Restoring from a wim image. Mounting an image using DISM
The development of technology, the emergence of new generations of components that work much faster and are more economical, makes it possible to extend the life of computers and delay the need to purchase a new, more productive model. One option for such an upgrade would be to replace a traditional hard drive with its solid-state counterpart.
Considering the excellent speed characteristics of such drives, using them as system drives is a The best decision. ABOUT possible problems that may arise during transfer system partition from a classic hard drive to an SSD, we'll tell you. We will talk about the Windows 8 system installed on a Lenovo laptop, and similar issues of modernization, repair, and computer setup Apple We'll leave it for another time.
Wim image binding
Windows 8 has a factory reset mode when problems occur that cannot be fixed by any other means. This will entail the loss of all installed programs, settings, personal data, etc., but all defects in operation will disappear, and the system will return to its original form.
When replacing a disk and after the accompanying procedure of transferring a system from an old disk to a new one, it happens that the connection to the system environment is broken Windows recovery 8 wim OS images with factory settings. It is contained in the hidden Recovery partition. The result of violating this binding is the impossibility of rolling back the system to factory settings.
Next, we will describe the process of how to restore the wim image binding. Used for example Lenovo laptop with UEFI BIOS. The algorithm of action will be similar for devices from other manufacturers. The difference may lie in the names of menu items and some other little things.

If you don’t have confidence in your abilities, and what is described below looks too complicated, then it would be best to go to the launch.rf workshop computer repair in Otradnoye and find out when they can help you with this problem.
You need to go to the Disk Management utility. There we will see that all partitions, including the hidden Recovery, are on system disk intact.

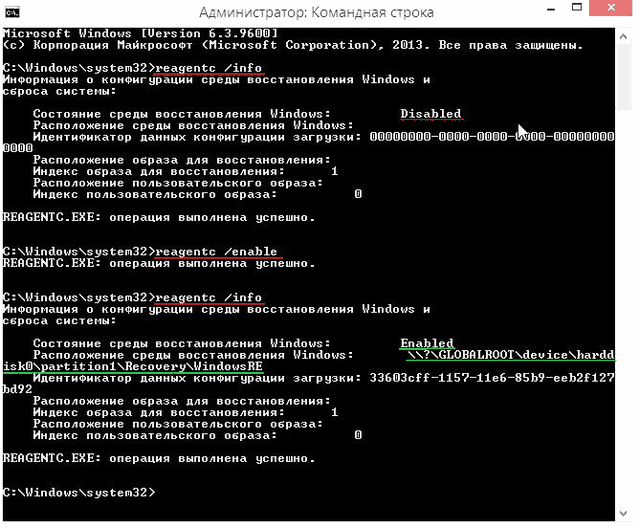
First of all, make sure that the recovery environment is enabled, for which you need to command line enter "reagentc /info".
In response, we will receive a message that the recovery environment is disabled. This happened after migrating the system from an old hard drive to an SSD. You need to turn it on. The command “reagentc /Enable” is intended for this.
The REAgentC program will report that the recovery environment (Winre.wim file) is enabled, and its standard location is in the hidden first partition of the disk - \\?\GLOBALROOT\device\harddisk0\partition1\Recovery\WindowsRE. The problem is that the location of the recovery image is unknown. This means that if you use the one-button recovery mode (Push-Button Reset Overview), the installation DVD will be used as the image. Windows disk.
Previously, we established that we have all the necessary partitions, including the hidden Recovery with the wim image, and the problem is the missing connection between this image and system environment recovery. Let's start restoring the connection. You will need a command line where you need to enter several commands in sequence:
- "Diskpart".
- “lis vol” – a list of all disk partitions is displayed.
- “sel vol 4” – select the section containing the desired image recovery.
- “assign letter M” – assign the letter “M” to section 4.
- “exit” – exits the Diskpart utility.

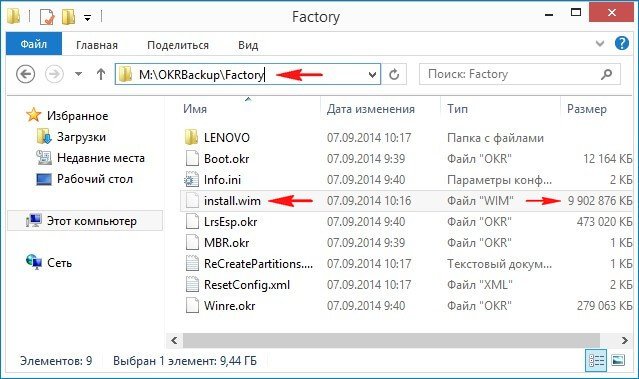
Now you should open “Explorer”, in which the “M” drive will appear. To control, you can check that the “install.wim” file containing the factory image of the system is located on this drive.
Let's return to the command line and continue working. “M:” – with this command we go to the “M” drive.
The next directive is “attrib /s /d”. With its help, the full paths of files located in the directory and subdirectories on this disk and their attributes. We see that the “Factory” subdirectory we are interested in has attributes S “system”, H “hidden”, R “read only”, which we do not need and need to be cleared.

To do this, enter the commands:
- “cd OKRBackup\Factory” – change the current directory to L:\OKRBackup\Factory.
- “attrib -s -h -r /s” – remove the listed attributes from all files in this directory.
- “attrib /s /d” – control that attributes have been removed.

“C:” – goes to the system drive.
Now we bind the wim image with the command “reagentc /setosimage /path M:\OKRBackup\Factory /index 1”. If everything went well, now when you roll back to the original settings, information from the desired section disk (from wim image). To verify this, you can run the command "reagentc /INFO".

Push-Button Reset Overview (one-button system reset)
Just in case, we will briefly describe the procedure for returning to factory settings. You need to go to “Options”.


Click the “Start” button in the “Remove all data and reinstall Windows” item.

A warning window will appear telling you what action will be taken. You need to click the “Next” button.

The system rollback procedure to factory settings will begin.
If the OS does not start
Need to boot from installation media Windows 8, click Next.

Click "System Restore".

In the “Select action” window that opens, click “Diagnostics”.

Select the “Return the computer to its original state” mode.


Then select “Windows 8.1”.

The last window will open, in which you can click the “Return to original state” button.

The process of restoring the system to factory settings will begin.

Sometimes Winre.wim and other errors system errors WIM may be related to issues in the Windows registry. Several programs can use the Winre.wim file, but when those programs are uninstalled or modified, sometimes "orphaned" (incorrect) WIM registry entries are left behind.
Basically, this means that while the actual path of the file may have changed, its incorrect former location is still recorded in the Windows Registry. When Windows tries to look up these incorrect file references (file locations on your PC), Winre.wim errors can occur. Additionally, a malware infection may have corrupted registry entries associated with Microsoft Windows. So, these corrupted WIM registry entries need to be fixed to fix the problem at the root.
Manually editing the Windows registry to remove invalid Winre.wim keys is not recommended unless you are PC service professional. Mistakes made when editing the registry can render your PC inoperable and cause irreparable damage to your operating system. In fact, even one comma placed in the wrong place can prevent your computer from booting!
Because of this risk, we highly recommend using a trusted registry cleaner such as WinThruster (Developed by Microsoft Gold Certified Partner) to scan and repair any Winre.wim-related registry problems. Using a registry cleaner, you can automate the process of finding damaged registry entries, links to missing files (for example, causing the error Winre.wim) and broken links within the registry. Before each scan, a backup copy, which allows you to undo any changes with one click and protects you from possible damage to your computer. The best part is that eliminating registry errors can dramatically improve system speed and performance.
Warning: Unless you are an experienced PC user, we DO NOT recommend manually editing the Windows Registry. Using Registry Editor incorrectly can cause serious problems and require re Windows installations. We do not guarantee that problems resulting from misuse Registry Editor can be eliminated. You use Registry Editor at your own risk.
Before manually restoring Windows registry, you need to create a backup by exporting a portion of the registry associated with Winre.wim (eg. Microsoft Windows):
- Click on the button Begin.
- Enter " command" V search bar... DON'T CLICK YET ENTER!
- While holding down the keys CTRL-Shift on your keyboard, press ENTER.
- A dialog box for access will be displayed.
- Click Yes.
- The black box opens with a blinking cursor.
- Enter " regedit" and press ENTER.
- In the Registry Editor, select the Winre.wim-related key (eg. Microsoft Windows) you want to back up.
- On the menu File select Export.
- On the list Save to select the folder where you want to save the backup Microsoft key Windows.
- In field File name enter a name for the backup file, such as "Microsoft Windows backup copy".
- Make sure the field Export range value selected Selected branch.
- Click Save.
- The file will be saved with extension .reg.
- You now have a backup of your Winre.wim-related registry entry.
Next steps when manual editing registry errors will not be described in this article, as they are likely to damage your system. If you want to receive more information about manually editing the registry, please see the links below.
Extracting Windows 7 files from the installation DVD
As a result of infection of the computer with viruses, Trojans and other dangerous programs, the files of the installed Windows 7 may be damaged or deleted by mistake. But do not rush to reinstall Windows 7 because of one or two damaged files, the necessary files can be extracted from the installation DVD Windows 7.
All files Windows 7 compressed and packed into an image file install.wim, located in the folder sources installation disk Windows 7. To extract the required file, you need to mount (connect) the install.wim file using the utility DISM. None third party programs this is not required.
Mounting an image using DISM
1. Insert the Windows 7 installation disc into your DVD drive, open it and copy the file install.wim from folder sources to drive D.
2. Create a folder on drive D and name it, for example, wseven. The install.wim image will be included in this folder. Please note that you CANNOT use the root of drive C as the folder for mounting the install.wim image.
3. Open Start > All Programs > Accessories .
Run the command:
dism /Mount-Wim /WimFile:D:\install.wim /name:"Windows 7 Ultimate" /MountDir:D:\wseven
Explanations:
- dism is a command line utility built into Windows 7 that allows you to mount and manage WIM images.
- The /Mount-Wim parameter mounts the WIM file.
- The /WimFile parameter allows you to specify the location and name of the WIM file to be mounted.
- The /name parameter allows you to specify a name Windows release 7, which will be mounted.
- /MountDir: Specifies the directory where the WIM image will be mounted.
6. Wait for the image to connect. This may take a few minutes.
7. Open the D:\wseven folder, find the required file in it and copy it to any location on your hard drive (for example, replace a damaged Windows file 7).
Disabling an image in DISM
After copying the necessary files, the image can be disabled.
1. Close all folders and files.
2. Open Start > All Programs > Accessories, click right click mouse over the command line icon and select Run as administrator.
3. Run the command:
dism /Unmount-Wim /MountDir:D:\wseven /discard
Explanations:
- The /Unmount-Wim option unmounts the image.
- /MountDir: Specifies the folder in which the image you want to mount is mounted.
- The /discard option discards all changes made to the image.
4. Wait for the image to shut down.
5.Delete the folder wseven and file install.wim from disk D. All recovery Windows 7 finished. Enjoy your work!!!
Introduction
So, you have finished installing the operating system, drivers, updates and programs, checked its performance and stability, were satisfied with the result obtained and want to be able to “roll back” to this system state in case of unforeseen circumstances.
Windows 7 is equipped with enough powerful means Reserve copy, which allow you to reduce the time to restore the system.
Those who bought new computers with pre-installed Windows system 7, are familiar with the recovery function, after applying which operating system, and sometimes the contents of the entire hard drive, returns to its factory state. In this case, user files located on the hard drive may be lost.
If you have an installation disk with the operating system, you are spared from such losses (How to reinstall Windows 7, saving settings and installed programs), but subsequent installation of drivers and updates is inevitable.
I offer you a method that will significantly reduce the time spent setting up the system after reinstallation; moreover, it does not require an installation disk.
The article uses materials from Vadim Sterkin's blog and Valery Volobuev's video report Setting up the Windows Recovery Environment in Windows 7.
The algorithm described below does not require specific knowledge and is relatively easy to implement for home user. We will perform the task in the following order:
- prepare a partition for the future recovery partition;
- create a system image in Windows environment RE;
- configure the recovery environment;
- Let's reinstall and reconfigure the recovery environment.
Preparing the recovery partition
First of all, we need to create a partition on which we will subsequently place the operating system image file, as well as the file for deploying the recovery environment.
There are many ways to perform this operation, I will use standard tools: Disk Management and Command Line Utility DISKPART. You can read about this in the article.
We will determine the partition size based on the current occupancy of the partition with the operating system and the availability free space. For example, if the system takes up about 20 gigabytes, the optimal size would be from 5 to 10 gigabytes.
In my example, the section D:\ was first compressed
Figure 1 - compression of partition D:\
then in the resulting unmarked area
Figure 2 - Unallocated disk space after compression
using the utility DISKPART a primary partition was created, formatted, and a label was assigned to it Recovery and letter R. (DISKPART was used because the fourth partition created by Disk Management will be an additional partition. You can experiment with placing the recovery partition on an additional partition.)
Run sequentially:
::Start DISKPART Diskpart::Select a disk. If there are several of them, then the number the desired disk determined by the command LIST DISK Sel disk 0::Creates a primary partition on the entire unallocated area of the disk. If necessary, specify the partition number using the LIST PART Create partition primary::Quick formatting of the created partition and assigning it the “Recovery” label Format LABEL=”Recovery” quick::Assigning the letter R to the partition Assign letter=R::Completing work in DISKPART Exit
Figure 3 - work in DISKPART
Here and in what follows we will work on the command line.
Before moving on to capturing an operating system image, create a R:\ folder WinRE for storing it.

Figure 4 - WinRE folder in the root of the future recovery partition.
Creating an operating system image
Once downloaded, launch the command line and text editor:
Using the “Open” menu (combination Ctrl keys+ O) identify the letters of the sections.
In my example, as can be seen from Figure 7, the system section received the letter D:\, utility imagex.exe is in the folder E:\WAIK Tools\, and the section Recovery- letter F:\.
Figure 7 - partition letters in the WindowsRE environment.
One note: since we will not need to transfer the customized image to another computer, we will use the command given in the “Boot to Windows PE and save the image using the ImageX utility” section of the above article. Run the command:
"E:\WAIK Tools\amd64\imagex.exe" /capture D: F:\WinRE\install.wim "Windows 7 Ultimate SP1 Custom"
Necessary clarifications:
- "E:\WAIK Tools\amd64\imagex.exe"- Path to the imagex.exe utility. Quotes are used to avoid problems with spaces in the folder name.
- /capture D:- The key indicates the capture of the system image located on the D: partition (as seen in WindowsRE).
- F:\WinRE\install.wim "Windows 7 Ultimate SP1 Custom"- Saving the captured image to the install.wim file (this is important, since in in this case only this name is valid) to the F:\WinRE folder. A file comment is specified and the default compression method is used. More details- in the TechNet knowledge base article ImageX Command Line Options
Figure 8 - creating an operating system image in the Windows RE environment
Quit WindowsRE and reboot. Let's move on to final stage creating a recovery partition.
Setting up the recovery environment.
In addition to the operating system image file, I decided to place a file on the new partition that would boot into the recovery environment. With this arrangement, it will not depend on the partition with the operating system.
As you know, the recovery environment is deployed from an image file WinRE.wim located in the folder Recovery at the root of the system partition. Via Explorer Windows access this folder is closed. The file attribute is hidden system. How to place the file in the location we choose? Let's use command line utilities.
First, disable the recovery environment. Please note that Any actions with the recovery environment must be preceded by disabling it! To do this, on the command line run
Reagentc /disable
After running this command the file WinRE.wim will move to the folder c:\Windows\System32\Recovery . From it we will copy the file to the folder R:\WinRE. Use the command xcopy with key /h:
Xcopy /h c:\Windows\System32\Recovery\winre.wim r:\WinRE
Figure 9 - copying the WinRE.wim file
And finally, a few final chords:
::Set custom path (key /path) to the system image file located in the folder, specified by the key /target Reagentc /setosimage /path R:\WinRE /target c:\Windows::Setting a custom path (key /path) to the system recovery environment deployment file located in the folder specified by the key /target Reagentc /setreimage /path R:\WinRE /target c:\Windows::Enable the recovery environment Reagentc /enable::Check the recovery environment settings Reagentc /info
As can be seen from Figure 10, the setup was successful. Do not close the window - the command line will still be needed.
Figure 10 - Setting up a custom recovery environment.
It will be interesting to see what changes have taken place in the section Recovery. To do this, enable the display of hidden and system files.
Figure 11 - changing the contents of the R section.
As you can see, the file WinRE.wim in folder WinRE no, but a folder appeared Recovery at the root of the section. Believe me, the file is now in it. I will not dwell on the structure of the Recovery folder - if you wish, you can study its contents and also compare it with the BCD parameters (using the bcdedit / enum all command).
All that remains is to protect the section from accidental impact from users. To do this, you need to hide it from Explorer and exclude the ability to work with it in Disk Management. The utility will help us with this again Diskpart. On the command line, run sequentially (the disk and partition numbers correspond to the configuration given in the article):
::Start DISKPART Diskpart::Select a disk. If there are several of them, then the number of the required disk is determined by the command LIST DISK Sel disk 0:: Select a partition. If necessary, specify the partition number with the command LIST PART Sel part 4::Deleting a letter - the section will be hidden in Windows Explorer Remove::Setting the section identifier ID=27. This ID is set specifically for recovery partitions. It becomes impossible to work with such a partition in Disk Management, which provides additional protection for it Set id=27
Figure 12 - working with the recovery partition in DISKPART
Changes that have occurred in the system
Firstly, the partition is not visible in Windows Explorer, and it does not have a context menu in Disk Management.
Figure 13 - Explorer and Disk Management Manager.
Secondly, in the Advanced Recovery Methods window in the description of reinstalling Windows, there is no requirement to have an installation disk.
Figure 14 - Windows advanced recovery methods menu.
Thirdly, the recovery environment menu has changed:

Figure 15 - additional item menu in Windows Recovery Options in Recovery Environment
This could have been the end of it. But there is a need to dwell on several nuances that arise after reinstalling the system in this manner. I will reinstall the system from the recovery environment.
Setting up a recovery environment after reinstalling the system
For the purity of the experiment, I will format the partition with the system and the partition with the download files. Moreover, I strongly recommend formatting the “System Reserved” section to avoid confusion with loading in the future.
Figure 16 - formatting partitions in the WindowsRE environment.
No user participation is required during the reinstallation process. You will receive a system identical to the one you had at the time you took the image.

Figure 17 - beginning of system reinstallation.
The only thing is that after reinstalling you need to make a few changes:
- Due to a complete rebuild of the BCD, the recovery environment must be reconfigured.
- hide section in explorer Recovery.
Disable the recovery environment with the command
Reagentc /disable
Turn on display of hidden and system files, open the folder WinRE on the section R:\ and make sure the file exists Winre.wim. If necessary, copy it from the folder Windows\System32\Recovery or from a folder R:\Recovery \xxxxxxxx -xxxx -xxxx -xxxx -xxxxxxxxxxxx.
After that delete the folder Recovery on the section R:\.

Figure 18- deleting the Recovery folder
Then enable the recovery environment:
Reagentc /enable
Make sure the settings are correct (note that the name of the folder in which the WinRE.wim file is located in the Recovery folder is different. Therefore, before connecting the recovery environment, you can safely delete the old one.):
Reagentc/info
Figure 19 - connecting the recovery environment after reinstallation.
Remove the letter from the partition R:\
Diskpart Sel disk 0 Sel part 4 Remove Exit
Your computer is ready for a fresh reinstallation.
One final note. While performing numerous reinstallations while preparing this article, I noticed the appearance of an incomprehensible folder in the list of available drives on the “System Protection” tab. This may be due to the missing folder in the system image System Volume Information or changing section IDs.
Figure 20 - phantom partition in the list of available disks on the “System Protection” tab.
To get rid of the strange folder, disable system protection on this phantom partition and enable it on the partition with the current system.
Conclusion
There are probably more simple ways reservations, especially using various programs. I don’t pretend that you will definitely use the method described above, but I think it’s convenient and practical.
Of course, the system will be updated over time. To keep the image up to date, periodically rewrite the file in Windows RE Install.wim.
In the main WinSetupFromUSB window, select the name of our flash drive.
Put a tick on the item Auto format it with FBinst and check the FAT32 box,
Check the box Vista/7/8/Server 2008/2012 based ISO and click on the button that opens the Explorer window.
Explorer opens, find it on the computer ISO image Live CD AOMEI PE Builder and select it with the left mouse, click "Open".

Click “GO”.


"Yes"

The creation of a bootable Live CD AOMEI PE Builder flash drive begins.

Bootable USB flash drive ready.

"OK"

We boot the laptop from the bootable USB flash drive Live CD AOMEI PE Builder. Our flash drive is universal; from it you can boot a laptop with a UEFI interface, as well as a regular BIOS.

Press “Enter” on the keyboard.

The Live CD AOMEI PE Builder desktop loads, which is a regular Live CD on Windows based 8.1.
We connect a portable hard drive to the laptop USB disk or regular flash drive volume 16-32 GB.

Click on Windows button Disk Management.

In disk management, three drives connected to the laptop are visible.
Disk 0. Laptop hard drive with all partitions:
The first hidden partition without a letter, volume 450 MB, contains the Windows 8.1 recovery environment.
The second hidden partition without a letter, volume 100 MB, with systemic EFI partition(contains the boot configuration store (BCD) and operating system boot files).
Section (C:) with installed Windows 8.1 which won't load.
Section (D:) with user data files.
The last hidden partition without a letter, volume 20.37 GB, is where the factory image of Windows 8.1 is located. We need to enter this section and copy the factory WIM image to a portable one HDD USB (I’ll explain why later).
Disc 1. Bootable USB flash drive Live CD AOMEI PE Builder.
Disc 2. Portable USB hard drive, capacity 1 TB.

Before work, the drive (C:) needs to be formatted. Right-click on it and select “Format”


"OK"

The drive (C:) is formatted.
Launch the command line

and assign a letterhidden partition, volume 20.37 GB.
Enter the commands:
diskpart
lis vol (list all sections hard drive)
sel vol 5 (using this command we select hidden RECOVERY section without letter, volume 20.37 GB, with factory image of Windows 8.1)
assign (the command assigns a letter to the hidden partition).

Open the My Computer window and see that the hidden partition is assigned a letter (E:), go to this partition.

First of all, turn on the display hidden files and folders, otherwise we will not see the factory WIM image with Windows 8.1, since it has the Hidden attribute. Left-click on View and check the box “Hidden” items ( Hidden elements)

Next we look in the folders factory WIM image. On my laptop it is in the folder"Factory" is called install.wim. Regardless of the laptop manufacturer, the file containing the factory image of Windows called install.wim.

Sometimes this file divided into several files with the extension .swm I will also explain to you what to do with these files later in the article.

So, let's copy our file install.wim to a portable USB hard drive. Right-click on the file and select"Copy"

Go to the partition (H:) of the portable USB hard drive.

Click on empty space right mouse and select Paste.
File install.wim is copied to the partition (H:).


File install.wim is copied to the partition (H:).

Friends, now all we have to do is expand the contents of the file using the command line install.wim(factory image of Windows 8.1) to disk (C:), for this you need to enter only one command, but you need to enter it correctly, the file index must be indicated in the commandinstall.wim and it's easy to define.
Any install.wim file must have a so-called image index and in the next command we must specify it. To determine the image index of the install.wim file, open the command line and enter the command:
DISM /Get-WimInfo /WimFile:H:\install.wim
Where H:, the drive letter where the file is located install.wim.
As you can see, the image index 1 .

In accordance with this, we introduce next command:
imagex /apply /check H:\install.wim 1 C:\
where image /apply /check H:\install.wim 1 C:\, means unpack the file install.wim from disk (H:) with the image checked for errors, on disk (C:), and 1 is the image index.
Unpacking begins Windows image 8.1 from file install.wim to drive (C:). In other words, we did it using the command line and the utility ImageX is what the factory reset program was supposed to do - deploy the factory image from the hidden partition to the (C:) drive.
Progress 100%. Unpacking completed successfully. Factory Windows 8.1 deployed to disk (C:)!

We reboot the laptop and enter the final phase of installing Windows 8.1.
We do not change the language and regional settings.

We accept the terms of the license agreement.

The laptop manufacturer may ask you to create your ID and register the system. You can refuse by unchecking the appropriate boxes.

Enter the computer name.

You can immediately set up an Internet connection via WI-FI or refuse.
"Skip this step".

You can manually configure the settings, as I told you how to do this.
Or you can “Use standard parameters»

Enter your username and click “Finish”

Windows 8.1 is loading.

When you connect to the Internet, the operating system is automatically activated.

I foresee your questions:
1. Hello admin! You found out the image index install.wim using the utilityDISM, why didn’t you further deploy the image using it?
Yes, you are right, you can use the DISM utility, the command will look like this:
Dism /apply-image /imagefile:H:\install.wim /index:1 /ApplyDir:C:\

but since Windows 7 I’ve gotten used to the ImageX utility, DISM does the same thing, but the commands are 2 times longer, which means the likelihood of errors (especially for an inexperienced user) increases.
2. Why transfer the install.wim file from a hidden partition of the laptop hard drive to a portable one? hard drive USB?
Basically, it doesn't matter where the file is located install.wim, and on the command line you can specify the full path to the file, for example, in my case, the command would look like this:
imagex /apply /check E:\OKRBackup\Factory\install.wim 1 C:\
3. What should I do if there is no file on my laptop in the hidden section? install.wim, and there is a group of files:
install4.swm...?
In this case, you need to add a key ref and the command will look like this:
imagex /apply /check /ref H:\install*.swm H:\install.swm 1 C:\

If you use DISM, the command will look like this:
Dism /apply-image /imagefile:H:\Install.Swm /SWMFile:H:\install*.swm /index:1 /ApplyDir:C:\

4. After expanding the file install.wim, Windows boot loader 8.1 gave an error. What to do?
It is better to restore the bootloader in a recovery environment. There is a shortcut to go to the environment on the Live CD AOMEI PE Builder desktop WIN recovery 8.1 - Windows Recovery Environment.

5. I have a 32-bit operating system and your image Live CD AOMEI PE Builder 64 bit, not suitable for me.