Enable wifi on packard bell laptop. How to turn on Wi-Fi on a laptop without hotkeys
Laptop owners usually use a wireless connection to access the Internet; fortunately, a Wi-Fi adapter is available on all laptop models without exception. However, to use it, sometimes you have to figure out how to turn on wifi on a laptop.
Hotkeys or hardware switch
The first step is to physically turn on the Wi-Fi adapter. This procedure differs slightly on different laptop models, but its meaning is the same: you need to find a hardware switch or use the function keys. Let's look at a few examples:
You can continue the options for turning on Wi-Fi for a long time, citing methods for MSI, Acer, Samsung and other brands. Even different series from the same manufacturer have different ways of activating the wireless module, therefore:
- Inspect the laptop case for a hardware switch or Wi-Fi power button.
- Examine the keyboard - one of the keys in the F1-F12 row should be marked with a wireless connection icon. If you press it together with the Fn button, the adapter will turn on or off.

If you have a Sony Vaio series laptop, then there may be neither a hardware key nor an Fn button on its keyboard. For Wi-Fi to work in this case, you need a special VAIO Smart Network utility, which can be found on the manufacturer’s official website.
Fn button doesn't work
What to do if the Fn button does not work? How to turn on the adapter in this case? First you need to figure out why the key does not work. Fn operates under BIOS control and has its own utility, without which the key does not function. Therefore, if the button does not work, you first need to find a utility for enabling hot keys on the manufacturer’s website for a specific laptop model (the name should contain the word “HotKey”). 
If installing the utility did not help or the key is physically damaged, you will have to use an alternative method of turning on the adapter. On Windows 8 and Windows 10, to turn on the adapter, just click on the Wi-Fi icon in the notification panel and move the “Wireless network” slider to the active position. If the adapter drivers are installed correctly, then the icon must be there. 
There is no such function in Windows 7, but you can try to enable the wireless connection through the window for changing adapter settings (this is discussed below). If this method does not help, then you will have to look for an external keyboard with a working Fn key and then never turn off the Wi-Fi module.
Setting up Wi-Fi on different versions of Windows
You will figure out how to physically turn on the module quite quickly. Sometimes this is where the Wi-Fi setup ends: the system performs the rest of the necessary actions on its own, displaying a list of available wireless points. But sometimes you have to establish the connection manually.
Regardless of the version of Windows, you first need to check that the Wi-Fi module drivers are installed without errors:

To be sure, it is better to go to the official website of the laptop manufacturer and find the latest version of the wireless network module driver for your model. In addition, right-click on the adapter and select “Enable” (if its operation is stopped).
Windows XP
In theory, Windows XP should have been discontinued a long time ago, but on some older Dell models and other laptops, the legendary system still continues to perform its functions. Wi-Fi in Windows XP is configured as follows:

There should be a Wireless Network Connection icon in the File Explorer window. Its presence demonstrates that the Wi-Fi module is working correctly. Right-click the icon and select Enable. Further:

If the list of available points does not include the network that your router distributes, click “Update list”. Then select the desired point by name and click “Connect”. If the network is password protected, you will be prompted to enter an access code, after which a connection will be established.
Windows 7
On Windows 7, the procedure for connecting to a wireless network has changed slightly, becoming a little easier. Now all available networks are displayed after clicking on the Wi-Fi icon in the system tray. But if there is no icon, then:
- Go to Network and Sharing Center.
- Click "Change adapter settings."
- Find your wireless connection and make sure it is turned on.

After turning on the wireless connection, the Wi-Fi icon will appear in the tray. Click on it to see a list of available points, select the network and click “Connect”.
Windows 8
On Windows 8, the procedure for connecting to Wi-Fi remains the same, but an Airplane mode has been added, which you need to know how to work with. If the adapter driver is installed and the wireless connection is working correctly, then in the notification panel you will see a Wi-Fi icon, when you click on it, a list of available networks appears.

If there is no icon, follow the same steps as on Windows 7 - open the “Change adapter settings” window and turn on the wireless connection. If there is no wireless connection itself, check the drivers and the status of the module - everything should be turned on and installed. 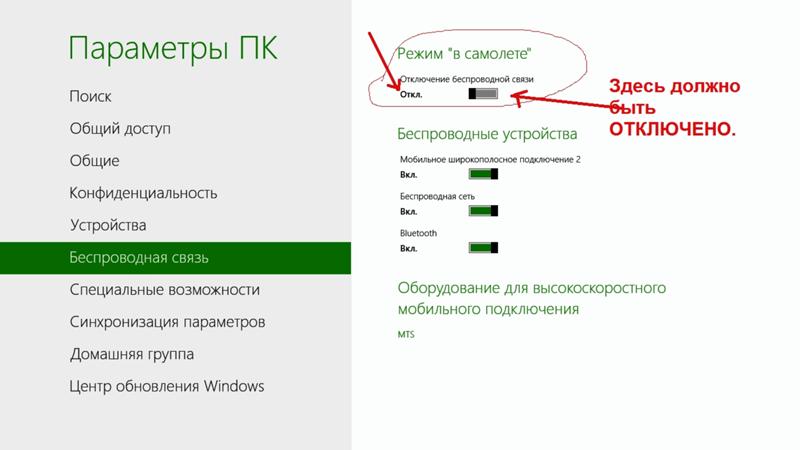
If the adapter is turned on, the drivers are installed, but no available networks are detected, check that the Airplane mode icon is not hanging on the notification panel. If it is, you need to disable this mode. To do this, click on the icon and move the slider to the “Disabled” state.
Windows 10
On Windows 10, everything remains the same with a few minor changes, so you'll quickly figure out how to connect your laptop to Wi-Fi:
- Click on the wireless connection icon in the tray.
- Select the desired network.
- Click "Connect" and enter your password.
If the access point does not appear, try adjusting your network settings. Click on the link of the same name - the “Network and Internet” section of Windows 10 settings will open. 
There are two tabs of interest here:
- Wi-Fi - Make sure your wireless network is turned on.
- Airplane mode - make sure the mode is turned off.
You can go to the section for changing adapter settings and enable the wireless connection. Simply put, on Windows 10 you have several equivalent options - you just need to choose the more convenient method for yourself.
To connect to the Internet on a laptop via a wireless network, you need not only a WiFi module, but also a working access point. To do this, you will need to buy a router at home, and to access the Internet while sitting somewhere in a cafe, it will be enough to turn on Wi-Fi on your laptop and enter the password for the desired network: installing an access point is the task of the owners of the establishment.
A WiFi module is installed in almost all modern laptops, and it’s easy to check whether your device has such a function. To do this you will need:
- Open “Control Panel”;
- Launch “Device Manager” (you can use the search bar);
- Expand the “Network adapters” block.
An existing device with the word “Wireless” in the name means that your laptop supports wireless Internet.
Turning on Wi-Fi on a laptop using the keyboard
Most often, Wi-Fi can be turned on using hot keys, usually two, pressed simultaneously. Their combination may vary among different laptop manufacturers, but the main Fn key, as a rule, is always there. The second key required to turn it on has a special WiFi icon and is located on the keyboard in the function row F1-F12.
You can learn more about how to enable Wi-Fi on a laptop of a specific brand from the following table.
In devices of the previous generation, Wi-Fi is turned on using a special slider on the laptop body, but the network icon remains the same.
How to turn on Wi-Fi on Windows 10
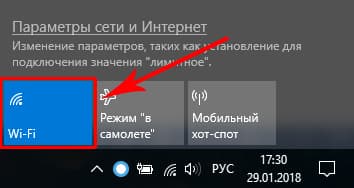
On laptops with “Ten”, “Wi-Fi” can be enabled either in the system parameters or using the notification area, and the second method is more convenient and faster:
1. From the taskbar, open system notifications.
2. Open the Network tab.

3. Turn on WiFi by clicking on the corresponding thumbnail.
To enable Wi-Fi on Windows 10 using the options menu, you must:
1. Open “Settings” and select the “Network and Internet” block.
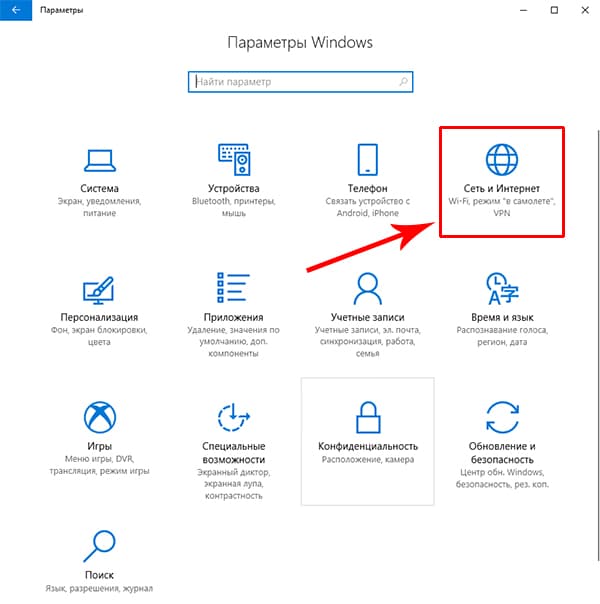
2. Click on the WiFi menu and turn on the wireless network status slider.

After these steps, the laptop will begin searching for all available wireless networks. If it is already in memory, the connection will occur automatically; if the access point for your device is new and protected (you will see a lock icon), you need to select it and enter a password to connect to the Internet.
Connecting WiFi on Windows 7 and 8
For laptops on previous versions of Windows, the algorithm for software enablement of Wi-Fi is different.
1. Go to “Control Panel” – “Network and Internet”, or right-click on the computer icon in the notification panel next to the clock.
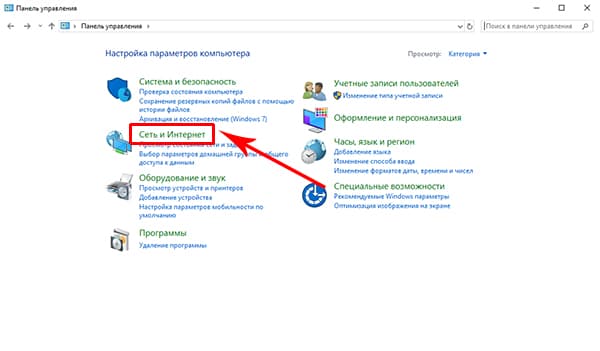
2. Select Network and Sharing Center.
3. Click on the “Change adapter settings” menu.

4. Using the right mouse button, turn on the wireless network.
When the Wi-Fi module is working, you need to select an access point (the list will open by clicking on the WiFi icon in the notification area) and, entering the password if necessary, connect to it.
If the Internet via Wi-Fi does not turn on
If Internet access on your laptop still does not appear after all of the above, connect the network cable to the computer directly, open Device Manager through the Control Panel, select the Network Adapters tab, find your Wifi module in the list and try updating the drivers. After that, disconnect the Internet cable and restart the laptop.

If you still cannot turn on the Internet after this, there may be either problems on the provider’s side, or incorrect router settings, or the Wi-Fi module is faulty. The cost of repairs at a service center ranges from 1000 to 2000 rubles, but you can get by with an external WiFi module - on Aliexpress such devices cost about 150 rubles.
When a user purchases a laptop, of course he wants to use all the features it provides. I chose the topic of today’s article, how to enable WiFi on a laptop in Windows 7 or 8, for a reason. It would seem that there is nothing complicated here, but if you do not know some of the nuances, then this procedure will not seem so trivial.
Problems can arise and, fortunately, they can be solved quickly and easily, you just need to know exactly how. In this article we’ll talk about some of the pitfalls that may arise when turning on Wi-Fi.
Is there wifi at all
The first thing we need to do is find out if your computer or laptop has Wi-Fi. Modern laptops, laptops, netbooks, phones and other devices have Wi-Fi. You can check whether your device has one on Google, but I can assure you right away that if you purchased it a long time ago, then the built-in receiver simply may not be there.
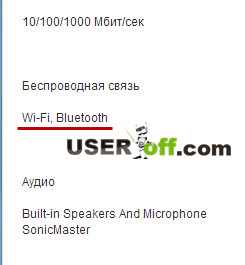
When you look for the technical characteristics of your device, look for the Wi-Fi inscription of the same name. For example, description of an Asus laptop:
Physically turning on Wi-Fi
Some laptops have a special slider that you move to turn Wi-Fi on or off. So that you understand what I'm talking about now, look at the image:

Next to it there may be the following inscriptions: “OFF” or “0” - turn off/off, as well as “On” or “1” - on/off. It is usually located on the right or left side of the laptop, and can also be on the front of it.
There are laptop models where to turn Wi-Fi on or off you need to click on the corresponding button, which is in the image below (button on the left):


Often, laptop manufacturers make this button backlit: for example, when Wi-Fi is on, it lights up; if it’s off, the laptop will not light up this button.

Although this is not always the case, that is, this button is not illuminated when turned on, so you must determine for yourself whether Wi-Fi is turned on. To do this, pay attention to the indicators on the front of the laptop. If you turn on Wi-Fi, the indicator that is responsible for this device should light up, thus letting the user know that they can now use it.

Function keys (Fn +)
On laptops from different manufacturers, this procedure is slightly different. Let's look at the hotkey combinations that may be on your laptop:
- Acer. Press and hold the keys: “Fn+F3”.
- Asus. Combination "Fn+F2".
- HP. Here we press “Fn+F12”.
- Lenovo. Required buttons: “Fn+F5”.
- Samsung. Either "Fn+F12" or "Fn+F9".
Listed above are ways to enable WiFi on the most popular laptop models. However, there is no guarantee that you have one of these laptops.
The Fn button may simply be missing. Then carefully examine all the keys on the keyboard. The WiFi network icon should be drawn on one of them, click it and the network will turn on.
Below you can see what the Wi-Fi icon looks like:

In the screenshot you can see that on this laptop you need to press “Fn” + “F2”.
Turn on Wi-Fi in Windows
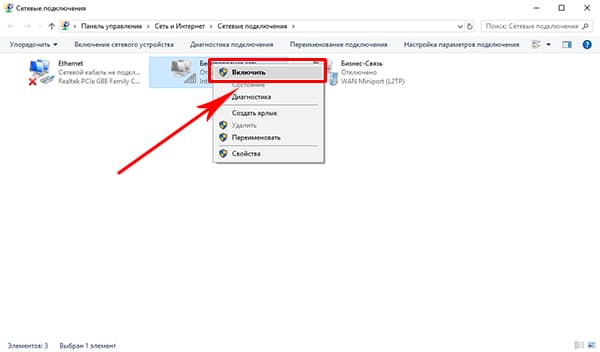
If you did the methods described above, but did not succeed in connecting to Wi Fi, do the following: go to the “Start” menu - “Control Panel” - “Network and Internet” - “Network and Sharing Center”. On the left, click on the item: “Change adapter settings.”

Right-click on: “Wireless Network Connection” and select “Enable”.

If there is no such item, but “Disable” is available, then Wi-Fi is enabled in Windows.

After this, Wi-Fi should work, but if it doesn’t help, or some error has occurred, or there is no network with that name, the question arises: “How to turn on WiFi on a laptop then?” Read on!
If our laptop is not automatically able to connect to the desired network, then the problem may be that the signal receiver device is disabled in the device manager. Now I will show you how to fix this using Windows 7 as an example.
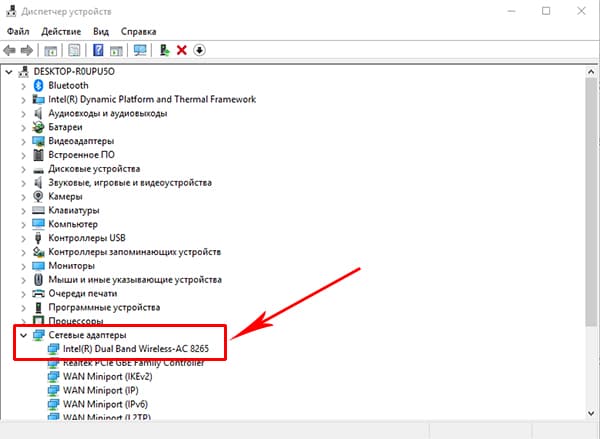
Go to the Start menu, right-click on Computer and select Properties.

In the window that opens, click on “Device Manager” on the left.

From here you can see which components in the laptop can be controlled - activate or disable the necessary device. We find something that has the word in its name Wireless. Right-click on it and select “Engage”.

By the way, if there is a yellow triangle with an exclamation mark next to the service icon, this means that the driver for this device is not installed on the laptop. In this situation, use another device (computer, laptop, netbook, tablet, etc.) through which you download Wi-Fi drivers, transfer them to the laptop and install them.
Other nuances of turning on Wi-Fi
Above, I described in detail how to enable WiFi on a laptop. But so that you can see the full picture of how to turn it on and how to connect to Wi-Fi, please follow the link further, since in this article I talk about other nuances that may arise in your case. The article “” was written using a “live” example, so it will be extremely useful for you.
If you are not familiar with installing drivers, then read: “”. To find the driver, go to the official website of your laptop manufacturer and enter the model in the site search. Then look for the Wireless driver in the list.
I do not rule out that users who read this article do not know the Wi-Fi password. If you don’t know it, then you won’t be able to log into the secure network. To find out how to view the Wi-Fi password, I recommend reading: “”. I also assume that some will ask about hacking, yes, it is possible to hack, but I won’t write about it.
Situations are different and there is no need to exclude the possibility that none of the above tips will help you. What to do then? Luckily for you, there is third-party software that you can safely use. Its meaning is that after installation, this program will automatically turn on every time you start Windows and, when you press a certain key combination, perform certain actions. For example, turn on Bluetooth or WiFi.
There are a huge number of such utilities; I can give SoftSwitch as an example. In addition to the above functions, it can also turn on the camera and TouchScreen. For each of these functions there is a specific combination of keyboard buttons, which you can familiarize yourself with if you decide to download this creation of programmers. Finding this program on Google will not be difficult for you, since it has a Free Soft license (free license). Download it, install it and enjoy!
And that’s probably all I have on this issue. Thanks for reading and I sincerely hope I helped you.
For clarity, watch the video:
24.03.2015
The wi-fi function is the most important element of laptops that is very popular today. A laptop without wifi is like a gas industry without gas.
Usually, when you buy a new laptop, the wifi function is turned off by default or you have to manually configure the wifi settings.
Configuration is carried out differently on different operating systems. There are also external settings that differ by laptop model (turned on using keys).
In this article I will tell you how to enable wifi on different laptops and how to make internal settings.
First of all, you need to configure the router and check whether wifi is turned on on the router itself. There are two ways to enable or disable wifi on your router:
1. On the back of the router there is a wifi button to turn it on and off.
2. Wi-Fi is turned on and off in the internal settings of the router.
We carry out an external inspection of the laptop, if you see an icon in the form of an antenna that lights up, it means that wi-fi is turned on, if it doesn’t light up, it’s turned off.

If you see an “X” on the wi-fi sign at the bottom of the panel, it means that the network is disabled.

Almost all laptop models have a mechanical wifi network switch or built-in software that turns wifi on and off. Laptop with mechanical wi-fi switches.

How to enable wifi on different laptop models
HP laptop:

HP Connection Manager software.
To open the program, go to “Start” - “all programs” - “HP Connection Manager”. Open this program in front of the device and press the power button. Let's look at the picture

Asus laptop:

For Asus laptops, Wi-Fi is turned on using a mechanical switch (on or off button).
In this case, managing wi-fi becomes convenient, but if the switch fails, there will be some problems.
Wi-Fi can also be controlled using the Fn+ F12 key combination on the keyboard, hold down the Fn key and press F12
Acer laptop:

But some Acer laptop models do not have a button on the case to turn Wi-Fi on and off. Therefore, the Fn+ F12 keyboard is used to control the wi-fi connection. You need to press Fn and without releasing press F12.
Lenovo laptop:

To enable Wi-Fi on Lenovo laptops, use the Fn+ F5 keys. Press the Fn key and without releasing it press F5. After performing these steps, the wi-fi indicator on the laptop should light up
Samsung laptop:

To connect a laptop to a wireless wi-fi network, you need to press the Fn+F9 combination on the keyboard. Hold Fn without releasing and press F9. As in all cases, if the connection to the network is successful, the indicator on the laptop will light up.
Toshiba laptop:

To activate wi-fi on Toshiba laptops, use the Fn+F8 key combination. Again, hold down the Fn key and press F8.
Internal wifi setup on a laptop
These settings depend on the operating system, which is configured differently. Basically, all settings are related to wi-fi in sleep mode, i.e. In some cases they must be enabled manually. Let's look at the settings on each Windows operating system. Before starting the settings, check the following parameter.
On the bottom panel on the desktop we look for the battery charging sign. Right-click on this sign and select “windows mobility center.”
In the window that opens, look for the wireless network section and make sure it is turned on.

How to enable wifi on a laptop with windows 7 operating system
Open “Start”, go to “Control Panel”, select “Network and Internet”. In the window that opens, go to “Network and Sharing Center”. Next, on the left side of the window, go to the “change adapter settings” section.

After that, the wireless networks window will open. Right-click on “wireless network connection” and select “enable”

If the network is on, leave everything as it is. If the data section is enabled, the window that opens will contain available wifi points.
Select the desired network and click connect. If you specified a password when setting up wifi on the router, then when you connect to the laptop network, it will ask you for that password, enter the password and press OK.
How to enable wifi on a laptop with windows vista operating system
In order to set up wifi on Windows Vista, you need to follow the same steps as on Windows 7.
Go to “start” and open “control panel”. On the left side, click “switch to classic view.”
Now you need to select “Network and Sharing Center”. On the left side of the window, click “manage network connections.”
Now go to “manage network and connections”, right-click on “wireless network connections” and click “connect”.
After completing these steps, a list of wifi connections will open. Select the desired connection, click connect, if necessary, enter the password, click OK.
How to enable wifi on a laptop with windows xp operating system
In order for the laptop to be able to connect to a wifi network on the Windows XP operating system, you must complete the following steps.
Click “start”, open “control panel”, go to “network connections”. Right-click on the “wireless network connection” section.
Right-click on “connection” and select “view available wireless networks.” A window will open in this window, click on “change order of network preference”.
Next, click on “network and access point” and click on the “automatic connection to the network” checkbox. Now go to the “view available wireless networks” section, select the network you need and click “connect”. If everything is done correctly, a message will appear on the taskbar in the lower corner indicating a completely successful connection to wifi.
If, when applying the above settings, it was not possible to turn on wifi on the laptop, then you need to check the following parameters.
Installing the wifi adapter driver on a laptop
In order to check whether the wifi adapter driver is working, you need to go to “Start” “Control Panel” “System and Security” and click “System”. Next, go to the left side of the window “Device Manager”

In the window that opens, go to the network adapters section. If there is a yellow triangle with an exclamation mark as in the picture

This means that the driver is not working. To fix this situation, right-click on the non-working driver and select “update driver.”
In the window that opens, select “automatic update”, if you have Internet access. Or go to the official website of your laptop manufacturer, in the drivers section, download the required driver.
In practice, there are cases when the wi-fi adapter is disabled. In this case, right-click on the adapter and click “enable”.
There are also cases when the adapter is located under the energy saving filter. To check whether the adapter is under this filter, go to the “control panel” “security system” “system” “device manager” then right-click on the driver itself, click “properties” in the window that opens and go to “power management”

In this window, uncheck “Allow the computer to turn off this device to save energy.”
This solves the question of how to enable wifi on a laptop. I hope the information was useful to you. If you have any questions, write comments.
Problems with connecting to a wireless network from a laptop often arise even for experienced users, and beginners do not even know how to approach the settings. Therefore, we decided to consider this issue in more detail. In the article we will figure it outhow to turn on Wi-Fi on a laptop, and we will provide a connection algorithm for different types of operating systems. We will also find out what main problems users face and how to solve them.
First of all, let's figure out how to activate the Wi-Fi module on the device. Without this, you will not be able to use wireless communication or set up a connection. Typically, activation depends on the laptop model and varies slightly in each specific case. The process involves certain function keys.
- For an ASUS laptop this is FN+F.
- If your gadget is called Acer or Packard bell, then you need to press FN+F3.
- Gadget from HP includes the WiFi module with a dedicated touch button, indicated by an antenna icon or FN+F12. A number of models from this manufacturer have a simple button with an antenna to activate a wireless connection.
- Lenovo - FN+F5, if there is no dedicated button.
- Samsung - FN+F9 or FN+F12, depending on the model.
We have listed the most common equipment manufacturers. If your laptop was produced by another company, then the required combination can be clarified in the instructions for the gadget or on the company’s website. Usually this is the FN function key, which is found on all modern laptops and an additional one from the F1-F12 series. 
If the power button is dedicated, then you can look for it in a separate block or even at the ends of the case. Usually it is indicated by the corresponding icon associated with the distribution of the signal.
Wi-Fi settings depending on OS
Now let's talk about those inclusion methods that are intra-system. Simply, how to enable a connection to a wireless network in the operating system. We will analyze the two most common ones; by analogy, you can make settings on other versions of Windows.
Windows 10
How to turn on Wi-Fi on a laptop, if everything is in order with the settings, the answer to this question is no less important than enabling the module. So, we bring to your attention a step-by-step algorithm for the tenth version of the operating system.

That's all. As a result, the laptop will connect and you will be provided with Internet access.
Windows 7
We also consider setting up for this version provided that the system is equipped with the necessary drivers and has a network adapter. That is, technically all the nuances have been met and the WiFi module is enabled. 
In the case of this version of the OS, everything is much simpler. You can simply click on the Internet connection icon in the lower right corner and select the desired network from the list of available wireless connections. Enter the password and wait for the connection to activate. That's all.
What to do if you can't connect

Situations often arise in which, when performing the above algorithms, the connection to the network is not achieved. In this case, two options are available:
- WiFi adapter is disabled;
- the necessary drivers are missing.
Don't be afraid. In both cases, the issue is not as terrible as it seems and everything is completely solvable.
Seventh version of the operating system
For the seventh version of Windows, the verification algorithm will be as follows.

The absence of an entry or the presence of a yellow sign next to the inscription means there are problems with the drivers for the adapter. In this situation, you will have to reinstall them from the disk provided with the laptop or the manufacturer’s official website. In any case, the process is simple, just download the necessary programs and reboot the computer, the system itself will distribute the software to the required location and activate it.
If there is a yellow icon, then click on it and in the menu that opens, click the “Engage” command. Then right-click on the adapter and in the “Properties” section, select “Power Management” and in the option to turn off the adapter in power saving mode, uncheck the box, if any. 
Enable the adapter in “Network Connections”, find the wireless connection here and click “Enable” next to it. At this point, all the problems in Windows 7 that the user can solve on their own have been fixed, and if the problem remains, it means that the problem is a technical issue and it is better to contact a professional.
Tenth version of Windows
If you have “Ten”, then, solving the issuehow to connect Wi-Fi on a laptop, problems with the adapter and drivers should also be ruled out.
If the icon for connecting to Wi-Fi is not found on the taskbar, then the adapter is disabled. To be able to connect to the Internet, the first one must be turned on.

If there is no “Wireless Network” icon at all, then go to the first section of our article and read how to enable WiFi using hardware.
To check the drivers, you need to right-click on an empty space on the taskbar and select the “Settings” section in the context menu. Then in the main section, select “Devices” and go to “Device Manager”. Expand the “Network adapters” block and look for an entry with the word Wireless. If the icon is accompanied by an exclamation mark, it means that the driver is not working correctly and needs to be reinstalled. If after downloading new drivers the problem is not solved, then you should also contact a professional.