Installing Windows from a hard drive without a flash drive or disk. Reinstalling Windows without a disk or flash drive
Today we will look at a way installation clean operating system from the main hard drive HDD, without using a CD\DVD drive, flash drive or external storage. In our discord there is only HDD computer, image Windows 8.1 and a program called to change boot records.
It seems to me that this article will be very useful, since it often happens that there is no clean optical disk or the drive is broken, or maybe you don’t want to spoil the blank at all.
The free utility can be downloaded from the official website http://neosmart.net/EasyBCD/.
First we need to create a partition on the disk where we will copy setup files Windows 8.1.
To do this, launch the disk management utility, go to Start and enter the command diskmgmt.msc.

We compress our disk by 5 gigabytes to create on them new section.
Click right click mouse on our disk and select Compress volume...

Then enter the desired size and press the button Compress

Then from the received 5 gigabytes of free space we create a new partition with the label Setup. Right-click on the unallocated space and select Create a simple volume...

We mount our installation image operating system into a virtual drive and copy all the contents to our new disk.
Now let's run to add boot entry to start installing Windows.
- Press the button Add a note
- Select the tab below WinPE
- In field Name enter our label Setup
- In field Path select a file boot.wim from folder sources our created disk
- Press the button Add

Clicking the button Current settings you can check if ours has appeared new entry. Now you can close the program and restart your computer.
When you turn on the computer, an OS selection menu will appear, in which we select our installation disk Setup. And the standard installation of the system, already familiar to you, will begin.
When selecting a disk, we remove the disk with our old OS and install it in the free space Windows 8.1.
After installing the new OS, section Setup you can delete it through the same disk management utility, and also expand the remaining partition.
OS name: Microsoft Windows 8.1
Official site: www.microsoft.com
Developer:
Interface language: Russian, English, etc.
Treatment: Required.
System requirements: ()
Processor: 1 GHz or higher supporting PAE, NX and SSE2
RAM: 1 GB (32-bit) or 2 GB (64-bit)
Free place Hard disk space: 16 GB (32-bit) or 20 GB (64-bit)
Graphics card: Microsoft DirectX 9 with WDDM driver
Screen resolution min: 1024 x 768 pixels
Access to the Internet(fees may apply)
For some functions to work Microsoft account required
Official way to download original for free ISO image Windows 8.1 from Microsoft website.
Before installing the system, please read the instructions:
- How to install the Windows 8.1 operating system.
Where can I download the original Windows 8.1 image for free?
For owners genuine Windows 7, 8, 8.1 and 10.
Many users wonder - Where can I download the original Windows 8.1 image for free?
You can find it on many websites on the Internet Pirate Windows builds
, which have a changed theme, disabled, removed or changed functions, images built into the system, signatures of the authors of assemblies, preinstalled programs and other applications that the user will not need.
To burn an image to DVD disc, or simply save the original image of Windows 8.1 on your computer, select step 2 - ISO file (Fig.8)
Fig.8 Fig.9Click “Save”, then the original will be downloaded Windows images 8.1 (Fig. 10, 11, 12). It will take some time for the image to be completely downloaded from the Microsoft website to your computer, it all depends on your Internet speed. By the way, you can check your Internet speed.
Fig.10 Fig.11 Fig.12When the image is completely downloaded, the following window will appear (Fig. 13), where you can click “Finish”.
Fig.13You can insert a blank DVD into your drive to immediately burn Windows 8.1 to a disc (you need to click " Open DVD burner") (Fig. 14). Thus, the disc you record will be no different from a licensed disc purchased in a store.
The only thing you will need during the installation process is key product to your version of Windows, and after installation Activation of the system itself.
Now that you have original image of Windows 8.1 Professional recorded on disc or made Bootable USB flash drive, and of course the purchased key, plus activation in your name, you can safely install the fresh original Windows 8.1 operating system.
Attention! If you are installing an operating system for the first time, you will need a key Windows product(xxxxx-xxxxx-xxxxx-xxxxx-xxxxx), which you purchase on the site Microsoft(License key).
System Description:
(formerly known as "Windows Blue") is a comprehensive update for Windows 8. The new Microsoft versions does not deviate from the Modern UI interface ( correct name interface, formerly called Metro). Windows 8.1 adds to user interface There are plenty of tweaks, along with some new and updated apps, all to help users enjoy the new Windows environment longer.
Additional Information:
Windows 8.1 features a familiar desktop with a taskbar and Start button, plus a stylish new Start screen where you can add your favorite apps, people, and sites for one-tap access.
In addition, you will be able to use the built-in cloud storage, allowing you to access photos and files anywhere and anytime, enjoy convenient full screen viewing With Internet Explorer 11 and an exclusive collection of built-in apps like Photos and Mail. More apps can be downloaded from the Windows Store.
What's new:
Quick Start: We've brought back the Start button to the desktop—tap or click to go to the Start screen. If you like, you can switch to the desktop immediately after you turn on your computer, or use the same background for your desktop and start screen. You can also go to the list of all downloaded applications.
Smart Search:
Bing Smart Search searches everywhere at once—the web, settings, files, and apps on your device—and lets you quickly jump to results. Play a song, call a friend, open an app or your favorite website. (Not all features are available in some regions.)
Get more done:
Chat while gaming, shop while watching a movie, and work while listening to music. Depending on your screen size, you can open up to four apps at once and easily switch between them.
Download more apps:
In the updated Windows Store you'll find apps built specifically for Windows 8.1 and new recommendations. This update also includes new pre-installed applications, for example, “Reading List” and “Cooking”. Now you can install apps on all your Windows 8.1 tablets and computers.
All files at hand:
Automatically save documents, photos and other files to SkyDrive so they're at your fingertips wherever you are, from any device. They will never be lost, even if something happens to your device.
Enjoy surfing:
Internet Explorer 11 loads websites faster, allowing you to full screen mode open two sites, place them side by side and view them simultaneously. Also new browser notifies you about updates on your favorite sites directly to home screen.
The Windows 8 operating system has long been of interest to many computer owners. Some people are interested in its updated interface, others just want to experience all the innovations offered by this product. Let's look at how to install Windows 8 on your computer, and how it differs from . Many people choose this axis because .
It's probably worth starting with system requirements, which your computer must comply with. They are not significantly different from those in the seven. So:
- Central processor operating at a frequency of at least 1 Gigahertz;
- 16 Gigabyte/20 Gigabyte free space hard drive (depending on the capacity of your system);
- Video card with 128 MB of video memory supporting DirectX 9;
- Volume random access memory at least 1 Gigabyte;
- You will also need an Internet connection to download system updates.
Therefore, if you once used the seventh version, but now decided to install the newer version eight on your computer, then you should not have any problems using this system.
Preparation
A clean installation of Windows 8 can be carried out using removable media, which is either a DVD or a flash drive. You can purchase a licensed version of the program in a specialized store or on the Internet. If you purchase your operating system online, you will most likely receive a disk image that you can later burn onto an actual DVD.

Installing Windows 8 has one important feature - you should already have more than one installed on your hard drive. early version Windows OS. If it was deleted from the hard drive, then installing eight will not work. However, if you preferred the system version 8.1, then this is not required - you can safely install it on a free HDD drive.
Installation
Now let's move directly to the issue of installing Windows 8 on your computer. First you need to insert the disk with the system into the drive, and then go into the BIOS. On different motherboards The ways to open the BIOS may differ (for example, sometimes you need to press F2 immediately after turning on the power, sometimes DEL). After opening, select Boot and set the drive where the OS disk was inserted as the priority device. If you are using as a medium bootable USB flash drive, then the algorithm of actions is the same, only it will be the priority device. Whether you install from a disk or a flash drive, this will not affect the installation process itself.

Next, you should restart your computer. If the priorities were set correctly, and the recording with DVD or from the flash drive went through without failures, then an inscription will appear on the monitor screen asking you to press any key. This indicates that the system is ready for installation. However, the key must be pressed as long as the dots appear on the screen. If you do not have time to do this, then the process will end and you will have to restart the computer again. After pressing the key, it will appear Windows icon 8, which means preparation for installation.
Installing Windows 8 compared to 7 or XP has become much easier and should take about 15 minutes:
- The first wizard window that appears will ask you to set the language, date format, and your keyboard layout. Here you can usually leave the default settings. Once you have finally decided on this, click “Next”, then “Install”.
- Text will appear on the screen license agreement, which you must agree to in order to continue installation on your computer.


- In the new window, select “Custom installation”. Actually, if you have not previously installed another operating system on your computer, then only this item will be available.
- The next step is to determine hard section disk where your operating system will be installed. By selecting required section disk and clicking “Next” will start the installation process. The computer will record necessary files to the hard drive and will also produce initial settings.

When you first log in, you will be able to set personalization options, as well as immediately connect wireless communication, if available.
That's all, the installation of Windows 8 is complete, and the system is completely ready for use. Now you know how to install Windows 8, and if necessary, you can install the same OS again from either a DVD or a flash drive. There is nothing complicated about this process. The same method can be used to install other operating systems.
(Visited 5,948 times, 2 visits today)
Installing or reinstalling Windows is a fairly simple and automated operation, however, only if you have a working disk drive or at least a flash drive with recorded Windows image XP, 7 or desired version. Reinstallation can be more problematic, especially when you need to save data. And if there is no disk or flash drive, how can you install and reinstall in this case? Our article will describe in detail how to reinstall working version Windows 7 without using a disk or flash drive.
Short description
The operation itself is quite simple, and for an experienced user the introductory words will suffice. Let's break the process into several stages:
- Hard drive compression and allocating the required amount of memory.
- Copying data from the OS image to a previously prepared memory area.
- Creating an installation disk, which is located inside the selected memory area using the EasyBSD utility.
- Installing Windows OS, as well as its configuration.
These factors will be described in more detail below, so that any user will be able to figure out how and what to do.
Downloading the necessary utilities
For this you will need the program Daemon Tools. You can download it from the official website. It takes up little space on your hard drive and is also not demanding on resources. You should also download an even smaller utility called EasyBSD. It can also be downloaded from the official website. It is with the help of the latter that we will carry out the entire operation of reinstalling and installing Windows without a flash drive or disk.
Preparing a partition for installation files
Create a section
The first step will be to install a partition on the disk where the operating system installation files will be stored. Windows systems. To do this you need to go to “ Disk Management" To get to this submenu, you need to right-click on “ My computer", there select the tab " Control", and it contains " Disk Management" You can also enter “ Disk management" and you will immediately be taken to desired page. There you can also track the amount of memory on a flash drive or other devices. The option we need looks like this:
Here you can see the amount of available and busy information on the hard drive. For our operation it is important that the hard drive is narrower divided into two sections, like on a picture. After fulfilling this factor, we divide the second disk (in our case D) into two different sections. To do this, right-click on drive D, and there select the tab “ Shrink Volume" After clicking, a window pops up asking you to enter how much to compress the disk. You need to enter a value slightly larger than the size of the Windows image. Although there is often enough memory for laptops, in order to save enter megabytes 150–300 more, than the image weighs. Click " Compress" The compression itself will not last long - about five minutes, no more.
Converting a Partition
After that, we need to convert the space we just shrunk into a clean partition. By right-clicking on the rectangle indicating unallocated space, select the “ tab Create a simple volume" It looks something like this:

The wizard will start. Without much thought, we click on the Next button everywhere, there is nothing particularly important in it. After creating the volume, we proceed to the main part of the work.
Copying installation data
Opening Daemon Tools Lite or another version available on your laptop, select the image with Windows 7 or 8. The next step is to click on the “ tab Add Image" After it appears in our program, click on “ Mount" A screenshot of this operation is shown below.

From the virtual drive we copy all the data, including folders and files, to a small disk that we created about 10 minutes ago. You can find out the name of the disk by looking at the letter located under the button panel.
Creating a virtual disk
The next step will be to work with the latest utility, which is called EasyBCD. After starting the program, click on Add entry. Among several tabs, select WinPE. In the name field you need to enter the name of the section we created. By default, in all laptops that have Windows installed, it is called " New Volume" So we write in the “Name” category. Let there be a file in “Path” boot.wim which is in the folder sources inside the image.

Windows installation
After completing the entire operation, click on the button Current settings. With its help, you can make sure that your actions were not in vain. If a new entry appears: congratulations, you have completed all the work yourself. As you can see, installing or reinstalling Windows without a disk and without a flash drive is very simple! After restarting the computer or laptop, in the special menu for selecting the operating system, select “ New Volume" and launch standard process installation or reinstallation Windows installations.
Features for Windows XP
It is worth noting that installing Windows XP is a little different. The process itself has changed significantly and more data is required from the user. Therefore, there are problems with Windows XP when they try to install it not from a disk. This trick allows the installation of Windows 7.8, but does not provide the ability to install XP due to the absence of some data, for example the file boot.wim, which is needed for one of the most important processes installations. If you want to install Windows XP, then you need a slightly different reinstallation method. One of the simplest is system update. However, reinstalling XP using this method will only update the system and will not install another OS.
Reinstalling XP from your hard drive will allow you to perform an operation that is similar to the previous one. The difference between them is that the latter option will help even when the system does not boot.
First you need transfer the distribution folder to your hard drive.

After this, we do not need to update the system, but install it completely again by selecting " New installation » in installation mode. The next step will be data collection and general installation Windows XP OS in the usual version - as from a disk. Your OS will be in the folder windows.0, however it can be renamed.
Video on the topic
Installing Windows 8 is no different from installing other Microsoft operating systems. You will need an image with operating system, a program for creating bootable media and the drive itself (disk or flash drive). Download Windows 8 in finished image can be done in two ways:
- through official utility from Microsoft;
- through third party sites/torrents.
Let's consider both options for installing the OS on a computer.
Before you begin installation, familiarize yourself with all the steps you will need to complete:
- preparing bootable media;
- setting BIOS settings or UEFI;
- preparing the hard drive and selecting OS characteristics;
- account setup.
System requirements
To install G8 on a PC or laptop, you need the following configuration (or more powerful):
- processor with a frequency of 1 GHz;
- minimum 1GB of RAM for 32-bit and 2GB for 64-bit versions;
- 16 and 20GB hard drive for 32 and 64 bits respectively.
If you meet the requirements, you will be able to use your Win8 computer without lags or slowdowns.
Media Creation Tool
Let's start with official application Microsoft, which allows you to download the original operating system image for free and burn it to a flash drive or disk in a few steps. This creates bootable media automatically, so you don't have to use third party software. To create a flash drive, follow these steps:
- Open your browser and follow the link to download the Windows boot utility from the official website

- The program does not require installation - just run the downloaded file.

- Interface Media Creation Tool is in Russian, so users without knowledge of English do not have to worry. On the first screen, select your language, OS edition, and architecture. Then click "Next".

- Select the installation method - from a flash drive or disk. Check the appropriate box and proceed to the next step.

- From the list of connected devices, select the prepared drive. Remember that when writing OS files, all data from it will be destroyed.

- A warning about deleting files on the flash drive will appear. Click "OK".

- Then the procedure for loading operating system files will begin. The download time depends on your Internet speed. Once the process is complete, close the window with the “Finish” button.

In this way you can get a full Windows version 8 and reinstall it on your laptop or PC. Let's consider the second option for creating a bootable drive.
Download the image manually
You can also find the OS image on a third-party site or torrent tracker. For example, use the download link via uTorrent.
After downloading the image to your PC, you need to find a recording program. Let's look at simple and well-known utilities: Windows USB/DVD Download Tool and Rufus.
Windows USB/DVD Download Tool
Download the utility from the link and install it. Then you need to:
- On the first screen, click “Browse” to proceed to selecting an ISO image.

- Find the installer on your hard drive and click the “Open” button.

- To continue, click “Next”.

- Choose USB device or DVD, depending on whether you are burning the image to a flash drive or disk.

- Select the drive (1) and click on “Begin Copying”.

- Now you need to wait for the recording to finish.

Rufus
Download the program to your computer from the Internet using the link. No installation required. Then:
- Select the recording device (1), set the MBR parameter for computers with BIOS or UEFI (2), file system NTFS (3) and enter the name (4).

- To select an image, click on the marked button.

- Locate the Windows image on your hard drive

- To start recording, click on the “Start” button.

Ready! Now you can create bootable media any Windows up to 10. Before installation, all that remains is to configure the BIOS.
BIOS/UEFI Settings
You can configure the BIOS before starting the operating system. It is necessary to set loading from the prepared flash drive as priority.
The BIOS interface is launched by pressing the F12 / F2 / Del / F9 key, etc. - each motherboard manufacturer has its own button. It is indicated on the initial loading screen:

Clicking on it will take you to the menu. It requires:
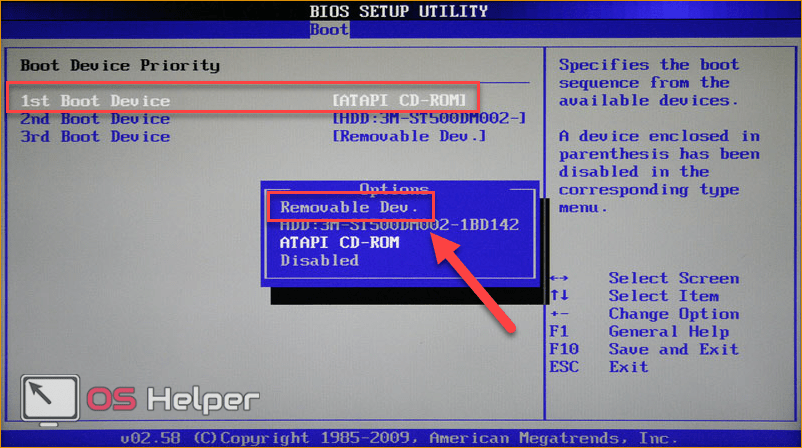
- Go to the “Boot” section (1) and select the “Boot Device Priority” line (2).

- In the “1 st Boot Device” line, select the port to which it is connected boot device(Removable Dev.), and save the changes using the F10 key.
Now the computer/laptop will reboot and you will see the Windows 8 installation menu.
Modern PCs use UEFI - improved BIOS version with convenient graphical interface, which supports mouse control and speeds up computer booting. Launching the settings is carried out in the same way as in the case of a regular BIOS. In the menu you need to do the following:
- Press the F8 key to go to the “Boot Menu”.

- Click on USB device, on which the Windows distribution is written.

All that remains is to restart the PC and proceed with the step-by-step installation.
OS installation
After choosing a priority and restarting your computer, you will see the installer window. Now you need to follow the instructions:
- Select your installation language.

- Click on “Next”.

- To start the process, click the “Install” button.

- Select the desired version (if you downloaded the full OS distribution).

- Check the box and click “Next”.

- Click on the second item.

- Now create system partition hard drive by clicking on the “Create” button.

- Specify the size and create the disk using the “Apply” button. Remember that installing Windows 8 requires at least 16GB of free space.

- Now the copying and installation of files will begin. Wait until the procedure is completed.

At the end of the procedure, the computer will reboot. The first start of a PC with a new operating system will take longer than usual. Then you will have to make the initial settings - create account, enter license key, set a password if necessary, set up the Internet, etc.
Conclusion
Now you know how to install Windows 8 for free on your laptop or PC. The entire process, except for downloading the distribution, takes no more than 40 minutes. After this, you will be able to fully use the computer.
Video instruction
Watch the video from step by step description all the steps given in this article if you still have questions about the installation.