Installing Kaspersky Security Center. Installing Kaspersky Security Center Operation of two Kaspersky security center administration servers
Good day, dear visitor. From the title of the article you already understand that today we will talk about protection. In one of the previous articles, I reviewed a product related to this area of IT, which showed itself well. Today I will tell you about an equally interesting product from Kaspersky Lab, of which we are partners, Kaspersky Endpoint Security. It will be reviewed in the Hyper-V virtual environment, on second-generation machines. The server part will be implemented on a domain controller running Windows Server 2012 R2, AD mode Windows Server 2012 R2, and the client part on Windows 8.1.
It is worth noting that we constantly use this product in our IT outsourcing practice.
What is Kaspersky Endpoint Security?
Kaspersky Endpoint Security for Windows combines world-class anti-malware technology with Application Control, Web Control, Device Control, and data encryption - all in one application. All functionality is managed from a single console, which simplifies the deployment and administration of a wide range of Kaspersky Lab solutions.
Possibilities:
- Single application
- Single console
- Unified policies
Kaspersky Endpoint Security for Windows is a single application that includes a wide range of critical security technologies, such as:
- Anti-malware protection (including firewall and intrusion prevention system)
- Workplace control
- Program control
- Web Control
- Device Control
- Data encryption
Kaspersky Endpoint Security differs in the set of included modules, containing a different number of modules depending on the edition:
- STARTING,
- STANDARD
- ADVANCED
- Kaspersky Total Security for business
In our case we will use ADVANCED.
The following features are available as part of the Kaspersky Endpoint Security for Business START solution:
The following features are available as part of the Kaspersky Endpoint Security for Business STANDARD solution:
- Anti-malware, firewall and intrusion prevention system
- Workplace control
- Program control
- Web Control
- Device Control
...as well as other Kaspersky Lab technologies to ensure IT security
The following features are available as part of the Kaspersky Endpoint Security for Business ADVANCED and Kaspersky Total Security for Business solutions:
- Anti-malware, firewall and intrusion prevention system
- Workplace control
- Program control
- Web Control
- Device Control
- Encryption
...as well as other Kaspersky Lab technologies to ensure IT security.
Architecture
Server part:
- Kaspersky Security Center Administration Server
- Administration console of Kaspersky Security Center
- Kaspersky Security Center Network Agent
Client part:
- Kaspersky Endpoint Security
So let's get started
Installing the administration server
In our case, the administration server will be installed on the AD controller in Windows Server 2012 R2 mode. Let's start the installation:
.jpg)
I forgot to clarify, we will use Kaspersky Security Center 10. Let's install full distribution , downloaded from the Kaspersky Lab website, which includes the installation package of Kaspersky Endpoint Security 10, respectively, and Network Agent 10
In the next wizard window, select the path to unpack the distribution and click “Install”.
.jpg)
After unpacking the distribution, we are greeted by the Kaspersky Security Center installation wizard; after clicking the “Next” button, the wizard asks “Network size”, because We will have only two clients, one x86 and the other x64, then we indicate “Less than 100 computers on the network.”
.jpg)
We specify the account under which the “Administration Server” will start. In our case, the domain administrator account.
.jpg)
Kaspersky Security Center stores all its data in a DBMS. During installation, the wizard prompts you to install Microsoft SQL Server 2008 R2 Express, or, if you have an already installed DBMS, you can select the name of the SQL server and the name of the database.
.jpg)
At the “Administration server address” stage, the wizard asks you to specify the server address, because Since we have AD installed and DNS integrated, it would be wiser to specify the server name.
.jpg)
After selecting the plugins for management, the installation of Kaspersky Security Center will begin.
.jpg)
After successful installation and the first launch of Kaspersky Security Center, we are greeted by the initial setup wizard, in which we can specify a key, accept the agreement for KSN participation, and specify an email address for notifications.
.jpg)
.jpg)
The update parameters are also specified and a policy with tasks is created.
.jpg)
After installation, the following will be installed on our server:
- Administration Server
- Administration Console
- Administration Agent
But Kaspersky Endpoint Security will not be installed. We will perform a remote installation, because... the administration agent is already installed, then we can deploy Kaspersky Endpoint Security to the server. If there is no administration agent and all incoming connections are blocked in Windows Firewall, remote installation will not be possible. Expand the “Remote Installation” node and select “Run Remote Installation Wizard”. Select the installation package and click the “Next” button
.jpg)
In the “Select computers for installation” window, select the installation option for computers located in administration groups. Then select the server and click the “Next” button.
.jpg)
A system reboot will be required after updating important modules of Kaspersky Endpoint Security, because... The package is new enough that a reboot is not needed. When selecting credentials, let's leave everything as default, i.e. empty. After clicking the “Next” button, we will see the installation progress of Kaspersky Endpoint Security.
.jpg)
.jpg)
Creating groups
Because Since the policies and tasks intended for servers differ from the policies and tasks of workstations, we will create groups corresponding to the type of administration for different machines. Expand the “Managed computers” node and select “Groups”, click “Create a subgroup”. Let's create two subgroups, “Workstations” and “Servers”. From the “Managed computers – Computers” menu, using “drag and drop” or “cut & copy”, move “DC” to the “Servers” group and create a policy and tasks for this group different from the tasks and policies in the “Managed computers” node "
Installing Kaspersky Endpoint Security
To install Kaspersky Endpoint Security remotely, you need to disable UAC during installation. The requirement is “inconvenient”, so we will create a policy in the GPO for Windows Firewall in which we will allow incoming connections according to the following predefined rule “File and Printer Sharing”.
After setting up and distributing Group Policy, let's go to the administration console. Expand the “Administration Server” node and select “Install Kaspersky Anti-Virus”, click “Run Remote Installation Wizard”. In the installation package selection wizard window, select the required package and click “Next”. Select clients in the “Unassigned computers” group and click “Next”.
.jpg)
In the next window, leave everything as default and click “Next”. After the window with choosing a key, the wizard prompts you to ask the user to reboot the system after installation of Kaspersky Endpoint Security is completed, leave it as default and click “Next”. At the “Remove incompatible programs” step, you can make adjustments, of course, if they are necessary. Next, the wizard suggests moving client computers to one of the groups; in our case, moving them to the “Workstations” group.
.jpg)
.jpg)
.jpg)
As we can see, the console “speaks” about the successful installation of Kaspersky Endpoint Security on client stations.
.jpg)
As we can see, after installation, the administration server transferred client machines according to the conditions in the remote installation task.
.jpg)
Kaspersky Endpoint Security on the client machine.
.jpg)
Let's create a policy for client stations in which we will enable “Password protection”; this is necessary, for example, if the user wants to turn off the antivirus.
.jpg)
Let's try to disable protection on the client machine.
.jpg)
Rules for moving computers
On the administration server, you can set movement rules for client computers. For example, let's create a situation in which Kaspersky Endpoint Security will be installed on a newly discovered PC. This is useful in a scenario where an organization has installed a new PC.
To automate the deployment of Kaspersky Endpoint Security, we will define movement rules for computers. To do this, select the “Unassigned computers” node and select the “Configure rules for moving computers to administration groups” item and create a new rule.
.jpg)
.jpg)
In the created rule, the newly detected PC will be added to the “Workstations” group from the specified range of IP addresses.
Next, we will create a task to automatically deploy anti-virus protection for machines on which it is not installed. To do this, select the “Workstations” group and go to the “Tasks” tab. Let’s create a task to install anti-virus protection with the “Immediate” schedule.
So, we see that the client computer has been added to the “Workstations” group.
.jpg)
Let's go to the "Tasks" tab and see that the installation task has started.
.jpg)
Let me remind you that the situation was reproduced on a machine without anti-virus protection (although before that I demonstrated a remote installation on one of them, after that the anti-virus was removed to demonstrate this scenario) and, as you can see, the installation takes place on a machine without anti-virus protection, a machine with anti-virus protection was not touched by the defense. After installing anti-virus protection, the KES policy will be applied to this client computer.
Reports
Reports in Kaspersky Endpoint Security are more than informative. For example, let's look at the report “About versions of Kaspersky Lab programs”.
.jpg)
The report, in some detail, displays information about installed Kaspersky Lab programs. You can see how many agents, client solutions and servers are installed. Reports can be deleted and added. You can also view the status of anti-virus protection using the “Selection of computers”, which helps you conveniently sort computers with infected objects or with critical events.
In conclusion, I would like to say that only a small part of the Kaspersky Lab anti-virus complex was reviewed. The controls are indeed convenient and intuitive. But it is worth noting the enormous workload of client systems during the search for viruses and potential threats; this workload is caused mainly by heuristic analysis, which requires quite a lot of resources. The product is very easy to administer and is suitable for both AD and workgroup environments. This product has been installed by many of our clients and shows only good results.
That's it, people, peace to you!
![]() The larger the network, the more the system administrator (or IT department) tries to automate the management of software products. Antivirus software is no exception in this regard.
The larger the network, the more the system administrator (or IT department) tries to automate the management of software products. Antivirus software is no exception in this regard.
Many antivirus manufacturers have remote administration tools in their arsenal; today we will talk about a similar solution from Kaspersky Lab.
In general, Kaspersky Security Center is a rather serious application, which definitely cannot be described in one article. Therefore, in this article we will analyze only its deployment.
You can download Kaspersky Security Center. The product itself consists of a server that will need to be deployed, an administration console that can be installed on another computer for remote administration of the server, a web console as an alternative to the usual one, and an administration agent that is installed on client computers and is responsible for communicating anti-virus software with the server.
The server itself must be deployed only on Windows operating systems. Moreover, the presence of a server edition is not necessary. Systems from XP and higher are supported, but only in the Professional/Enterprise/Ultimate editions. A complete list of supported systems can be found on the website.
In addition, the server requires MS SQL or MySQL (remote is possible) to operate. If you don’t have a ready-made database server at hand, the Kaspersky Security Center installer will install MS SQL Express itself, which is quite sufficient for most organizations.
So, to deploy the server, download and run the installation file (I recommend downloading the full distribution). As a test bench, we selected a computer with the Windows Server 2012 R2 operating system.

You will see a convenient menu in which we are now interested in the “Install Kaspersky Security Center 10” item.
After starting the installation, you will be asked to accept the license agreement and select the installation type. For better control over the installation process, we note the custom installation.
![]()
If you have mobile devices on your network, you can install a separate component to manage their security.

Enter the size of your network. This point, however, does not carry any important determining force.

Next, the installation program will ask under which user to run the administration server service. You can specify an existing user with admin rights or allow the installer to create a new one.


The next step is to select a database server. As already mentioned, there are two options here - MS SQL or MySQL. If you do not have a ready-made server, Kaspersky Security Center will carefully deploy MS SQL Express.


At this step in the installation process, you may be in for a small surprise if you do not have the .NET Framework 3.5 SP 1 installed on your system.

Windows Server .NET Framework 3.5 SP 1 is built in as a feature and only needs to be enabled. If you do not have a server operating system, then you need to go to the Microsoft website and download the installer.
Let's consider the option of enabling the component in Windows Server. To do this, open Server Manager and select “Add roles and features.”

A wizard will launch in which we need to indicate that we are going to install roles or components.
 Windows Server Add Roles and Features Wizard
 We select our server and skip the selection of roles. In the list of components, find .NET Framework 3.5 Functions and check them.
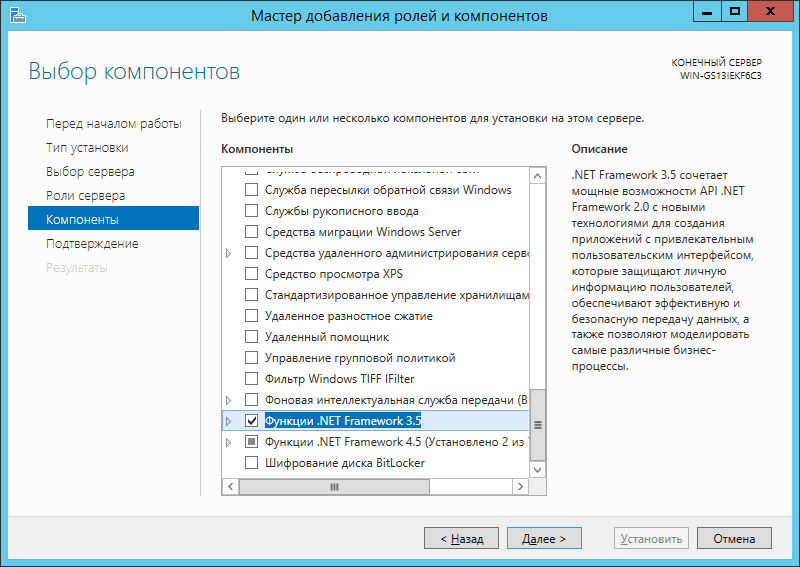
 Adding a Feature to Windows Server
 After this, we will return to installing Kaspersky Security Center itself.
We need to select the SQL authentication mode. This can be either a separate account or a current one.

The Kaspersky Security Center server needs a shared folder that client computers can access to receive updates and installation packages. You can create a new folder or specify an existing one.

We indicate the ports through which we will connect to the administration server.

Specify the server address on the network. If the server has and will have a static IP address, you can limit yourself to it. But it’s still more convenient to identify the server by name.

The last step before installation is to select the necessary plugins. Plugins allow you to manage various Kaspersky Lab antivirus products. This is useful if you have a whole “zoo” of versions. Plugins can also be installed later.

Now all that remains is to watch the installation process. Sometimes plugins require you to accept a separate license agreement.

The installation of Kaspersky Security Center is complete.

Now let's go over the initial server setup. The administration console installed with the server looks like this:
 Administration console of Kaspersky Security Center
 The console can also be installed separately. And it’s even necessary so as not to log into the server every time for routine actions.
The left column lists the servers. For now there is only our newly created server. If you administer several servers, then simply click Add Administration Server.
So, click on the newly created server and the Initial Setup Wizard will launch. You will be asked to activate the program using a code or key. However, this can be done later.

In addition, the wizard will ask for your consent to participate in the Kaspersky Security Network program. Essentially, this is another spy on your computers that sends Kaspersky Lab data about what resources you access and where you pick up the infection. This is motivated by the creation of a certain knowledge base. In my opinion, for the end user the point of participating in such a program is questionable.
You will also be asked to specify mailboxes for notifications from the Kaspersky Security Center server. You can skip this step.

After all these steps, the server will start downloading the latest updates from the network. In the future, you can configure not the Kaspersky Lab server on the Internet as an update source, but an upstream server, if there are several of them on your network.

After downloading updates and polling the network, the wizard will display a successful completion message and offer to run the Deploy Protection on Workstations Wizard.

We will talk about deploying protection on workstations in.
- Go to node Administration Server.
- Select from menu View → Interface setup.
- Configure the display of interface elements using the following checkboxes:
Display System Administration. If the checkbox is checked, in the folder Remote installation Deploying device images, and in the folder Storage subfolder is displayed Equipment. By default, the checkbox is cleared.
Display encryption and data protection. If the checkbox is selected, you can manage data encryption on devices connected to the network. After restarting the program, a folder will appear in the console tree Encryption and data protection
Display workplace control parameters. If the checkbox is selected, in the section Security control The Kaspersky Endpoint Security for Windows policy properties window displays the following subsections: Program control, Vulnerability monitoring, Device Control, Web Control. By default, the checkbox is cleared.
Display Mobile Device Management. If the checkbox is checked, the function is available Mobile device management. After restarting the program, a folder will appear in the console tree Mobile devices. By default, the checkbox is cleared.
Display slave Administration Servers. If the checkbox is selected, the console tree displays nodes of slave and virtual Administration Servers as part of administration groups. By default, the checkbox is selected.
Display sections with security settings. If the checkbox is selected, the section will be displayed in the properties windows of the Administration Server, administration groups and other objects Safety. By default, the checkbox is selected.
- Click OK.
To apply some changes, you must close and reopen the Administration Console.
This material was prepared for specialists involved in managing anti-virus protection and security in an enterprise.
This page describes and discusses the most interesting functionality of the latest versions of Kaspersky Endpoint Security 10 and the central management console of Kaspersky Security Center 10.
The information was selected based on the experience of communication by NovaInTech specialists with system administrators, heads of IT departments and security departments of organizations that are just switching to Kaspersky anti-virus protection, or are going through the process of switching from using the 6th version of the anti-virus on client computers and the Administration management console Kit 8. In the latter case, when anti-virus protection from Kaspersky Lab is already in use, it is also often the case that IT specialists do not know the most interesting aspects in the work of new versions of products that really help make life easier for these same IT specialists, and at the same time increase level of safety and reliability.
After reading this article and watching the videos, you can briefly familiarize yourself with the most interesting functionality that the latest version of the Kaseprky Security Center and Kaspersky Endpoint Security management console provides and see how it works.
1. Installation of the Kaspersky Security Center 10 administration server.
You can find the necessary distribution kits on the official Kaspersky Lab website:
ATTENTION! The distribution package of the full version of Kaspersky Security Center already includes the distribution package of Kaspersky Endpoint Security of the latest version.
First of all, I would like to talk about where to start installing anti-virus protection from Kaspersky Lab: Not with the anti-viruses themselves on client computers, as it might seem at first glance, but with the installation of the administration server and the central management console Kaspesky Security Center (KSC ). Using this console, you can deploy anti-virus protection on all computers in your organization much faster. In this video you will see that after installing and minimally configuring the KSC administration server, it becomes possible to create an installer for an anti-virus solution for client computers, which even a completely untrained user can install (I think every administrator has such “users”) - the installation interface contains only 2 buttons - “Install” and “Close”.
The administration server itself can be installed on any computer that is always on or is maximally accessible; this computer must be visible to other computers on the network, and it is very important for it to have access to the Internet (for downloading databases and synchronizing with the KSN cloud).
Watch the video, even if you have installed the center console before, but from previous versions - perhaps you will hear and see something new for yourself...
DID YOU LIKE THE VIDEO?
We do the same supply of Kaspersky products. And even more - we provide technical support. We care about our clients.
2. Setting up centralized management on computers with Kaspersky already installed.
It is often found that in small organizations, system administrators install and configure anti-virus protection on each computer manually. Thus, the time they spend on maintaining anti-virus protection increases and they do not have enough time for some more important tasks. There are cases when administrators, simply due to lack of time, simply do not know that corporate versions of anti-virus protection from Kaspersky Lab generally have centralized management, and do not know that they do not have to pay anything for this miracle of civilization.
In order to “link” already installed client antiviruses with the administration server, you need very little:
- Install the administration server (First section of this article).
- Install the administration server agent (NetAgent) on all computers - I will tell you about the installation options in the attached video below.
- After installing the administration server agent, the computers, depending on your settings, will be either in the “Non-distributed computers” section or in the “Managed computers” section. If the computers are in “Not distributed computers”, they will need to be transferred to “Managed computers” and configure a policy that will apply to them.
After these steps, your computers will be visible to you from the central console, users will no longer be able to manage the antiviruses installed on their machines and, as a result, there will be fewer infections and less headaches for the administrator.
In the video below, I will try to describe scenarios for installing NetAgents on client computers, depending on how your network is structured.
A large number of articles describe how to remotely install an application on several computers in a domain network (AD). But many people face the problem of finding or creating suitable Windows Installer (MSI) installation packages.
Really. In order to install, for example, FireFox for all users of a group, you must either assemble an MSI package yourself (), or download a suitable one from the appropriate website. The only thing is that in the first case - in fact - the task is not at all trivial, but in the second - we get a package configured in the way its creator wanted, and even in fact modified (doubtful, but a minus).
If your organization uses Kaspersky Lab products as anti-virus protection - and you use an administration server - you can install programs remotely even from *.exe packages, using keys - to manage installation parameters.
Silent installation options
Most programs can be installed in “quiet” mode, for example there is a table with a large number of frequently used programs, and supported parameters passed during installation. You can also find a large number of transferred installation parameters.So we need:
- Download the standard distribution of the program we need from the developer’s website (or where you usually get them from)
- Find on the Internet which silent installation keys the program you are using supports.
- Install the program on the user's PC using Kaspersky Security Center
Administration panel - gives full control (during installation) comparable to administration through Win-server group policies, and for me it’s even more convenient - less tricks - less chance of making mistakes;)
If you assign installation of programs manually, or all your users use the same set of programs, then you can skip this section, but if in your organization different software is installed for different departments, these departments can be assigned different groups for which different tasks will be used .
User groups in KSC are divided - similar to the structure used in AD - directories and sub-directories. Tasks and policies used in parent groups are applied to all child groups.
This way, for example, all company users can install FireFox and Chrome, and only Photoshop designers.
So let's get started:
1) To create an installation package, you need to go to the “Installation packages” subsection of the “Storage” section in the KSC control panel. There we will see a list of created IPs, the ability to create a new one, as well as edit or delete an existing one.Creating a new installation package is simple: you indicate its name (how it will be displayed in KSC), select “IP for a program specified by the user”, specify let to the program (exe, bat, cmd, msi) and specify launch parameters (quiet keys installations).
The specified package can then be used for installation on remote computers.
2) Now we need to create a task to install the created package. If you have previously worked with KSC, or its previous analogue Adminkit. The process of creating a task itself will not be difficult for you.
You can either create a task by going to the folder of the corresponding group, and going to the “Tasks” tab - create a new task. Or Go to the “Tasks for sets of computers” section and create a new task.
Set the name of the created task and select the task type “Remote program installation”.
We select the program that we want to install, which user groups will be assigned this task, and indicate the user who is allowed to install the software on all of the computers used (usually a domain administrator).
The only thing in terms of settings is that we are limited only to those parameters that the developer allows to be passed when installing the program, and we are unlikely to be able to configure the proxy server in the browser via the command line. But here standard AD group policies come to our aid. After all, alternative browsers usually use system proxy settings, and we can assign them to the desired users via AD. ;)
Kaspersky Endpoint Security 10 for Windows is one of the best solutions for protecting a private local network or an organization's network. The program is installed on a computer that is a base station, but protects all network components. This scheme of work allows you to save on licenses, because it is enough to equip one computer with anti-virus software, and not all. This is why Kaspersky Endpoint Security is the best option for large organizations.
Like other Kaspersky products, Endpoint security has all the necessary elements for comprehensive protection. They work independently of each other, which allows you to configure protection parameters with the highest precision. For example, you can disable verification of downloaded files, but leave site security monitoring. This ensures maximum performance and efficiency. You can download Kaspersky Endpoint Security for free to evaluate its functionality and the quality of its graphical interface. The program can be easily installed on regular home computers running Windows 7/8/10. Of course, both 32 and 64 bit versions are supported.
Technically, this version is a regular anti-virus software, which has added special tools for centralized communication of several devices, as well as a number of specific utilities that guarantee greater security when working on the network. By using Endpoint Security, you can be sure that your organization's data will remain private and that all kinds of spyware will not be able to access it.
Many tests were carried out that showed that the Windows system, supplemented with the Kaspersky anti-virus solution, is not susceptible to all existing threats. This is also facilitated by cloud technology, which identifies malware not only by signatures, but also by behavioral characteristics of the program. This approach does not allow downloading files infected with unique viruses on a computer with Kaspersky Endpoint Security installed.
Additional features of KES 10:
- Control of devices installed on the computer;
- Monitoring the network and browser status;
- IM and mail protector;
- Encryptor of hard and removable drives;
- Anti-DdoS.
This material was prepared for specialists involved in managing anti-virus protection and security in an enterprise.
This page describes and discusses the most interesting functionality of the latest versions of Kaspersky Endpoint Security 10 and the central management console of Kaspersky Security Center 10.
The information was selected based on the experience of communication by NovaInTech specialists with system administrators, heads of IT departments and security departments of organizations that are just switching to Kaspersky anti-virus protection, or are going through the process of switching from using the 6th version of the anti-virus on client computers and the Administration management console Kit 8. In the latter case, when anti-virus protection from Kaspersky Lab is already in use, it is also often the case that IT specialists do not know the most interesting aspects in the work of new versions of products that really help make life easier for these same IT specialists, and at the same time increase level of safety and reliability.
After reading this article and watching the videos, you can briefly familiarize yourself with the most interesting functionality that the latest version of the Kaseprky Security Center and Kaspersky Endpoint Security management console provides and see how it works.
1. Installation of the Kaspersky Security Center 10 administration server.
You can find the necessary distribution kits on the official Kaspersky Lab website:
ATTENTION! The distribution package of the full version of Kaspersky Security Center already includes the distribution package of Kaspersky Endpoint Security of the latest version.
First of all, I would like to talk about where to start installing anti-virus protection from Kaspersky Lab: Not with the anti-viruses themselves on client computers, as it might seem at first glance, but with the installation of the administration server and the central management console Kaspesky Security Center (KSC ). Using this console, you can deploy anti-virus protection on all computers in your organization much faster. In this video you will see that after installing and minimally configuring the KSC administration server, it becomes possible to create an installer for an anti-virus solution for client computers, which even a completely untrained user can install (I think every administrator has such “users”) - the installation interface contains only 2 buttons - “Install” and “Close”.
The administration server itself can be installed on any computer that is always on or is maximally accessible; this computer must be visible to other computers on the network, and it is very important for it to have access to the Internet (for downloading databases and synchronizing with the KSN cloud).
Watch the video, even if you have installed the center console before, but from previous versions - perhaps you will hear and see something new for yourself...
DID YOU LIKE THE VIDEO?
We do the same supply of Kaspersky products. And even more - we provide technical support. We care about our clients.
2. Setting up centralized management on computers with Kaspersky already installed.
It is often found that in small organizations, system administrators install and configure anti-virus protection on each computer manually. Thus, the time they spend on maintaining anti-virus protection increases and they do not have enough time for some more important tasks. There are cases when administrators, simply due to lack of time, simply do not know that corporate versions of anti-virus protection from Kaspersky Lab generally have centralized management, and do not know that they do not have to pay anything for this miracle of civilization.
In order to “link” already installed client antiviruses with the administration server, you need very little:
- Install the administration server (First section of this article).
- Install the administration server agent (NetAgent) on all computers - I will tell you about the installation options in the attached video below.
- After installing the administration server agent, the computers, depending on your settings, will be either in the “Non-distributed computers” section or in the “Managed computers” section. If the computers are in “Not distributed computers”, they will need to be transferred to “Managed computers” and configure a policy that will apply to them.
After these steps, your computers will be visible to you from the central console, users will no longer be able to manage the antiviruses installed on their machines and, as a result, there will be fewer infections and less headaches for the administrator.
In the video below, I will try to describe scenarios for installing NetAgents on client computers, depending on how your network is structured.
We looked at the functionality of Kaspersky Endpoint Security 8, which provides a comprehensive multi-level protection system for computers running Windows operating systems. To centrally manage all deployed copies of Kaspersky Endpoint Security 8 on an organization's computers, the Kaspersky Security Center solution is used. In the second part of the review, we will look in detail at how administration occurs using the new, ninth version of Kaspersky Security Center and what main capabilities it provides.
The main purpose of Kaspersky Security Center is to provide the administrator with tools for configuring all components of the security system and access to detailed information about the security level of the corporate network. Kaspersky Security Center is a single tool for centralized management of a large set of security tools in an organization, provided by Kaspersky Lab. The range of software products that can be managed using Kaspersky Security Center includes solutions for protecting workstations, servers and mobile devices:
- Kaspersky Endpoint Security 8 for Smartphone;
- Kaspersky Endpoint Security 8 for Windows;
- Kaspersky Endpoint Security 8 for Linux;
- Kaspersky Endpoint Security 8 for Mac;
- Kaspersky Anti-Virus 6.0 for Windows Workstation;
- Kaspersky Anti-Virus 6.0 Second Opinion Solution;
- Kaspersky Anti-Virus 6.0 for Windows Servers Enterprise Edition;
- Kaspersky Anti-Virus 8.0 for Windows Servers Enterprise Edition;
- Kaspersky Anti-Virus 8.0 for data storage systems;
- Kaspersky Anti-Virus 8.0 for Linux File Server;
- Kaspersky Anti-Virus 6.0 for Windows Servers;
- Kaspersky Anti-Virus 5.7 for Novell NetWare.
Figure 1. Logic of using Kaspersky Security Center to protect an organization’s network
Kaspersky Security Center can operate in two modes - the usual one, which is described in this review, and the mode necessary for the work of service providers who provide other organizations with protection of their networks in the form of a SaaS service. This mode requires a special license.
Kaspersky Security Center is not a separate program, but a set of software tools that includes:
- Administration server – a service responsible for security management. It is the main module of Kaspersky Security Center and stores all information about managed computers in a database (MS SQL Server or MySQL). In addition to the main administration server, you can organize a hierarchical structure of administration servers to work through them with remote parts of the local network or the local network of the serviced organization. This is especially true for companies whose structure is distributed. In this case, local users access only their server.
- administration console – a module implemented as a snap-in for the Microsoft Management Console and intended for managing the administration server;
- web console – a web application that has a purpose similar to the administration console. The difference is that the web console allows you to access the administration server through a browser using the web interface. However, compared to the same administration console, it has limited management capabilities;
- Kaspersky Security Center Administration Agent is a program designed for interaction between the administration server and client computers. It is installed on client systems and allows you to receive information about the current state of programs and events that occurred on client computers, send and receive control commands, and also ensures the functioning of the update agent.
- program management modules – modules that are installed on the administrator’s workstation. The purpose is to gain access to Kaspersky Lab software products in an organization through the administration console.
Figure 2. Block diagram of interaction between Kaspersky Security Center components

The diagram shows that the administrator has the ability to work through the snap-in with several administration servers, which are, for example, company servers located in different offices. In addition, the administrator has the ability to access the administration server through an Internet browser from any computer without having to install any modules on it, which can be useful when it is necessary to monitor the security system. This access method is also used when deploying protection in an organization by an external service provider, whose administration server can be accessed from the protected network using the web console.
Figure 3. Web console usage diagram
 ;
;
Kaspersky Security Center allows you to configure and manage components and settings on client computers. For each user group or specific user, the administrator can specify different settings for the following components:
- Protection components: file antivirus, mail antivirus, web antivirus, IM antivirus, firewall, protection against network attacks, network monitoring, system monitoring.
- Control components: program launch control, program activity control, vulnerability scan, device control, web control.
Figure 4. Diagram of components managed by Kaspersky Security Center

The ninth version of Kaspersky Security Center is a development of the Kaspersky Administration Kit 8.0 tool. In comparison, a set of new functions has been added to Kaspersky Security Center. It has become possible to create virtual administration servers, control over the operation of the Application Control, Vulnerability Control, Web Control and Device Control components has been added; a web console has appeared for managing the administration server via a browser; functions for managing clients on virtual machines have been added, it became possible to centrally detect and eliminate vulnerabilities on client computers. The functions of tools for managing installations of various components, obtaining additional information about controlled computers, creating reports and working with accounts have been significantly expanded.
System requirements
To work with Kaspersky Security Center 9, your computer must meet the general system requirements listed in Table 1.
Table 1. Hardware requirements for working on different operating systems
| Operating system version | Hardware requirements |
| 32-bit OS | |
| Microsoft Windows Server 2003; Microsoft Windows Server 2008 deployed in Server Core mode; Microsoft Windows XP Professional SP2, Vista SP1, 7 SP1. | processor with a frequency of 1 GHz or higher; 512 MB RAM; 1 GB of free hard disk space. |
| 64-bit OS | |
| Microsoft Windows Server 2003; Microsoft Windows Server 2008 SP1, 2008 R2, 2008 R2 deployed in Server Core mode; Microsoft Windows XP Professional SP2, Vista SP1, 7 SP1; | processor with a frequency of 1.4 GHz or higher; 512 MB RAM; 1 GB of free hard disk space. |
Since Kaspersky Security Center 9 includes three components - the administration server, the administration console and the web administration console server, for each of them to work, the following requirements must be met.
Administration Server
- Microsoft Data Access Components (MDAC) 2.8 or higher or Microsoft Windows DAC 6.0.
- Microsoft Windows Installer 4.5 (for Windows Server 2008 / Windows Vista).
Database Management System
- Microsoft SQL Server Express 2005, 2008;
- Microsoft SQL Server 2005, 2008, 2008 R2;
- MySQL Enterprise.
Administration Console
- Microsoft Management Console 2.0 or later.
- Microsoft Internet Explorer 8.0.
Server web administration console
- Web server: Apache 2.2.
- Browser – Internet Explorer 7, Firefox 3.6 or Safari 4.
Functionality
The main functions of Kaspersky Security Center are to deploy protection on client machines, centralize the administration of these programs, and receive information about events on protected computers.
Deployment of protection
- Remote installation and removal of endpoint protection software and administrative tools.
- Deployment of third-party products or your own installation packages on protected computers.
- Ability to install endpoint protection systems on infected computers.
Administration
- Creation of virtual administration servers to ensure protection of physically remote segments of an organization’s local network or remote offices.
- Formation of a hierarchy of administration groups for “flexible” configuration of rules for the work of various user groups.
- Combining a set of rules and settings of various components into policies and flexible application of the created policies to regulate the activities of a specific user or group of users. The ability to use both standard policies and create new policies.
- Implementation of centralized (if necessary, remote) management of programs to protect endpoints.
- Centralized updating of databases and protection modules with endpoint protection programs.
- Centralized work with files placed in quarantine or in backup storage, as well as with objects whose processing has been postponed.
- Inventory of hardware devices and software on computers on the organization’s local network.
- Centralized detection and elimination of vulnerabilities found in the operating system and various software.
- Management of Kaspersky Endpoint Security 8 deployed in virtual environments (automatic detection of virtual machines, life cycle management of virtual machines, optimization of the load on the host server when performing resource-intensive tasks).
Monitoring
- Obtaining information about critical events on protected computers in real time.
- Receiving statistics and reports on all events on protected computers. It is possible to generate reports containing events in each protection component and administrator actions. Reports can be generated on a schedule or at the request of the administrator. If necessary, you can configure sending reports in a convenient format by email.
- Using the web console allows you to organize access to operational information about the protection status and reports from any computer on the network or remotely.
Also in Kaspersky Security Center there is now the ability to manage the protection of virtual workstations. When a new virtual machine appears on the network, it is automatically found, connected to the administration console, and all the necessary protection components are installed on it. Kaspersky Security Center allows you to distinguish between virtual and physical machines and combine them into different groups for easy administration of the virtual infrastructure. Dynamic mode support for Virtual Desktop Infrastructure (VDI) is also implemented.
Preparation for use
To install Kaspersky Security Center, you need to run the program installation file, after which the installation wizard welcome window will appear.
Figure 5. Initial window of the Kaspersky Security Center installation wizard

Next, you need to read the license agreement and accept its terms. After this, you need to select the installation type. The standard installation contains a minimum set of components and is recommended for networks containing up to 200 computers. Custom installation allows you to configure additional settings for Kaspersky Security Center and is recommended for networks containing more than 200 computers. Select a custom installation and click the “Next” button.
Figure 6. Selecting the Kaspersky Security Center installation type

The next step requires you to select the components to install.
Figure 7. Selecting Kaspersky Security Center components for installation

Figure 8. Selecting network size

In the next step, you need to select the account under which the administration server will be launched on the computer. You can choose one of two types of accounts - a system account (not available in Windows Vista and later Microsoft operating systems) or a user account.
Figure 9. Selecting the account under which Kaspersky Security Center will be launched

After this, you need to select the database type for the administration server - Microsoft SQL Server (Express Edition) or MySQL. When you select MS SQL Server, if this DBMS is not available, it will be installed. If you choose MySQL DBMS for operation, it must already be installed on the system.
Figure 10. Selecting a database server for Kaspersky Security Center

The next step is to configure the connection parameters to the server with the database. And then an account is configured to connect to the server.
Figure 11. Configuring connection parameters to a server with a database

After this, you need to determine the location and name of the shared folder in which installation files and updates will be stored. You can create a new folder or select an existing one.
Figure 12. Creating a public folder

Next, you must specify the port number for connecting to the administration server (“port 14000 is used by default”) and the SSL port number for a secure connection to the administration server using the SSL protocol (“port 13000 is used by default”).
Figure 13. Configuring connection parameters to the administration server

After this, you need to set the address of the administration server. The address can be a DNS name, NetBIOS name, or IP address.
Figure 14. Setting the address of the administration server

The next step is to select modules to manage programs. We need a module to manage Kaspersky Endpoint Security 8 for Windows, so we select it.
Figure 15. Selecting modules for installation

This completes the setup process and you can start installing the program. Next, you need to restart the operating system, after which the installation can be considered complete.
After installation, you will need to make a number of additional settings - specify a key or registration code, decide to use cloud technologies, configure the sending of notifications about the occurrence of events and proxy server settings. After this, you can start working with Kaspersky Security Center.
Working with the product
The administration server is managed through the administration console. It is a special snap-in that is integrated into the Microsoft Management Console (MMC).
Figure 16. Microsoft Management Console snap-in window

The advantage of using the snap-in is its standard interface, which is familiar to administrators working with Windows OS. In addition, you can add several different snap-ins to one management console. For example, Windows Firewall, Diskeeper defragmentation program, Performance snap-in and Kaspersky Security Center.
Figure 17. Example of creating a management console

The main window for working with Kaspersky Security Center consists of a menu, a toolbar, an overview panel (console tree) and a work area. After installing Kaspersky Security Center, we gain access to the administration server, through which we will manage instances of Kaspersky Endpoint Security 8 installed on computers on the local network.
With a distributed company structure, it is necessary to create a set of administration servers that will allow servicing each network segment separately, but, at the same time, centrally manage everything from one point. This will reduce traffic within the local network and simplify work with remote offices or local network segments. If you have several administration servers, you can delegate responsibility for security and authority to manage each virtual server to individual administrators. You can add administration servers from the context menu of the “Kaspersky Security Center” node (“Create” – “Kaspersky Administration Server” – “Administration Server...”). The created hierarchy allows you to create rules for inheriting tasks and policies for different administration servers.
The hierarchy of tools for the administrator’s work is presented in Figure 18.
Figure 18. Hierarchy of tools for administrator work

The administration server can be used as a proxy server for Kaspersky Security Network (KSN), a special service - KSN Proxy - is responsible for this. Its use allows all computers under the control of the administration server to transmit and receive data to the “cloud” even if they do not have access to the Internet. Also, by caching requests, KSN Proxy allows you to reduce the load on Internet access.
Figure 19. Configuring KSN Proxy parameters

The logic for working with the program when deploying protection and administering it is constructed as follows. First, the administrator configures the administration server settings. After this, administration groups are created in accordance with the logic of the protected network. For example, accounting employees can be prohibited from using any removable media, and programmers can be configured with the most stringent web control parameters.
Computers are added to the created groups, and the Administration Agent and Kaspersky Endpoint Security 8 are installed on each computer. Security policies are then created and configured for each user group. The administrator can also create various tasks (virus scan, update, etc.) and set criteria for their execution (by timer, by event, etc.). After this, work with the program goes into the background - the administrator needs to periodically review reports, respond to threats, add new users for protection and perform other network maintenance work. Let's take a step-by-step look at how it works.
To manage protection settings on client computers, use the “Computer Management” group, which contains four panels: “Groups”, “Policies”, “Tasks” and “Computers”.
Figure 20. Computer Management group

Creating administration groups and setting them up
The “Groups” panel contains tools for managing groups of computers on the “Administration Server”. These administration groups allow you to organize a hierarchy of computers on the network in order to selectively apply various policies and tasks to them in the future. By default, only one, the root, group is available. Using the “Create Group” and “Create Subgroup” commands in the “Groups” panel, you can create the hierarchy of computer groups required in your organization.
Figure 21. Example of creating administration groups

Using the context menu of the “Managed computers” node (command “All tasks” - “Create group structure” in the context menu), a hierarchy of computers can be created automatically. For this purpose, information about the structure of Windows network domains and workgroups, Active Directory groups, or the contents of a text file is used.
In the “Groups” panel, you can set the conditions for installing programs on computers newly added to the group. You can also specify the criteria by which the user’s computer will be assigned the “Warning” or “Critical” status. For example, if the databases have not been updated for more than X days or more than Y viruses have been found.
Figure 22. Setting criteria for setting statuses for computers

Once the groups have been created and configured, you can begin populating the groups with computers. To do this, use the “Computers” panel, in which you can add and remove computers on the “Administration Server”. You can also view information about each computer on the network - its status, the time the databases with signatures were updated, the number of viruses found, etc.
Figure 23. Computers panel with the filtering panel expanded

To add a new computer, you need to click on the “Add computers” button, after which the wizard window will appear. The first step is to determine how to add client computers.
Figure 24. Window of the Add Client Computers Wizard

When manually adding computers, you need to specify the IP address or range of IP addresses of computers on the network. You can also import a list from a text file with a list of IP addresses.
Figure 25. Manually adding new computers

When adding automatically, you just need to specify the required computers from the list of detected computers on the network.
Figure 26. Window for adding computers detected by the administration server

If for some reason the computers were not distributed into administration groups, they remain in the folders of the “Unassigned computers” node. You can also apply tasks and configure policies to these computers. New computers found by the administration server when polling the Windows network, IP addresses and Active Directory groups are also placed in these folders. After finding new computers on the network, the administrator can move them to one of the existing groups.
Installing applications via Kaspersky Security Center
Kaspersky Security Center allows you to install various programs on computers on your local network. These may be Kaspersky Lab customer protection programs or third-party programs. To install the program on a client computer, you must create a task of the appropriate type and specify the computers for which it will be executed.
Installing programs through Kaspersky Security Center is primarily necessary to deploy protection on client computers when starting to use Kaspersky Lab solutions in an organization and when adding new computers for protection.
To organize protection on client computers, you first need to install administration agents and Kaspersky Endpoint Security 8. The installation package is installed using the Remote Installation Wizard, which is launched from the “Groups” panel by clicking on the “Start installation” button. Select the administration agent and click the “Next” button.
Figure 27. Selecting the program to install

We indicate that the program is installed “From a shared folder”. After installing the Administration Agent, it is more convenient to carry out all installations through it, since in this case it is possible to centrally manage the installation repository. And when adding a new computer to the network, the administrator will be able to run one task to install the entire list of necessary programs.
Figure 28. Selecting program installation options

In the next step, you can specify accounts that have administrator rights.
Figure 29. Selecting accounts with administrator rights on the target computer

After this, you will need to choose whether to restart the computer after installing the program and, if so, whether to force it or ask the user. At this point, the creation of the program installation task is completed and you can run it.
Figure 30. Running the application installation task

If for some reason installation over the network is not possible (for example, the network is disabled on the computer), then you can create an installation package and provide it to the user for independent installation.
Subscribe to news