Installation of 2 hard drives. Installing a Hard Drive
A typical laptop configuration involves installing two drives: one of which HDD, the other is the drive optical disks. There is only one compartment for installing a hard drive.
Therefore, to install second hard the disk must be sacrificed to a CD-ROM device (usually a recording device DVD drive disks). For this, there are adapter devices that completely replicate the shape of the internal optical drive with a mount for a standard 2.5-inch HDD.
In this article I will tell you in detail how to replace the cd rom in a laptop with a hdd.
How to determine the thickness of the device
I know of two types optical drives used on laptops that differ in thickness. "Thick" has a height of 12.7 mm, and "thin" - 9.5 mm. You can determine the thickness of the device you have installed without disassembling the laptop. To do this, first look at the device manager and look at the product model.

I have this Optiarc AD-7580S. Now let's visit any popular internet a resource selling similar products or Yandex.market and look at the characteristics of the device.

As you can see, the thickness of the device, according to the description, is 13 mm (taking into account rounding, in reality 12.7 mm).
If in doubt, you can measure it yourself using an ordinary ruler. You can tell the difference between 12.7 and 9.5 drives with the naked eye.
Where to buy an adapter for HDD to ODD bay

It is a plastic box with small fee with connectors and chip, also included USB cord for connection and a decorative strip on the front side. For some reason, the package included a mini-CD with drivers, but Windows 7 saw the device without installing additional software. Moreover, the device is detected from the BIOS, so it can be used as a bootable CD-ROM.
Instructions
Second Winchester allows you not only to get additional space for files, but also to significantly increase the reliability of data storage due to duplication important files on . Before you begin installation work hard drive, be sure to make sure that the computer is disconnected from the network! Then use a screwdriver to unscrew the screws holding the left (when looking at the front) side cover. Note that different models cases, the procedure for removing the cover may differ - for example, you may first need to remove the front panel. After unscrewing the screws, carefully remove sidebar. You may have to pull it back slightly to do this.
After removing the panel, you will see the computer motherboard, power supply, various wires and cables. And, of course, the hard drive, usually located at the front of the computer. Pay attention to how it is installed - second the hard drive will need to be installed in the same way, in a free niche. Such niches can be found above or below the main disk. If possible, do not place the disks immediately on top of each other - leave a gap between them, this will help them better cooling. Important point: available on hard drives special jumpers, setting the operating mode. The main disk should be set to the “Master” position. On the second – to the “Slave” position. The jumpers are very small and may require tweezers to install them. After placing the jumper, carefully install the disk in the location chosen for it, tighten the retaining screws. Together with Winchester There are usually none, so a couple of short screws should be found in advance - they should fit the threaded holes on the left and right sides Winchester A.
The disk is installed, all that remains is to connect the power and data cable to it. To connect power, you may need an adapter to a SATA drive. Best before purchasing Winchester But open the computer and see if the adapter is on the existing disk and if so, buy the same one. When connecting, pay attention to the shape of the connectors and the color of the wires of the main drive that go to them - the new drive must be connected in the same way. To connect the adapter, use any free connector with wires of the desired colors. The power is connected, the whole process is very simple. And most importantly, do not use force - all connectors are equipped with special protrusions that do not allow them to be installed incorrectly.
The power is connected, now you need to connect the data cable. When purchasing a disk, make sure that the cable is included in the package. If not, then buy it. Usually this is a flat red wire with connectors at the ends, its width is within a centimeter. One end of the cable is connected to Winchester y, you can easily find the connector you need. The second one is connected to the corresponding socket motherboard. To find it, look where the cable of the main disk is connected - the socket for the second (and often also the third and fourth) should be nearby.
That's it, the disk is connected. We put the cover back in place and turn on the computer. If everything is connected correctly, the computer will start to boot. After loading, open “My Computer” - a new disk should appear in the list of hard drives. If you don’t like the letter assigned to it by the system, go to: Start – Control Panel – Computer Management. In the “Storage Devices” section, select “Disk Management”. Clicking new drive right click mouse, select “Change drive letter or drive path.” A window opens, select “Change” and set the desired drive letter.
If you have to disconnect any cables when installing a drive, sketch out their connections on a piece of paper. This will allow you to connect them correctly in the future.
Sources:
- how to install a second hard drive on a computer
- How to connect a second hard drive
Modern hard disks very reliable and can work for a very long time. But no one is immune from breakdown of any equipment. If the hard drive fails, there is little chance that it can be repaired. Then you will have to purchase and install a new hard drive. This process is not complicated, but there are some nuances associated with the type of interfaces of hard drives and motherboards. You need to choose a hard drive that fits the interface of your motherboard.
You will need
- computer, hard drive with SATA connector or IDE connector, screwdriver.
Instructions
First, find out what interfaces your motherboard is equipped with. This can be done by looking at the technical documentation for your computer. See if there is motherboard SATA interface. If you don't have technical documentation, you can look at the connection interfaces on the motherboard itself. After all, in any case, the system unit will have to be opened.
Disconnect the computer from power. Remove the screws that secure the cover system unit and remove the system unit cover. Now look for the SATA inscription on the motherboard. Interfaces are nearby SATA connections. Typically these interfaces are located in the lower right corner of the motherboard. Please note that SATA interfaces may not be available on fairly old motherboards.
If there is not enough space on the hard drive, there are two options - replace the existing disk or install an additional one. Replacing a hard drive on a computer is a very lengthy and labor-intensive process. After all, you will have to reinstall the operating system, all programs, configure everything again, and then also transfer information from the old disk to the new one. This will take a whole day, and maybe more than one.
There is an easier way out - installation second hard disk.
How to install a new hard drive
Today, this can be done either by installing a second hard drive in the computer itself, or by connecting external storage.
U external device There is undeniable advantage- it can be disconnected at any time and connected to another computer, thus transferring large volume information.
However for permanent job it is not suitable because, judging by its name, it is located outside the system and therefore data exchange with it is much slower than with the internal, local disk. In addition, for an external drive you need to find a place near the computer so that it does not accidentally fall, which could mean the loss of all the information on it.
Selecting an internal hard drive
At first it seems that everything is simple. Let's go, buy the required amount of terabytes and use it with peace of mind. But it's not that simple. As in the production of a processor or video card, there is competition between hard drive manufacturers. Each strives to outdo the other manufacturer. In addition, each of them has its own advantages and disadvantages. And all this must be taken into account when buying hard disk. Which one should you choose?
It all depends on the computer itself and the needs of the owner. Let's talk about how to choose a suitable hard drive.
Hard disk capacity
First of all, let's consider the concept of hard drive volume. It takes first place in consideration for a reason. Since the larger the disk capacity, the more information you can record on it: movies, music, photos, documents or programs, as well as educational videos.
If you base your choice of volume on films, you can calculate that one film with high-quality recording takes up approximately 1.5 GB. How much you like movies (that is, how much you usually record on your computer) can be your starting point when choosing the size of your hard drive. Today, the minimum volume is 250 GB. And the maximum volume is already measured in terabytes.
It is often better to overpay when buying memory than to save now and then worry again about how to increase memory.
Hard disk format
The next parameter is the disk format. Hard drive format in old and modern systems is different. Older systems used the IDE format. Its advantages include the fact that its reliability has already been tested by time, and it has proven itself well. Its advantages include the fact that it is compatible with most computers. However, in terms of performance, it is much inferior to the new generation of SATA hard drives, which appeared in the early 2000s.
Unlike IDE formats, SATA dramatically improves the performance of the entire system, which, of course, affects the mood when working with programs that operate large files. Its advantage is that it has low power consumption, which long work will contribute to less overheating.
But before you install new hard drive, you need to pay attention to its compatibility with motherboard. Each drive has its own connector, so you need to take this into account when choosing it so as not to make rash actions. When choosing new technology You can consult the seller, who will tell you what disk format is on it.
Hard drive speed
Data transfer speed is the next criterion that you need to pay attention to. The rule here is simple: than more speed transmission, the faster we get access to it. On new drives it can reach 150 MB/s.
Data transfer speed is directly related to the rotation speed of the disks. Standard indicators are following parameters: 5400, 7200, 10000 and 15000 rpm. In most cases, the price difference between drives that have different speed rotation is not significant, so if possible, do not skimp on speed. Eventually you will have to work on this computer.
Is it worth buying a used drive? Of course, there is nothing wrong with this, but, like all parts, the “screw” also has the concept of wear. It will be very unpleasant if, a couple of weeks after purchasing a used hard drive, it breaks down.
It is better and more reliable to buy a new (factory) model. In this case, you can get the benefit twice. And there will be a guarantee, and it will last for more than one year. When purchasing a new hard drive, you may also need new accessories: screws, a connector for connecting to the motherboard, fans, and a power cable. All this may be needed when replacing a hard drive.
Installing two hard drives
At installing two hard drives Do not place them close to each other. There must be a free position between them. Typically, the case has at least three “slots” for hard drives. Therefore, you need to place discs at the top and bottom, leaving a gap for air circulation.
Otherwise, two hard drives will heat each other, and increased temperature is one of the main reasons for reducing the durability of their working surfaces. If all the hard drive slots are occupied, it makes sense to install additional fan, which will blow on the drives.
This video will help you install hard drives:
Installing a hard drive and DVD drive
Preparing the hard drive
The new disk will appear in the system immediately after turning on the computer and logging into Windows. After Windows boot click the button Start , select My computer and find a new drive. The same can be done in Conductor. The drive letter assigned depends on the computer configuration. If the new disk does not appear, try to find it using the snap-in « Computer management».
Open the section " Computer management». To do this, click the button Start , select components sequentially Control Panel, system and safety, Administration, and then double-click Computer management.Administrator permission required. If you are prompted to enter or confirm an administrator password, enter the password or provide confirmation.
In the left area in the section Storage select item Disk management and find a new drive.
Putting your disk in order
The disk capacities are very large and allow you to store thousands of files. In order not to waste a lot of time in the future searching for recently downloaded files, you need to put things in order from the very beginning. hard drives and comply with it in the future.
Immediately after installing the hard drive, you need to transfer the folder My Documents to a new disk. To do this, open Libraries, Documentation, My Documents, Properties, Location. Then enter D:\My Documents(or another drive letter if there are more than two) and press Move. To the question of the system Move all files? answer positively.
Now inside the folder My Documents make folders with something like this structure:
- My images
- My photos
- My pictures
- My videos
- My films
- My videos
- My downloads
- Archives
- Video
- Music
- Programs
- Books
- Useful
- Courses
Which folders to create depends on your interests.
Now move the files from the old drive to the new one according to their purpose. You'll be surprised how much unnecessary files You will delete during such a transfer.
Download Rule
In the future, set yourself a rule - immediately after downloading another file decide his fate.
Watch/listen to the downloaded file and determine its usefulness. If you need the file, move it to the desired folder, then be sure to rename it, replacing something unclear like video1 with a new file name, for example, “Video tutorial on creating a gravatar on Gravatar_com.” Spend a few seconds on this renaming and you will no longer have to spend hours watching dozens of videos in search of the desired video tutorial.
If you downloaded the archive, before unzipping it, create a folder with a detailed name, and after that unpack the archive into it. The size of disk space occupied by files will increase slightly, but using them will be much more convenient.
P.S. This video will help you download files from the Internet quickly and without problems.
Even big disk space If you work on the computer for a long time, it may end. You can delete files and programs to free up some space, but this is a temporary solution. You can replace the hard drive, then you will have to reinstall the OS and configure the computer. It's easier to connect a second drive, which will significantly increase disk space for photos, games and movies.
Buy in store computer equipment a hard drive of sufficient capacity and a SATA data cable for connecting it. The disk capacity depends on the user's desire, but it is better not to save money and purchase a disk of at least a terabyte, so that you do not have to think about increasing the memory again soon. HDD modern computer most often connected using a SATA interface. The IDE format was used on computers until 2000. To be sure that the drive and motherboard are compatible, consult your dealer or read the instructions for your computer. Completely turn off the computer and everything additional devices from the power source. Place the system unit on its side and remove its side panel. Consider the motherboard. On modern boards There may be several SATA controllers, up to 6 pieces. The IDE connector may be missing or used to connect a CD/DVD drive. A computer board diagram will help you find the right controllers.


Elevated temperatures can cause rapid wear on the surface of the hard drive. If it is not possible to separate the hard drives by space, then there is one way out - install a second fan to cool the drives. If all SATA controllers on the board are busy, then buy PCI controller With SATA connectors to connect a second drive.
Articles in the same category
I’ll share with you how I solved a problem related to my hardware. I worked and worked... and there wasn’t enough space. Have you thought about how to install a hard drive on your Acer AX3910 computer? There are not enough connectors for it.
I’ve been using this computer for several years now and I’ll tell you honestly, it’s never let me down, it works super reliably, quickly, and the most important thing I like about it is its noiselessness. Works like a laptop. It's on the table and you can't even hear it.
Installing a second hard drive on an Acer AX3910 computer.
Before this model I used the same ones desktop computers, the same brand, only less powerful and with less hard drive. As they were used, the need for a faster processor and a larger hard drive arose. I have been using this model for more than two years and have no plans to change yet. Except that there wasn't enough space on the hard drive.
Computer settings:
For extra space I've been using information storage for a year now external hard“WD Elements” disc. The brand is not known to me, it is made in Thailand. 
This HDD has a USB3 connector, the data transfer speed is very high that I didn’t even need to increase the built-in hard drive.
And I wouldn’t worry if at one point he didn’t start working slowly. The time it takes to load files into my programs has increased dramatically since this external drive. And energy-intensive programs - Adobe Premier Pro, Adobe Muse. The brake became concrete.
And there was concern. When checking Windows disk announces system error on the disk, but cannot fix it. And “my whole life” is on it! Archival photos, work over many, many months. It became creepy to even think, if suddenly... I don’t even want to say this word! I handle it very carefully, blowing off the dust.
How to install a second hard drive
What to do? I decide to urgently install an additional 1 TB hard drive, leaving the original drive of the same manufacturer under the system, without reinstalling the system or changing anything. Bought for 3820 rubles. And knowing that in this compact case there is no free space, I decide to install it instead of a CD/ROM, and use an external CD/ROM, connected via a USB connector. It's not needed that often these days. And on the motherboard there are only two SATA connectors for disks.
I disassemble the case, it's easy

unscrew the CD/ROM 

Connecting a second hard drive
How to install a second hard drive programmatically. I connect the connectors to it from the CD/ROM and assemble it. I just swap the connectors of the native HDD and CD/ROM. This is done in order to new HDD did not act as a root disk. If you don't reset the connector, the computer simply won't boot the system. Tried it in setup Switching the drives didn't work, so I had to re-wire the wires. This is done quickly and is not difficult. 
Next, connect all the wires, turn it on and press on the keyboard Del. This is necessary in order to get out setup and just in case, set the boot priority from our native hard drive. 

 Exit, saving the settings.
Windows will boot, but when you open Explorer, you will not find the new disk. To do this, we will make the following assumptions:
We go out to Control Panel-Administrative Tools-Computer Management-Disk Management
.
Point the mouse at this disk 
and right-click to call up a pop-up menu in which we create a simple volume.
The Creation Wizard window will appear. simple volume, which will guide you through setting up this disk. 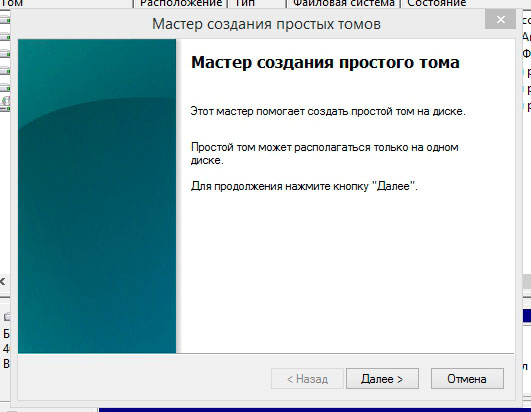
During the creation process, we assign a drive letter, you can come up with a name for it. Let's format it. And a second hard drive appears on our computer. This operation is simple and intuitive. 
Thus, the computer gained new storage, essentially tripling its memory capacity. It remains to add Random access memory up to 16 GB. And you can still use it for two years.