DNS management, working with NS and A records using examples. What are the types of NS records for a domain?
Among ordinary users no one has ever thought about how the Internet works. How surfing happens on the World Wide Web, why browsers get to exactly the pages you request. This is where the DNS server (Domain Name System) comes into play. This system is necessary in order to correctly follow the routes between Internet addresses, from the PC to the requested sites.
When and why is there a need to change the DNS server?
By default, the DNS server is assigned by your ISP, but there are cases of overload when there are too many clients accessing a particular service. Because of this, the speed of downloading and transferring data packets may drop significantly. Also, some DNS servers have restrictions due to the legislation of the state in which they operate. It happens that governments even block global social networks and instant messengers. In some cases DNS change can allow access to blocked resources, as well as increase the speed of downloading files and content.
The principle of operation of a DNS server is to direct the user to correct address Internet
How to find out the registered DNS server address and how to change it
Now the global trend among providers is to automatic detection A DNS server, that is, it is not needed initially. But it’s still quite easy to recognize it, just a few clicks of the mouse.
Windows
You can find out your DNS server and change it in the corresponding column of the “Control Panel”.
- Press the Win+R key combination, enter control in the “Run” field and launch the command with the OK or Enter button on the keyboard.
Launch the “Control Panel” through the executable program
- Change the view from “Categories” to “Icons” and click on the “Network and Sharing Center” item.
Select the item “Network and Sharing Center”
- A window will open with active (active, connected) networks. Click on the link opposite the one that has access to the Internet.
Looking through the list active networks in the Network and Sharing Center
- The network status window will open. Click the “Details...” button.
In the “Status” window, click the “Details” button
- Another window will appear with all the data of the connected network. In the column “IPv4 DNS servers” we get acquainted with the current addresses of the services that the connection is currently using.
View connected DNS servers
Changing the DNS server is also easy. First, let's return to the "Status" window.

As a result, we have access to the specified domain name conversion service.
Ubuntu
To change DNS settings in operating systems Ubuntu systems can be used in different ways. The simplest one is using the interface.
- On the right top corner network drop-down menu. Click on the corresponding icon and select “Change connection...”.
Open the network drop-down menu and click “Change connection...”
- Select an active Internet connection and click “Change”.
Select an Internet connection and click the “Change” button
- Go to the “IPv4 Settings” tab.
Go to the “IPv4 Settings” tab
- Change the “Configuration method” filter to “Automatic (DHCP, address only)”.
Change the “Configuration method” filter to “Automatic (DHCP, address only)”
- In the “DNS Servers” column we write required addresses separated by commas. Then click the “Save” button and close the window.
In the “DNS Servers” field we enter the corresponding addresses
To find out the current DNS server in the Ubuntu OS, you need to enter the command $ cat /etc/resolv.conf in the terminal. This will display all the information on the network: the nameserver column contains the domain address.
On the router
It’s worth noting right away that not all router models allow you to change the address of DNS servers in their settings. Some devices allow you to replace them with well-known services, for example, Yandex-DNS or Google DNS.
- First, you need to go to the router management page. For this purpose in address bar any browser, enter 192.168.1.1 and click Enter key.
- Depending on the brand of router further instructions have options. In some cases, additional settings and information may already be on the main page. But most often you need to press a certain button to go to the accompanying menu. The button may be called Advansed, Setup, “Settings” and so on. Click on this button to go to the additional menu.

- There are several options to change the service:

Errors that may occur when using DNS
It is rare for a user to encounter errors that are related to the DNS server, but they do happen and are divided into two types: internal and external. By external we mean problems with the service itself that the browser accesses. This problem is easy to solve: you need to set automatic selection DNS or change the service to a more reliable one, as shown in the examples above.
If changing the methods does not solve the problem, then the problem is related to the “DNS client” service. It may be disabled or damaged by viruses.

If the problem does not disappear after rebooting, it means that the service files are damaged and you need to run a system scan for viruses and restore OS files. It is better to use two or three antivirus programs.

Video: How to fix DNS server errors
Changing the DNS server is easy. If necessary, you can easily restore the speed of your favorite sites. Follow the instructions above and you won't have any problems surfing the Internet.
This article will discuss one of the first steps in creating a website. One of the initial stages of publishing a website on the Internet is purchasing a domain and hosting. Next you need register DNS and link the domain to hosting . Initially, it is recommended to create a website on a local service on your computer, for example XAMPP, and check all plugins and scripts. This ensures that you avoid difficulties when working on a site that has already been published on the Internet.
What is DNS? This is a technology that allows you to bind a domain to a specific IP address. If you buy a domain and hosting on the same service, then this procedure is not necessary. But in most cases, site hosting is chosen on another service, which significantly reduces costs. All the same, no matter what you say, the site, at least to begin with, must recoup the costs of creating and hosting it on a hoster.
In my own way personal experience To save money, I recommend buying hosting on . In my opinion, this hosting has the most best ratio price-quality. For one site only 30 rubles per month. Unlimited traffic, mail, databases and everything necessary for normal operation. And the support service is great. Next tariff plan very beneficial if you plan to develop your group of sites. For 5 sites and 2012 megabytes only $2 per month.
This website hosting service was selected after detailed analysis on the Internet and checking reviews. Very often, many webmasters recommend that the more expensive the hosting, the better, but later it turns out that such hosting freezes for several days, there are many problems with them and the support service does not work well.
Linking a domain and registering DNS is not difficult. I have been working with hostia.ru for over a year now and have not experienced any problems. On this hosting I have sites for CMS Joomla and WordPress and there are no problems.
Next, we’ll look at how to link a domain to a hoster and register DNS using the example of Hostia.ru and official partner Reg.ru for domain registration 2domains.ru. Here, purchasing and renewing a domain costs only 99 rubles.
However, these steps for registering DNS and linking a domain to a hoster are quite suitable for other services and registrars.
When you buy hosting, you receive a letter in the mail containing your registration data and information about what DNS to register in order to link the domain to the hosting. If you have lost this letter, you can obtain this data from your hosting support service.
Usually two addresses are specified. Here is an example of a letter to the hostia.ru support service:
After receiving information on how to register DNS and link a domain, you need to go to the domain registrar services control panel. In our case, this is 2domains.ru. For DNS changes you need to go to the Domains->Manage->My Domains menu and then follow the instructions.

For example, these are the steps you will have to do in order to register DNS and link the domain. Here is the 2domains.ru control panel

Anyone who has ever encountered the creation of a website at least once in their life knows about the need to write down a list DNS server ov. For experienced web masters, this article will not be a big discovery, but for beginners, this post can shed light on certain subtleties of DNS settings.
Managing DNS settings is a very important component for many users who independently manage their Internet project. The performance of your website may depend on how correctly the DNS setup process is carried out. The thing is that DNS changes are not visible immediately after installation, they appear only after some time, and it will be very difficult to understand where exactly the error was made.
What is DNS
Domain Name System (DNS) is a system that provides domain names with their numerical equivalent. The Domain Name System is seen as a repository for domains and their corresponding IP addresses. Each server (computer) has 2 main identification marks - a domain name and a unique set of numbers. The first identifier is characteristic of human perception, for example, domain website. The second, numeric, is intended for computer processing; the so-called IP address. For example, when you enter a specific URL into a browser field, the domain name system checks the IP associated with that address and then redirects the user to the page they need. In other words, main task DNS servers consist of transliterating Internet protocols (IP) into domain names and vice versa.
All DNS records are stored on physical server, which processes huge amount requests daily. As soon as the user has given a request for the desired domain name, the DNS server processes the information in just a matter of seconds and issues desired result to the user. A separate category of NS servers is responsible for storing DNS records. In turn, 2 representatives are responsible for the NS servers. The first one is administrators. domain zones. And the second representative is either , or an Internet provider.
Updating DNS records
When you purchase a new domain name, the registrar company provides you with a control panel in your personal account. The NS server will be registered by default to the registrar. If your hosting was purchased from a completely different place than the domain, you can register your NS yourself.
Processing recordsWhen a domain is first registered, information about it is sent to other DNS servers approximately 2-4 hours after registration. Ideally, the site will start working exactly after these 4 hours. However, on average, distributing information to other servers can take 24 hours or longer, after which your resource will be fully operational. An explanation for such a long delay in data dissemination among servers may be the factor update frequency. That is, the servers are configured for a certain frequency of updates, for example, once a day, and because of this, your site appears on the network only after the next wave of system updates.
In addition, it is worth considering that the accessibility of the site for different users may also be different. For example, if you see that your site has already appeared on the Internet, this does not mean that absolutely any user can see it just like you. The visibility of your site depends on the Internet service provider of other users. In other words, the site may be accessible to you, but not yet to other users, and vice versa. Each provider independently sets the frequency of DNS server updates, which is why users or even you yourself will see the site online only after updating the servers.
Prescribing NS
For each domain name, you must register at least two NSs. This will provide more stable work your site in case one of the records is unavailable for some reason.

Each entry must be written especially carefully. In order to register server information in the domain, go to your personal account and in the domain name control panel in the “DNS server” tab, enter your data.
As we said earlier, your data will appear online with a delay, so there is no need to panic ahead of time, but just wait until the DNS server is updated again.
Speeding up the process
In order to speed up the processing of your domain and get started with it quickly, there is one way you can do this. You need to enter the line xox.oxo.xox.oxo.sampledomain.ru (xox.oxo is your IP and your personal domain) in host file, which is located in your OS. Path to this file for Windows it looks like this.

You can add an entry at the bottom of the file. This will allow you not to rely on updating the provider's server records.
Assigning DNS Records
To provide normal work domain name, you are required to set certain DNS records for it. Below we will consider the types of such records.
- A-type record – Designation of the IP address of the node. Used to tie your . Example entry: * IN A 87.12.xox.oxo. , where * is your domain.
- MX record type – IP address designation mail server. Applies when delivering/sending mail to your domain mailbox.
- CNAME record type – Used when assigning an alias to a host to shorten the name or simply to associate the host with some function.
- NS record type – Used to delegate a domain name, as well as to connect your domain with hosting.
So, these are the main records necessary for carrying out processes such as linking your domain with hosting, setting up domain name mail agents and other important processes.
Pickuphost rating
A domain name is absolutely impossible to imagine without virtual hosting. These two concepts always go hand in hand. Therefore, if you are looking for a reliable hosting company with free domain name, the Pickuphost rating is exactly the place where you can analyze the hosting services market and choose the best offer for yourself. Please note that a certain number of hosting providers. This can reduce your expenses a little and allow you to spend the savings, for example.
To ensure a secure and reliable Internet connection and uninterrupted access to websites, social networks and online services, you can use third party DNS servers, which operate at the first line of access to the Internet.
Popular DNS servers are presented on our website in the Secure DNS services section. Most often, setting up DNS helps VPNs and proxies work more efficiently, providing more high level protecting your privacy and anonymity.
We present to your attention detailed instructions how to set up DNS on a computer with operating Windows systems 10, 8.1, 8, 7, Vista and XP.
Setting up DNS using DNS Jumper
Run the utility, select from the list DNS server preferred server (eg Google Public DNS) and click the button Apply DNS.

Setting up DNS in Windows 10, 8.1, 8
![]()
2. In section View basic network information and set up connections, select Network From
![]()
3. In the window that opens, select Properties.

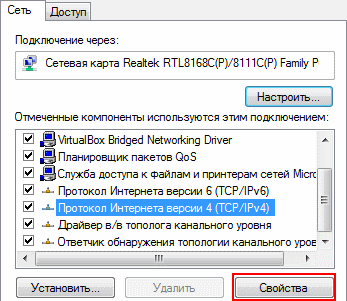
4. In the connection properties window in the list The marked components are used by this connection select item IP version 4 (TCP/IPv4) in Windows 10 or and click Properties.

5. In the window that opens, on the tab General select item.

6. Enter the DNS addresses of your choice, such as Google DNS, in the Preferred DNS server and Alternate DNS server fields (depending on the selected service, the field may be left blank).
7. Check the box for and click OK to save changes.
- Click right click mouse by Windows icon(Start menu) and select Command Line (Administrator) or Windows PowerShell(administrator)
- Type the command ipconfig /flushdns and press Enter

Setting up DNS in Windows 7
1. Right-click on the Internet icon in the tray, select Network and Sharing Center.

2. In section View active networks, select the item to the right of:

3. On the tab General in the window click the button Properties.

4. On the tab Net connection properties window, scroll down and select , click the button Properties.
5. On the General tab of the Properties window, at the bottom, select , and then enter the IP addresses of the selected DNS service, for example, Google DNS.

6. Check the box for Confirm settings on exit and press OK to save changes.
Update DNS cache as follows:
- Click menu Start> enter cmd in the "Search programs and files" field > right-click on the found link and select Run as administrator
- IN Command line Type ipconfig /flushdns and press Enter.
- Restart your computer.

Setting up DNS in Windows XP
- From the Start menu, open Control Panel.
- In the Control Panel window > select Network connections , then select your current connection.
- On the General tab in the window Connection Status Click Properties.
- On the General tab of the Connection Properties window, scroll down and select Internet Protocol (TCP/IP), then click Properties.
- On the General tab of the Internet Protocol (TCP/IP) Properties window, at the bottom, select , and then enter the IP addresses of the selected DNS service, such as Google DNS.
- Click the button OK and close all windows.
Setting up DNS in Windows Vista
- From the Start menu, open Control Panel.
- In the Control Panel window, select Network and Sharing Center.
- Under Network, select View status each connection.
- On the General tab in the window Connection Status Click Properties.
- On the Network tab of the connection properties, scroll down and select , click the Properties button.
- On the General tab of the Properties window, at the bottom, select , and then enter the IP addresses of the selected DNS service, Google DNS.
- Click OK and close all windows.
Found a typo? Press Ctrl + Enter
DNS server is extremely useful opportunity secure own computer from malicious sites. The process seems difficult for beginners, but in reality everything is much simpler, and the procedure for installing a DNS server will not take much time.
DNS is an acronym derived from Domain Name System. WITH English language this translates into Russian as “Domain Name System” changing them into IP addresses. And the DNS server stores the corresponding addresses in the database.
The work is carried out in this way: the browser, going to the site, contacts the DNS server to find out the desired address. The Server identifies the site, sends a request to it, and sends the received response back to the user.
How to find out if the DNS server is enabled on your computer
The current DNS server settings are determined as follows:
- “Control Panel” -> “Network and Internet” -> “View network status and tasks.” Select your network connection, go to the “General” panel, then go to properties.
- Go to the properties of “Internet Protocol Version 4 (TCP/IPv4)”.
- Open the "General" tab. If the option to use the following DNS server addresses is activated, it means it is in working mode.

Repeat the previous steps, activate “Use DNS server”. After this, you will need to specify a primary DNS server, and then a secondary one.
How to configure/change DNS
When changing or additional settings you don't need to do much. You must use the window that was opened earlier and go to the “Advanced” item. Here, detailed adjustment of access to DNS servers is carried out. In Windows 7, you can configure all this yourself. Therefore, the question of how to change the DNS server yourself will not cause problems.
DNS suffixes are also available for management. The average user does not need them. This setting, which helps to conveniently share resources, was created for providers.
On a wi-fi router
When using a router, you must set its IP address in the DNS options. To perform these manipulations, you will need DNS relay and DHCP server enabled.
The router interface is designed for verification and subsequent detailed settings. First you need to check the DNS in the WAN port. DNS relay is activated in the LAN port settings.

On the computer
Setting up a DNS server in Windows 10 is similar to the same situation in earlier versions OS. First you need to select the “Internet Protocol Version 4 (TCP/IPv4)” properties. Go to additional options and configure the list of servers.
Setting up a DNS server on a computer and on a laptop is the same.
On a tablet
Depending on the installed operating system, the actions differ somewhat, but they all have the following points in common:
- Open the “Wi-Fi” menu located in “Settings”.
- Go to the properties of the current Internet connection.
- Click “Change network”, then “Show additional parameters”.
- Scroll to the DNS servers item, then register them.
On a smartphone
Since now there is not much difference between operating systems I don’t have a phone or tablet; to set up the necessary DNS servers, you just need to know the instructions described above.

Possible errors and how to fix them
Problems with the Internet occur when incorrect settings DNS servers, including when they unexpectedly fail.
What to do if the server is not responding or is not detected
Most often, this problem occurs when the server is disconnected or the settings are lost. To do this, open the “Control Panel”, go to “System and Security”, then “Administration”. Click on “Services”, find “DNS Client” and double-click on it. The status bar indicates the command “Running”. Otherwise you need to select automatic type launch from the drop-down list above.
If the service is running but the error still appears, there are server problems. First, it is better to change the DNS server addresses according to the above instructions. However, it is still possible to reinstall the drivers network card, check your Internet connection and ask your provider about possible technical problems.

Doesn't resolve names correctly
If this error occurs, you need to check the correctness of your DNS server settings. It’s better to simply change the DNS server address to get rid of the problem.
Problems are also possible on the operator’s servers, and the problem is solved in the same way - by changing the DNS.
For the inexperienced user, there is a list of high-quality and free servers:
Addresses: 8.8.8.8; 8.8.4.4
 Like everyone else Google services, performs its tasks efficiently, but has a known disadvantage - it collects and stores user statistics. Despite this, the server does not have any access to personal data, so there is no need to worry about security.
If you want to learn more about server work, there is official documentation on the information site.
OpenDNS
Addresses: 208.67.222.222; 208.67.220.220
A popular server due to the presence of a wide range of filters and protection against identity theft. Basic functions are free, but it is possible to purchase premium access, which allows you to create a “locked network environment” and increase connection speed.
DNS.WATCH
Addresses: 84.200.69.80; 84.200.70.40
Does not require registration to use, provides a more serious level. The only negative is the low speed.
Norton ConnectSafe
 Addresses: 199.85.126.10; 199.85.127.10
It also does not “ask” for pre-registration and securely stores user data. Created by the developers Norton antivirus, without requiring additional advertising.
Level3 DNS
Addresses: 4.2.2.1; 4.2.2.2
Suitable not only for personal use, but also for corporate purposes. Fully free resource, ranks third in global popularity.
Comodo Secure DNS
Addresses: 8.26.56.26; 8.20.247.20
The basic version is free, but some cash it is possible to purchase large quantities useful services. Both paid and free options provides reliable protection data.
OpenNIC DNS
Addresses: you should go to the project website, it will select the best ones depending on the user’s location.
Due to its huge coverage, it allows you to conveniently explore the Internet anywhere in the world.
DHCP server: what is it and what are its features
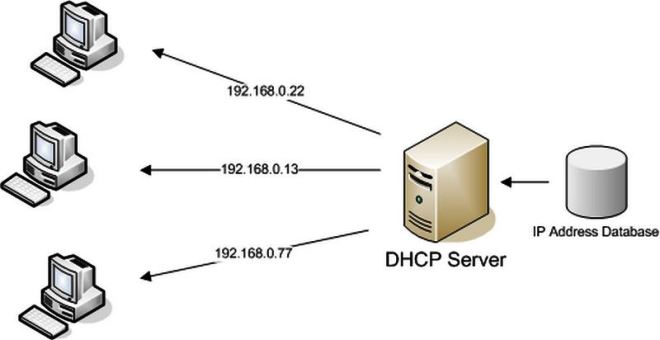 Most suitable for meshes with large quantity computers due to the transfer of their network settings all connected devices.
Such a server allows the administrator to specify a range of server hosts and avoid wasting a lot of time on detailed optimization.
It only works with IP address settings and the addresses themselves.
Conclusion
The primary task of DNS servers is to transfer an IP address. Servers from other companies, some of which are described above, can speed up and greatly facilitate Internet surfing. However, it does not require painstaking setup, and many errors can be resolved by using another server.