Creating a DVD menu.
DVD is gradually conquering the market and the issues of using programs and hardware solutions for working with DVD are becoming more and more interesting for many, many people. With the hardware component, everything is more or less clear - there are writers DVD drives two competing standards, there are hardware MPEG encoders for those who can't wait hours for results from software encoders. All that remains is to understand what programs can and/or should be used to create DVD-Video discs.
This question is not as simple as it seems. Just a few years ago there were very few programs for DVD Authoring, they cost a lot of money even by Western standards (up to $30,000) and their use was the lot of only a few thousand people, 90% of whom worked in the USA. With the advent of computer DVD recorders, the situation has changed, but now there is a bend in the other direction. The release of a program for creating DVD-Video discs has become a matter of honor for all companies that have at least some connection to video. In advertising press releases from manufacturers, any DVD program-Authoring is now being touted as a universal tool, ideal for creating Hollywood Video-level DVD-Video discs. Some similar programs even have menu templates, which are modestly called Hollywood Quality. In reality, of course, this is far from the case. To list the programs that can actually create Hollywood Quality DVD-Video discs, the fingers of one hand will suffice. The mass development of DVD Authoring programs is also facilitated by the inviolability of the DVD-Video standard, and changing this standard is hardly possible in the foreseeable future, since tens of millions of DVD players are already in tens of millions of apartments and it is impossible to ignore such a number of users in a hypothetical change of the standard.
But there is one distinctive feature that allows you to separate one group of programs from another - this is the approach to creating menus for DVD-Video discs. The vast majority of new programs created for the mass user allow only small variations in both the design of the menu and the selection methods in it, and most importantly, do not allow the use of a video clip as a menu. This limitation significantly reduces the creative possibilities of the disc author.
But, unfortunately, we will not be able to discuss further the pros and cons of programs for creating DVD-Video discs without at least briefly getting acquainted with the requirements for a DVD-Video disc.
The table below shows the most important parameters source data for further creation of a DVD-Video disc (hereinafter we assume that PAL is used as a television system):
| Name | Meaning |
| Frame size | 720x576, 704x576, 352x576, 352x288 |
| Frame frequency | 25 fps |
| Screen aspect ratio | 4:3 or 16:9 |
| GOP parameters ** (header required). | 30 fields, 15 frames |
| Maximum bit rate (video+audio) |
9.8 Mbit/sec |
| Minimum bit rate (video+audio) | No **** |
| DVD used in the project PCM sound. | 8 Mbit/sec |
| The maximum video stream speed, if DVD used in the project Dolby Digital Stereo sound. | 9.4 Mbit/sec |
| Sound format | PCM (uncompressed audio), Dolby Digital Stereo or 5.1, DTS (Digital Theater System) and MPEG-1 Layer II *** |
** GOP - Group of Pictures - literally “group of images”. An MPEG stream always consists of sequential GOPs. Each GOP begins with a reference, or I-frame, in which the image is compressed without taking into account the video information in adjacent frames. All other GOP frames contain only the information that is not contained in the I frame. MPEG compatible DVD must contain only GOP with titles. The GOP header specifies parameters such as bit rate, GOP size, image aspect ratio, etc.
***Not recommended format. Playable on PAL only DVD players.
**** Many encoders or DVD creation programs limit minimum speed flow. In particular, ReelDVD does not allow encoding of static (still) menus at a speed of less than 1 Mbit/sec. Scenarist has no such restrictions.
If you look closely at valid parameters video and sound for DVD-Video, it is easy to notice that the quality of the video depends on the format in which the sound is recorded, for example - if the sound is in PCM, then the maximum bitrate of the video should be much less than when encoding sound into the Dolby Digital format . Encoding audio into the MPEG-1 Layer II format gives a sound bitrate comparable to Dolby Digital, but the quality of the compressed audio itself is inferior to Dolby Digital at the same bitrate.
Briefly about many things
We can now move on to a brief analysis of the most popular programs for DVD Authoring. Like any other similar analysis, it is partially subjective, but nevertheless:
Programs for those who do not want to waste time creating a DVD-Video discUlead MediaStudio Pro 6.5- in terms of creating a DVD, it is very simple, it has practically no degrees of freedom for the author, but therefore there is no mastering stage and any beginner can make a DVD on it.
Advantages:
No skill or knowledge is required to create a DVD.
Speed of operation - it will take 10-15 minutes to prepare the menu and you can burn a disc.
Support VCD, SuperVCD, XSVCD.
Flaws:
The film must consist of only one file (not counting the short introductory file), and only the MPEG Program Stream format is supported (video + audio in one file).
No other video or audio formats are supported.
The menu cannot be spoken.
The menu can only have frames from the movie as buttons, and only the place where these frames are taken can be navigated to.
SpruceUP- program entry level. There are also few degrees of freedom, but somewhat more than in Ulead MediaStudio Pro 6.5. But with this program you cannot make a DVD disc just by mechanically pressing Next and you will have to perform several independent actions. Unfortunately, the company that developed the program, Spruce Technologies, was acquired in 2001 by Apple And further development This and a number of other programs in the Spruce line will no longer exist.
Advantages:
Dolby Digital (AC-3) audio support. Own encoder in Dolby Digital program does not, but allows the use of ac3 files.
It is possible to use control buttons of your own design.
To display a chapter, any frame of the film can be used.
Flaws:
The movie must consist of only one file, since the sequence of playing the files is not specified. At the end of playing each file, you return to the menu.
It can make a disc that is incorrect for a home DVD player, but will only play normally on a computer DVD-ROM.
Without entering the menu, watching a movie is impossible.
Ulead DVD Movie Factory- a more “advanced” version of DVD Plug-in to Ulead MediaStudio Pro. Allows the use of multiple files, allows you to voice the menu. Has a built-in MPEG encoder. Otherwise almost identical to DVD Plug-in.
Programs for advanced amateurs
Sonic DVDiT Professional Edition 2.5.2- this program, despite its simplicity, has a number of significant differences from entry-level programs.
Advantages:
No significant knowledge is required to create DVDs.
Supports Dolby Digital Stereo audio. Has a built-in audio encoder for this format.
A film can consist of many files, and the playback sequence is easily determined by the user when creating the disc.
A hierarchical structure of several menus is allowed.
You can watch the entire movie, including the introductory clip (First Play), without going to the menu.
Ability to specify the coordinates of chapters via timecode.
Flaws:
Does not support Dolby Digital AC-3 six-channel audio (i.e. 5.1).
Does not support motion menu.
Ulead DVD Workshop 1.3- outwardly it looks like a program that has many of the capabilities of professional products, but in fact it cannot be classified as a serious class program.
Advantages:
Intuitive interface.
Supports audio in LPCM format.
Each menu can have its own sound accompaniment.
Built-in MPEG encoder.
It is possible to use control buttons, backgrounds, text, etc. own design.
To indicate a chapter, you can use any frame of a film or any other picture.
Motion menu supported.
Audio compression into Dolby Digital Stereo format is supported when upgrading Workshop to version AC-3.
Flaws:
After playing the intro clip, you always go to the menu.
The menu does not work on some DVD players.
The menu appearance can only be quite monotonous - rectangular windows for video fragments/still frames of the film. Another type requires noticeable volume self made from the author.
Dazzle DVD Complete- the program practically corresponds to Ulead DVD Workshop 1.3, but differs in slightly greater menu design capabilities. On the other hand, DVD Complete is more difficult to understand than DVD Workshop.
Programs for professionals and very advanced amateurs
Sonic (formerly Daikin) ReelDVD 2.5.1/3.02- semi-professional level program. It operates with subpicture, so the possibilities for disc design are great.
Advantages:
Does not require serious knowledge to create DVD.
Intuitive interface.
Built-in Dolby Digital Stereo encoder and Dolby Digital 5.1 capability.
Since the menu is created either in a graphic or video editor, the menu design is limited only by the author’s imagination.
A movie can consist of many files, and the playback sequence is determined by the user when creating the disc.
Flaws:
Requires understanding of principles DVD works player.
Mastering a program based only on its description is very difficult.
Sonic (formerly Daikin) Scenarist NT 2.5/2.7- professional level program. In short, you can say this - he can do everything. There is only one drawback - the program is somewhat difficult to understand and master.
So what should we work on?
This short review programs for DVD-Authoring, of course, does not pretend to be complete; we only talked about the most famous programs on the market. A reasonable question arises - which program to choose to create your DVD-Video discs? In our opinion, there are 3 options for this choice:
There is no desire to spend more than 15 minutes creating a DVD-Video disc.- in this case the most the right choice will be the application of Ulead DVD Movie Factory. Everything is simple and clear, you don’t even need to think about anything.
I just want to make a disc with a movie, no menus need to be created, but the disc should be played in its entirety, without going to any menus- in this version it is easiest to use Sonic DVDiT Professional Edition 2.5.2. Oddly enough, this program does not more complex programs entry-level, but allows you to simply link several different clips and, having made one symbolic (phantom) menu, simply put your movie on a DVD disc, easily ensuring its continuous viewing.
I'm not looking for easy ways, I want to make my DVD no less interesting than my film on this disc- in this case, only ReelDVD or Scenarist NT will allow you to create any design for your disc.
Regarding the last point, I would like to talk in a little more detail - in our opinion, ReelDVD covers 95% of the needs of both amateurs and a number of professionals to create their projects. Of course, Sonic Scenarist NT can do even more, but its interface is somewhat less intuitive and the features that make it different from ReelDVD may never be needed. Mastering ReelDVD, if necessary, will make the transition to Sonic Scenarist NT much easier, since these programs are similar in many ways and you can easily transfer your project from ReelDVD to Sonic Scenarist NT, and this possibility is provided by the authors of both programs.
Based on materials from the site radiolocman.ru, 2004.
Making a DVD from existing video files in AVI, MPEG, MP4 and other formats seemed like a simple task to me. But I did not imagine that you would also have to pay for conversion to a de facto standard. But videos shot with a smartphone or tablet can easily turn out to be an interesting video.
1.Windows DVD maker
Included in Windows composition 7, no additional expenses. It understands a bunch of file formats, you can make both a disc from video files and a presentation from photos, you can create a DVD menu. But a huge minus is that the program immediately writes to disk. In my case, this turned out to be impossible, because... The drive in the laptop has long since outlived its usefulness. I just wanted to make a DVD project, and I wanted to burn DVDs on a desktop computer.

2. WinX DVD Author
WinX DVD Author is found by Google when searching for free DVD authoring software. And she even works for free. You can create a menu there. Only here is the program logo and a message that the DVD has been made free version, negate all the capabilities of the program.

3. DVD Styler
It turns out that there are still programmers who simply do good for other users. Alex Thuring has released a program called DVD Styler, with which you can create a DVD from a set of video files of different formats. The program contains several nice menu templates.

This is why there are programs for creating DVD videos, or, in other words, DVD authoring. Currently, there are a huge number of such programs on the shelves (the law-abiding citizen himself will choose the desired counter) and on the Internet, but in this article we will talk about only one of these products called DVD LAB Pro. Canadian made considerable efforts in creating this program, as a result of which this product, to some extent, can be classified as professional solutions. In this article, we will be able, using both the built-in techniques implemented in the program, and using our imagination and creative fervor, to create a full-fledged DVD video disc. So, let's begin.
To
1. Launching the program and creating a new project
Launching the DVD-lab PRO shortcut will open a program window with a choice of parameters for our future DVD.
In the first line you need to select the project color system (PAL or NTSC). In Russia, as you know, PAL is used (set by default). Now you need to select your project type. To create a regular DVD video, just check the box Normal. How is it different? Advanced from Normal, what's happened VTS And VMG and why we considered the type sufficient Normal? Each DVD disc consists of a set of films (clips) and a menu, this is VTS, that is, a kind of container in which clips and menus are stored. In DVD LAB, each VTS can contain 99 movies (clips) and 250 menus. However, all menus and all films (clips) in one VTS must have the same settings, and if you set, say, the proportions to 4:3, then in the entire project all clips and menus will have the same proportions, however, if you want to watch the same film also in a wide format, for example, 16:9, then you need to create an additional VTS with 16:9 parameters. But in order for the DVD player to understand that your disc includes two VTS (4:3 and 16:9), you need to create VMG- Video Manager menu. From the above, it can be assumed that the average user is unlikely to create a DVD with a film about how he had fun in Turkey in two or even three formats, so in this lesson only the project type is used Normal, which is quite enough to create an amateur DVD video disc.

The next item of project properties that needs to be considered is Simple. Selecting this item will create a project with space only for a video fragment ( Movie).

You can add the remaining items yourself, but more on that later. Paragraph Template creates an empty project, but the meaning of the phrase Open project(Open project) is understandable to everyone without exception. 2. Import video, sound fragments, pictures
So, in stock - an empty project for now. Pay attention to the bottom open window programs.

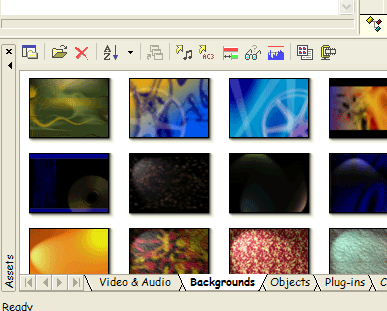
It is called Assets window(the window in which our “property” will accumulate). Here, namely in the tab Video & Audio, all video fragments, pictures and sounds needed for work are imported. The remaining tabs represent various objects built in by default: Backgrounds(background pictures), Objects(objects), Plug-ins(plugins), Clips(clips), Music(musical fragments), Images(Pictures). Import is carried out in several ways, the first way is the simplest: just drag the selected file from Windows Explorer through this window. Second way: press the button Import Files and select the desired file.

The third way is to open File Browser using DVD Lab by clicking the appropriate button.

The file browser will launch, from which you can simply drag it into the window Assets Window you can import files.

However, you may notice that the file import button is present not only in the tab Audio & Video, but also in other tabs, respectively, import will be carried out in the tab that is currently open. The difference is that in the tab Assets Window there is a link to video and audio fragments and pictures located in any folder you created, and when importing, say, into a tab Images, the image file is copied to the Images folder, located in the directory where the program is installed. Therefore, when loading a new project, the window Assets Window will be empty, and in the tab Images You will find pictures that are there by default, as well as pictures that were imported earlier (if they were imported).
Unfortunately, DVD LAB Pro can only work with certain file types, in particular .mpeg, .mpg, .mpa, .wav, .m2v (see ), and to convert your video to these formats you need to use third-party programs (for example, TMpgenc, Canopus ProCoder). Files are imported by simple transfer. In our case, these are files with the extension .m2v and .mpa. If the parameters of the files that you try to import for some reason do not correspond to the supported ones, a window will appear with a list of errors or warnings. If you try to import one video file containing video and audio (.mpg) into the program, a window will appear containing two items: Demultiplex to Elementary Streams(Demultiplex) and Quick mode without Demultiplexing(Quick insert).

Let's talk briefly about demultiplexing. To put it simply, this is an ordinary splitting of a .mpg file into its constituent parts, video and sound. The demultiplexing process makes two files from one .mpg file, a video file and sound file, which are then imported into the project. It is recommended to select demultiplexing (otherwise the program will do this for you when compiling the project), after which in the Window Assets window you will also receive 2 files, video and audio.
Let's continue working on the project. Go to the window Movie by double-clicking on the shortcut Movie in the window Project.

By simply dragging files from the Assets window to the Movie window, add audio and video files.

Now in this window you have a movie track and an audio track. 3. Creating chapters of the future film.
There are two ways to create chapters. The first is automatic chapter detection using DVD LAB Pro. Why do you need to select the menu item Movie>AutoChapters...

A dialog box will appear Add Chapters by Scene Detection.

In this window you can set the sensitivity to scene changes - Scene Detection Options. The higher the value in a point Sensitivity(Sensitivity) the more chapters you get. In field Chapters Distribution Type(Chapter Allocation Type) there are two options. By selecting Add X Chapters in whole movie, you will indicate the number of chapters into which the film will be divided, and selecting the option Find all possible chapters provides for the minimum length of one chapter in minutes. Thus, if in this field you specify a chapter duration of one minute and set the maximum sensitivity to scene changes (255), then the number of chapters will be equal to the length of the film in minutes.
The second way is to distribute chapters manually. For this you will need a window Preview(View).

The buttons at the top of the window mean (from left to right): playing a movie in normal mode, in fast forward, stop, frame left, frame right, add chapter, open automatic chapter mode and show or hide timecode display. Therefore, having selected the desired frame in this window, click on the add chapter icon and it appears in your film.
What if you installed the chapter in the wrong place and want to remove or move it? To do this, select the chapter by clicking on the green diamond or red arrow (the arrow or diamond means, respectively, whether the frames of the clip are indexed or not. Indexing is used to more accurately distribute chapters).
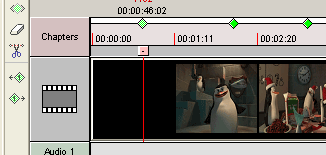
In the square under the diamond the sign will change from plus to minus; by clicking on it, you can delete the chapter. You can also use the Eraser tool in the toolbar, just click on the unnecessary chapter and it will be deleted. To move a chapter, activate the move tool, point at the chapter and move it to the desired location. 4. Creating the Main Menu
To create a main menu (or root menu), you need to open the menu itself. Double-click on the corresponding shortcut in the project window.

The Movie window will change to a blank black background. First of all add background picture your menu. To do this, you need to import the image you are interested in in advance into the Assets Window tab and add a background by simply dragging and dropping. You can also use the available pictures in the tab Backgrounds Assets Window.
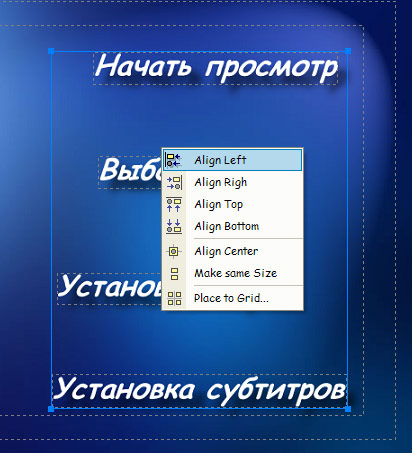
The background is ready. Now let’s create the menu itself, let it consist of four items: Start watching, Scene selection, Setting the sound, Installing subtitles. To create inscriptions, click on the button Ahh and click where you would like the text to appear.

A window for entering text, as well as its formatting (changing the font, location, etc.) will appear.

By repeating the operation four times (since you have 4 menu items) you will get the following:

The text can be moved. Click and hold it with the mouse, positioning it however you like, it all depends on your imagination. Or place the lines one below the other, select them and click on the selection with the left mouse button. A menu will appear containing additional tools for arranging your text in the window. IN in this case align the lines left using the command Align Left.
Next, using the knowledge you’ve already acquired, decorate the menu a little with pictures. In our example, pictures were cut from movie frames and imported into the tab Images Assets Window so that you can later use these images in other projects. Pictures were imported in .psd format and created in the program Adobe Photoshop- DVD LAB Pro allows you to work with layers. You can change the direction of the picture using the toolbar to the right of the window Menu, in the same place where the text creation button is located.
As a result, you can get something like this:

Now create links for the lines of text. For now, you can only link to the first menu item, “Start Watching,” since the movie already exists and you can find it as follows: click right click mouse over the text, select Link>Movie1>Chapter 1(Movie Start). It's simple.

Now create three more empty menus, in which we will have the chapter menu, and the settings for sounds and subtitles. Right-click in the project window and select Add Menu, or use hotkeys Alt+N.

Let's say that you have not four menus, but a hundred. Of course, it's hard to remember which material is where, so you need to assign names to each object. To do this, select in the project window desired menu left mouse button and click F2. You can now rename your menus. These names are displayed only in the program itself and nowhere else.


After all links are installed, numbers will appear next to the lines, indicating that this line has a link with a certain serial number. If you select a line, you will see below it where the link is installed. For example, number 1 “Start watching” will start showing the movie, and link number 2 “Select Scenes” will take you to the scene selection menu.

5. Menu testing and improvement.
Test your menu to see how all this beauty will work and look. To do this, select the command Menu>Simulate.

A menu simulator with a nice control panel will start. Move your mouse over the links, press a button on your keyboard or remote control.

Please note that when you select a menu item, the color of the line changes. Exit menu test mode and notice the window Properties(Properties) to the right of the menu window.

This properties window provides a wide scope for management color scheme, textures, connections, etc. Open the tab Map.

In this tab you can see the fields Button Hi-Lite group And Color Map. In the first field, check the box Antialised(Smoothing), and go to the second field, which has the option set by default Selected. Click the arrows located to the left and right of the option name. It is easy to guess that this function is responsible for the state of the menu buttons at a certain point in time. So, Normal- normal button state, Selected- the state of the button when this menu item is selected, and Activated- the state of the button clicked on the link. For each position, you can select your own color parameters - use the slider for this. If the slider is moved all the way to the left, then there will be no color. Remember that these three modes do not apply to each button individually, but to the entire menu, and you need to configure them once for each menu. Now complicate your menu. Make sure that when you hover over the desired menu item, it is underlined, no matter what or from what side. To do this, draw a line under one link (for example) using the menu toolbar. Select the rectangle icon.
Copy it and paste it under each menu item (use hotkeys Ctrl+C And Ctrl+V) . Then in the properties window, in the tab Color(Color) Change the color of each line.


Please note that in the screenshot the dash under the “Start viewing” menu item is highlighted with an orange dotted line. This means that the dash is not normally visible. This is set again in the properties window, but in the tab Link(in the picture on the right). In addition to setting the visibility of the buttons in this window, you can also set links as you did by right-clicking on the dash or text and selecting the link. Click on the button visibility selection item.

In principle, everything is quite simple: Visible the button is always visible, regardless of whether it is selected or not; Invisible Normal the button is not visible in normal condition, but when selecting it ( Selected) it becomes visible; Invisible Selected reverse Invisible Normal, the button is visible when not selected; Invisible All the button is not visible in all cases. Set the mode for all created lines Invisible Normal and test your menu. There are no lines, but hover over the line where it should be and it will appear. However, you won’t look for this dash before watching, and you never know where it might be located - below, on the right, on the left, on top, or maybe it’s not a dash at all. It’s easier to click on the visible text and start viewing. Go back to the toolbar and select a tool Group HotSpot.
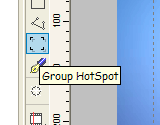
In the work area of your menu, circle the line "Start viewing" and your dash.

This way you have grouped both objects - text and line. Do the same for the other four items, test the menu. At the same time, enjoy the resulting beauty. The main menu is ready. 6. Create a chapter menu.
First of all, go to edit the "Scene Selection" menu. Give the menu any background and create 12 text links for each chapter.
The second option is to create beautiful menu with windows in which video clips of the beginning of your chapters will be played. In DVD LAB Pro, for this you need to use the function Motion Menu. Import the background and take a look at the toolbar in the menu editor.

Click the button Insert Chapter Still(Insert first frame of chapter). You will receive a list of the movies in your project and a list of all the chapters in the movie. Just select the desired chapter and click on it with the mouse, for example, Chapter 2. A video fragment will appear in the center of your future menu, the frame of which will coincide with the frame of the beginning of the second chapter. Arrange its window to your liking, using the parameter Change Size(Resize), which can be found by right-clicking on the frame itself.

In the window that appears, arrange the objects on the menu screen as you please. So, after importing 6 fragments, you will get the following menu, and each picture will have a link to each chapter, starting from the second:

And here is the first drawback: we do not see which menu item the cursor is currently on. We'll fix it now. In the case of text links, we used underlining, but here it would be more appropriate to use frames, that is, appearing frames. To do this, you first need to remove all links from your fragments. Then find the shortcut in the toolbar Frame and, having selected it, draw a frame of any size.

Then use the window resizing and positioning options again. Enter the same values as the first clip in our menu with a link to Chapter 2. You will get something like this:

Next, each frame must be assigned a link according to the frames, and in the properties window, select the parameter for each frame Invisible Normal, as in the main menu. Test the menu, if everything is done correctly, then when you select the desired item, it should be highlighted with a frame of the color specified in the tab Map menu properties windows. You need to remember that in the same tab the color value for the button in the mode Normal must be at zero, otherwise all frames will be highlighted as usual. Now proceed to creating not static pictures, but a moving menu, for which select the item Menu>Render Motion.

The window for creating a moving menu will open.

What do we see in this window? The first is a picture of your menu, the second Motion Objects, that is, those objects to which movement extends. Next to each name there is a checkbox, unchecking which will disable the creation of a moving menu (in this case, a red cross will appear opposite the name instead of a checkbox). Next after Motion Objects field for setting dynamic effects (Dynamic-FX Objects)? responsible for setting up special effects used as an addition to Motion Menu. The bottom part of the window shows the frame from which the menu should begin playing. Click the mouse in the window Motion Objects by name, and you will see that the starting frame also changes in this window. To the right of the menu window there is a slider, by moving which you can select a different starting frame. This can be useful when you don't want the first frame of the chapters to match what will be shown on screen. Well, the last part is Global Settings and Outputs, that is, general settings together with output parameter settings.
In the window Motion Menu nothing more than a video file is created that plays while viewing the menu on the screen. After reviewing everything carefully, decide on the settings for the duration of clip playback Total Clip time(set it to 10 seconds), Intro Effect this is the effect of frames appearing when you go to your menu, leave it blank. Check the box next to the option Cross-fade the End for looping in 50 frames. This will mean that when the clip finishes playing, it will start playing again, and to avoid mismatch between the beginning and ending frames, we created smooth transition within 50 frames from the end of the clip to the beginning. Now click Render and wait for the rendering process to complete, having first specified the name of the file that will be contained in motion menu. Notice that after rendering you now have another clip in Assets Window, and 2 tracks appeared at the bottom of the menu window, audio and video. The video track contains your video file as you just created it. But to Audio you can add any audio track that will be played while viewing the menu.
So, the menu you created contains frames with links to scenes from the film. If desired, each frame can be provided with a short text comment. But since this example contains 12 chapters, then all of them are unlikely to fit into one menu, so you will need to create a second menu of chapters, not forgetting to provide the entire menu with buttons Further And
Programs for DVD recording video discs are designed to create digital videos discs that can be played on any DVD player. If you have videos of birthdays, various holidays, New Year's events, dances, your pranks and any other pleasant memories captured on video cameras and stored on mini-discs, VHS tapes and other specific media, then it would be a good idea to record and structure them on DVD. DVDs can be stored for quite a long time and, today, they can be opened almost anywhere where there is digital equipment.
With this class of programs, you will not need to edit each video separately and try to stitch them together. You can create and record videos with interactive menu in a variety of templates, divide videos into chapters for easier navigation, add subtitles and additional audio tracks, cut scenes from videos, and even create slideshows from photos. And all this can be done quickly and easily.
Note: You don't have to edit videos only with DVD video burning software. You can use any video editor for editing and correction. And this class of programs is only for importing and creating menus before burning to DVD.
Review of free programs for burning DVD video discs
DVD Flick - convenient and powerful DVD video recording
It is a fairly simple program, but at the same time it has powerful tools for editing and burning video to DVD. With this program, you can quickly turn video reports stored on different folders, into a full-fledged DVD video disc that will open not only on your computer, but also on any other digital players, including home theaters. At the same time, you can add additional audio tracks, for example, to clarify some important events. Insert explanations in the form of subtitles. And structure the video as separate menu for fast and easy navigation.
The developer’s website notes the following advantages:
- Burn almost any video file to DVD
- Supports over 45 file formats
- Supports more than 60 video codecs
- Supports more than 40 audio codecs
- Easy to add menu
- Ability to add your own subtitles
- Easy to use interface
- Completely free, no adware, spyware and any restrictions.
DVD Flick allows even a novice user to create their own DVD video surprisingly quickly.
Other DVD video burning programs
- Bombono DVD is a cross-platform program that supports mp4, mov, mkv, avi and other video formats. With the ability to create various types of menus. Linux version is free. The Windows version is divided into a commercial version and a limited free version.
- DVD Author Plus (unfortunately, the program has become a trial program) allows you to create DVD video discs, read and convert the most common video formats. Includes a lot useful functions, such as copying discs, creating ISO images and then burning them to disc.
- DeVeDe is Linux program with open source code, designed for burning video to DVD and CDs (VCD, SVCD, CVD) of any number and format of video files, including mpeg, mpeg4, avi, asf, YouTube, Google flash video, wmv, ogg, etc.
- Koyote Video to DVD - you will be pleasantly surprised by the number of features this program provides. You can build a menu almost from scratch, select a background, rename individual chapters of an existing video, and much, much more.
- is a cross-platform program for creating professional-looking DVDs. Allows you not only to record videos to DVD that will play on any DVD player, but also to create individually designed menus. Note: Be careful, the installer is trying to install unnecessary programs. Better use portable version, in which there is nothing superfluous.
Quick selection guide (links to download programs for burning DVD video discs)
DVD Flick
| Simple, but powerful program to burn video to DVD. Supports many file formats and audio-video codecs. It's easy to add a menu. Own subtitles. And much more. | ||
| ------------- | ||
| http://www.dvdflick.net/download.php | ||
| 13 MB 1.3.0.7 Open source freeware Windows 2000 - 7 | ||
| 64-bit OS support |
A free program for creating DVD video images and burning them to disc.
Everyone has probably seen professionally made DVDs with all kinds of transitions and navigation menus. Have you ever wondered how these menus are created? Wouldn't you like to try to create something like this yourself? Probably, I wanted to (more than once :)).
Today we will learn how to create and record our own DVDs, which will be little inferior to their professionally made “brothers”. And one very good free program called DVD Styler.
The program combines everything you need for DVD authoring (as the process of creating menus is called) from scratch. And although before professional solutions It still falls short; a decent-looking disk can be created with minimal time and effort. If we compare DVD Styler with paid analogues, then ZC will be closest to it in terms of functionality DVD Creator Platinum.
Comparison of the free DVD burning program DVDStyler with the paid analogue ZC DVD Creator Platinum
With relatively identical functionality, DVD Styler weighs five times less than its paid counterpart! Another plus is multilingualism, which makes the work of a Russian-speaking user much easier.
Installing DVDStyler
Download and install DVD Styler. In principle, the installation follows a standard scenario, but there are some minor nuances. The most important hitch will be related to the proposal to install a plugin for Internet Explorer and/or Mozilla Firefox - kikin.

If you agree to install this plugin, then your browser, based on the history of pages visited, will begin to offer you the “most interesting” information from various online resources. If you can find everything you are interested in on your own, I advise you not to install kikin.
DVDStyler interface
When the installation procedure is completed, the program itself will start. The first (and, in principle, the only) thing you need to configure is the interface language.

Select "Russian" from the list and click "Ok". After this, you will see the program itself, which will offer to create a new one or open a ready-made project.

We choose to create a new one and set the required information: Disc name (optional), disc size (standard DVD or double-layer), video format (PAL/NTSC), aspect ratio and sound format of future films. Install it as needed and click “Ok” to start working.
Let's take a closer look at the program's working window:

We hardly need the menu bar at the top, since all the necessary buttons are located on the toolbar (below). On the left is the program’s file manager, with which you can manage downloaded pictures and videos. Below is a kind of storyboard for navigating through the sections of the future DVD. The main space is occupied by the work area displaying the current active menu item.
Creating a DVD Menu
When creating a new DVD, we have one ready-made menu on the storyboard. True, it is empty. Let's add some background image to it. Go to the "Background Images" tab and double-click on the image you like. If the standard ones do not suit you, you can add any image from your computer.
To do this, let's go to " File manager"and we'll find what we need. The drawing can be prepared in advance in any graphic editor, so that it contains ready-made captions and/or additional fragments that correspond to the general theme of the future DVD.

Adding movies
Once we have decided on the image, we can start adding films to the project (although this could have been done before choosing an image for the menu). This is done simply: click the "Add file" button and select using Explorer Windows required movie. It is better to do this by expanding the program window to full screen.
Why? Because in this case, in the lower right corner you will see a scale of how full the future disk will be over time. Be careful not to overdo it with the number of films!

So, the films have been added, they’ve been completed within the allotted time, now it’s time to think about the menu. Right-click on it and select “Properties”.

Sound design in the menu
Here we can add sound to our menu (if we want, of course). Click on the button after the "Audio" field and in the Explorer window that opens, select the right music. You may be alarmed that the formats listed are only MP2 and AC3 files. Just set this field to "All files" and you can add any MP3 or WAV tune.
Typically, a DVD consists of several menus: a main menu, and an episode menu for each movie (although the latter are not the main attribute). We'll create a disc with just the main menu as an example.
Creating Buttons
We go to the "Buttons" tab and can add navigation keys to our menu by simply dragging the button you like directly from the list. I note that among the buttons there is a frame in which arbitrary frames from the movie “linked” to it will be displayed. Adding such frames significantly improves the overall appearance of the menu.

The first button is by default "linked" to the first added movie. Let's see what we can do with it. Let's call context menu buttons by right mouse click. Here we are interested in two items: “Add” and “Properties”. Thanks to the first one, we can add beautiful inscription(for example, the title of a movie) using the “Text” and “Text with shadow” items.

There shouldn't be any problems here, so let's take a closer look at "Properties".

Here are all the settings for a specific button. In the first section we can set the action that will be performed when the button is clicked. This can be either going to a certain part of the DVD, or, for example, playing a certain melody or going to another menu. The "View" section is responsible for the design of the button.
In the case of a frame, we can install any image from a computer into it or allow us to install an arbitrary frame directly from the film (you can also manually specify the time of the desired frame). Here we also indicate the transparency level of the inserted image, the width of the frame and its color. It is better to adjust the location and size using the mouse.
Above we looked at how to add text with the title of the movie. However, the name can also be written on the button. Select the appropriate one, drag it into the working window and write the desired name in the properties. Then we “bind” this button in “Actions” to one of the films, and the job is done!

In a similar way, we create buttons for moving to other movies, and we will get a rather beautiful and functional menu:

Since all the films may not fit on one page, sometimes it will be very useful to make another one, linking it with cross-references to the first one. You can also add additional images if you have not taken care of this in advance.
Saving a project and burning a disc
Now that everything is ready, you can move on to the last step - saving. You can save a project, a disk image, or directly burn a DVD. If we don’t want to stop there, click the “Burn” button on the toolbar and be transferred to the following window:

This is the “last bastion” of DVD Styler. Whatever you choose, in any case you will have to wait (and for quite a long time). After all, all files are first converted to DVD format, and only then can be burned to disk. For processing you will need a video free place on your hard drive (about half the size of a DVD project).
You can reduce the size only if you select “Create ISO image” (probably the word “image” was translated incorrectly). If you choose this option, you will also need to specify the folder to save the image. You can also activate " Preview" after generating the DVD by checking the appropriate option.
After all the installations, finally press the “Start” button and wait until everything is ready:

conclusions
As you can see, creating your own DVDs is not that difficult if you use good software. DVD Styler may not have some of the features that it does. paid analogues, but it is quite convenient to use, and it has a lot of functions.
Another plus is that DVD Styler allows all manipulations to create a disc to be carried out within one window, which significantly saves time and effort when searching the right tools. I wish you successful and beautiful projects that will give you joy every time you watch them!
P.S. Permission granted to freely copy and quote. this article provided that an open active link to the source is indicated and the authorship of Ruslan Tertyshny is preserved.