Pairing your phone with a computer via wifi. Making your phone a Wi-Fi hotspot
Everyone knows that connect your phone to your computer possible by USB cable. And it doesn’t matter whether it’s Android or Apple - the difference is in the methods of transferring files, and not in principle. However, there is another opportunity to download files from a smartphone to a computer and vice versa without a cable - via WiFi.
To do this, we will use one universal program for connecting your phone to a computer, which is available for both Android and iOS - WiFly.
In order to connect your smartphone to your computer via WiFi, you must have a home local network configured through a router, to which all devices will be connected, between which files will be exchanged. By the way, you can exchange data not only with a computer, but also with another tablet.
Method 1 - QR code
So, install the WiFly program on your phone or tablet and launch it. On the first page we will be asked to go to wifly.me on the computer and receive a QR code, which we can then scan with our phone and thereby gain access to it.

Let's do this:
- go to the site
- press the “Scan” button on your phone
- and scan the QR code from the monitor screen

After this, a page with folders and files contained on the smartphone will open on your computer.
Method 2 - IP address
However, it happens that this site is not accessible and there is simply nowhere to scan the code to connect a smartphone through a computer. In this case, we will go a different route.
Click on the “Advanced” button (on iPad).

Or go to the tab with the icon in the form of a student's cap, if you have Android.

A new window will open in which information will be provided to connect the computer to the smartphone via a WiFi network - this is its IP address and port, as well as data for access via FTP client.

Open a browser on your computer and go to the specified IP address. In my case it is http://192.168.1.2:4885.
And we see the same result as in the first method - files and folders on the smartphone, depending on whether you have full access to your phone and what OS is installed on it. In the event that your smartphone is without Root is right or without jailbreak if we're talking about about iPhone, an empty window will appear, and you will only have the opportunity to add files from the photo and video archive here. If you have full access to the smartphone system, then you will immediately display all the folders present on it and you can add absolutely any documents to the program.

Adding files to the program
As you already understand, on a hacked device, all files will automatically be at your fingertips. But on a smartphone and tablet that has closed system, such as an iPad or iPhone, you will have to manually add documents to share. To do this, in the lower menu, switch to the tab with the folder icon. And click on the plus button.

We add files from our media library here, after which they will also appear in the browser on the computer.
Transfer files between phone and PC
So, we have the documents, now let's try to transfer them between devices.

Connecting a computer to a phone via FTP
Let's consider another option for connecting your phone to a computer - through an FTP client. To do this, you need to install the appropriate program on your PC, for example, free FileZilla. We enter into it the connection data provided at the very beginning - address ftp server, login and password.

We connect and get the opportunity to transfer files back and forth directly.
The traditional method of connecting a smartphone to a PC via a USB cable is not always convenient. Many desks are overloaded with wires, while others have connectors hidden far away, so we suggest you consider how to connect your phone to a computer via Wi-Fi to transfer files quickly and easily.
This will give full control over files on your phone or tablet. They can be transferred, copied, and new ones created. Only you can do all this remotely, for example, while your smartphone is charging or even in another room. The connection is made via FTP, and now we will tell you how to easily set it up in just a few minutes.
You only need a mobile device and a computer connected to the same Wi-Fi network, and the PC can connect to the router using a cord.
Method number 1. ES Explorer
This application is a multifunctional file manager, which gives full control over your smartphone’s directories and also helps you transfer files to and from your PC via Wi-Fi.
Connection instructions:

For now, we are done with the mobile phone, and it’s time to work with the computer. But before that, we advise you to look at the ES Explorer menu. To do this, click the gear icon located at the top of the screen. There are several useful options, which will make data transfer and connection more convenient and stable. One of them is the ability to “Create a shortcut” on the desktop in order to launch an FTP server in one click. And the second is the prohibition of shutting down the server after closing the application.

Computer settings
The settings below will work equally well on laptops and desktop computers, they can easily access the FTP server running on the smartphone.
For everything to work properly, you need to configure the following:
- open "My Computer" in address bar enter the address from ES Explorer;
- The root directory of your smartphone’s folders will open in front of you.

You can manage all components as if it were one of the directories on your laptop.
Method number 2. My FTP Server
The second way for synchronization is implemented through the My program FTP Server, which you need to install on your phone. Next follow the instructions:

In the main panel of My FTP Server, click on “Start Server”, after which the “Server Status” window should turn green and the switch will change to “ON”.

Computer settings
There are nine short steps left to complete, namely:


This way you also have access to your phone files.

Method No. 3. SHAREit
The easiest way to connect your phone to your computer.
- Download SHAREit for your computer from the official website.
- Install the application on your smartphone by downloading Google Play.
- Run programs on both platforms;
- In the side menu of the application installed on your mobile, tap on “Connect to PC”.
- Find your desktop name on your radar and click on it.
- Confirm pairing with your mobile phone.
- Now we connect to it, and in a couple of moments you will have access to the phone.

We have described the two simplest and most popular ways to connect a smartphone to a laptop or phone. Now you just have to choose which one would be better suited for permanent use.
How to connect an Android tablet or phone to a computer wirelessly. How to transfer files and watch videos from a PC. About the intricacies of data synchronization between mobile devices and desktop computer via Wi-Fi, see the next article.
Usually after purchasing a device with OS Android user begins to actively “clog” it with a variety of multimedia content. Some people love music and films, others - books of various formats, others - funny (or not so :)) pictures.
And, as a rule, all these files are “migrated” to phone-tablets from a regular work computer running the “everyone’s favorite” Windows OS :).
And now, attention, a question :). How to move necessary files from PC to Android device?
Connection using standard means
The most obvious way is using the included USB cable. If you don’t go too crazy, a standard “cord” allows you to connect your mobile device to a PC without any problems. At the same time, a new removable drive, which, in essence, is nothing more than microSD card memory of our Android device.
If we get a little more twisted, then in addition to accessing the flash drive of a phone or tablet, we can also get access to contacts, SMS messages, applications and some other (sometimes even system!) folders and files. For this it is best to use official programs for PC from the developers of your device model. For example, for my Samsung GT-S5360 I use official application Kies:

With the help of Kies and him similar applications we can easily not only exchange files between a computer and a mobile device, but also view any multimedia files no downloading!
It would seem that everything is fine, what more could you wish for :). But no... The main “stumbling block” is the notorious USB cable, which has the “magical” property of “disappearing” exactly when it is needed most :) Therefore, the topic this review There will be data synchronization between Android and Windows wirelessly.
A little hardware :)
Usually, when we say “wireless,” we mean “via WiFi,” but such a statement is not entirely complete. Modern smartphones and tablets also have in their arsenal, at a minimum, a Bluetooth module, and, at a maximum, also an NFC module and a 3G modem.

If there is 3G in the device, we can synchronize files via the Internet, for example, using the popular file storage Dropbox, which has its clients for both Windows and Android.
This method of communication mobile device from a PC will be effective only when we are far from the computer, but we urgently need to transfer it to it important information. In other cases, it is better to use other methods of data transfer.

All the beauty this application is that it allows you to turn on/off the server with just one button. From the settings, it will be enough for us to activate the “Anonymous user” item (which should be active by default, but it won’t hurt to check).
We press the big red button on the screen, and it turns into green, under which there is the data we need to connect:

If the input function anonymous users is active, you can now easily open the contents of your device’s memory card directly in Windows Explorer. Just open any window and enter the address (starts with ftp://...) indicated on the screen in the second line in the address bar:

All! :) Now you can drag and drop files from/to your PC just like you would with a USB cable! For greater convenience in the future, I advise you to create a shortcut to enter the phone’s file storage.
For example, in my screenshot above you can see a link to an FTP folder created using the Clover Explorer add-on program.
Despite the fact that Windows supports working with public (which do not require a login and password) FTP servers, I would advise using special FTP clients (for example, Filezilla) to access remote storage on a mobile device.
Firstly, they work faster and in multi-threaded mode, and secondly, they allow you to use closed access to an FTP server (login information can be set in the Android application settings).
Also, for synchronization you can use any file manager with FTP support (for example, Free Commander).
Closing the question of simple file sharing, I can say that the program discussed above for creating an FTP server is one of the most convenient, but not the only one.
If you need similar application, but smaller in size, you can use a good free tool under a similar name - FTPServer(), which “weighs” only 89 KB!
How to synchronize contacts and SMS of an Android phone with a PC via Wi-Fi
Proprietary utilities from mobile phone manufacturers allow, in addition to transferring files and media content, viewing and editing a contact list and an archive of SMS messages on a computer using a USB connection.
However, we can get almost everything the same (and even more!) via Wi-Fi by installing the AirDroid () program on the phone:
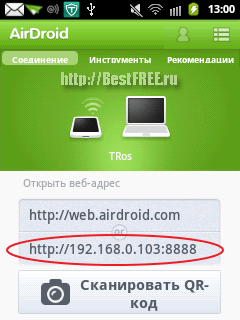
After installing the application on the phone and launching it, we will see a welcome screen on which we are offered three ways to enter the control panel. The first and third require registering an account on the developers’ website. It opens up full functionality, but imposes some restrictions on the user (for example, the amount of data transferred to the device).
In addition, all data in this case is transmitted via the Internet, which is not entirely practical.
In view of all the above disadvantages, we use the second method.
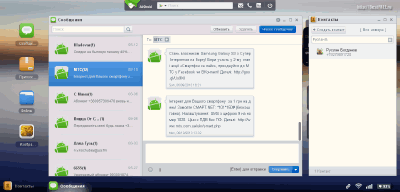
We need to open a browser (preferably a standard one) Internet Explorer or Google Chrome), enter the IP given in the second line in the address bar and press Enter. A notification will appear asking you to confirm the connection on the phone, after which we will be taken to the device control panel, which looks like a full-fledged operating system desktop:

On the left are icons responsible for calling a particular function, top center search string, allowing you to search for applications on Google Play, and on the right is a row of widgets that display the phone's memory status and provide access to some additional features.
You can access Contacts and Messages by clicking the corresponding icons on the left side of the control panel work area:
AirDroid supports multi-window mode, so we can work with several tools at the same time.
For Contacts we have search, edit, add/delete and dial functions (unfortunately, it does not work with all phone models). The only drawback is the lack of import/export functions for all (or selected) phones. However, manual editing is not limited in any way.
We can search, read, delete and even create messages! Last function, in my opinion, is the most convenient, since we can use a full PC keyboard when typing SMS. Yes, and viewing correspondence on big screen seems more convenient.
In addition, like the previous application, AirDroid allows you to share files with your PC. Moreover, in two modes at once: using the file manager (called by the “Files” icon) and the widget of the same name. Moreover, you can access not only folders on the SD memory card, but also the system directory of the phone!
However, that's not all:). AirDroid provides a number of other features, including:
- viewing the call log;
- viewing and playing music and video from your phone;
- viewing images from your phone without downloading to your PC;
- managing phone applications (including installing new ones);
- taking screenshots of the device screen;
- access to the device’s camera (for example, to use it as a web camera);
- synchronizing the contents of the clipboard with your PC;
- exchange of links.
If you create an account, you will also have access to such functions as:
- Access to frequent contacts with the possibility of editing them;
- Protect your phone data if it is lost or stolen;
- Access to the list of recommended software;
- Access to notification management;
- Access to multiple application desktops.
The only drawback of AirDroid is that it is quite a resource-intensive application (for both mobile and PC). However, if there is enough memory on your device, and your work computer is powerful enough, then this program will become best choice to synchronize data between Android and computer via Wi-Fi!
How to watch videos from a computer on an Android device via Wi-Fi without downloading
Having considered all the most simple tasks, let's move on to the most difficult (although not too difficult :)) - streaming video from a computer to an Android device. There may be several ways, however, following the concept of minimalism in installation third party software on a PC, the most universal option seems to me to be using a local network.
To implement our idea in this case, the first thing we need to do is make the folder with video/audio files on the computer accessible via the local network. This is easy to do by calling context menu and selecting “Sharing and Security”:

In the properties window that opens, we just need to check the “Open general access to this folder" and click "Ok". If suddenly a window appears in front of you informing you that opening access to the folder is unsafe, simply ignore it and close it.
This completes the preparatory stage. All our video files are now available over the local network and all we have to do is access them from our Android device. For this we need an application with LAN detection functionality.
One such application is the file manager ES Explorer (aka).

This is a fairly powerful file manager with numerous functions, but right now we are only interested in one of them - wireless access to the local network. To activate this function, you need to press the button with the image of a phone and a globe in the left top corner main screen of the program, in the menu that appears, go to the “Network” section and select “LAN”.
The screen that opens is still empty, so we need to find all the computers available on the local network. To do this, click the “Search” button on the bottom panel and wait a bit until the scanning is completed. If everything was done correctly, ES Explorer will easily find and display the computer with its IP as the name:

Click on the icon of the found PC and get a list of folders available for viewing on the local network. Open the one you want and click on the movie you want to watch. A window will open to select the application with which we want to view the file:

And here many people usually advise choosing BSPlayer FREE () as a player.

I don’t argue that the player is good, but sometimes some videos (for example, WMV format) don’t play well. Therefore, it is advisable that you have one more installed “in reserve” alternative player, supporting streaming video. I recommend installing MX Player () as such.
If you have a device based ARM processors 5, 6 or 7, then you may also need additional codecs for the players to work ( full list We look at the codecs and download them from the official websites of the developers: MX Player and BSPlayer). However, if the player does not require this, then there is NO NEED TO DOWNLOAD ANYTHING.
If you did everything as written above, then with a high degree of probability you will be able to watch the video (the music should be at 100%). However, sometimes punctures happen... Especially if the phone/tablet is “weak” and the video is “heavy” (for example, in MKV or DVD format).
There is no need to blame the developers (or us for what they advised :)), but you should put up with it or convert the video to a “lighter” AVI format with a smaller size.
Finally, a few tips:
- Using ES Explorer, you can also exchange files with a computer, but in this case (since access is via a local network), folders with the necessary files must be “shared” on the PC.
- In order not to search for local network servers every time and have fast access You can approach previously found computers as follows. After finding your PC and it appears in the LAN list, hold it down (long tap) until the change menu appears. In this menu, click the “Change server” button and in the window that opens, set a name for permanent connection in the “Show as” field, then click “Ok”. The connection shortcut will now always be on the LAN screen!
- ES Explorer is not the only file manager that provides the ability to work with local network via Wi-Fi. For example, I also like working with Total Commander () for Android, which has a plugin for working with LAN () (although it does not yet have auto network scanning, so the settings have to be made manually).
Conclusion
In this article we have covered almost everything possible options connecting Android devices to PC via Wi-Fi. However, in addition to the applications described, there are dozens of others that differ in some nuances and additional features. This article does not claim to be the ultimate truth, but only gives you a guideline for the future :).
The Play Market is large, so you can find almost any tool that you like. The main thing to understand is that connecting a phone or tablet to a PC wirelessly is not such a difficult task;).
Good luck with your file sharing, stable signal and fewer disconnections! :)
P.S. Permission granted to freely copy and quote. this article provided that an open active link to the source is indicated and the authorship of Ruslan Tertyshny is preserved.
If to connect to a point Wi-Fi access created using a mobile phone, you will be using a computer, make sure it has network Wi-Fi card or corresponding USB module for connecting to wireless networks. If you don't have the necessary equipment, your computer won't be able to connect to the hotspot, so you'll need to purchase one of the devices to use Wi-Fi. After purchasing the module, install it into the USB port of your computer and install the driver by inserting the disk with software, which comes with the device.
If you purchased network card Wi-Fi, insert it into the appropriate PCI slot on motherboard computer, and then install the drivers from the included disk. If all settings have been made correctly, you will see a corresponding icon similar to the signal reception level indicator mobile communications on the phone. To use a laptop as a means of accessing the Internet, you do not need to make additional settings, since most devices initially have the necessary Wi-Fi module.
Phone setup
To create a Wi-Fi hotspot with Android phone go to the “Settings” - “Modem Mode” menu. Some devices on this operating system The menu item may be called “Wi-Fi Access Point”. Go to the “Access point settings” section to change the password and set the name of the future network. Then check the box next to “Wi-Fi access point” and wait for the connection to be created. A similar menu is available on iPhone and iPad devices in the “Settings” - “Modem Mode” section. To create a connection in devices on Windows Phone go to “Settings” - “ Shared Internet" and switch the slider to the "Enabled" position.
Connection
On your computer screen, click on the signal strength indicator, which is located in the lower right corner of the Start panel. From the options provided, select your phone's name or the name you assigned to your access point. Enter given password and click "OK". The connection will be completed within a few seconds and you will be able to use your network connection. If you can't navigate to the sites you need, check the mobile Internet connection (EDGE, 3G or 4G) on your phone. If necessary, try disabling and then re-enabling the hotspot on your phone to connect from your computer again.
Connecting Android to your computer via Wi-Fi is easy, and there are even several various options, how to do it. Thus, the user can not only gain access to files, but also fully control the gadget remotely. Previously, we told you how to connect and implement.
How to connect Android to PC via Wi-Fi
For this to be possible, we will need to install special applications both on a computer and on a smartphone (or tablet). But there's no problem with that. I love it the desired program you can easily find it on GooglePlay.
So, let's look at how to connect an Android gadget to a computer over the air. Here you first need to decide what exactly you want to connect for. The point is that for different tasks are used specific applications. For example, to access files, you can use the FTP server program, which must be installed on your smartphone.
Once launched, the application will assign an IP address to the phone. It will need to be registered in the browser or file explorer on the computer. After this, you will have access to the smartphone files from your computer.
Here is a list of the most common applications that allow access to Android from a PC via Wi-Fi:
- FTP server.
- AirDroid.
- MyPhoneExplorer.
It is worth noting that the FTP server allows you to work exclusively with files internal memory and flash drives. If you need access to messages, phone book and other applications on your phone, then MyPhoneExplorer will help you here.
This is a convenient utility that allows full access. At the same time, you can freely delete contacts, send messages, and so on.
For this program to work, you will need to install it on both your smartphone and your computer. After launch, select the connection method:
- Wi-Fi.
- Bluetooth.
Next, the system is synchronized. In the utility settings on your phone, you can specify the PIN code that will be required for synchronization. To do this, click the “Settings” button and select “Wi-Fi-PIN”.
Now all that remains is to enter the specified PIN code and the name of the connected smartphone.
Moreover, the name can be anything you want. It is introduced for convenience, so that in the future you can see which device you are working with.
Now you know how to access an Android phone from a computer with using Wi-Fi.
Sometimes it doesn't stop there. Most often used to access the Internet on a smartphone. WiFi connection. But what if you don't have wireless router, but your laptop is connected to the Internet via cable? In this case, you can distribute Wi-Fi from your laptop.
In this case, all connected devices will have an output to global network. So, let's take a closer look at how to do this.
Connecting Android to computer via Wi-Fi: Video
Distributing Wi-Fi from a laptop
You can distribute the network both from a laptop and from a desktop PC. But, if laptops are almost always equipped with wireless adapters, then with a desktop PC everything is somewhat more complicated. Before moving on to further actions, make sure that the latter is equipped with a Wi-Fi module.
We have two options for how to connect the Internet from a computer to mobile phone from Android OS via Wi-Fi:
- Use built-in Windows utilities.
- Install special utility from a third party developer.
The first option does not require you to search and install additional programs. It involves setting up a PC using the command line. Essentially, you only have to run two commands. Let's take a closer look at this process.
Networking via the command line
First, let's start the service we need. This is done like this: press the key combination [Start]+[R]. In the window that appears, write CMD and click .
So we launched command line. Now it remains to write two commands:
So, now you distribute Wi-Fi, but users still cannot connect to you and do not have access to the Internet. To fix this, we need to set up sharing. To do this, click on the network icon in the system tray right click mice. Select Network and Sharing Center.
Enter the "Edit" section Extra options public access." Here you need to enable discovery and sharing in all points, and also disable password protection. Save the settings and return to the control center.
Open the "Change adapter settings" item.
Here you will see all the available computer connections. Our virtual distribution will be called " Wireless connection 2". We need to select the connection through which the computer accesses the Internet. Right-click on it and select “Properties”.
Go to the "Access" tab. Next, check the box next to “Allow other users to use this computer’s Internet connection.”
Below in the line “Connection home network» choose our virtual network. Click OK. This completes the setup procedure. Now all connected subscribers will have access to the Internet.
Through third party programs
There is another way to connect the Internet from a laptop to a mobile phone running Android OS via wireless Wi-Fi connection. It implies the use third party programs, For example, Virtual Router Plus. This program allows you to distribute the Internet via Wi-Fi.
In this case, the setting comes down to three points:
- Create and enter a network name.
- Set a security password.
- Specify an Internet connection that provides access to the Internet.
As you can see, everything is extremely simple. First option the better that you don't need to install any utilities. At the same time, the connection is more stable and secure.
The second option is easier to set up and use, but sometimes certain problems and glitches may occur. Which option to choose is up to you.
How to distribute Wi-Fi from a laptop to Android: Video