The network drive must be connected. How to connect a network drive
Many users, when administering their home local network, are faced with the need to map network drives. If you are also interested in this issue, then this article should help you. Here we will talk about how to connect a network drive, as well as correctly open access to a folder for a network drive.
Step No. 1. Open access to the folder (preparing the first computer).
The first thing to do is to open access to the folder that should be used as a network drive on another computer. It's not difficult to do, but there are a few details you need to be aware of.
First you need to configure the network correctly. To do this, open the “Network and Sharing Center” and click on the “Change advanced sharing settings” link (screenshot below).
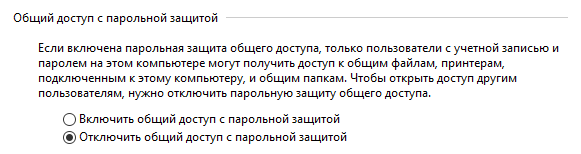
In the window that opens, you need to enable “Network discovery”.

Also here you need to disable “Password protected sharing” (if you don’t need it).
Hello.
Let me outline a typical situation: there are several computers connected to a local network. It is necessary to share some folders so that all users from this local network can work with them.
To do this, you need:
1. “share” (share) the desired folder on the desired computer;
2. on computers on the local network, it is advisable to connect this folder as a network drive (so as not to search for it every time in the “Network Neighborhood”).
Actually, how to do all this will be described in this article (the information is relevant for Windows 7, 8, 8.1, 10).
1) Opening public access to a folder on the local network (folder sharing)
Before you can share a folder, you must first configure Windows accordingly. To do this, go to the Windows Control Panel at the following address: " Control Panel\Network and Internet\Network and Sharing Center"(see Fig. 1).
Then open the " Change advanced sharing options«.

Rice. 1. Network and Sharing Center
- private (current profile);
- all networks;
- guest or public.
You need to open each tab in turn and set the parameters as in Fig.: 2, 3, 4 (see below, clickable pictures).

Rice. 2. Private (current profile).

Rice. 3. All networks

Rice. 4. Guest or public
Now all that's left is allow access to the required folders. This is done very simply:
- Find the desired folder on the disk, right-click on it and go to its properties (see Fig. 5);
- Next, open the tab “ Access" and click the " Sharing" button (as in Fig. 5);
- Then add the user “guest” and give him rights: either read only, or read and write (see Fig. 6).

Rice. 5. Opening public access to a folder (many people simply call this procedure “sharing”)

Rice. 6. File Sharing
By the way, to find out which folders are already shared on the computer, just open Explorer, then in the “Network” tab click on the name of your computer: then you should see everything that is open to public access (see Fig. 7).

Rice. 7. Shared folders (Windows 8)
2. How to map a network drive in Windows
In order not to climb into the network environment every time, not to open tabs again, you can add any folder on the network as a disk in Windows. This will slightly increase the speed of work (especially if you often use a network folder), and will also make it easier for novice PC users to use such a folder.
And so, to connect a network drive, right-click on the “ My computer (or This computer)" and in the pop-up menu select the function " Connect a network drive"(see Fig. 8. In Windows 7 this is done in the same way, only the icon " My computer" will be on the desktop).

Rice. 9. Windows 8 - this computer
After this you need to select:
- drive letter (any free letter);
- indicate the folder that should be made a network drive (click the “Browse” button, see Fig. 10).

Rice. 10. Connecting a network drive
In Fig. Figure 11 shows folder selection. By the way, after making your selection, you only have to click “OK” 2 times - and you can start working with the disk!

Rice. 11. Browse folders
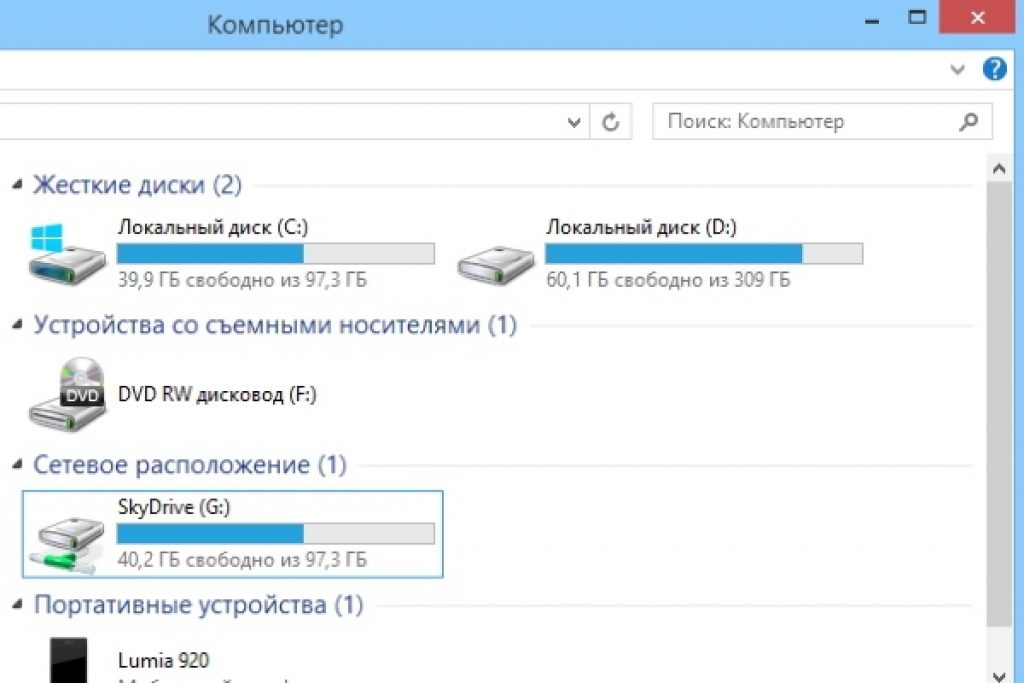
If everything was done correctly, then in “ On my computer (on this computer)"A network drive with the name you selected will appear. You can use it almost the same way as if it were your hard drive (see Fig. 12).
The only condition: The computer on whose disk the shared folder is located must be turned on. Well, of course, the local network must work...

Rice. 12. This computer (network drive connected).
Very often people ask what to do if they cannot share a folder - Windows writes that access is impossible, a password is required... In this case, most often, the network was simply not configured appropriately (the first part of this article). After disabling password protection, problems, as a rule, do not arise.
Good job 🙂
For active data exchange over a local network, you can use network folders that store various information you need. However, for complete convenience, these folders can be configured as a network drive.
And in this article we will look at connecting a network drive using the operating systems Windows XP, Windows 7 and Windows 10 as an example.
How to connect a network drive in windows xp?
So let's start with Windows XP. To add a network drive, go to the “My Computer” section and in the “Tools” menu, click on the “Map network drive” tab
The “Map network drive” window will open, where there will be two active editing windows: “Disk” and “Folder”

The active “Disk” editing window means that you can select any “unallocated” letter of the Latin alphabet to designate the disk.
To do this, click on the arrow of the active window and select the drive letter you need

And the active “Folder” editing window means that you must indicate which you want to make a network drive. To do this, click on the “Browse” tab and select the location of your folder. This can be either yours or another


This completes the creation of a network drive in Windows XP, and we move on to the next example.
How to connect a network drive on Windows 7?
When creating a network drive on Windows 7, you should first make sure that the network settings are configured correctly. To do this, click on the network connection icon in the lower right corner and select “Network and Sharing Center”

Or click on the “Start” menu, click on “Control Panel” and find the “Network and Sharing Center” tab.

A Network Control Center window will open to you, where you will need to go to the “Change additional sharing settings” tab, after first seeing which network is being used (in this example, it is “Home”).

To do this, you need to check the “Enable network discovery” tab.

After these manipulations have been completed, you can begin creating a network drive on Windows 7. To do this, go to the “My Computer” section and click on the “Map Network Drive” tab.

The “Map network drive” window should open, where you should select a drive letter and specify the path to your network folder. To do this, first select the disk (by clicking once on the “Disk” tab), and then click the “Browse” button, where select the computer name, as well as the name of the network folder and click “OK”


What is a network drive in Windows 10?
And in the third example, we will look at how to connect a network drive in Windows 10.
To make a network drive here, first of all you should check the network settings. To do this, right-click on the network icon in the lower right corner of the taskbar and select “Network and Sharing Center”
A network management window will open, where you should click on the “Change advanced sharing settings” tab.

In the next window, check the box next to the “Enable network discovery” tab (if it is not there) and click on the “Save changes” button

Now you can start connecting a network drive in Windows 10.
Go to the “This PC” tab → “Computer” menu and click on the “Map network drive” tab

The “Map Network Drive” window will open, where you will be asked to change or leave the network drive letter, as well as specify the path to the network folder


net use connecting a network drive
It should be noted that there is another way to connect a network drive in the Windows family, namely using a script.
To use the script to connect a network drive, you will need the “Net use” command: this command allows you to connect a network resource.
In this article, we will not give the full syntax of the “Net use” command, but will limit ourselves to only a few of them.
To do this, open a text editor (for example, Notepad) and write the command there:
net use z: \\WORK\Users, where the letter “Z” means the network drive letter, and \\WORK\Users means the network path of the folder (in your case it should be different). Next you should add the following inscription: net use /Persistent:Yes, which means when rebooting, restore the mounted disk. Then save the text document with the extension “bat”

Now if you click on the file that you saved, your network drive will automatically be connected
Windows 7 is a wise and practical decision on your part. Now I will explain why. Anyone who has organized a local network in his home constantly uses certain data that is located on other computers using this same local network.
To make your work more convenient, you can connect a network drive to your computer. What it is? This is just a network folder that is connected in such a way that your computer or laptop will see it the same way as its own hard drives. It is assigned a specific letter, after which you can simply forget that it is actually located on another device.
In order for you to be able to connect a Windows 7 network drive to your computer or laptop, open the standard Explorer, which is located in the “Standard” folder. To do this, click the “Start” button, select the “All Programs” section in the menu that appears, and then expand the “Accessories” tab. The “Explorer” we need will be there, so launch it. Once you've done this, look for a menu at the top called "Tools." Open it and select Drive. At this moment, a corresponding window should open in which we will set the necessary settings.

The first thing you need to do is select the desired letter in the expanded window. Once you do this, your network drive will assign it to itself. Note that you can only select a letter that is not already used by other devices (hard drives, CD drives, floppy drives, etc.). After this, you will be required to specify the exact location of the directory. You must enter the desired path to the folder that you want to use as a network drive. This can be done in various ways. For example, you can enter an exact address using the keyboard, and you can also locate this resource by clicking on the "Browse" button. The latter method will be much more convenient and faster.
Important condition: during this procedure, the device on which this folder is physically located must be turned on. Otherwise, you won't succeed, because your computer or laptop simply won't be able to see the required directory.
In the event that you want to connect on behalf of some other user, you will need to check the box next to the use other credentials field. After this, you will have to fill in all the necessary data for a specific user in the window that will appear in front of you immediately after you confirm your choice using the “Done” button.

Upon completion of all the above steps, a group called “Network Locations” should appear in your window called “Computer”. Your new network folder will be reflected there.
Disabling a network drive is done using a similar method. Call up the Explorer window, and through the “Tools” menu, select the function of disabling a network drive. In the window that appears, select the disk that you no longer need and confirm by clicking “Ok”.
We will look at the reasons why a network drive may not connect and how to fix this problem on the Windows 7/10 operating system.
Opening access to a folder
Read also: TOP 3 Easy ways to show hidden folders or hide a required folder and set a password on it in Windows 10

Open the folder that you plan to use as the new device on your . It won’t be difficult to do this, it’s just important not to miss a few points.
Correctly configure the local network by logging into the control center and clicking on the link "change advanced settings" .
In the window that opens, click "Network Discovery" .
Disable "General access" if you don't need it.
Open access to the directory that should be connected as an application. Right select "Properties" , if the network drive is not connected.
Open the tab "Access" and and select "General access" .
In the new window, click "All" And "Add" . A list of users will appear in the list "All" . The user will have access to the folder.
At the last stage, confirm opening access to the folder by clicking on "Ready" . As a result, access to the folder will be opened.
Now you need to move on to connecting the drive on the second computer. Open "My computer" , press "Connecting a new floppy disk" on the tab "computer" .
After the Map Network Drive Wizard has started, it will open "Device connection" , select the appropriate drive letter and specify the access address to the network folder.
You can select any drive letter. The folder address should be specified like this: /Computer name/Shared folder name.
For example, you can select drive Z and specify the address as notebook/tmp. If you have forgotten the name of the shared folder, click "Review" .
Near "Restore connection when logging in" , check the box to connect the new application again after rebooting the device.
After all settings have been made, confirm the action and click "Ready" .
If everything is done correctly, the system will connect the folder as an installed add-on and open a window. It will appear in the window "My computer" .
Methods for connecting a network drive
Read also: TOP 10 Best Network Attached Storage (NAS) for Home and Work | Rating of current models in 2019
You can connect the device you are using in the following ways. So, you can create an additional service that can handle two functions.
That is, it starts the mount, and after that it starts an additional service that uses this add-on. It should have the following properties:
- It is important that the helper service executes the same commands as the normal service, i.e. start/stop/restart.
- The auxiliary and main services should perform tasks on behalf of the same user to avoid problems with access rights. If the main service is launched from LocalSystem, there may be problems with access to various applications.
A more interesting option is also possible. But you should use it at your own risk. This will require Sysinternals Suite. So, the steps are as follows:
1 Open cmd.exe(on behalf of the administrator);
2 Select the PsExec.exe option. Go to the SysinternelsSuite folder and run the command psexec –I –s cmd.exe . As a result, the user will receive nt authority/system rights. You can check this by typing whoami. The i option is needed because floppies cannot be displayed without user interaction.
3 You need to create a permanent connected application that will be used as the SYSTEM account. To do this, type the following command net use z://servername/sharedfolder /persistent:yes
This add-on can be disabled in the same way it was created, along with .
If you need to remove it, follow the first and second steps, but in the third step change the command, namely write
Net use z: /delete .
Connection using group policies
Read also: [Instructions] Unidentified network without Internet access - How to fix it? | 2019

Many people believe that the method of creating a new application through Group Policy is outdated. However, most system administrators prefer this option.
So, using Group Policy, you can connect the installed device as follows.
First, launch the Group Policy console by clicking on the Win + R combination. In the window that opens, click "Run" and enter the command gpmc.msc. After this, the user will see the Group Policy Management Console on the screen.
If the network drive does not connect, going to "Group Policy Management Editor" do the following "user configuration-settings-configuration-floppy mapping" .
In the right half of the window, right-click "create-mapped device" .
Enter its name and check the box next to the option "reconnect" . Then go to the tab "Common parameters" .
In the tab, check the box next to "Target element level" and press "targeting" .
Going into "targeting editor" click the button "creating elements" and select "security group" .
There, specify the name of the user who needs to be connected to the floppy disk being used. Activate the item "Users in group" .
Many users say that this method is quite difficult.
It is especially difficult for those who do not have sufficient knowledge of Windows architecture. So it is recommended for use by people with a high level of training.
Read also: Control Panel in Windows 10: where it is, how to open it and how to make a shortcut to the desktop

If necessary, you can easily create a shortcut to any application by matching its position.
Once the user has connected the device, it will be displayed in Explorer, so the required file can be easily accessed as if the user were working on an existing local floppy disk.
You can create a similar shortcut for a new device in the OS as follows:
- With File Explorer open, click "My computer" .
- By clicking “Connect new add-on” , choose "Connecting the application you are using" (this option is located next to the tab "Computer" , which opens automatically when the user goes to the PC in the specified way).
- Having selected the diskette letter that you plan to use for network folders, click "Review" .
- Having navigated to the folder for which you want to create shortcuts, click OK after selection.
- Don't forget to confirm your choice and click on "Ready" . The user can choose to permanently connect to this particular folder during the login process. As a result, it will always be available, and if necessary, you can use another computer user account to connect to the folder.
Once the user is done with the settings, he should see under the shortcut "New device" . This will give him the ability to access content and other folders on the PC.
If you no longer need a network application and want to disable it, right-click on it and select "Disable" .
Connection methods in Windows XP
Read also:

To quickly access shared resources, assign floppy drive letters to them. This way you can make it easier to access.
As a result, in the folder "My computer" a special icon will appear. So you don’t need to surf the web to find the information you need from online resources.
The main way to connect a device from "My Network Neighborhood" :
- Click on "Network environment" on the menu "Start" by selecting the command "Net" , double click on "Windows Network" ;
- Double click on the domain you want to open;
- Don't forget to double-click on the one that contains the shares you want to connect. The windows will display the device's shared resources.
- Press "shared resource"
that you want to connect, right-click, and in the context menu select the command
If necessary, you can connect a network drive on Mac OS
Instructions for users who are wondering how to connect a network drive to the following. First, you should open Finder.
To open a window "Connect to the server" , press Command + K. Don't forget to enter the path to the gadget you want to connect to.
Enter the path in the following format: Protocol/Computer name. It is not necessary to specify the protocol at the beginning. After the user has entered the password, the OS will ask you to specify the required folder for the connection.
The network drive will become accessible after the computer is turned on if you add it to "Login Objects" . After clicking on the menu, click on "System Setting" .
Having chosen the appropriate option, click on "Add" . If nothing is displayed, you need to open Finder by going to Settings and pressing Command.
Selecting a tab "Are common" , check the box next to "Server Connection" . As a result, the required icon will appear on the display.