Apache server for windows 7. Installing the Apache web server
The Apache web server is quite popular. It's free software with open source code. It is usually installed on computers with an operating system UNIX system family, but it is possible to install it on a Windows family operating system.
I found Apache version 2.4.25, and installed it on windows 7 x64 httpd-2.4.25-win64-VC11.zip. There are 32 bit version and 64 version. On Windows 7 x64 you can install both versions, on 32 bit Windows 7 will only work the 32-bit version. So choose according to your capabilities. I will also note that executable files compiled to Microsoft Visual Studio 2012, I need to install the Visual C++ Redistributable Package for them to work. You can download it from the Microsoft website vcredist_x64.exe. And choose a package of the appropriate bit size
Let's start the installation. If not installed Microsoft package, then install. It's not difficult, everything is done automatically. Then from zip archive extract the Apache24 folder and move it to “C:\Program Files”. If you have Windows x64 and the server is x86, then go to the folder "C:\Program Files (x86)".
I saw advice on the Internet that you need to create a folder in the root of the C: drive and unpack the contents of the archive into it, but I have a different opinion. For programs there is a folder "C:\Program Files". For those who object that the configuration files are deeply buried and you will need administrator rights to edit them, I answer: there is no problem. Create a shortcut for notepad ("C:\Windows\notepad.exe"), in the properties of the shortcut after the notepad path add in double quotes full path to the configuration file ("C:\Program Files\Apache24\conf\httpd.conf"), and in the additional properties check the box "run as administrator". Place the shortcut in a location convenient for you, and when you click it, a notepad with administrator rights will be launched and it will open the server configuration file. Once you open it, you need to adjust it a little.
After editing httpd.conf you need to create batch file, write into it
"C:\Program Files\Apache24\bin\httpd.exe" -k install and run it as administrator. This command is for the server to register itself as a windows service, which will automatically start when the system starts. You can also place a small assistant program “C:\Program Files\Apache24\bin\ApacheMonitor.exe” into startup. It is located in the tray, shows the status of the service, and allows you to start, stop, restart the Apache service. You need to restart the Apache service after each edit of the configuration files for the changes to take effect.
If the batch file is completed successfully and the apache service is running, then you can type http://127.0.0.1 or http://localhost in the browser, the browser will open the file “C:\Program Files\Apache24\htdocs\index.html”, in which single line " It works!"If the browser was able to display this, then the server is running.
Of course, the default location for HTML documents that will be processed by the web server is not very convenient, but that doesn’t matter. The fact is that apache can contain many virtual hosts, each of which can be individually configured. Denver's supporters take credit for Denver's ability to host several different sites, but that is due to the apahce server that is built into Denver. We have a full-fledged server that works like windows service. And now it’s time to start creating
Below I have written instructions as on local computer with Windows 7 - set up an Apache server and install PHP, MySql and phpMyAdmin on it.
Installing Apache
Download the distribution from Apache server from http://httpd.apache.org/download.cgi. Select version 2.2.22 and download the installer for windows. On your home computer you are unlikely to need SSL, select “ Win32 Binary without crypto (no mod_ssl) (MSI Installer)«.
Before installation, turn off Skype, or disable the use of port 80 in the Skype settings, as this will interfere with the installation.
Install Apache by running the installation file. All installation steps are standard.
Click Next.

We agree with the license.


Enter data into all three text fields. You can enter a non-existent domain like test.test or example.com. This data is needed to create a basic configuration file. Under the text fields one of the most important settings is to install Apache as a service or as regular program. Select “for All Users, on port 80, as a Service - Recommended” - install as a service.

Select Custom (custom installation).

Selecting components and installation location. You can leave all the default values.

Click Install.

We complete the installation.

Installation completed. An Apache icon will appear in the tray, with which you can quickly stop/start.

We check the functionality. Go to your browser at http://localhost/ If everything is done correctly, you will see the inscription “It Works!” Congratulations, the first step has been completed successfully.
Note.
I recommend immediately enabling support for CNC links; to do this, uncomment the line LoadModule rewrite_module modules/mod_rewrite.so in file httpd.conf. It is in the folder conf in the place where you installed Apache.
It was like this:
(codecitation)#LoadModule rewrite_module modules/mod_rewrite.so(/codecitation)
It should look like this:
(codecitation)LoadModule rewrite_module modules/mod_rewrite.so(/codecitation)
Here and henceforth, uncommenting means removing the comment sign - #, which is located at the beginning of the line.
To be continued.
Select the latest version (at the time of writing this article - 2.2.17) and go to the list of distributions. On your home computer you are unlikely to need SSL, so download the version Win32 Binary without crypto (no mod_ssl) (MSI Installer).
Now run the installer (the user must have administrator rights). At the beginning there is nothing interesting - just a welcome screen:
The second stage is to agree to the license terms:

The third stage is a few introductory words from the developers. Immediately click Next:

Fourth stage. Here you need to enter data in all three text fields. You can enter a non-existent domain like test.test or example.com. This data is needed to create a basic configuration file. Under the text fields, one of the most important settings is to install Apache as a service or as a regular program. Select “for All Users, on port 80, as a Service - Recommended” - install as a service:

Type of instalation. Select Custom:

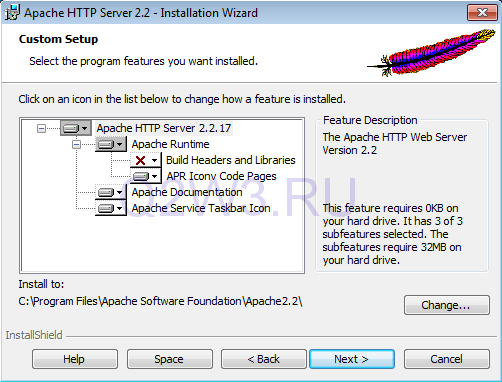
Sixth stage. Selecting components and installation location. I left all the default values:
Seventh stage. Everything is ready for installation. Click Install:

We complete the installation (Finish):

Installation completed. An Apache icon will appear in the tray, with which you can quickly stop/start the service:

We check the functionality. Open the browser and address bar enter http://localhost/. If everything is correct, a page should open that says It works!

In order for the server to be accessible not only on the local computer, but also from outside, you need to open the input TCP port 80 in Windows Firewall.
Opening a port in Windows Firewall
Open Start -> Control Panel -> System and Security -> Windows Firewall. In the left column, click on the link “ Extra options" In the window that opens, also in the left column, click on “Rules for incoming connections” and then in right column“Create a rule...”:

The Create Rule Wizard will open. Select the rule type “For port”:

Protocols and ports. TCP protocol. Below, select the “Specified local ports” option, and enter the port number - 80 - in the text field on the right:

Action. Select “Allow connection”:

Profile. Leave it as default (all three options are checked: domain, private, public):

Finally, enter the name of the created rule. For example Apache Web Server:

That's all. Click Finish. Now you can try connecting from another computer.
I remind you that for connections to the server not only from local network, but also from the Internet, on the router (if you have one) you need to configure forwarding of port 80 (port forwarding or this is often called a virtual server).
PHP installation (manual)
Download the latest PHP version(5.3.5 at the time of writing) from the site: http://windows.php.net/download/. There are several versions available here:
- VC9 x86 Non Thread Safe - for installation on IIS in FastCGI mode.
- VC9 x86 Thread Safe - ???
- VC6 x86 Non Thread Safe - for installation on Apache in CGI/FastCGI mode.
- VC6 x86 Thread Safe- for installation on Apache in module mode - our choice.
Because we started installation in manual mode, download the zip archive.
We unpack the contents of the archive into the installation directory. I selected C:\Program Files\PHP.
Let's go to this directory. In the installation root you will find two files php.ini-development and php.ini-production. These files contain basic settings. The first file is optimized for developers, the second for production systems. The main difference is that the settings for developers allow errors to be displayed on the screen, while for production systems the display of errors is prohibited for security reasons.
So, select the file you need (I chose php.ini-development), open it and save it in the same folder under the name php.ini. This operation can be done in a regular notepad, but it is still better to use a more convenient editor, for example notepad2.
Now you need to make a few changes to php.ini:
- Find the extension_dir option (use CTRL+F search) and change the path to the ext folder according to the path PHP installations. For me it looks like this: extension_dir = “c:\program files\php\ext”
- Find the upload_tmp_dir option. Here you need to specify the path to the temporary folder. I chose c:\windows\temp. All together: upload_tmp_dir = “c:\windows\temp”
- Find the session.save_path option. Here you also need to specify the path to the temporary folder: session.save_path = “c:\windows\temp”
- Go to the Dynamic Extensions section. Here you need to uncomment the lines (remove the semicolon at the beginning) corresponding to PHP modules, which you need for work. Basic set modules may look something like this: ;extension=php_bz2.dll ;extension=php_curl.dll ;extension=php_fileinfo.dll extension=php_gd2.dll ;extension=php_gettext.dll ;extension=php_gmp.dll ;extension=php_intl.dll ;extension= php_imap.dll ;extension=php_interbase.dll ;extension=php_ldap.dll extension=php_mbstring.dll extension=php_exif.dll ; Must be after mbstring as it depends on it extension=php_mysql.dll extension=php_mysqli.dll ;extension=php_oci8.dll ; Use with Oracle 10gR2 Instant Client ;extension=php_oci8_11g.dll ; Use with Oracle 11g Instant Client ;extension=php_openssl.dll ;extension=php_pdo_firebird.dll ;extension=php_pdo_mssql.dll ;extension=php_pdo_mysql.dll ;extension=php_pdo_oci.dll ;extension=php_pdo_odbc.dll ;extension=php_pdo_pgs ql.dll ;extension =php_pdo_sqlite.dll ;extension=php_pgsql.dll ;extension=php_phar.dll ;extension=php_pspell.dll ;extension=php_shmop.dll ;extension=php_snmp.dll ;extension=php_soap.dll extension=php_sockets.dll ;extension=php_sqlite. dll extension=php_sqlite3.dll ;extension=php_sybase_ct.dll ;extension=php_tidy.dll ;extension=php_xmlrpc.dll extension=php_xsl.dll extension=php_zip.dll
Now let's move on to Apache settings.
Open the Apache installation folder (by default C:\Program Files\Apache Software Foundation\Apache2.2\). Open the conf folder. Open the httpd.conf file.
Go to the end of the file and add the following lines there:
# Charset AddDefaultCharset windows-1251 # PHP LoadModule php5_module "c:\program files\php\php5apache2_2.dll" PHPIniDir "c:\program files\php" AddType application/x-httpd-php .php
Way to php folder indicate the one you selected during the installation process.
In the same file we find following lines:
Before index.html we add index.php separated by a space. The result is:
For the changes to take effect, restart the Apache service. If the service restarts, this is a good sign. If not, look for errors in configuration files. Check all paths especially carefully.
To make sure PHP is working, open the Apache installation directory, then open the htdocs folder (this contains the default website files). Create an index.php file in this folder with the following content:
Now open http://localhost/ in your browser. If everything is fine, you will see a page similar to this:

If you see a page that says "It works!", try refreshing the page using CTRL+F5.
Installing MySQL
Moved into a separate article.
or install a bunch of servers yourself
Tested on Windows Vista SP1, Vista Ultimate, Windows 7
Your actions:
- Download the following distributions for free from official websites:
Setting up the PHP interpreter
- Open double click php.ini file from the C:\server\php\ folder.
- In the "Paths and Directories" section there should be a line extension_dir ="C:\server\php\ext" .
- In the "Dynamic Extensions" section, find; Be sure to appropriately set the extension_dir directive. , at the bottom of this line place:
extension=php_gd2.dll
extension=php_mbstring.dll
extension=php_mysql.dll
extension=php_mysqli.dll
extension=php_pdo.dll
extension=php_pdo_mysql.dll
extension=php_sqlite.dll - Somewhere at the end of the file, find the line; End: and delete everything that follows it.
Save the modified file there.
Once you've finished editing the files, create a www folder in the server folder and a cgi-bin folder in the www folder. Restart your computer. As a result, a green triangle appeared in the tray, in the server status instead of a red square; if not, and an error warning window is displayed, then the change in the httpd.conf file was inaccurate and you will have to carefully check everything, slash slopes, quotes, and so on.
www is the root directory of the local server, this is where you should save all documents (folders, pages, images, scripts and other files) of your site.
Testing the PHP interpreter
Create new file in an editor (Notepad2 or Notepad+) and write the code:
echo phpinfo();
?>Save the file in the C:\server\www\ directory as index.php . In your browser, type http://127.0.0.1 or http://localhost/ ⇒ the table should be shown:

I succeeded! If you have any questions or suggestions, please write to the blog.
We have local server in conjunction with an interpreter and now you can learn PHP.
Testing the connection to the MySQL database server
Small script:
$dblocation = "127.0.0.1" ;
$dbname = "test" ;
$dbuser = "root" ;
$dbpasswd = "" ; /* Enter the password you entered when
MySQL installation */
$dbcnx = @mysql_connect ($dblocation, $dbuser, $dbpasswd);
if (! $dbcnx )
{
echo "MySQL server is not available";
exit();
}
if (!@ mysql_select_db ($dbname, $dbcnx))
{
echo "Database not available";
exit();
}
$ver = mysql_query("SELECT VERSION()" );
if(!$ver)
{
echo "Error in request";
exit();
}
echo mysql_result ($ver, 0);
?>Save the script in the C:\server\www\ folder as mysql.php and type http://localhost/mysql.php in the browser ⇒ it will be shown serial number MySQL servers:
5.5.12 - Download the database management manager distribution package for free from the official website php-myadmin.ru, the latest stable version, file with the extension all-languages.zip.
- Unpack the archive into the phpmyadmin folder, and place it in the www folder.
- Download config.inc.php, extract from the archive and copy it to the phpmyadmin folder.
- Open config.inc.php , find the line $cfg["Servers"][$i]["password"] = "pass"; ⇒ instead of pass, specify the root password that you used when installing MySQL server⇒ save the file.
- In your browser, type http://localhost/phpmyadmin/ ⇒ will be shown Title page manager:

Having installed the above components, we received a complete local web server and everything necessary for organizing further work.
Materials were used from the sites: dev.mysql.com | php.net | php-myadmin.ru
1.3) In the root of drive E: create two folders iSites (our sites will be located here) and iLogs (general server logs will live here).
1.4) In the G:\iSites folder we create two subdirectories localhost and testru and then each of them has its own www subdirectories, log and ssl

2) Now you need to download the Apache binaries. All! We've arrived! There are no more installers! Everything is like an adult :)
In order to download, go here http://httpd.apache.org/download.cgi and see something like this (depending on the date when you read this article of mine :)):

At this moment latest version Apache 2.4.18. After clicking on the specified link, we get here:


12.1) Unzip the contents of the archive into the D:\iServer\PHP directory

12.2) We will attach PHP to Apache as an Apache module. To do this, go to the catalog E:\iServer\Apache\conf, and add to the file httpd.conf at the end of a block of instructions LoadModule two lines:
LoadModule php7_module "D:/iServer/PHP/php7apache2_4.dll"
PHPIniDir "D:/iServer/PHP"
12.3) Find it in the file httpd.conf AddType instructions, at the end of this block we insert the instruction:
AddType application/x-httpd-php .php
12.4) Find in the file httpd.conf instruction block DirectoryIndex. And add it to the instructions DirectoryIndex file reference index.php. So that the final instructions look like this:
DirectoryIndex index.html index.php
12.5) In file httpd.conf to the section AddHandler add a line AddHandler application/x-httpd-php .php
12.6) Now it’s time to configure the php.ini file. To do this, rename or copy the file php.ini-production(in the catalog D:\iServer\PHP) to file php.ini.
12.7) In file php.ini uncomment the line extension_dir = "ext" and the extensions you need
12.8) Find the line in the php.ini file short_open_tag = Off. And we bring her to mind short_open_tag = On
12.9) Create in a directory E:\iSites\localhost\www phptest.php file and write the following code in it:
phpinfo();
?>
Save the file.
12.10) Stop and start Apache again through the Apache management console. After restarting Apache, you can open the Apache service management window by double-clicking on the tray icon. You should see the following window:

Please note that now with the Apache version, the PHP version is also indicated.
12.11) Testing PHP work. Type in the browser http://localhost/phptest.php and we see the following picture and enjoy life. PHP worked:

12.12) We’ll also turn it on for testing PHP functions for working with graphics. Edit the file D:\iServer\PHP\php.ini. Finding the line extension=php_gd2.dll and uncomment it. Restart Apache.
Create a file in the G:\iSites\localhost\www directory gdtest.php and enter the following code:
$pic=imagecreate(350,100);
$piccolor=imagecolorallocate($pic, 255,255,255);
$textcolor=imagecolorallocate($pic, 0,0,0);
$linecolor=imagecolorallocate($pic, 0,0,255);
$text="GD test successful - gdtest.php!";
imagerectangle($pic, 1.99, 349.0, $linecolor);
imagestring($pic,5,30,40, $text, $textcolor);
header("content-type: image/png");
imagepng($pic);
imagedestroy($pic);
?>
We enter the address http://localhost/gdtest.php in the browser and see:

If we don’t see it, then as usual we smoke the manual until we are completely clear :)
13) Now let's set it up rewrite_module, very useful thing :). In file httpd.con f uncomment the line
LoadModule rewrite_module modules/mod_rewrite.so
AllowOverride none
Require all denied
And replace the line in it AllowOverride None per line AllowOverride All
Then just below there will be just a line AllowOverride None it needs to be changed to AllowOverride All
This includes processing ALL ALL.htaccess settings in all directories.
Now we check the operation of the rewrite module. Restarting Apache
In the catalog E:\iSites\localhost\www create a file .htaccess and add one line to it
this line redirects from the file index.html to the site ya.ru
In the browser we simply type localhost and it should redirect us to the page ya.ru
If it works, then everything is configured correctly. Well, if not, then we look for where we messed up.
14) Install MySQL. Come here and download the installer mysql-installer-community-5.7.11.0.msi. It is worth noting that at least msi file 32 bit, but it installs both x32 or x64 depending on the platform . And so, click on it and the installation starts...


Then we see this and begin to select the components you need and remove the ones you don’t need...

I chose the following components:

Then click Advanced Options...
And choose where it will be installed MySQL server and where its bases will lie:

Click OK and Next and we see that the installer needs a redist for Workbench to work. But as he reports, he will try to install it himself

Click Execute and see:

Well, we set the redist... and now everything is fine with us


And click Execute...


It's time to configure MySQL...


Well, click Execute...


After clicking Finish, Workbench will start...

Let's connect to MySQL using it


If we see this, it means the server is installed and running. But Apache cannot work with it yet.
14.1) Let’s configure MySQL a little. By default, it stores temporary files on the system drive, which I think is not good. Therefore, we transfer temporary files to another location. To do this in the file E:\MySQLdb\my.ini in section add a line tmpdir=E:/MySQLtemp. Naturally, the E:\MySQLtemp directory must already be created. Restart the MySQL service and enjoy the view:

14.2) Checking the operation of MySQL (separately for now without connection to Apache and PHP). We give from command line in the directory D:\iServer\MySQL\bin team
mysql.exe -h localhost -P 3306 -u root -p
enter the password and give next command
show databases;

15) We attach MySQL to Apache, although it would be more accurate to say to PHP, but it is already attached to Apache. This is how the train turns out. So let's edit the file D:\iServer\PHP\php.ini . We find the lines in it
extension=php_mysqli.dll
extension=php_pdo_mysql.dll
and uncomment them. Then we find the line mysqli.default_port = and bring it to the form mysqli.default_port = 3306 . Next, we find the line mysqli.default_host = and bring it to the form mysqli.default_host = localhost
Restart Apache.
In the catalog E:\iSites\localhost\www create file mysqltest.php and enter the following code there:
try (
$DBH = new PDO("mysql:host=localhost", "root", "YOUR PASSWORD");
foreach($DBH->query("SELECT CURDATE()") as $row) (
echo "";
echo "";
}
}
catch(PDOException $e) (
echo $e->getMessage();
}
?>
Enter the address in the browser http://localhost/mysqltest.php and if everything was done correctly, then we see current date. This means that PHP can work with MySQL.
Let's summarize. We are currently working on Windows Server 2008R2 x64 Apache 2.4 x64 + PHP 7.0.3 x64 + MySQL 5.7.11 x64. This whole thing took up enough space on drive D::


Compare with that free space on drive D: what happened in the beginning.
Therefore, plan your disk space in advance.
Although service data (websites, logs and databases) still occupy almost nothing, over time they tend to grow. Therefore, it is better to keep them separate disk, as well as services, so that neither one nor the other clogs system disk.
16) Now all that remains is to make the Apache service work not under the system account, but under regular user. By default, during installation, the Apache service is launched under the SYSTEM user, which has maximum rights in the system. This is not gud. Now we will correct this situation.
16.1) Create and configure an account under which we will run Apache.
- create an iUser account and assign it a password that never expires
- we check that it is included only in the users group
- prohibit for the user iUser local login and set the right to work in the mode operating system and login as a service through the gpedit.msc snap-in

- We give account iUser has the right to write to directories necessary for Apache to work:
E:\iLogs– general Apache logs
In the directories of site log files. In our case: E:\iSites\localhost\log And E:\iSites\testru\log - In the future, if you need write permissions to any folder or file on your site, then these permissions must be added. But most files on your site should not have write permission. And even more so for the .htacess file
- Restarting the Apache2.2 service
- Well, let’s check the work by going to http://localhost
If you did everything correctly, then everything should work.
17) And so everything works well for us locally. What if you try to connect to our web server over the network? And here’s a surprise :) No one will be able to connect, since on Windows Server 2003R2, by default, this port is closed by a firewall. Therefore, you need to create a rule that allows incoming connections to port 80.
18) We prohibit Apache from giving out its version and PHP version. This information can allow you to know for sure whether your version of Apache and PHP is vulnerable or not. It’s better to turn this off, since any, even the simplest scanner will show you this data:

By the way, here you can also see that our Location is http://ya.ru. This is exactly what our mod_rewrite did - another protection.
18.1) To prevent Apache from showing its version and the PHP version, do the following:
- In the file, uncomment the line Include conf/extra/httpd-default.conf
- In file D:\iServer\Apache\conf\extra\httpd-default.conf looking for a parameter ServerTokens and change its value from Full on Prod and restart Apache.
And now Apache only shows this:

Do you agree that this is already more pleasant :)?
For complete happiness, all that remains is to tell you how to attach it to Apache SSL certificates for virtual sites. But more on that in another article. Although I already wrote about this. But times change and now everything is a little different, but the essence has not changed.