The most efficient antenna. Simple ways to make a television antenna with your own hands
The main indicator of the quality of each antenna is its interaction with broadcast signal. This principle work underlies both purchased and homemade antennas. We suggest that you familiarize yourself with recommendations on how to make an antenna for digital TV with your own hands.
Features of modern television
If you compare modern television broadcasts with the broadcasts that existed several years ago, you can find certain differences. First of all, the UHF range is used for television broadcasting. Thus, it is possible to significantly save money and signal reception by the antenna. In addition, in this case, there is also no need for periodic maintenance of antennas.
Also, there are many more television sensors than before, so most television channels are available in almost all places in the country. To ensure television broadcasting in habitable areas, low-power sensors are used.
In big cities, radio waves travel differently. Due to the large number of multi-story buildings, the signal through them is weak. In addition, there is great amount television channels, for the reception of which one standard television antenna is not enough.
With development digital broadcasting Receiving channels has become even easier. These types of antennas are distinguished by their resistance to interference, phase or cable distortion, and image clarity.
Simple DIY digital antenna: device requirements
Since the conditions of television broadcasting have changed, so have the operating rules modern antennas changed:
1. One of the main parameters of a television antenna, in the form of directional coefficient and protection coefficient, are not particularly important. To combat various types of interference, various electronic means are used.
2. The coefficient responsible for the antenna gain improves the signal, clears it of extraneous sounds and various kinds of interference.
3. One more thing important quality modern television antenna - range. Preservation electrical parameters carried out automatically, without additional human intervention.
4. Working value the range of the television antenna should interact well with the cable that connects to the antenna.
5. To avoid the occurrence of phase distortion, it is necessary to ensure decent characteristics antennas in amplitude-frequency ratio.
The characteristics of the last three points are determined by the properties of receiving a television signal using an antenna. An antenna operating at one frequency is capable of receiving several wave channels. However, in order for them to be consistent with the feeder, it is necessary to have a USS that strongly absorbs signals.
Therefore, there are certain options digital antennas available for making at home. We suggest you familiarize yourself with them:
1. All-wave version of the antenna, such devices are frequency independent, they are cheap, and very popular among consumers. One hour is enough to make such an antenna. This antenna is perfect for city apartments, but in locality, which is somewhat distant from television centers, such an antenna will work worse.
2. Speech therapy band version of the antenna - such an antenna picks up certain signals. It has a simple design, is well suited for various operating ranges, and does not change the feeder parameters. Differs in average technical parameters, great for country houses, cottages, apartments.

3. Z-shaped antenna, which is also called a zigzag antenna. Making such a structure will require a lot of time and physical effort. It has wide receiving characteristics. With the help of such an antenna it is possible to expand the reception range of television channels.
To achieve precise matching between antennas, it is necessary to lay the cable across the zero potential value.
DIY digital TV antenna: reception characteristics
Vibraton antennas are capable of finding several more digital ones on one analog cantal. Such devices receive wave channels. They are rarely used and are relevant for places remote from television towers.
Making your own satellite dish is a pointless process. Since in this process you will need to purchase a commercial tuner and head, and the alignment of the mirrors must be very accurate; achieving it at home is almost impossible. You can only configure such an antenna yourself, but not manufacture it.
In order to make the above antenna options, you need to have a very good understanding of higher mathematics and electrodynamic processes. Among the main characteristics of the terms used in the manufacturing process of television antennas, we note:
1. KU - antenna power, which is determined in the ratio of the accepted antenna signal to its main petal.
2. KND - the relationship between the solid circle and the solid angle of the antenna lobes. If there are lobes of different sizes, they change in area.
3. KZD - the ratio between the signal received at the main lobe and the total amount of antenna power.
Please note that if the antenna is a band antenna, then the power is taken into account in relation to the useful signal.
Note that the first two terms are not necessarily interdependent. There are certain antenna options that have high directivity, but unity or less gain. However, a zigzag antenna combines significant gain with a low directivity level.

DIY digital TV antenna: manufacturing technology
Each of the antenna elements, through which the current flows, supplying the useful signal, must be connected to the other by soldering or welding. Any prefabricated unit located outdoors must be well fixed, since the destruction of electronic contact on the street occurs faster than indoors.
Particular attention should be paid to zero potential. It is in these places that the tension nodes are located, electricity, at its highest power. Solid bent metal is used to make zero-potential locations.
For the manufacture of braid or central core is used coaxial cable, made of copper or an inexpensive alloy with anti-corrosion properties. To solder the cable, a forty-volt soldering machine is used, with low-melting solders and flux paste.
A do-it-yourself outdoor digital antenna is made in such a way that all connections are resistant to moisture, temperature changes and other environmental influences.

To make an all-wave antenna you will need two triangular plates, two slats made of wood and enameled wire. At the same time, the size of the wire in diameter is practically unimportant, and the interval between their ends is about 2-3 cm. The interval between the plates on which the ends of the wire are located is 1 cm. One-sided square-shaped fiberglass coated with foil can replace two metal plates. At the same time, copper triangles should be cut out on it.
The antenna's width should be the same as its height. The canvases open at right angles. In order to lay the cable to this antenna, you must follow a certain diagram. The cable braid is not soldered to the point indicating zero potential. She just gets attached to her.
The CHNA, which stretches 150 cm inside the window, is capable of receiving most meter and DCM channels of any direction. The advantage of this antenna is that it is different wide interval receiving channels. Therefore, such antennas are popular in large cities where there are various television centers. However, such an antenna has certain disadvantages - the antenna gain is single, and the gain is zero. Therefore, in the presence of large interference, the antenna will be irrelevant.
It is possible to make other types of digital antennas with your own hands using CNA, for example, a logarithmic spiral of two turns. This option The antenna is compact and easier to manufacture.

Over-the-air digital antennas made from beer cans
For the manufacture of digital antenna You will need beer cans from the cable yourself. This antenna option, with the right approach to its production, it has good performance characteristics. In addition, such an antenna is quite simple to manufacture.
The operating principle of such an antenna is based on increasing the diameter of the arms on a conventional linear vibrator. In this case, the working band expands, while other properties do not change.
Beer cans, in proportion to their size, are used as arms on the vibrator. At the same time, the expansion of the shoulders is unlimited. This version of a simple vibrator is used as a do-it-yourself indoor digital antenna for reception television broadcasting connecting directly using a cable.
If you choose the option of assembling a common-mode grating from a beer diopole, located vertically, with a step of half a wave, you will be able to improve the gain value of the antenna. Also on this device An amplifier from the antenna must be installed, with the help of which the device is coordinated and configured.

To strengthen such an antenna, a CPD is added to it, a screen and a grid are installed on the back of it, with an interval of half a grid. To install a beer antenna, you will need a dielectric mast, while the screen and the mast are connected by a mechanical connection.
At the same time, about three or four rows are arranged on the grid. Two gratings are not capable of achieving high gain.
DIY UHF antenna for digital television
A log-periodic version of the antenna is called a prefabricated antenna, which is connected to the halves on a linear diopole, the interval between them varies in relation to the geometric parameters of the progression. There are configured and free lines. We suggest choosing a longer and smoother version of the antenna.
To manufacture LPA, it is necessary to have any predetermined range. The higher the progression indicators, the greater the gain of the antenna. This antenna option in terms of operational and technical specifications is ideal for making at home.
Its main principle normal functioning- carrying out correct calculations. With increasing progressive indicators, the gain increases and the directivity angle decreases. This antenna is not required additional screen. Since it does not depend on its general characteristics.

When calculating a digital LP antenna, use the following recommendations:
- the second longest vibrator must have a reserve of frequency power;
- Next, the longest diopole is calculated;
- After this, another specified frequency range is added.
If the shortest diopole leaves lines, then it is cut off, since it is needed on the antenna only for calculations. The total length of the antenna will be about 40 cm.
The diameter of the lines on the antenna is about 7-16 mm. In this case, the interval between the axes is 40 mm. The cable is not tied to the line externally, as this will negatively affect the technical properties of the antenna.
The outdoor antenna is fixed to the mast using the center of gravity. Otherwise, the antenna will constantly shake under the influence of the wind. However, the metal mast is not connected to the line in a straight line, since a dielectric mast must be provided in this place, the length of which is about 150 cm. A wooden beam, previously painted or varnished, can be used as a dielectric material.
DIY digital antenna video:
How to make an antenna for a TV with your own hands so that it is not inferior in quality to a purchased device is a question that interests many home craftsmen and TV enthusiasts. Exist various ways How to make an antenna yourself, from the simplest designs to devices that receive satellite signals.
This option is suitable for people who want to install a regular indoor antenna at home or in the country for viewing federal channels. Anyone can construct such a device; no special knowledge is required.
This is the most basic method, so you only need copper wire 70–90 cm, thickness 2–3 mm. An indoor antenna is made as follows:
- Strip both ends of the copper wire.
- Attach one end to the battery, and insert the other into the TV connector.
The signal will appear immediately, and from 1 to 5 channels will be available to the user. So simple method you can make a home antenna in 5 minutes.
The most popular way to make an antenna with your own hands from scrap materials. To make this you will need beer cans. Experts say that it will take no more than an hour to assemble an antenna from beer cans.
You will need:
- Connecting cable.
- Several cans of beer.
- Plug.
- Screws in the amount of 2 pieces.
- Screwdrivers.
- Insulating tape or heat shrink tubing.
- A wooden beam or metal pipe for mounting the antenna.
You can make a homemade antenna from tin cans according to the following scheme:

This is another one easy option how to do TV antenna for a short time. The device picks up the signal well, providing high quality Images.
All-wave antenna with amplifier
An all-wave antenna with an amplifier can be of different configurations. Its assembly takes more time than the first two options. But the advantage is that it is very powerful and takes everything analog channels in excellent quality. One of the common options all-wave antenna"BUTTERFLY" shape.
Tools:
- Board or plywood sheet, dimensions 550/70/5 mm.
- Copper wire.
- Connecting cable PC75.
- Drill.
- Soldering iron.
- Plug.

Instructions:

The DIY TV antenna is ready for use.
UHF antenna
Homemade antennas that pick up a decimeter signal can be of a variety of configurations.
Option 1
Most simple option counts it is relatively easy and simple to assemble.
You will need:
- Plywood.
- Cord.
- Soldering iron.

Instructions:
- Make a ring from the connecting cable, size 53 cm.
- Cut another piece of cable to make a loop, size 17.5 cm.
- You need to solder a loop to the ring and a cable that will be inserted into the screen.
- Attach the structure to the plywood.
- Point the assembled device towards the TV tower.
So it's going to UHF antenna range with your own hands.
Option 2
Another possible method TV antenna manufacturing UHF band called "Eight".
Tools:
- Wire (copper, aluminum).
- Glue gun.
- Cable.
- Wire cutters.
Instructions:

This is another way you can make an antenna yourself.
This device's signal range can reach up to 490 MHz, this means that the picture quality will be very high. But for manufacturing you need to purchase a transformer.
You will need:
- Transformer.
- Foil.
- Glue.
- Roulette.
- Cardboard.
- Stapler.
- Marker.

Instructions:

The device is ready for use.
DIY satellite dish
One of the most popular questions is whether it is possible to do satellite dish with your own hands? There are many videos on the Internet on how to make a plate for viewing. satellite television on one's own.
This device can be made at home in two ways:
- Sticking on the matrix.
- Soldering mesh and wire.
The first manufacturing method is considered the most optimal and convenient. To do this, you need to make a drawing of the future device. The work must be approached very responsibly at this stage, all parameters must be calculated accurately, otherwise the output will be a device unsuitable for operation. The drawing draws a parabola, which is then transferred to a steel sheet. Its thickness should be 0.05 cm.

Stages of work
- By using welding machine make a steel frame with a diameter of 9–10 cm. The steel rods are turned to the outside, and the bearing is welded to the center.
- Install the resulting structure on a level place, and a pipe is attached to the installed bearing, then a knife is installed.
- Then the frame is filled with concrete and dried for 5 days.
IN final stage it is necessary to glue the antenna, this can be done different ways. To make work easier, it is recommended divide the structure into 8 parts. For gluing, fiberglass or epoxy primer is used.
Apply machine oil to the dry concrete form and insert the pipe into the washer. Afterwards, the homemade plate is covered with resin and the fiberglass is glued. The manufacturing process of the device is completed. Read also,.
Despite rapid development Internet, television remains the main source of information for the majority of the population. But in order for your TV to have a high-quality picture, you need good antenna. It is not at all necessary to buy a television antenna in a store, because you can make it yourself and save a lot of money.
How to do quality antennas for different broadcast bands and what materials to use, you can find out by reading our article.
There are many types and forms of television antennas, the main ones are listed below:
- Antennas for receiving a “wave channel”.
- Antennas receiving a “traveling wave”.
- Loop antennas.
- Zigzag antennas.
- Log-periodic antennas.
- Array antennas.


 Array antennas
 Antennas for digital television reception
The whole world, including our country, has switched from analogue to digital broadcasting. Therefore, when making an antenna with your own hands or buying it in a store, you need to know which antenna is best suited for receiving DVB-T2 format:

If you live not far from a TV tower, then you can do it the simplest antenna to receive a signal in DVB-T2 format with your own hands:
- Measure 15 centimeters from the connector antenna cable.
- Remove 13 centimeters of outer insulation and braid from the cut edge, leaving only the copper rod.
- Referring to the TV picture, point the rod in the desired direction.
The antenna is ready! It should be noted that such a primitive antenna is not capable of providing a high-quality and stable signal at a distance from the TV tower and in places with sources of interference.
DIY antennas
Let's look at several options for television antennas that you can make yourself from scrap materials:
Beer can antenna
An antenna from beer cans can be made in literally half an hour, using the materials you have on hand. Of course, such an antenna will not provide a super-stable signal, but for temporary use in a country house or in a rented apartment it is quite suitable.  Beer can antenna
To make an antenna you will need:
- Two aluminum cans of beer or other drink.
- Five meters TV cable.
- Plug.
- Two screws.
- A wooden or plastic base on which the jars will be attached (many people use a wooden hanger or mop).
- Knife, pliers, screwdriver, insulating tape.
After making sure that you have all the above items in stock, do the following:
- Strip one end of the cable and attach the plug to it.
- Take the other end of the cable and remove 10 centimeters of insulation from it.
- Unravel the braid and twist it into a cord.
- Remove the plastic layer from the insulating rod of the cable to a distance of one centimeter.
- Take the jars and screw the screws into them in the center of the bottom or lid.
- Attach a rod to one can and a braided cable cord to the other, screwing them onto screws.
- Attach the jars to the base using electrical tape.
- Attach the cable to the base.
- Insert the plug into the TV.
- Moving around the room, determine the location of the best signal reception and attach the antenna there.
There are other variations of this antenna, with four and even eight banks, but no obvious effect of the number of banks on the signal quality has been identified.
You can also learn how to make an antenna from beer cans from the video:
Kharchenko zigzag antenna
The antenna received its name in 1961, after the name of its inventor Kharchenko K.P., who proposed using zigzag-shaped antennas to receive television broadcasts. This antenna very good for reception digital signal. Antenna Kharchenko
To make a zigzag antenna you will need:
- Copper wire with a diameter of 3-5 mm.
- TV cable 3-5 meters.
- Solder.
- Soldering iron.
- Plug.
- Insulating tape.
- A piece of plastic or plywood for the base.
- Fastening bolts.
First you need to make an antenna frame. To do this, take the wire and cut off a piece of 109 centimeters. Next, we bend the wire so that we get a frame of two parallel rhombuses, each side of the rhombus should be 13.5 centimeters, make loops from the remaining centimeter to fasten the wire. Using a soldering iron and solder, connect the ends of the wire and close the frame.
Take the cable and strip its end so that you can solder the rod and cable shield to the frame. Next, solder the rod and cable shield in the center of the frame. Please note that the screen and the rod should not touch.
Place the frame on the base. The distance between the corners of the frame at the junction with the cable should be two centimeters. Make the size of the base approximately 10 by 10 centimeters.
Strip the other end of the cable and install the plug.
If necessary, attach the antenna base to a stand for further installation on the roof.
More detailed instructions on the manufacture of the Kharchenko antenna, you can watch in the video:
Coaxial cable antenna
To make the antenna you will need a 75 ohm coaxial cable with a standard connector. To calculate the cable length required for the antenna, you need to find out the digital broadcasting frequency and divide it in megahertz by 7500, and round the resulting amount.  Cable antenna
Once you have the cable length, do the following:
- Strip the cable on one side and insert it into the antenna connector.
- Step back two centimeters from the edge of the connector and make a mark from which you will measure the length of the antenna.
- Having measured the desired length, bite off the excess with pliers.
- In the area of the mark, remove the insulation and braiding of the cable, leaving only the inner insulation.
- Bend the cleaned part at an angle of 90 degrees.
- Set up your TV with a new antenna.
You can visually consolidate the information by watching the video:
Satellite antenna
It is worth mentioning right away that for the reception satellite signal a tuner and a special set-top box are required. Therefore, if you do not have this equipment, then creating a satellite dish with your own hands will not be possible, since you yourself can only make a parabolic reflector:

All of the methods listed above can be considered seriously only out of sporting interest, since making a parabolic reflector by hand is a very labor-intensive and expensive process. In addition, it is very difficult to accurately calculate the parameters of a satellite dish at home. Therefore, we advise you not to be original and buy a complete satellite dish.
Antenna amplifier
If the place where you live is weak television signal And regular antenna cannot provide a high-quality picture on your TV, then an antenna amplifier can help in this situation. You can make it yourself if you have a little knowledge of radio electronics and know how to solder. 
Amplifiers should be installed as close to the antenna as possible. It is better to power the antenna amplifier via a coaxial cable through a decoupler.  Isolation power circuit
The decoupler is installed at the bottom of the TV and is supplied with 12 volt power from the adapter. Two-stage amplifiers consume a current of no more than 50 milliamps; for this reason, the power of the power supply should not exceed 10 watts.
All connections of the antenna amplifier on the mast must be made by soldering, since the installation of mechanical connections will lead to their corrosion and rupture during further operation in an aggressive external environment.
There are times when you have to accept and strengthen weak signal in the presence of strong signals from other sources. In this case, both weak and weak signals enter the amplifier input. strong signals. This leads to blocking the operation of the amplifier or switching it to a non-linear mode, mixing both signals, which is expressed in the overlay of the image from one channel to another. Reducing the amplifier supply voltage will help correct the situation.
Please note that UHF amplifiers are greatly influenced by signals in the meter range. To weaken the impact of meter signals, a high-pass filter is placed in front of the UHF amplifier, which blocks meter waves and transmits only signals in the decimeter range.
Below is a diagram of a VHF antenna amplifier:
We also suggest that you familiarize yourself with the circuit of the decimeter amplifier:

You can see the operating principle of the antenna amplifier in the video:
Now, having familiarized yourself with the diagrams and armed with a soldering iron, you can safely begin making an antenna amplifier.
We hope that our article about television antennas was useful to you!
Digital television T2 is gaining momentum in popularity. And this is natural, analogue television is being replaced by digital television and this is an irreversible process. Moreover, in the near future, analogue broadcasting will be stopped altogether. What should users who have TVs without a T2 receiver do? cable television? The answer is simple - buy a T2 set-top box. Today, the price of T2 consoles has dropped greatly and does not look exorbitant. The advantages are quite big: you have many channels in digital quality, with no monthly fees, minimal costs and without having to buy a new TV. Only by comparing the quality of digital and analog TV will you never regret your choice.
Quite a lot has been written on the choice of T2 receivers. Moreover, new models are constantly being released. I would advise taking an inexpensive one, but new model, after reading reviews on online store websites. As a rule, any receiver works, but the antenna has great importance. Even if you are close to a TV tower, but are blocked by high-rise buildings, etc. - and this is almost always the case, then a good antenna is the key to trouble-free (and most importantly, stress-free) high-quality reception of the maximum amount digital channels TV.
But an expensive antenna is not always a good antenna. Especially if you are 50 km or more away from the TV tower. Stores offer “special” antennas for T2. In fact, there is nothing “special”; you need a good antenna for the DCM range. If you still have an old DCM antenna, try connecting it first. Widespread "Polish" antennas are not suitable for receiving T2 digital channels.
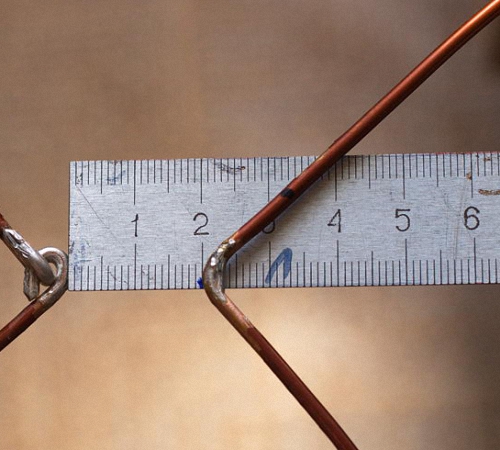
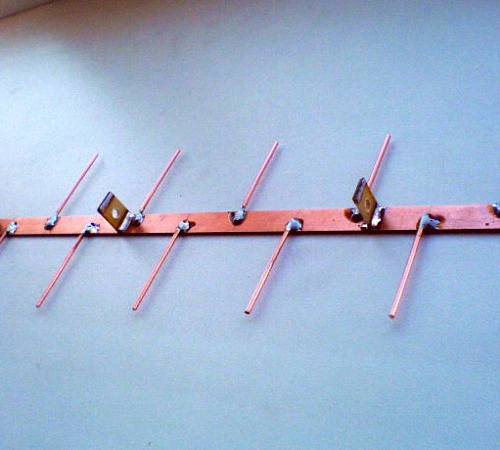
I offer a proven option that is simple, but at the same time has proven itself, homemade antenna for T2. The shape of the antenna is not new; it has been used for a long time and when receiving DCM analog television, but the dimensions are optimized for receiving T2 digital channels.
It is worth noting that the Internet offers a large number of options for homemade antennas for T2: from beer cans, from the antenna cable itself, a converted Polish one, etc. This is for the completely lazy, and you shouldn’t expect quality from such antennas.
So. The long-known “figure eight” was taken as the shape of the antenna. The antenna body is made of any conductive material of suitable cross-section. This can be copper or aluminum wire with a thickness of 1 to 5 mm, a tube, strip, busbar, corner, profile. Copper is, of course, preferable. I used 6mm diameter copper tube. A good option and copper wire. I just had such a pipe.
Dimensions
The outer side of the square is 14 cm, the inner side is slightly smaller - 13 cm. Due to this, the middle of the two squares does not converge, leaving a gap of about 2 cm.
In total, you will need a tube, wire or other material 115 cm long (with a small margin).
The first section is 13 cm + 1 cm for a loop (for strength), if made of wire, or riveted for overlapping soldering for a tube. The second and third - 14 cm each, the fourth and fifth - 13 cm each, the sixth and seventh - 14 cm each, and the last eighth - 13 cm + 1 cm, again for connection.
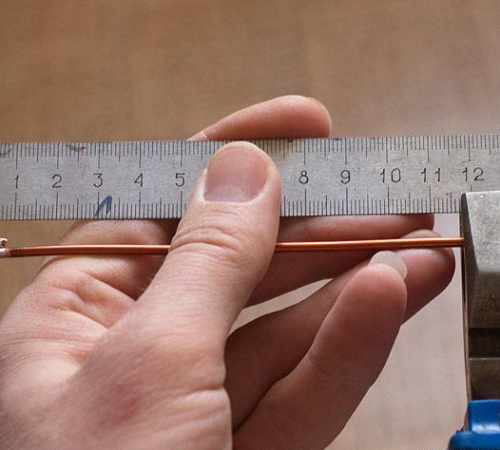
We strip the ends by 1.5 - 2 cm, twist the two loops behind each other, and then solder the joint. This will be one cable connection pin. After 2 cm another.
From copper tube it looks like this

It’s a little more difficult to bend the tube, but we don’t need much precision. Minor flaws in the shape do not affect the performance of the antenna. But the fact that the conductor area increases is a plus. Well, the conductivity of copper is higher than that of aluminum and, especially, steel. The higher the conductivity, the better the antenna reception.

The connection prepared for soldering is first riveted and cleaned. For soldering you need to use a powerful soldering iron (from 150 W). Simple amateur radio at 30 watts. don't solder. You can use acid for soldering.

Check the geometry again and solder the connection


If you are not particularly bothered by the aesthetic appearance, you can simply attach the antenna to a glazing bead or any other available holder. This antenna was located in the attic, so the simplest mounting method was used - electrical tape. If the antenna will be placed outdoors, take care of more aesthetic and reliable mounting.

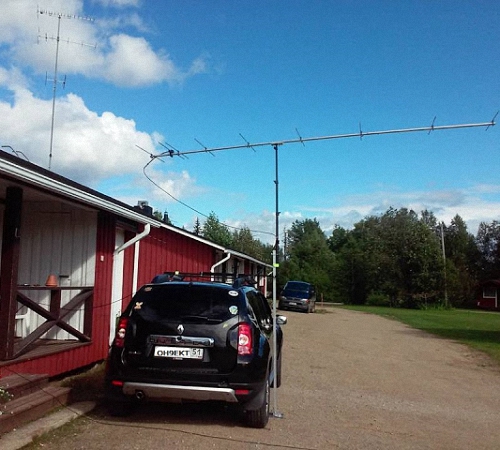
This is a version of the T2 antenna made of aluminum wire with a diameter of 3 mm. Secure with one screw to the window. The distance to the TV tower is about 25 km. True, it’s the 6th floor, I didn’t check it below, but under these conditions the signal level is 100% and the quality is 100%. The cable is old, 12 meters to the TV. Receives all 32 channels. At first I was worried that it wasn’t copper, but as it turned out, it was in vain. Everything worked out perfectly on ordinary aluminum wire (which happened to be available). That is, if you have a zone confident reception, then you don’t have to bother and feel free to use aluminum (I don’t know, maybe steel will do).

This antenna does not use any amplifiers. It is set up very simply - turn it according to the maximum signal level and quality on the channels of your tuner. Check other channels and fix the antenna. At bad reception You can experiment not only by rotating, but also by changing location and height. Very often, the signal can be many times stronger if the antenna is shifted only 0.5-1 m to the side or in height. Good luck - the antenna has been tested - 100% operational and better than at least half, or even more, of purchased antennas, where they save on everything and sell garbage for good money.
Decimeter waves with a length fall within the range of 10 cm - 1 m. This feature serves as the basis for naming devices. At frequency, electromagnetic oscillations propagate predominantly in a straight line, avoiding going around the earth's surface, and are partially reflected by the troposphere. Therefore, long-distance UHF communication is difficult; the range does not exceed 100 km. Can a decimeter antenna be assembled with your own hands? Maybe it is being actively collected by amateur engineers.
Beer cans will receive television broadcast
UHF frequencies are located in the range 300 MHz - 3 GHz. This includes many commercial, public channels.
The program “Cheap and Cheap” taught Muscovites how to catch Channel One. According to available data, it is transmitted by the HF band, the sound is adjacent to FM radio stations, the homemade design demonstrated by the presenter is used by the UHF.
You will need two beer cans with a capacity of 0.5 liters (larger volume, lower received frequencies). You can save money by buying mineral water and juice in cans. To attach the mentioned containers you will need a frame.
Channel One recommends using a wooden board 10 cm in diameter; enthusiasts have come up with a constructive solution. It is proposed to hang the jars on an ordinary wooden hanger. An indoor decimeter antenna made in a similar way can easily be placed on a window handle or a wall nail.
In addition to two beer cans you will need:
- A pair of sharp screws (screws) with a diameter of 2-3 mm, a screwdriver.
- A piece of coaxial cable from the antenna location to the TV.
- One standard jack connector.
- A roll of adhesive tape, insulating tape.
- A soldering iron, rosin, solder, and a pair of terminals for the screws indicated in step 1 will come in handy.
You should start by sealing the connector and terminals into the wire. The first will be located on the TV side, the second - on the opposite end (core, screen). Both terminals must be separated by 12 cm.
The design of the antenna avoids complications: the cans are secured with a horizontal crossbar with their necks facing each other at a distance of 75 mm from each other. Assembly begins by attaching the terminals to the necks with screws. There is no need to tighten it all the way, the wires should be pressed tightly against the cans.
The containers are secured parallel to each other with tape on a hanger. The homemade decimeter antenna is ready. Hanging the hanger in place best regards- first you need to find one - cover it with a curtain, clothes. According to eyewitnesses, the design works, equipped with cans of a more modest displacement. You can actively experiment by changing the distance between the containers and visually assessing the image quality.
Standard TV wire ring
The design will not require anything other than a coaxial cable with a resistance of 75 Ohms (RK 75). An even ring is bent from a piece 530 mm long and reinforced with plywood and plexiglass. High input impedance will not allow you to create direct connection to the TV, a special matching device is used - a U-elbow.

A piece of cable 175 mm long is bent into a U shape. The ends are aligned with the edge of the wire going to the TV on both sides. The structure is fastened with tape or any other suitable material. Three screens are soldered to each other. The conductors of the U-elbow are connected to the screen of the curved ring on both sides, the central wire of the television cable - on one side.
The result is a passive UHF antenna. For outdoor use, coat the cable with a compound, resin, and enclose the product in a durable, impermeable plastic casing.
Wi-Fi, TV rings
Two aluminum circuits
“Cheburashki” firmly captured oblivion, but it turned out not completely. Many people have seen a flat aluminum plate equipped with huge rings on the sides, how to make decimeter antenna with your own hands? You will need two flat aluminum rings with an outer diameter of 100 mm and an inner diameter of 38 mm. Each is cut through with a 5 mm wide slot.
It turns out that two circuits will avoid the use of a transformer. The frame will be a fiberglass lath, a piece of durable board. Both rings are attached with a distance between centers of 103 mm towards the slots. The upper and lower edges of the slits are connected in pairs. The screen and the core of the coaxial cable going to the TV are connected to the resulting pairs.
The antenna decorates the balcony, room, roof. The length of the coaxial cable to the TV is shorter, the reception is more reliable.
The circuit is formed by circular vibrators. With horizontal polarization of the wave, there is no phase difference between the symmetrical rings located one above the other, the cable removes the received radiation from the isthmus.
The resonant frequency of the product is 802 MHz, allowing the use Wi-Fi networks 900 MHz, viewing television channels 38 - 64. The UHF antenna fits perfectly with the RK-75 coaxial cable, demonstrating a gain of 15 dB.
The structure is positioned vertically, the slots should be one above the other, respectively, the polarization of the received signal is horizontal.
Two getinax circuits
Radio amateurs may find another method of manufacturing the described design attractive: the required shapes are cut out on the getinax board, textolite with one-sided foil. Between the rings, according to the described scheme, it is necessary to leave a contact bridge with an external width of 20 mm and a 5 mm slot inside. Two mirrored holes are drilled for the coaxial cable.

The method is convenient: four fastening grooves cut into the getinax by the edge of the sheet will allow you to firmly secure the product. Use:
- wall;
- frame;
- roof.
The design can be easily transposed to high, low frequencies by changing the geometric dimensions of the circles. It is easier to select the optimal input impedance empirically (by trying practical dimensions).
Sealing is carried out with plexiglass plates equal in size to getinaks. The perimeter of the gap is sealed with liquid nails.
An interesting feature of the antenna type is the possibility of creating a phased array. Two identical structures are mounted vertically above each other, separated by a verified distance (the described example is 406 mm between the centers of the eights). To create a single grid, a summing device is used, formed by two branches 325 mm long, fastened in the middle. The coaxial cable is soldered to the connection point.
One circuit with transformer
Now that it is clear how to make a decimeter antenna, consider the transformer mentioned above, which carries out galvanic isolation antenna and TV circuits. The basis is the design described above. There is only one circuit, both ends are closed to the primary winding of a miniature transformer, and the coaxial cable of the TV is soldered to the secondary winding.
The core, formed by several turns of wire, plays the role of a matching device. To manufacture a hinged element, it is necessary to take a ring core with an outer diameter of less than 10 mm and a thickness of 2-3 mm. With a wire with a diameter of 0.2 - 0.25 mm, two windings are wound side by side, each with several turns.
The design is not inferior in efficiency to the dual-circuit models described above. Polarization - horizontal (the slot should be positioned vertically).

Digital television
UHF antennas for digital television are made relatively simply. You will need a wooden square with a diagonal of 200 mm, or a similar object made of plexiglass, and a large piece of ordinary RK-75 cable.
The option under consideration is part of a zigzag antenna; it perfectly serves the reception range of digital channels, regardless of the presence of direct visibility to the tower. To improve performance, you should purchase an amplifier.
The tip of the wire is stripped to 20 mm. Then a square with a diagonal of 175 mm is bent from the cable. The end is bent outward by 45 degrees, the beginning is bent, stripping an area of 20 mm, and tightly wound to the end. Reliable contact between the screens is ensured. The end of the vein hangs in the air.
At the corner opposite to the beginning they cut off protective layer, the screen on an area of 20 mm will be the top of the antenna. The cable square is symmetrically fixed around the perimeter of the wooden sheet. In the area where the screens meet - where the beginning and end are wound to each other - thick copper wire staples are used for fastening to improve electrical contact.
This is how you make a UHF antenna with your own hands. For outdoor use, it must be protected by a plastic case against the influence of the external environment, or securely hidden by the opening of the attic window. The signal rarely passes through metal, tiles, slate. If the roof is made of PVC, plastic, fabric, or similar materials, it is permissible to place the product in the attic.
To block the multipath effect, a reflector shaped like a piece of wood is used. It is secured with ebonite struts coaxially with the antenna.
The designs considered are designed to receive waves with linear polarization. The use of helical antennas may be necessary.