From Android to TV. Duplicate smartphone screen on TV
Transferring images to a TV is considered a useful skill for comfortable viewing of your favorite movies, videos, and family photos.
To output video from your phone to your TV, you will need to connect these devices together. In general, this process will not take much time. Moreover, it is quite simple to implement, so any user should not have any problems.
Connection features
The specifics of connecting a mobile device to a TV are manifested in the model of the equipment used. For example, some smartphones are equipped with an HDMI interface, while others are not. Therefore, the choice of connection method will depend on what kind of cell phone you use.
A high-quality image displayed from a smartphone on a television device allows all friends and family to enjoy watching the captured moments.
How to display an image from a phone to a TV? Initially, you should consider character traits technology. In general, there are two connection options:
- Wired.
- Wireless.
Regardless of the chosen option, each is simple and requires minimal effort from the user. The main thing is to do the whole process for the first time, then everything will become much simpler.

The two methods are suitable regardless of the TV manufacturer or used operating system. OS settings do not affect the display of images on the big screen. Moreover, you only need an HDMI or USB cable, no other devices are needed. There are special adapters, quite affordable in price, which are designed to connect to external monitor ports. Selected models cell phones come with these adapters.
By connecting your cell phone correctly, you can send files, watch movies, TV shows, series, etc. on TV from your phone. Since there are several most popular methods of conducting this process, you will need to consider each. After all, all methods have their pros and cons, and the user will be able to choose the most suitable one for himself.

Image output via USB
This method allows you to access the memory and data of your cell phone. You can transfer photos, videos, and files to a television device via a familiar USB cable. Playing any material will take a little time.
To display an image from your phone to a TV with via USB, you will need to initially connect the micro-usb connector to your cell phone. A USB connector to the port of the TV device.
In some cases, the smartphone may request the connection type. Accordingly, after this window appears on the screen, you need to click on the menu "USB connection".

To display the desired content, you will need to switch the TV to "reading media files". This stage is influenced by the model of the TV device. The user will have to work with such functions as: multimedia, Home or Source, it all depends on the TV series.
The source of data reading can be multimedia or USB. After that, a file is selected that needs to be played on the TV screen. To read files mobile phone, you just need to change the signal source. That is, change USB input on terrestrial TV or any other source. The smartphone is charged during this connection.

Outputting images via HDMI
To broadcast high-quality images from a smartphone to the TV screen, you can use the HDMI interface. This type of connection is considered the most common, since on almost all models television device there is an HDMI port.
To display an image from a smartphone using this method, the cell phone must have a micro-HDMI connector. If your phone does not have such an interface, you need to purchase a special adapter. Visually it looks like a classic USB port.
This cord should have an HDMI Type A connector on one side and a micro-HDMI Type D connector on the other.

During the synchronization process, the devices used must be disconnected. When the connection is complete, you can turn on the devices. In the TV menu, find and set the signal source, you need to select HDMI. Sometimes television equipment is equipped with several of these ports, but you need to select the one to which the cord is connected.
After this, on the smartphone the user selects necessary functions, allowing you to duplicate the image on the screen of a TV device. Images from the phone and other multimedia content are displayed without special problems. Not all applications are equipped with the option of duplicating images on 2 monitors. By default, all parameters are set automatically. But, the user may encounter that the image is not displayed. In such a situation, the catalyst for the problem is most often the smartphone settings.
To solve this problem, you will need to go to the cell phone settings and find the item responsible for the HDMI format. In the same menu you can configure the frequency of updates. Also, if your mobile does not have an HDMI connector, you can use additional means in the form of a micro-USB-HDMI adapter. The connection process itself remains unchanged, the user simply inserts one end of the cable into the TV, and the other into the adapter that was previously connected to the phone.

Transferring images to TV via Wi-Fi
To transfer images to your TV using a wireless connection, you need to set special program for Android.
The software is called “Screen Cast”, which can be downloaded from the play market. The application for displaying files on the screen of a television device has extensive functionality, the main task is to duplicate data from the cellular screen to large monitor TV.

The key condition is that the cell phone and TV must be connected to Wi-Fi. Accordingly, to do this you need to connect the devices to the router. If necessary, create new point. Check if the TV has a browser.
When the program for Android has been downloaded, on your cell phone, to duplicate the TV screen, you need to launch the software and click on "Start". A window opens in front of the user, select "Start Now". To activate in automatic mode, opposite the line "Don't Show Again" put "agree".

Open your browser and go to the page using the link provided by the software. It is important to specify the combination of numbers and the port address. For convenience, use the keyboard for screens. When the transition takes place, all data from the gadget will be presented on the screen of the television device.
The application is easy to use, so there should not be any problems. If desired, the user can enter own changes to parameters. It should be remembered that the position and quality of the screen cannot be changed.

There is also a security setting option. If necessary, the function of setting a password for broadcasting is available. To do this, click on the image, better known as a “sandwich” (3 horizontal lines), then click on "Settings" and tap on this menu.
Then you need to check the box next to "Required password for viewing screen cast". In auto mode, you will be prompted for a password each time you connect.

By clicking, the user activates the automatic setting of a security password. If necessary, each user can change it according to their own preferences, but it is recommended to leave the preset parameters. Since passwords are generated in a chaotic way. After this, to gain access to view the photo on your Android device, you will need to enter a combination of numbers and letters. When the user enters the password correctly, the cell phone desktop will immediately appear on the television device.

Connecting a phone through special programs
Miracast is a fairly well-known Wi-Fi CERTIFIED technology. Considered the new standard wireless transmission multimedia signal. WI-FI Direct technology is used as the basis.
The task of the developers was to simplify the technology already known to everyone. Thanks to improvements and new developments, owners of mobile phones whose models support this technology are able to play videos or games and then transfer the image to a large TV screen. To carry out this operation you will need to tap on the cell phone to set up device synchronization.
In order not to waste time, the user must initially make sure that the device supports the function of wirelessly transmitting images to the display. After all, not everything Android devices can provide their owners with this opportunity. Mobile phone models belonging to the middle and lower price segment, this option is not supported.
- To do this, go to "Settings", click on the screen, and then find the item "Broadcast" or "Wireless display". The name of this section depends on the cell phone model. Then you need to activate this item using the menu (3 dots).
- The next section where you can find information about availability WI-FI options transferring pictures is the point quick settings located in the OS notifications section.
If there are no parameters in these two places regarding wireless display, broadcast, Miracast or WiDi, you can search by settings. If the work done did not provide the desired result, most likely the equipment is not equipped with a Wi-Fi option for transferring content to a TV device.

Let's look at how to enable Miracast on different models television devices depending on the manufacturer. Let us remind you that the wireless display option in most cases is not activated by default on the TV device. So first you need to turn it on.
- Samsung- on the remote control you have to press the signal source selection button, and then scroll through and select Screen Mirroring.
In addition, in the network settings of a separate model range TVs from this manufacturer have additional options in screen mirroring settings.
- LG- go to settings, select the network, then activate Miracast.
- Sony, Bravia- here the owner is required to click on selecting a signal source on remote control and scroll to "Duplication". In the settings of the television device, enable the wireless network without selecting the signal source. The device must be active when performing this operation.
- Phillips- requires the user to go to settings, select network parameters, and then activate Wi-Fi.
In theory, when new models are released, adjustments to these points can be made by the equipment manufacturers themselves. Despite this, most modern models TV market with built-in Wi-Fi module support receiving images via a wireless network.
Let's start looking at the features of setting up image transfer from Android to TV using Miracast technology.
First you need to activate Wi-Fi. You can start a broadcast using one of two methods:
- Go to settings, then select a screen. A list of devices available for connection opens. You need to click on the gadget and wait for the connection to complete. Some TV models may require permission to connect. You have to tick the box accordingly.
- Open the list quick action, go to the Android OS notifications subsection, click on "Broadcast" When your TV has found the required signal source, select it.
Setting up and transferring the image to the big screen is completed. After a few seconds, it will open on one of the devices. "Camera", and all images are duplicated on the TV.
Helpful Tips:
- It is not always possible to synchronize equipment right away. Therefore, if an error occurs, try to do everything again.
- The content is transferred to low speed. Therefore, you may have to adjust the sound of your Smart TV, but most likely its quality will not be improved.
- If the user is working with a vertical display orientation, then the picture will only be displayed on half the screen, you can enable full screen mode, activating auto-rotate and rotating the gadget.
The program for viewing images from Apple on a TV is called AirPlay. This software, created by a popular brand for the technology of the same name. You can download the software from your smartphone store.
Thanks to the application, Apple cellular phones can be synchronized with different devices connected to your home network. However, there are limitations: the image from a smartphone on a TV screen can only be displayed at the same scale.
Moreover, pictures or videos may be transmitted with a slight delay if you do not use AirPlay to AppleTV. By using the application, the user can get rid of these problems.

To use this connection option, you need Wi-Fi. After downloading the application and installing it on your cell phone, you need to register. The user opens a personal account, in case of its absence, is registered. To connect a television device, you will need to download the application to the TV and do the same work.
If you are the owner of a late generation model above the 4th, for example, an Iphone X, then the AirPlay Mirroring option will be available to you. This function allows you to scale the image.
Conclusion
Connecting your cell phone to view photos, programs, videos and other content on the big screen is a simple process. You can actually do this by following one of the above methods. The specifics of the connection and settings are affected by both the brand and model of the TV, not to mention its functional set. This option is popular among smartphone users as it makes viewing photos and videos more comfortable.
Regarding the financial component, if we're talking about about the use of cables, you will need about 200-500 rubles. Depending on the chosen cord and its manufacturer. At the same time, do not forget that for wireless connection phone to TV, it is important that the TV is equipped with a built-in Wi-Fi module.
I decided to write instructions for setting up DLNA technology between a smartphone (tablet) and a TV in a separate article. In this article :)
What are we going to do? We will view photos and videos stored on your smartphone on your TV screen. Agree, this is very convenient! You took some cool photos, or shot a video, came home and without any cables, by pressing a few buttons, watch these photos on the TV screen. Here they are, technology!
What do we need?
- Well, first of all, a TV that supports DLNA technology. If the TV has the ability to connect to the network via cable or Wi-Fi, then most likely it supports this technology. I will show using the example of a TV LG 32LN575U with Smart TV.
- Phone, smartphone, tablet that also supports DLNA. Almost everything modern devices they support her. For example, I will have HTC One V on Android 4.0.
- Android Application – BubbleUPnP. It's not obligatory. It will be possible to broadcast using standard means.
Now attention!
It is necessary that the TV and smartphone are connected to the same network (to one router).
The TV can be connected to both.
If you do not have a network at home, you can establish a direct connection. But in this case, the TV must have Wi-Fi.
If your TV supports Intel technology WiDi/Miracast then you can display the image over the air from your smartphone or tablet using this instruction /. Provided that the device supports the “Wireless Screen” function.
Broadcast photos and videos from your smartphone to your TV
The TV must be turned on and connected to the network.
There are many programs that help broadcast media content using DLNA technology. But the standard gallery in HTC also copes well with this.
In the list of programs on the smartphone, launch the gallery.
For example, open the first photo, click on the button "More" And “Select player”.
 Our TV should appear in the list. Let's choose it.

At this moment a photo should appear on the TV (no need to include anything). You can scroll through a photo on your phone and it will automatically appear on your TV. Like this (sorry for the photo quality):

The photo above captures the essence of what we do.
To stop the broadcast, just click the close button (in the right top corner screen). You'll figure it out :).
Setting up DLNA using the BubbleUPnP app
This could be the end of the article, but not everyone has smartphones from HTC. But I think that other manufacturers such as Samsung, Sony, LG also have standard function, which allows you to stream media content via DLNA. If I'm not mistaken, then in LG it is Smart app Share.
I'll also show you an application as an example. BubbleUPnP, having installed which, you can do everything that I already wrote about above.
Launch the application and immediately select the tab from below DEVICE S and put a mark near our TV.

Now go to the tab LIBRARY. Open the corresponding folder (video, music, photo), then tear off the folder in which our photos are stored (or other content) and simply open any photo or video.

The picture will immediately appear on the TV. This program has a lot different settings and functions, I showed only the main ones. The only thing I didn't like was the speed at which the photo appears on the TV. When I opened it through the standard gallery, everything worked somehow faster.
That's all! If you have any problems, write to us and we will try to solve them together. Best wishes!
Also on the site:
We view photos and videos on TV directly from your phone (tablet). Setting up DLNA between TV and smartphone updated: February 7, 2018 by: admin
Today, no one is surprised that through a smartphone you can watch videos, surf the Internet, check email and much more. Owners of such a gadget want to expand its capabilities and are trying to figure out how to connect a smartphone to a TV. This allows you to watch your favorite movies, photos and listen to music not on a relatively small phone monitor, but on a large screen.
Connect via HDMI
It is no coincidence that the method of connecting a smartphone to a TV via HDMI was put in first place: currently it is the most popular way. This type of connector can be found on almost all modern gadgets(year of manufacture above 2010). Connecting via HDMI has many advantages, including high quality Pictures, high speed transmission without delays of both video and audio formats.
Obviously, to make the connection, you need an HDMI connector on your phone. This condition must be met for both the smartphone and the TV. The presence of such a connector will be described in the instructions. However, you can find it yourself - just inspect your smartphone.
Picture 1.HDMIon a smartphone
Another feature of this connection method is its versatility. As a rule, every TV has a connector for an HDMI cable, so it doesn’t matter whether it’s an old LG or a completely new Samsung– you can still connect it to the TV using it.
We connect using the following algorithm:
- First of all, turn off the smartphone and the TV itself;
- We connect the two devices with a cable and turn them on;
- After the TV and phone have been turned on, the setup is carried out automatically and the “mirroring” function starts or English version– mirroring. The picture on the gadget's displays will be transferred to the TV screen.
There are often cases when offline configuration does not occur. Don’t be scared, as this can be fixed quite easily manually:
- Let's go to separate menu settings for each device;
- In the TV menu, you must select the appropriate signal type - HDMI. Some models have several connectors for such a cable, if so, select the number of the one involved;
- On the smartphone itself, we activate the ability to transmit a signal via HDMI.
As you can see, connecting your smartphone to your TV via HDMI is quite simple. the main task– connect the connector correctly and select the video input.
If there is no micro connector, there are special converters micro USB– HDMI. The device converts the signal and sends it to the TV so that it is able to recognize it. Using similar technology, you should not count on getting a high-quality picture.
There is another way to connect a smartphone to a TV - via USB. The option works with any gadget, be it Lenovo, Samsung, HTC, Nokia, etc. However, it should be taken into account that in this case the image from the smartphone to the TV may not be duplicated. The condition depends on the phone model. In this case, only a black screen will be visible on the phone. But there is also an advantage - the gadget will be used as a USB drive, which acts as the main signal source.

Figure 2. Connection viaUSB
You will have to manage files through the TV interface using the remote control. Modern TVs, both Chinese and branded, allow you to open not only video or audio data, but also most text and presentation editors. This allows you to turn your TV into a whiteboard that displays presentations or just slideshows.
Setting up a connection is quite simple:
- The mini or micro USB cable (depending on the smartphone) must be connected on one side to the phone, and on the other to the TV connector located on the back panel.

Figure 3. ConnectorUSB
- It is important to remember to turn off both devices, otherwise the offline setup will not start.
Connect wirelessly
Demon wired connection A smartphone to a TV is by far the most promising type of connection, so absolutely every TV manufacturer is trying to create a special application that allows you to connect a TV and a smartphone via Wi-Fi.
For example, LG offers users of its phone and TV a special software– Smart Share. It connects two devices through a wireless connection. For this reason, almost all modern TVs are equipped with a Wi-Fi module, which allows you to connect your gadget to the TV without any problems.
To connect a smartphone to a TV Apple company offers its customers to purchase a special set-top box called Apple TV. This method is distinguished by its simplicity (setting takes place in just a couple of clicks) and high image transmission parameters. The connection itself is also carried out via Wi-Fi.

Figure 4.AppleTV
The entire wireless connection algorithm consists of several steps:
- Setting it up home network Wi-Fi;
- We connect devices to it;
- We activate the wireless connection function on the gadget and TV.
Wi-Fi Direct
A distinctive feature is that you can set up a connection without a router and a configured Wi-Fi network. To put it simply, this is direct connection gadget for TV. But there is a nuance here: both devices must support the Wi-Fi Direct function (you can read about this in the instructions). The following steps will help you connect your gadget to your TV directly without using “intermediaries”:
- Let's launchWi– Fi Directon the phone. This is done like this: go to the “Settings” section and to the subsection wireless networks. We look for Direct itself there and activate the technology;
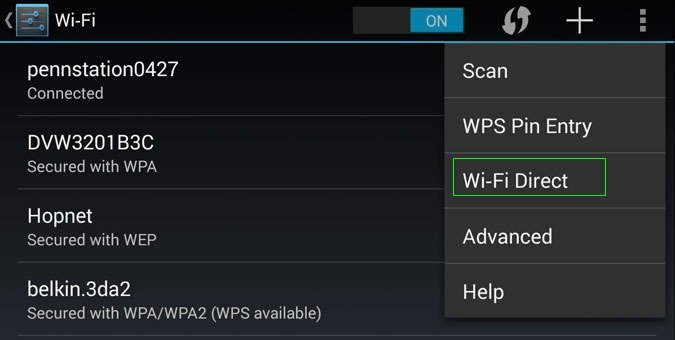
Figure 5.Wi-FiDirect on Android
- Setting up the TV. We go to the “Settings” menu section and to the network subsection (on some models, on PU, there is special button, which allows you to go to the “Network”). We look for the Wi-Fi Direct function and enable it by checking the box or clicking “OK”. You should now be able to select a device to connect to. We look for our smartphone and send a connection request and receive it on the phone.

Figure 6.Wi-FiDirect on TV
The connection is complete. It is worth noting that this technology is not only simple, but also good quality transfers. But, despite this, it is not particularly popular among users.
Connection via tulip
It is an analog composite type connection. Previously it was the most popular connection option. To carry it out you will need a cable consisting of 3 colored wires (white, yellow and red). They usually come with the TV. The method is not always possible due to the technical component (there is nowhere to connect 3 wires in a smartphone). The quality of image and sound transmission leaves much to be desired, so it has been replaced by a more convenient connection via HDMI.
Controlling the TV from a smartphone (video)
Modern phones can be used as a control panel for a TV: it is possible to select a channel, change the volume, but the main goal is to make it easier to “surf” the Internet due to the presence of a keyboard and big screen.
However, not every TV, even modern ones, supports this function. You can find this out on the manufacturer’s website or in the instructions (although in some cases this is not noted).
We configure the gadget as a control panel:
- Setting up home Wi-Fi network. If the router does not support such a function, then it can be purchased additionally;
- We connect the TV to the wireless network (wait for the installation to complete, then enter your username and password);
- Download the application to your phone - Remote App. The choice of program directly depends on the brand of TV;
- We pair the TV and gadget in the application, following the instructions.
There are some limitations, for example, almost all TVs do not have the Wake-On-LAN function, which allows you to turn on the TV from your phone. All the described methods are quite easy to implement and you just choose the one that will be convenient.
In contact with
IN last years Tablet computers are gaining increasing popularity among users due to their wide functionality. They easily replace laptops for work on the road or at school, and allow you to view photos and videos as conveniently as possible. At the same time, more and more modern TV models are being produced with the function of displaying images on screens from a tablet.
This is convenient when working with video editing or watching movies, in addition, this option is ideal for working with presentations. Well, it’s completely clear that displaying images on a TV will provide more comfortable work in an Internet browser, in the absence of a laptop or desktop computer.
In this material we will try to talk in as much detail as possible about how to connect an Android tablet (phone) to a TV and at the same time avoid software problems technology.
So, to successfully connect an Android tablet to a TV, you first need a TV that supports this function(check this information in the instructions or on the official website of the manufacturer). In addition, you will need special tools for the tablet itself.
HDMI connection.
Gives best picture, this is due to the fact that HDMI interface:
- Allows you to display not only the highest quality image, but also no less high quality sound(which is especially important for watching videos and movies) using just one cable, without burdening the television receiver with many cords and connections.
- Used digital format, transmitting the signal, allows you to achieve excellent quality.
- Due to its great popularity among users, it is available in most modern TVs and tablets from various manufacturers.
- Supports “display mirroring” technology, which allows the TV to “copy” what is happening on the tablet screen.
- Allows you to perform easy setup connections with a maximum of two clicks (or even without them).

To connect your tablet to a TV with using HDMI-cable, perform the following steps:
- After connecting the gadgets with a cable, video and audio signals should be transmitted in automatic settings.
- If this does not happen, go to the settings menu on both devices and on the TV, select the HDMI port as the signal source (input, input, source...) (if there are several of them, it is important not to make a mistake with the number), and on the tablet as output ) specify HDMI.
If the tablet is equipped only with “mini-HDMI” (micro-HDMI), then you need to select a cable with a plug of this type at one end or use a conductor.
If your tablet does not have an HDMI connector, you can purchase MHL or SlimPort separately. The disadvantage is that quite often when displaying an image on a monitor using HDMI, there is no way to output sound if the TV does not have built-in acoustics. We consolidate what we read:
RCA connection.
This option doesn't give enough high-quality image, since the transfer occurs using analog signal, however, the advantage here is that absolutely all multimedia devices (including not quite “recent” releases) are equipped with the ability to connect via a composite cable (RCA), which is also called a “tulip”. It should also be taken into account that sound and image transmission will occur via separate cables. How the connection occurs:

- To make such a connection, you will need an HDMI-RCA converter, to which, on one side, we connect HDMI-HDMI (the other end is directed to the tablet).
- On the other side, three “tulip” cables are connected to the converter (yellow, transmitting a video signal and white with red for sound), and the other ends are connected to the TV connectors of the corresponding color.
WiFi connection
Connecting the tablet via WiFi connection Ideal for Smart TV owners who have a built-in Internet distribution adapter. You can connect the tablet either using Wi-Fi technology Direct, or by using special applications for tablets, which are individually matched to your equipment.
For use Wi-Fi functions Direct needs to be supported by both the TV and your tablet model.
- Go to the wireless network settings on your tablet computer, find and launch Wifi Direct.
- After a successful launch, in the television menu we find the “Network” tab, and in it Wifi Direct.
- After activating the connection, wait until the automatic setup of both devices is completed.
Wi-Fi connection using Miracast technology:
How to connect a tablet (smartphone) to a TV via USB
Unfortunately, it is unfortunately impossible to use a USB connection to launch applications or watch movies on a tablet. The fact is that companies producing tablets have not yet figured out how, through this type of connection, to transfer functions that allow the TV to be used as an additional display.
But still, a connection can be made via a USB cable, only in this case will the gadget function as a data storage device (in other words, a flash drive). Then, using the television interface, you can manage media files stored in the memory of the Android device (for example, create a home movie library storage). In addition, in this way you can transform the TV into a kind of presentation board. To make a connection:
- We connect the devices with a USB cable through the connectors provided for this purpose.
- In the “Settings” section of the TV, select the signal source.
However, there is still positive news in this direction. The fact is that today there is already an HDMI interface, which is built into the USB module. We are talking about a micro USB connection type with support for the MHL protocol. Unfortunately, tablets with this function began to be produced quite recently, and if you are the happy owner of such a gadget, then you, as they say, have cards in your hands!
In this case, the connection will be carried out in the same way as described above, only you will need hdmi cable for connecting to a television receiver and an MHL adapter.

I would like to believe that our material was able to fully satisfy your curiosity, and now you, knowing how to connect Android to a TV, will cope with the task without any problems.