Acorp WR300N router: connection and configuration. Acorp modems are the optimal solution for tasks of any complexity. What does an acorp modem consist of?
Acorp 56EMSF modem review
Six months ago, a neighbor brought the box shown in the photo; I had never dealt with such devices. I had to turn to the Internet. And here's what turned out:
“This modem can be briefly described as a modem for a simple Russian user. First of all, the important thing is that it is a full-fledged hardware modem. This means that its operation does not use any processor power or RAM. The modem is completely self-reliant. Of course, if you have a Pentium 4 and 512 MB of RAM, this is not all that important. But for owners of old “fours”, such unpretentiousness can play a decisive role when choosing a device.”
During the search process, we managed to find out the following, look at the screenshot from the Yandex search engine.
In general, the thing is morally outdated, but as it turned out, inside this box there are parts valuable for radio amateurs. The appearance of the printed circuit board is shown in photo 1.

On the board, in addition to SMD resistors, capacitors, transistors, diodes, there are also elements of particular interest.
Digit 1: DC-DC converter controller - AIC1563. Judging by the documentation, this is one of the universal controllers capable of operating in boost, buck, converter and converter circuits implemented using SEPIC technology. Without an additional transistor it is capable of delivering current up to 1A to the load. Nearby, under the number 3, is the working choke for this controller and a diode.
Number 2: Two diode bridges - AM154, also a necessary thing. Operating voltage 400V, current – 1.5A. Operating temperature – 55… +125С.
Number 4: Voltage stabilizer series 1117, Operating current 1A, input-output voltage drop – 1V.
Number 5: Sound emitter – KPM1201A8. Maximum current - 30mA, resonant frequency - 2800Hz.
Number 6: LF amplifier chip - LM386NC in SMD housing. With a microcircuit supply voltage of six volts, a load resistance of 8 Ohms, an output power of 125 mW at an input signal frequency of 1000 Hz, it has a harmonic coefficient of 0.2%.
Number 7: Two-position switch, also a necessary thing.
Number 8: Sharp transistor optocoupler - LTV817. Very often found in switching power supplies in output voltage stabilization circuits and in many other modern
schemes.
Number 9: Electromagnetic relay.

Number 10: Varistors - TVR 07 271. I don’t provide documentation for them, the file size is too large. If you need it, you can find it yourself on the Internet.
In general, this outdated box turned out to be not so useless.
A bit of poetry. As they say, a good owner’s dog’s x... will come in handy on the farm. As my beloved grandfather said: “I was walking along the road one day, and I saw a dog’s dick lying around. I picked it up, brought it home, threw it on the rubble, and when it was dry, I hammered it into the wall in the hallway and now I’m hanging clamps on it.”
Good luck. K.V.Yu.
Download article:
Article on setting up the Acorp router models W422G and WAP-G.
The instructions are given using the Acorp router from Rostelecom as an example, but it is also suitable for other models and firmware.
Router connection diagram
There are several ports on the back of the W422G or WAP-G router.
If in the future computers will be connected to it using a LAN cable, there are 4 connectors here.
The fifth port, located separately from the other four, is intended for connecting an Internet cable (the one installed by Rostelecom or Megaline employees from the entrance). If your computer does not have a Wi-Fi antenna, insert the cord that was in the box on one side into the device, and on the other into a similar network card input on the rear panel of the system unit.
Setting up the router's connection to the Internet
After this, turn on the Acorp W422G or WAP-G router, and on your computer open any browser - a program for browsing the Internet.
In the address bar, type 192.168.1.254 or 192.168.1.1 and press Enter.
Let us emphasize, not in the search bar, but in the address bar.
Usually, by default, these are the words “Admin” and “Admin”.

The router is fully configured here. To do this, click on the “Setup” tab and then click “New Connection”. Next, fill out all the fields that appear correctly:
- Name - connection name (any);
- Type - connection type (PPPoE);
- Username - user name (provided by your Internet service provider);
- Password - password (provided by your Internet service provider);
If everything is done correctly, save the changes - click on “Apply” and wait for the modem to connect to the Internet, then check its operation using any browser. For a computer, the router acts as a modem.
Setting up a WiFi access point on the router
Wi-Fi is configured on the “Wireless” tab. On the left, select Serup. Check "Enable AP" - it should be enabled. Next, go to “Security” and select the WPA2 encryption method, and in the PSK String field enter a combination of at least 8 characters (this code will be needed to connect to the modem’s wireless WiFi network).
Acorp modems have always been popular due to their good quality at reasonable prices. ADSL modems are no exception either. Today I will tell you how to configure Acorp LAN 110 and 410 to connect to Rostelecom using the PPPoE protocol. Before setting up the modem, I would strongly recommend setting up a static IP address 192.168.1.2 on the network card and disconnecting the telephone cable from the modem while the work is being performed.
Open a web browser - Internet Explorer or Google Chrome is recommended. Enter the address in the address field and press the Enter key.
An authorization window should appear where you must enter your login and password. For ADSL modems Akorp means “Admin” with a capital letter. Click “OK”. The Sprinter LAN110 or LAN410 modem settings window will open:
DIn the menu on the left you need to select the menu item WAN >>> Channel Config:
You can edit existing connections by checking the box in the table Current ATM VC Table. But it is better to delete the old ones and create a new one.
In a new connection in the list Channel Mode select a protocol PPPoE.
“Admin status” should be “Enable”.
Into the fields VPI And VCI you need to enter the parameters of the Internet channel. You can find them out in the technical support of your provider or search on the Internet. For example, here is VPI/VCI for Rostelecom.
The type of encapsulation most commonly used is − LLC.
All we have to do is enter the username and password in the fields User Name And Password— they were given to you when you connected to Rostelecom.
After this, press the button Add in order for the connection to be created. If the existing one was changed, then you need to press the button Modify.
Select section from the menu on the left Admin >>> Commit/Reboot:
Click the Commit/Reboot button to save the settings.
Your Acorp Sprinter LAN 110 or LAN 410 ADSL modem is configured to work in the provider’s network. You can connect a telephone line and check network access. The Internet light should also light up.
The Russian Internet provider market today is experiencing not only an active transition to new wireless access technologies based on Wi-Fi, but also the replacement of conventional analog modems with DSL equipment.
In the domestic market, most companies providing Internet access offer the end user a connection service via an ADSL (Asymmetric Digital Subscriber Line) modem. This technology allows you to simultaneously use both an ADSL modem and a regular telephone, which are connected to the same telephone line. In this case, the transmission of digital data and voice occurs in parallel, but in different frequency ranges, and therefore independently. Asymmetric DSL (ADSL) technology provides different speeds for upstream and downstream traffic, that is, the speed of data transfer to the user is an order of magnitude higher than the transfer speed from the user. Speed indicators can theoretically reach 8 Mbit/s to the client and 1 Mbit/s from the client - it all depends on the equipment on the provider’s side, the quality of the copper wiring, and the user’s distance from the telephone exchange. Among the advantages, we should mention the ease and simplicity of installation, since the ADSL modem is connected to a regular telephone wire. Without going into technical details, we can say that the basic operating principle of an ADSL modem is to divide the frequency range from 24 kHz to 1 Hz into 4000 Hz bands, each of which is assigned a virtual modem. Thus, each of these virtual modems operates with its own frequency range.
The ADSL modem is connected to the frequency divider, and not directly to the telephone line. It is a filter that separates the low-frequency telephone signal from the high-frequency ADSL signal. The frequency divider in appearance resembles an adapter-splitter having three sockets. One socket for telephone line input and two output sockets - for telephone and ADSL modem. Thus, both digital and analog signals can be transmitted over one telephone line. Frequency dividers are installed not only in the subscriber’s apartment, but also directly at the telephone exchange, where the analog telephone signal is sent to the telephone network, and the digital signal is sent to the DSLAM access multiplexer (Digital Subscriber Line Access Multiplexer), from where it enters the Internet through the provider’s network. A DSLAM multiplexer is equipment installed in a telephone company office that connects all subscribers to one high-speed line. ADSL is one of the cost-effective technologies that is successfully taking root in Russia. It costs the end user less than a dedicated channel with the same bandwidth.
The Acorp company, well known to the Russian consumer market, also produces modems that use ADSL technology. This article discusses two of them: Acorp Sprinter@ADSL USB and Acorp Sprinter@ADSL LAN420.
The Acorp Sprinter@ADSL USB model, as the name suggests, connects to a computer via a USB interface. Externally, the device resembles a regular analog modem with dimensions of 115x142x28.5 mm. The ADSL modem case is black. The front panel is made of transparent plastic. There are green indicator lights on it that show the current state of the modem. There are only three indicators: USB, RX and ADSL. The first and last show respectively: whether the connection is connected and whether the cable is installed using the same protocol/interface. The indicator with the simple name RX (Receive Data) blinks when data is transferred from the provider to the user. On the back of this small device there are two connectors for connecting a USB cable and a telephone network, both cables are included with the modem. It is also worth noting that the Sprinter@ADSL USB does not require an external power supply, as it relies on USB power. The modem is supplied with a CD with software, a user manual, an RJ-11 cable for connecting to a telephone line socket, a USB cable for connecting to a PC, the ADSL modem itself and a splitter for the telephone line (frequency divider).
According to the specifications on the manufacturer's website, Sprinter@ADSL USB complies with ADSL Full-rate T1.413 issue 2, ITU G.dmt (G992.1) and G.lite (G992.2) standards and supports PPP over ATM (PPPoA) data transfer protocols ), PPP over Ethernet(PPPoE), Bridged/Routed Ethernet over ATM and IP over ATM.
Installing the modem is simple and convenient: after connecting to a PC and installing the necessary software, the modem itself will determine the line settings (Fig. 1) and connect to it (the software includes ready-made settings for leading providers). If you successfully connect to the ADSL line, the program tray icon will notify you by changing color.

Rice. 1. Program for connecting to an ADSL line
In conclusion, we can say that this modem will certainly find its buyer. Simple installation that does not require special knowledge, high connection speed and affordable price - these are its main advantages. Approximate price of Acorp Sprinter@ADSL USB - $25.
Since users often have more than one computer at home, there is a need for ADSL modems with multiple network outputs and high connection speeds. The Acorp Sprinter@ADSL LAN420 modem is equipped with four LAN outputs for connecting computers.

In appearance, the device is practically no different from the previous one, the dimensions are also almost the same. On the front of the modem there are status indicators for both the ADSL channel and for each connected LAN connection - there are four in total. On the rear side there are four RJ-45 connectors and one RJ-11 connector for connecting to a telephone line. The maximum data transfer rate for Ethernet is 100 Mbit/s, Internet access via an ADSL connection can be achieved at speeds of up to 24 Mbit/s. There is also a connector for connecting an external power source. The device comes with one UTP5 cable and a telephone cable. In addition, the delivery includes a power supply, description and splitter. It is worth noting that the description for this modem is very sparse, although there are many additional settings. Acorp Sprinter@ADSL LAN420 complies with G.dmt, G.lite, ADSL, ADSL2, ADSL2+ standards and supports PPPoA, PPPoE, IP and bridge routing (IEEE 802.1D).
The modem is installed via the built-in web server. When you first connect your modem to your computer, you must set up special network settings in order to connect to it. After standard authentication, the router settings (Fig. 2) and ADSL connection (Fig. 3-5) appear on the modem side. The built-in router allows you to fully configure each of the LAN ports (Fig. 6). It is possible to configure SNTP, IP QoS (Quality of service), port forwarding, ip filters, etc. Sprinter@ADSL LAN420 can also work as a DHCP server, which eliminates the need to configure each computer separately. Each of the LAN pots can be configured individually depending on the requirements. The DMZ function has been implemented for access to router management from outside. Sprinter@ADSL LAN420 supports NAT and NAPT address translation, as well as Masquerade header substitution.
Rice. 2. Internal web server Sprinter@ADSL LAN420

Rice. 3. ADSL connection settings

Rice. 4. Special ADSL channel settings

Rice. 5. Detailed settings for ADSL connection via PPPoE protocol

Rice. 6. Router settings
The router collects statistics on both the LAN port and the ADSL channel (Fig. 7). All events are recorded in the system log. There are statistics on DHCP clients in the form of a very simplified billing system. Like most similar devices, it is built on a UNIX system and has the ability to update Firmware via an Ethernet connection. To reset to factory settings, there is a Reset button on the bottom of the Sprinter@ADSL LAN420.

Rice. 7. Statistics collection
Wide range of customization options and support for most ADSL protocols will have a positive impact on your choice when purchasing such a device. Easy installation and quick access to the most important settings via the web interface, high connection speed and compactness - all these are the undeniable advantages of the Sprinter@ADSL LAN420. The estimated price of the modem is $40.
The editors express their gratitude to MERLION for providing the Acorp Sprinter@ADSL USB and Acorp Sprinter@ADSL LAN420 ADSL modems.
Instructions for setting up the Acorp LAN 122 modem (new)
ATTENTION! For users with old logins like ats...
- For Internet VPI / VCI = 8 / 35
- For television VPI / VCI = 0 / 35
- For Internet VPI / VCI = 0 / 35
- For television VPI / VCI = 1 / 36
Well, you finally purchased this modem from your nearest store. Now I will tell you how to configure this modem in router mode. Of course, you have already connected to the Webstream service, and you are absolutely sure of it.
This modem has four lights on the front:
- PWR(lights up as soon as you turn on the modem to the network)
- Lan(constantly lights up when a connection is established between the computer and the modem, if it just blinks, this means that the modem is trying to establish a connection)
- USB(lit only if you connected the modem via USB. I HIGHLY DO NOT RECOMMEND)
- ADSL(there are four operating modes: off - no ADSL connection; constantly on - ADSL connection is established and maintained; blinking slowly - the modem is trying to initialize the connection; on quickly and synchronously with Lan - data is being transferred)
On the left side of the modem there is a switch Power- an extremely useful thing, it will be discussed in detail below. In the meantime, we need to move it to position ON
On the back of the modem there are interface connectors where you must plug in the appropriate cables. Between connector Power And Lan- there is a small hole with an inscription RESET, use only in extreme cases..
So you connected the modem, the lights on your modem came on PWR, Lan And ADSL. And the first thing you need to do is set up the connection between the computer and the modem. You can find out more about this. I only recommend that at first you check the option “Obtain an IP address automatically”
Go to your browser and type 192.168.1.1 A window like this should appear
Type as Username&Password - Admin/Admin (Important! Please respect case of letters)
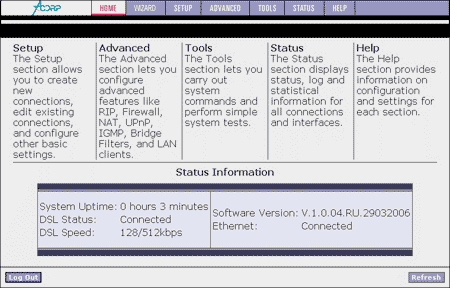
If you did everything correctly, then the modem home page should appear in front of you

Your speed, connection status, firmware version, and how much time has passed since you turned on the computer are highlighted in red.
Then follow the steps indicated in the pictures. Explanations will appear when you hover your mouse over the image.


You can check the connection status in Status/Connection Status. There you will find out your IP address.

The setup is complete.
After you have finished setting up, I highly recommend turning off and then turning on the modem after 30-60 seconds. Thus, you will reboot it and the final application of the settings that you have specified will occur. It is also recommended to do such a reboot if you are unable to enter the modem settings and there is a yellow exclamation mark on the connection icon in the tray (which indicates a connection with limited access). By the way, if your sites suddenly do not load, but all the lights are on, then the first thing to do is check your connection status. Suddenly there is a break. You can restore the connection if you go into the modem settings again: Setup/Webstream/Connect