A program to remove unnecessary drivers and files. Removing old versions of drivers from the Windows storage
We continue to clean the system of accumulated garbage. Today we will touch on the topic of drivers. In the article, I only showed a little at the end how you can remove drivers. But in the article it was a matter of “firewood” and it was necessary to remove it. There I described in more detail.
Therefore, if you want to remove or roll back drivers, read one of the articles above. Or better yet, both.
Now closer to the point. The method described below will help you see and remove all drivers that are on the system and not in use. What kind of firewood is this? Yes, all kinds. These are also those that were installed when you “stuck” some other person’s flash drive once. This includes firewood that was installed along with some program for video or sound processing, as well as antiviruses, etc. software. Subsequently, you have already deleted these programs, but the tails in the form of drivers may remain. Also, this rubbish may remain after an incorrect reinstallation of Windows.
Now we will delete them in a standard way Windows system.
Opening Properties of the system. This can be done in three ways:
1) Win + Break/Pause
2) RMB on the icon My computer and in context menu choose Properties
3) Start -> Control Panel -> System
In Windows 7 and 8 you also need to select on the left Extra options systems

In this window, click the Create button in the “System variables” field

Now in this new small window we enter Variable name How devmgr_show_nonpresent_devices, A Meaning there will be 1

Then click OK everywhere until the System Properties window.
All that remains is to open this same Manager.
Or in this very System Properties window, select the tab Equipment:

Or call and enter Devmgmt.msc or start devmgmt.msc into it

All. Now you can open the lists and you will see that there are translucent or exclamation mark. That's what we need:

Right-click on them and delete:

You can also simplify all these actions (before opening the Manager) by entering command line Set devmgr_show_nonpresent_devices=1
Then you can open the manager, show hidden ones and delete them.
The thing to keep in mind here is that after a reboot this option will disappear.
That's all. And as a conclusion I would like to give a few notes:
1) If it doesn’t work, try doing it as Administrator
2) If not displayed, click on the "Update hardware configuration" button or restart the Manager
3) Watch carefully what you delete. If something doesn’t start later, it’s not my fault.
4) The list does not always show unnecessary ones. Everything that was installed may be present there. Therefore, think again about whether you need to delete it and whether it will definitely no longer be used. Although the firewood will then be reinstalled again, but not for all devices.
Created based on
Free utility Driver Sweeper will help you completely remove unnecessary drivers or their remnants from the Windows operating system. Moreover, in case of system failures due to the removal of any driver, it will help restore it in a matter of seconds.
It often happens that after installing new drivers on the system, it stops working normally. This happens especially often among beginners who are just beginning to learn the basics. computer literacy. The reason for system failure is most often the remaining traces after removing the drivers, or a conflict between the new version and the old one.
It is not at all easy to correct this situation by removing the remnants of drivers, especially if unofficial or very “ancient” versions of specialized software were installed. In addition, when changing a video card, for example, from NVIDIA to ATI, incompatibility problems may also arise; not only can they, but they will arise in 90% of cases. When replacing a graphics video adapter, you must install the appropriate drivers for it. If you do not remove drivers, they will clog Windows, possibly conflict with it and slow down its operation. Decide this problem will help free program for removing drivers Sweeper. Today we will talk about no, and how to remove Windows drivers using it.
Completely remove drivers using Driver Sweeper
The Driver Sweeper program is distributed by the developer completely free of charge. You can download the driver removal program from our website using the link above, or from the official website of the utility, the address of which is indicated in the table. When installing the utility, please note that along with it you are asked to download and install another program; it is paid, so if you do not need it, then do not download it. This is done like this: In the program installation wizard, carefully review each step and, where necessary, uncheck the “I accept” checkbox License agreement with the end user and Privacy Policy and I want to install Mobogenie for free.”

After you download and install the program, you can begin removing drivers from the system. By default Driver Sweeper has English language interface, to make it more convenient to work with it, it needs to be changed to Russian. To do this, click in the “Options” section of the “Navigation” menu on the “Language” item and then select Russian from the drop-down list (see the figure below). Click the “Apply” button to localize the program interface.

To detect all remnants of previously installed Windows drivers, click on the “Analysis and Cleaning” link, tick the driver checkboxes according to their developers. We recommend checking all checkboxes. Click the “Analyze” button.

The utility will find all specials. programs and their traces, and displays them as a list in the next window. Mark the ones you don't need. If the program has found a lot of garbage and you decide to delete everything, then for easier selection, click on the button with an asterisk located at the very bottom of the list and select “All”. To begin the driver removal procedure in Window, click on the “Cleanup” button.
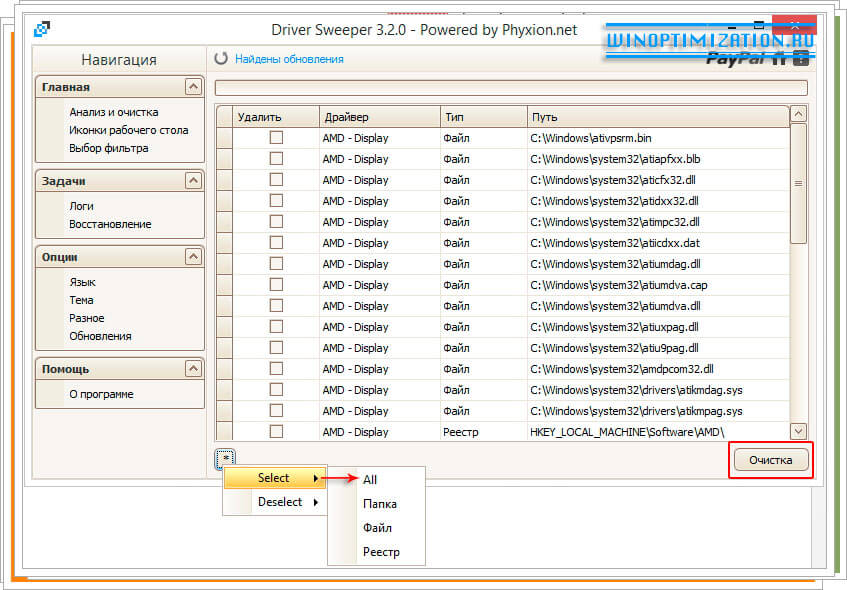
The program will ask you Security Question– “Are you sure you want to continue?” click “Ok” in the dialog box that opens to confirm your intentions. After the utility completes the process of removing drivers from the system, you will need to restart your computer.
If after uninstalling the drivers and rebooting Windows computer will malfunction, then you will be able to recover all deleted files. This is done simply. Run again Driver program Sweeper and in the “Navigation” menu, click on the “Recovery” item in the “Tasks” section. On the list deleted files, which the utility will display, select the ones you need and click “Restore”.
That's all. Good luck!
Similar materials


A computer is a container for various interconnected devices, and for the correct interaction of the equipment, special software is needed, namely drivers. Thanks to this software, full functionality of the device is achieved. Due to outdated, outdated, crookedly installed or unsuitable drivers for the equipment, failures are likely; the system may also not see components, as a result normal operation impossible. Installing new software on top of the old one is not always successful, even if these are updates of the same the same drivers.
TOP programs for removing drivers.
In a good way, you must first completely remove unnecessary firewood, and then install new ones, this will help avoid software conflicts, and also prevent the accumulation of excess ballast. Old drivers leave “tails” behind them, which also need to be cleaned up. You can delete regular means systems, but here you need to be especially careful not to leave any traces of the software being removed. In addition, the standard procedure with built-in tools will not always be effective, because some files, empty folders or registry entries may remain, which will interfere in the future correct operation new software, which may affect the functioning of the entire system. To completely erase the remnants of old software, a program is used to remove drivers, completely eliminating all connections with them.
You can remove unnecessary firewood, just like other software, in several ways. In the standard way, the procedure is carried out through the “Control Panel” in the “Programs and Features” section, where you can find in the list the software that is no longer required and perform the removal. But such actions are often ineffective, since they still leave traces. Another method involves performing manual removal using Device Manager :

IN Windows systems 10, 8 or 7 there is an integrated disk cleanup utility. To use it to remove drivers, you need to perform the following steps:

To complete these steps you need administrator rights. In addition, after removing old drivers using any method, you must restart the computer. In practice, the use of functionality built into the system often does not live up to expectations, leaving traces of the presence of old drivers. To more thoroughly remove software with all its “tails,” you can use both native utilities from device developers and third-party products.
The procedure for removing drivers from the system is required for various purposes. This could be a replacement of equipment, incorrect work installed software or just install the new version completely. Remains of some components of old drivers after standard removal may provoke a conflict with new software. To erase absolutely all memories of the past, it is better to use a driver removal program.
Regardless of what means are used to get rid of the ballast of unnecessary software, it is recommended to create a system restore point before the procedure, which will help minimize the risks associated with possible failure at work. There is no need to remove the driver if there is nothing to replace it with, since restoring the software can be problematic. Among software solutions There are various developers that are really worth paying attention to. There are both free and commercial versions of driver removal programs, but they are often inexpensive.
A program for completely removing video card drivers, which also removes other software that is usually included in the package. Display Driver Uninstaller is one of best utilities, which will help even if it was not possible to complete the procedure with standard tools, and when the most thorough liquidation is required, the software will come in very handy to the user when replacing equipment without reinstalling the system. The program is designed to remove AMD drivers, Intel, NVIDIA + Physics. System registry keys, files, directories and other elements related to this software will disappear from the depths of the system without a trace. Using Display Driver Uninstaller, you can not only uninstall video card drivers, but also view information about the device, model and identification number.

The program interface requires a choice of language, so for convenience you can immediately switch to Russian. Working with Display Driver Uninstaller is simple; in principle, the algorithm of actions when using this category of utilities is similar. After installing the software, it is recommended to boot the computer into safe mode, further in automatic mode The video driver is determined (if the card manufacturer is displayed incorrectly, select manually from the list). Information about the video card can be seen in the log at the bottom of the program window. The selection field must indicate the name of the files to be deleted NVIDIA drivers, AMD or Intel, when we have decided on this, press the delete button (there are only three of them, select the option of rebooting the device or turning it off if the video adapter is being replaced). After the procedure, there will be no trace left of the old drivers and their “tails”. The product is regularly updated and supports Windows 10 OS.
A free utility that not only correctly removes video adapter drivers, as discussed above, but also other devices, including sound cards, USB ports, printers, etc. The Driver Sweeper product allows you to erase all traces of their presence in the system, getting rid of unnecessary trash in the registry, folders and other objects related to the software being eliminated. Unfortunately, the application is no longer supported by the developer, for this reason it is becoming increasingly outdated, but at the same time it does not lose popularity among users.
The utility options allow you to change the interface language to Russian. When you go to the “Analysis and Cleaning” section, a list of all detected driver manufacturers (sound, keyboard, USB, NVIDIA video cards, AMD, Intel, HP printer, Canon or other equipment). Here we check the boxes next to the firewood that is no longer needed and click the “Analysis” button, after which the program will find all related objects. Use the “Cleanup” button to delete the files, confirm the action in the window that appears, then reboot the device.

Driver Sweeper also offers a feature Reserve copy old versions of drivers before the cleaning procedure so that you can return to them if necessary. Another interesting option is saving the location of icons on the desktop, which is very convenient when replacing a video card driver.
This is a program for removing drivers and their remnants, replacing Driver Sweeper. There are two versions of the program - free and paid with extended functionality. By using of this instrument remove Realtek, Marvell, NVIDIA, AMD, Intel, HP, ATi and other devices. Even with a limited range of options in free version You can effectively solve some problems; in any case, the utility finds the most popular device drivers. There is also the ability to save shortcuts on the desktop when removing video card drivers, a backup function, thanks to which you can return everything to its place, checking the relevance of drivers, and customizable filters.
The interface is simple and convenient, there is a language selection option, Russian is also available. To perform the removal procedure from using Driver Fusion, open the application and in the left block of the interface open “Driver Cleaner”, where we select the device type and manufacturer, then click the “Clean” button and restart the computer. The premium version also provides the ability to delete protected files and registry keys. Software Driver Fusion is updated by the developer and supports latest versions Windows.

The software is paid, but its cost is insignificant. Driver Tool Cleaner works with almost all modern drivers computer devices, on any operating system. The product interface provides a choice of languages. There is also very useful option backup, allowing you to go back in case of failure.
After installing the program, it is better to immediately update it; the corresponding option is in the “Tools” menu, after which you need to restart the software. All actions in the application are performed by analogy with those discussed above, select drivers from the list (if you need to check several, check the box next to the “Several filters at the same time” item). If necessary, choose separate files and registry keys after scanning, also check the box next to “Use Advanced cleaning”, then click the “Scan” button to start the analysis, and after it is completed, mark the detected elements, click the “Clean” button, then reboot.

In some cases it may be sufficient to use standard tools systems, but to control equipment it is better to use special software, especially since mastering it does not require any special skills. Cleaning processes in applications are automated, so the risk of deleting something important is minimized, and the backup option will protect against the possibility that the deletion will not work in the best possible way or the user accidentally selects the wrong driver to fix.
Hello everyone, my dear readers!
Glad to see you again on my blog! Yesterday I changed the software to more latest versions and was faced with the fact that sometimes you have to demolish old software. The question immediately arose - how to remove installed drivers? After all, sometimes simple rollback not enough. In this article, I will tell you all the ways you can do this safely and without damaging your PC.
What is it for?
Sometimes removing drivers is not just desirable, but necessary. If, when updating programs, only a few files are added to them, then with system software the situation is completely different. Manufacturers sometimes completely change the driver structure, for example, for audio devices.
Especially with the advent of the new DierctX. And in this case, you need to remove all old versions of drivers. This can be done in several ways and programs, which I will discuss below. By the way, this applies not only to primary hardware and a certain OS. This may even be necessary modern windows 10.
I want to immediately give an important clarification: do not uninstall if you do not have a new driver. Remember, as soon as you uninstall the software, the operating system will simply stop working with it, or even turn it off altogether. Therefore, it is important to have in advance new version, or software with which you can find and install it.
Removing the driver using special software
The good thing about this option is that everything is done quickly. However, quality program, and even a free one, is quite difficult to find. Driver Sweeper is a software that I tried myself. You can download from here. Download and install. After launching on Windows 7, or on any other system, it is advisable that you immediately activate the Russian language. This is done in the Language tab.
On the left side you need to click " analysis and purification" You will have all the devices for which the OS has drivers, even for the printer. Choose the hardware that needs to be rid of old software. Then click on the button Analysis. The system will display all files that are associated with this device. Also, parts of the registry that are related to it will be shown.

Then you should click the button Cleaning" Once the process is complete, close the program and restart your PC. This is how it is done on desktop computer, and on a laptop. Only after this you can install new software.
There is another program that will help you with this. It's called Driver Genius. Download it you can from here. Download, install and run it. A window like this will open.

As shown in the picture, click Driver Cleanup and select the device. Then click the button " Next" The program itself will remove everything you need, and all you have to do is restart your PC.
Removal through the operating system device manager
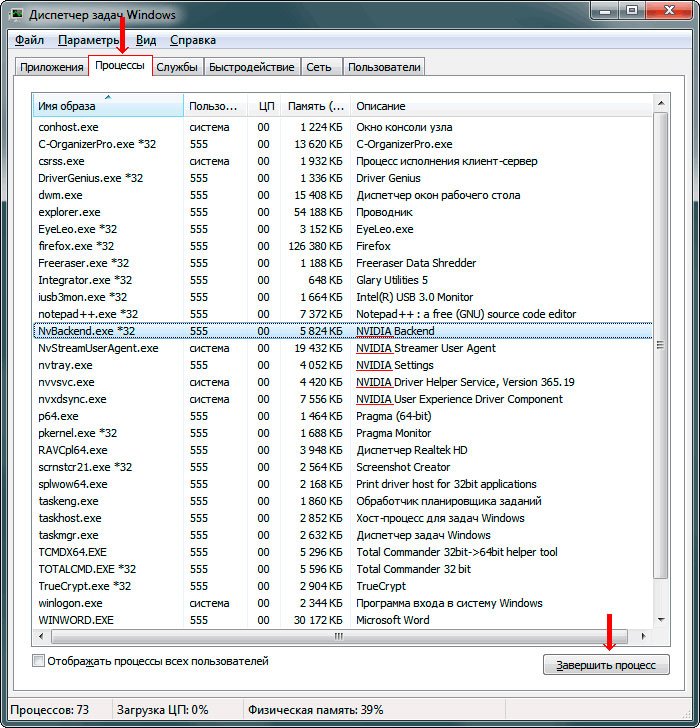
First you need to open the task manager. Click right click mouse on panel quick launch, on some free space, not occupied by shortcuts and in the menu that appears, select the line with this name. You need to end all processes associated with the driver you want to remove. For example, you want to remove the software on your laptop that is responsible for the video card, close all processes related to the image.
Now you need to go to the control panel and open device Manager. You will see a window like the image below.

In it, select the desired device, right-click and select the “ driver" Next, click “ Delete».

The following will appear.

Check the box where indicated and click " Delete».
In principle, all this is enough, however, this method does not completely delete all files associated with the device. For example, there will still be entries in the registry. This is not dangerous, but in the future, without cleaning the registry, it can slow down the system.
Precautionary measures
Installing new drivers while uninstalling old ones can cause problems. For example, you will remove the driver, but the new one will simply not be installed, causing an error digital signature. This especially happens with software for a printer or scanner. In this case, reboot into Safe Mode. To do this, restart your machine and click F8, and select the first line.

Only after loading the operating system in this mode can you begin to take action. In this case, the OS simply disables some functions that block some actions related to confirming the quality of the software. And for operating systems installing new versions of software without driver signature is simply potentially dangerous action. Therefore, we have to use this method.
Conclusion
At the end of the article, I want to warn you that any operation described here must be carried out to the end. Do not interrupt the process associated with software removal. Otherwise, your system will slow down. The worst thing that can happen is errors in the registry. It will be very difficult to correct them manually, so it is important to complete all procedures. By the way, there is an excellent video on this topic.
On my own behalf I can recommend you to use special programs. They will not harm the system, and will definitely delete all files associated with drivers. All software is free, I tested it myself. The programs work on all versions and are visible. By the way, some actions may require permissions from the system itself, so it is better to always run the software only as an administrator, otherwise nothing will work.
With this I say goodbye to you! Hope. my article helped you, share it with your friends on in social networks, because they may need help too! Also, subscribe to my blog updates, because I only collect here useful information! All the best to you, I wish you not to meet with computer problems and see you in new articles!