Program for installing Windows 7 from a flash drive. Installing Windows from a USB flash drive via BIOS
As sad as it sounds, today there is a misconception that the problem of how to install Windows laptop 7 is quite complex and practically unsolvable for the average user. This is partly true, but often such myths have no basis.
Windows 7: first acquaintance
Windows 7 OS is one of the most popular and in demand systems among users computer equipment. Very often it is installed not so much on stationary computer terminals as on laptops.
Among the versions available for installation, you can find several main assemblies: initial, home basic, home extended, professional and maximum. Actually, which version the user chooses to install depends only on him. In any case, the problem of how to install Windows 7 from a disk to a laptop, for almost all models of any manufacturer, has common decision. The same applies to installing operating systems from USB devices, popularly called flash drives.
General concepts about installing Windows 7 on laptops
Regarding the answer to the question of how to install Windows 7 from a disk on a laptop, usually here special problems not visible. This is understandable, because laptops, as a rule, are always equipped with optical CD/DVD-ROM drives. So to install the system it is enough to have original disc or a copy thereof.

In the future, of course, some specific situations may arise, but the same problems, say, how to install Windows 7 on an HP laptop or on a model from another manufacturer, generally appear only at the final stages of the installation process and most often come down to correct installation device drivers. This will be discussed a little later.
Installing Windows 7 on netbooks
It's another matter when a user tries to install an operating system on a netbook. This is where the problems begin in most cases. This is due to the fact that netbooks do not have optical drives, and the system must be installed from a flash drive. However, here too, as practice shows, the problem is how to install Windows 7 on Lenovo laptop or some other model, also has a general solution.

Here the fundamental link in the installation process will be correct entry image of the installation distribution onto a removable USB drive, and this must be done in such a way that the flash drive is bootable, and the launch must be carried out before the start of the existing system, if there is one on board.
Pre-preparation of the disk
Now let's look at some preliminary actions, without which the question of how to install Windows 7 on a laptop cannot be resolved. It's good if the user has the original disk with specific version operating systems. But what to do when he is missing?
IN in this case you need to either make a copy of it or write it down installation disk from a pre-created image. You can create such an image using any program like UltraISO or Daemon Tools. In addition, you can use standard means OS itself and create a boot disk.
The first option looks preferable, since this is how you can create an exact copy of the distribution, which will be practically no different from the original. I think there is no need to explain exactly how this is done, since the process of writing an image to disk is very similar in all programs. Sometimes only the menus and corresponding commands differ. This comes down to using the image recording functions, after which a blank optical media, and then the path to the pre-created image file is specified. The image itself is created using the same programs using the appropriate function and saving the image file on the hard drive or in a logical partition.
Creating a bootable USB flash drive
In some cases, for example, the answer to the question of how to install Windows 7 on Asus laptop(or any other), may directly depend on the device model itself. As is already clear, we're talking about about netbooks, although they are classified as laptops. Here you will initially need to create a bootable USB flash drive.
This is done using the above software packages the only difference is that the image is written not to an optical disk, but to a removable USB drive. The pre-imaging remains unchanged. Below we will show you how to install Windows 7 from a flash drive on an Asus laptop. Moreover, this does not concern any specific model or manufacturer.
Required BIOS settings
In the preparatory process, it is important to understand how to install Windows 7 on a laptop via BIOS. The fact is that when using the default BIOS settings, an already installed OS (for example, Windows XP) will simply ignore the media with the “seven” distribution kit. Here you need to take a responsible approach to setting the priority order of boot devices.
To enter the BIOS, depending on the laptop model and the manufacturer of the BIOS itself, the keys Del, F2, F12, etc. can be used. Now you need to find the Boot section (Boot Sequence) or something similar, where the Boot Device Priority line will be indicated . By default, the first device is the HDD.

If you intend to install the system with optical disk, the first device you need to specify is the CD/DVD drive. If the question is being resolved, say, about how to install Windows 7 from BIOS on a laptop when using a flash drive, naturally, it is this that needs to be specified as the first priority device. However, sometimes problems may arise in that the USB drive may not be displayed in the settings. The main reason why this happens is only that the flash drive must be inserted into the appropriate USB port before turning on the laptop (netbook) and calling up the BIOS settings.
After all the settings have been made, you must save the changes before exiting (Save and Exit Setup), after which a reboot will occur. If everything is done correctly, the installation of Windows 7 should start from the selected media.
Start installation and format partitions
So, the start has been made. Don't rush to rejoice. Of course, the installation process is automated. First, as usual, you need to select the system language, time and date format, and then specify the keyboard layout. Let us immediately note that entering the activation key and license is postponed until the end of the process. The fact is that the "seven" can work in normal mode up to 30 days as a regular shareware program.
Now, in the question of how to install Windows 7 on an HP laptop (or on other models), you should correctly choose which version of Windows 7 OS should be installed. This is due to the fact that license key is designed specifically for a specific assembly and, after installing any other, will not lead to activation of the system simply because of its inconsistency.

Now all that remains is to accept the terms of the installation and use agreement. Next, a window will appear in which there are two types of installation: update and full installation. Almost all experts and users recommend producing full installation from scratch (before starting the process you need to copy necessary for the user files and folders, since formatting will destroy the data). Another advantage of this installation is the fact that new system will not “pick up” from the old one system errors or, worse, viruses.
Problems arising at the initial stage of installation
The installation wizard will prompt you to select the partition into which the new OS will be installed. It will need to be formatted. And as it turns out, it is at this stage that the question of how to install Windows 7 from a flash drive to a laptop (or from an optical disk) may seem insoluble, since the system flatly refuses to perform the formatting operation, and sometimes also indicates that formatting requires hard drive driver.

Let us say right away that you should not be afraid of such messages. In fact, everything is connected only with the fact that some hard disks may contain incorrect boot records MBR or disk layout errors. In some cases, the problem may be due to the presence of different file systems on the disks and their partitions.
You can get out of this problematic situation by running command line directly during the installation process. For this, a combination is used Shift keys+ F10. In the window that appears, you must enter the command bootrec /fixmbr, which allows you to restore the bootloader.

Sometimes, in solving the problem of how to install Windows 7 on a Lenovo (or some other) laptop, re-entry in the BIOS, where in the SATA controller settings you need to change the hard drive access mode from AHCI to IDE.
After this you need to return to the installation. In this case, the problem of how to install Windows 7 on an Asus laptop (as an example) when the error described above occurs should disappear, and you can proceed to directly formatting the disk or partition (you need to click on the “Format” hyperlink below). All you have to do is wait for the process to complete, after which a window will appear indicating the main steps that will be applied during the installation process.
Initial system settings
Once the installation process is complete, the user will be required to enter the laptop name, username (if prompted), and then serial number product.

After the steps described above, the same answer to the question of how to install Windows 7 from a flash drive on an Asus laptop or on Acer netbook(or even from a disk to other device models), comes down to setting the time zone, time and date. Then, if desired, you can configure the network. If there is no clear certainty in choosing the type of network, you can postpone this process until later.
When everything is done, the system will start for the first time, after which the familiar “Desktop” will appear.
Installing device drivers
But that's not all. You need to understand that some versions of the "seven" (especially unofficial) are supplied without required package drivers. For example, the problem is how to install Windows 7 on Acer laptop With complete set drivers problem is solved quite simply if, when purchasing the device itself, there was a special disk with drivers among the additional software. This applies to any laptop model.

As a rule, this issue is resolved quite simply. True, the drivers will have to be installed manually if there is no special “Wizard” on the disk, which, upon startup, will install absolutely all device drivers that are present in the laptop itself as components. As you can see, the problem of how to install Windows 7 on a laptop is not as terrible as some users tend to describe it. Yes, of course, you will have to pay attention to some specific settings and problem solving during the installation of the “seven”, but a user of any level of training can solve this. As they say, there would be desire and a little patience.
Installing additional utilities
As for additional software, the problem of how to install Windows 7 on a laptop with all the capabilities of the system can also be solved quite simply. You will need to additionally install an antivirus, archiver, codecs, office programs etc. True, if all this is on the original disk, there is nothing to think about; you should install applications from such a disk (usually Acronis is present as the shell).
It goes without saying that during the installation of the system itself or after finishing the “Wizard”, you can split the hard drive into logical partitions. Utilities for this today can be found very a large number of. Even on some discs there are own funds like Partition Magic, etc.
Windows 8 compatibility issues
Finally, one more problem. Let's say we need to solve the question of how to install Windows 7 from a flash drive on an Asus laptop with G8 preinstalled. Version 7 and 8 systems have different file systems. Although it is believed that the “seven” supports the “eight” file systems, in fact this is a conditional statement. In practice, this causes a lot of confusion. A way out of this situation may be to include in BIOS mode Legacy compatibility and subsequent conversion of G8 partitions from GPT or UEFI to the standard G7 MBR format.
Conclusion
Probably, many have already noticed that the question of how to install Windows 7 on a laptop, although it has several specific points that you will have to pay attention to Special attention, however, it is not too complicated. Depending on the laptop model, you may sometimes have to tinker. But if all the settings are made correctly, and the original CD with drivers is included in the kit, there is no need to strain too much.
Hello. It’s probably worth starting with the fact that not all computers have a CD-Rom, or there’s not always an installation disk with Windows on which you can burn an image (already discussed earlier). In this case, you can install Windows 7 from a flash drive.
The main difference there will be 2 steps here! The first is preparing such a bootable flash drive and the second is changing the boot order in the bios (i.e. include a check for USB boot records in the queue).
So, let's begin…
1. Creating a bootable USB flash drive with Windows 7
There are several ways to create a bootable USB flash drive. Now we will look at one of the simplest and fastest. To do this, you will need such a wonderful program as UltraISO (link to the official website) and an image with a Windows system. UltraISO supports big number images, allows you to record them on various media. We are now interested in recording an image from Windows OS to a flash drive.
By the way! You can make such an image yourself from a real disk with the OS. You can download it on the Internet, from some torrent (however, beware of pirated copies or all kinds of assemblies). In any case, before this operation you should have such an image!
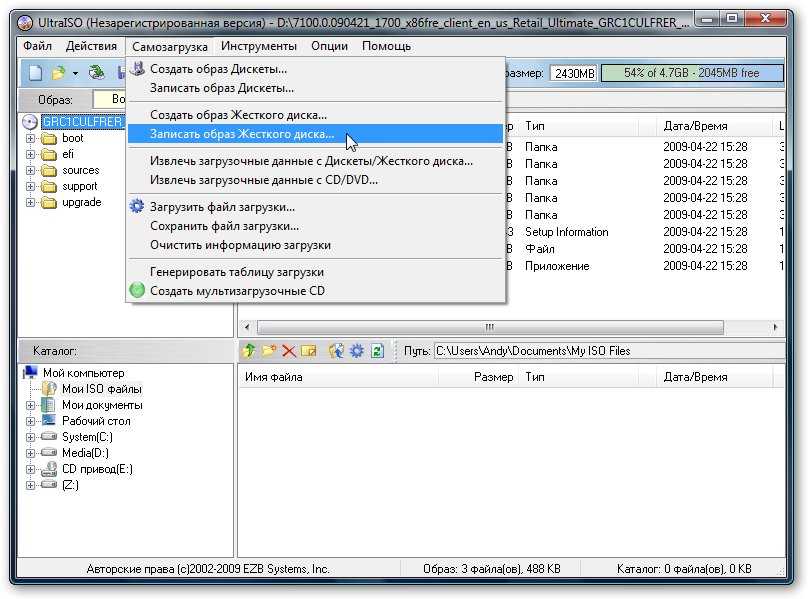
Open the image with the system in the UltraISO program
After successfully opening the image with Windows 7 OS, click on “”
Selecting a flash drive and parameters
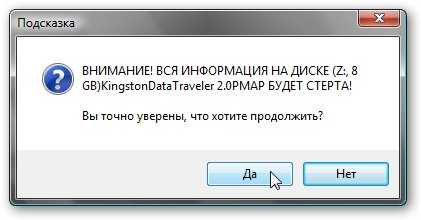
Be extremely careful, because... if let's say you have 2 flash drives inserted and you specify the wrong one... During recording, all data from the flash drive will be deleted! However, the program itself warns us about this (it’s just that the program version may not be in Russian, so it’s better to warn us about this small subtlety).

Warning.
After you click on the “record” button, all you have to do is wait. On average, recording takes min. 10-15 on average based on PC capabilities.

Recording process.
After some time, the program will create a bootable USB flash drive for you. It's time to move on to the second step...
2. Enable the ability to boot from a flash drive in bios
Many people may not need this chapter. But if, when you turn on the computer, it doesn’t seem to see the newly created bootable USB flash drive with Windows 7 OS, it’s time to dig into the bios to check if everything is in order there.
If you do not have Enabled there, then using Enter keys turn them on! Next, go to the download section (Boot). Here you can set the boot order (i.e., for example, the PC first checks CD/DVD disks for boot records, then boots from the HDD). We need to add USB to the boot order. This is demonstrated in the screenshot below.
The first check is for loading from a flash drive; if no data is found on it, the CD/DVD is checked - if there is no boot data there, yours will be loaded old system with HDD
Important! After all the changes to the bios, many people forget to simply save their settings. To do this, select the “Save and exit” option in the section (often the F10 key), then agree (“Yes”). The computer will reboot and should begin to see the bootable USB flash drive with the OS.
2.2 Enabling boot from USB on a laptop (using the example of Asus Aspire 5552G)
By default, booting from a flash drive is disabled in this laptop model. To enable it when booting the laptop, press F2, then in bios go to the Boot section, and using the F5 and F6 keys move the USB CD/DVD higher than the line with booting from the HDD.
By the way, sometimes this doesn't help. Then you need to check all the lines where USB is found (USB HDD, USB FDD), moving them all higher than booting from the HDD.
Setting download priority
After the changes, click on F10 (this exits while saving all the settings that have been made). Next, reboot the laptop by inserting a bootable USB flash drive in advance and watch the beginning Windows installations 7…
3. Installing Windows 7
In general, installing from a flash drive is not much different from installing from a disk. The only differences can be, for example, in installation time (sometimes it takes longer to install from a disk) and noise (CD/DVDs are quite noisy during operation). For more simple description, we will provide the entire installation with screenshots, which should appear in approximately the same order (differences may be due to differences in build versions).
Starting Windows installation. This is exactly what you should see if you followed the previous steps correctly.
Here you just need to agree with the setting.
Wait patiently while the system checks the files and prepares to copy them to HDD
Do you agree...
Here we select installation - option 2.
This is an important section! Here we select the disk that will become the system disk. It is best if you do not have information on the disk - split it into two parts - one for the system, the second for files. For Windows systems 7 recommended 30-50GB. By the way, keep in mind that the partition in which the system is installed can be formatted!
We are waiting for the installation process to complete. During this time, the computer may reboot itself several times. We just don’t touch anything...
This window signals us about the first start of the system
Congratulations. The system is installed and you can start working with it!
This completes the installation of Windows 7 from a USB flash drive. Now you can take it out USB port and move on to more pleasant moments: watching movies, listening to music, playing games, etc.
Installing Windows 7 from a flash drive via BIOS today is the most relevant option for resolving the issue related to the independent installation process of the Seven. Why? The thing is that it's time for popularity disk drives has already passed, which means that many people simply do not have DVD-ROMs. On the other hand, Windows 7 does not have an installation procedure, which is actively used today when switching to Ten. Fortunately, every computer has USB, so most users have only this option.
To install Windows 7 from a flash drive via BIOS, you need to consistently implement several steps:
- Prepare a source;
- Change the equipment settings so that it becomes possible to implement the plan;
- Directly launch and execute the installation process.a
This article will give you all necessary information for each of these stages. After reading it, even an inexperienced user can install Windows 7.
Of course, there are other options for creating a bootable USB flash drive with Seven, but the use is absolutely free utility Rufus makes solving the problem as simple as possible.
So to complete successfully this stage, you must repeat the following steps:
- Search and download a working image with the operating system that you plan to install on your PC.
- Search for a utility and similar download. By the way, you can easily find portable version, that is, you don’t even need to pre-install the program.
- To plug external storage, which you plan to use for recording. Check to see if it contains information important to the person. If there is one, move it to another place.
- Run the program.
- When a flash drive is connected, the utility will immediately display information about it in the “Device” window.
- In the second point, it is recommended to choose MBR for computers with BIOS or UEFI. This type is suitable for almost most modern technology options.
- The next point can be easily ignored, since the utility will independently select best option file system when adding a writable image.
- All that remains is to check the boxes where it is written about the quick format and creating a boot disk.
- Before starting the procedure, you only need to specify the path to the image to be recorded and click on the “Start” button.
- The utility begins its work, the success of which can be monitored by the slider at the bottom of the window.

After the “ready” message appears, you can move on to the next steps in implementing the task.
Setting up BIOS for installation from a flash drive
Before you start making such changes, it is recommended that you initially go to the section hard drive, which is planned to be used for the Seven. The thing is that installing the OS will automatically erase all information on it. Therefore, you need to make sure that nothing important is left on it. After this, the following actions are performed:
- The PC restart is initiated.
- At the very beginning of this process, a button is pressed that allows you to enter the BIOS. In most cases, this will require you to press "del". Although there are other options. For example, “F1”, “F2” and so on - depending on the manufacturer of the equipment being used.
- The BIOS screen is also for different models may have differences. However, in all of them you can find an item called First BOOT - it allows you to prioritize the devices from which the boot will be performed.
- You should open it and change the priority to USB or USB-HDD - depending on who you are.

Naturally, the flash drive should already be connected. Then the changes made are saved and you can exit the BIOS. If everything is done correctly, the computer will begin to launch the installation program.
Windows 7 installation process from USB
The further process is very simple - the main thing is to take the right actions:
- Select your preferred language and keyboard layout.
- Read and agree to the agreement from the operating system developers.
- Select the hard disk volume where the installation will be performed.
- The program will issue a warning about the need to format the partition and erase all information located on it.
- You must agree to this condition and start the installation procedure.
- For some time everything will happen in automatic mode. After the appearance information message When the work is completed, you will need to click on “next”.
- The personal data of the equipment owner is entered. If you don't need a password to log in, just leave an empty line.
- When using a licensed version of a product, a key is inserted, which the person must have.
- Time and network settings are performed.


The actions are confirmed, which leads to the appearance of the well-known Seven desktop - operating system ready for use. As you can see, installing Windows 7 from a flash drive via BIOS is very easy.
Hello, dear readers! The obvious fact is that even careful and not the most active PC users sooner or later need to reinstall the operating system. Computer, long time running on the same OS starts to work slower, new errors appear and make it difficult normal work with the device.
That is why it is recommended to periodically reinstall the system. Here the question arises: how can this be done if the distribution kit on disk is not at hand? There is only one answer - using a flash drive. This guide will help you quickly figure out how to properly reinstall Windows 7 from a flash drive without any problems - the debriefing will take a maximum of a few minutes!
Preparing for the upcoming procedure
Before you begin the reinstallation procedure, you need to prepare:
- Copy from system disk(usually “C”) all the necessary and valuable information for you to another partition of the hard drive, or better yet to removable media. During the reinstallation process, data from local disk“C” is erased as a result of formatting, so it is recommended to duplicate the necessary information.
- Prepare in advance all the drivers necessary for the operation of your devices. It often happens that after Windows is reinstalled, some external devices will stop working due to lack of drivers. To avoid this problem, you will have to look for the drivers yourself before the procedure.
- Make sure that bootable flash drive with the distribution, the OS was recorded correctly. Check whether all the files from the image are on the media - to do this, just compare the number of files and volume. If the flash drive does not have all the data, it is recommended to overwrite it so that no problems arise during installation.
Now that everything is ready, you can start Windows installations 7 from a flash drive. Don’t be alarmed ahead of time - this procedure is much easier and faster than it might seem to a user, especially an inexperienced one.
Setting up the BIOS to reinstall the OS correctly
BIOS is a place where all the parameters of your PC are written, be it a computer or a laptop. These include system boot settings. In order for the device to start from a flash drive, you need to configure the BIOS to work with it. This is quite simple to do - follow the instructions below:
- Insert the media into the USB port and restart your PC.
- During reboot, press F2. In some BIOS models you need to press F11 or Delete. More detailed information you can find out when the OS starts - everything will be written in white font on a black background.
- In the opened BIOS menu select BOOT (name may vary). After this, a list will open with devices from which the system can boot. Select your media and move it to first place using the keys on your keyboard. Save the changes by pressing F10 and confirming exit from BIOS.
After BIOS settings you can proceed directly to such a task as installing Windows 7. How to do this?
Reinstalling the system in a few simple steps
In fact, you have already done the most difficult part in the previous stages - the actual installation of the system is carried out almost automatically. We recommend that you read the following instructions:
- Insert the media into the USB port and restart your computer. The download should come from your flash drive.
- Wait for the installer's welcome window and follow the instructions it offers you.
- At the stage of selecting a disk for installation, specify system partition, format it and click Next.
- Wait while Windows 7 is installed on your PC - this procedure is performed automatically.
During installation, the PC will reboot several times. At the final stage, you will be asked to specify the PC name, date and time settings, and administration settings. There will be no problems at these stages.
After you have entered all the data, you will need to wait a few more minutes - after configuring the OS, you can start working - at this point the procedure for reinstalling the operating system is considered complete!
Share this article with your friends using social networks– they will be grateful to you when they learn to install the system from a flash drive! Subscribe to updates to always stay up to date with the latest blog articles!
You don't need to buy a disk and drive to install Windows 7, as you can install the operating system from a USB flash drive.
Inexperienced users puzzles the question - how to install Windows 7 from a flash drive. Not everyone knows how to install from a disk, and even fewer know how to install from USB. In fact, there is nothing complicated; it is important to strictly follow the installation instructions and not break the sequence of steps. Let's immediately decide what you need USB Flash or external hard disk with a capacity of at least 4 GB. File system, in which the media is formatted does not matter. In addition, you can even burn the image to an SD card or external device, for example, an MP3 player, which is detected on the computer as a flash drive.
Installation sequence
If you install the OS on a blank disk, then you don't need to worry about its contents. If you are reinstalling the OS, remember that the disk on which you are installing the system will be completely formatted, which means that all data on the disk will be deleted. Therefore, the very first step you need to think about is what files you need to save. Next, follow the following instructions:
- Download the OS;
- Create installation media;
- Changing BIOS settings;
- We start the computer from an external device;
- Follow the instructions for installing the OS;
- Install drivers and update the installed OS;
These 6 steps are similar for all versions of the operating system; the scheme also works for other versions of the OS, including Windows Vista or Windows 8.
Where to download OS
You need to download not just system files, you need ISO image, suitable for recording on a flash drive. You can download it here. Already at this stage you need to decide which version of the OS you need. The question is not only whether you will use the “Home” or “Professional” version, but also what bit capacity it will have - 32 or 64 bits. After you decide on the OS version, download it to your hard drive.
How to write an OS to a flash drive
If you simply burn the distribution kit to USB, then you will not be able to run the OS from it, nor can you run the installation from a flash drive. To create bootable media you need to use specialized software. One of best programs for creating - . Let's look at creating this utility as an example. First of all, open our ISO image of Windows 7 inside UltraISO:
You need to choose not only the drive, but also the recording method. Select USB-HDD+, you don’t need to touch other settings.

How to start installation via BIOS
After you have created a flash drive with seven, you need to boot your computer from it. To do this, you need to reboot it and during system startup go into the BIOS and specify the startup sequence. Depending on the BIOS version, entry is available using the F2, Del, Esc keys, but there may be other keys. Inside the BIOS you need to find the BOOT tab, where you can specify the startup order. Your media must already be in the device, otherwise you will not be able to specify it to start when you start your PC. The loading sequence should be something like this:

After making changes to the BIOS, they must be saved and exited. Then the system will automatically reboot and start from USB.
Installation
After the start, the installation of the system itself will begin. If you downloaded the Russian version, then the entire installation will be accompanied by Russian instructions and recommendations. Just follow the instructions that appear on the screen, and within 20-30 minutes the operating system will be installed on your computer. If you have any questions, look at the instructions:
Don't forget that the hard drive where you install the OS will be formatted. This means that all data on the disk on which the new system is installed will be deleted. Therefore, you need to take care of their preservation in advance.
Setup and updates
After installing Windows 7 on your computer, it’s too early to relax. Next you have to configure the system, and then install all the necessary drivers. For settings and drivers you can use the following programs:
- DriverPack Solution;
The first program will optimize the operation of the system. The second program will automatically install everything necessary drivers. During setup, be sure to create backup copy OS, as well as the first restore point, which will be useful to you in the future if you have any problems, for example, you encounter errors.