Re-initialize the hard drive. Initialization - what is it? Making a program or device ready for use
04.09.2009 05:49
The easiest way to initialize a hard drive is to use the Windows 7 Management Console.
1. Open Control Panel -> Administration -> Computer Management. (You can also right-click the Computer icon and select Control).
2. In the left menu of the Windows 7 management console, select .
3. Right-click to the left of the hard drive you want to initialize. In the context menu that appears, select .

4. In the window that opens, check the new disk box, select Master Boot Record(MBR), press OK and wait for the initialization process to complete.

Creating a Volume
After initialization is complete, you need to create a volume (partition) on your hard drive so that it appears in the Computer folder and so that you can use this drive.
1. Right-click on the initialized hard drive and select .

2. In the New Simple Volume Wizard window that opens, click Further and specify the volume size in megabytes.
3. In the next window, assign a drive letter so that the drive appears in the Computer folder and click Further.

4. In the next window, select formatting options for the new volume (partition):

- File system(we recommend NTFS, because it is more resistant to failures and can store files larger than 4 GB, unlike FAT32);
- Cluster size(we recommend the minimum – 512 bytes, as this will allow the system to use disk space more economically);
- Volume Label– the name of the hard drive under which it will be displayed in the Computer folder;
- Quick formatting(we recommend unchecking this box to perform full formatting at least for the first time);
- Apply folder compression– by default the option is disabled (we recommend leaving this function disabled and not using NTFS compression, as it slows down the hard drive, although it saves space).
5. In the next (last) wizard window, check the specified parameters. At this point the volume has not yet been created or formatted, so if you want to change anything, click Back and make changes. If everything is ok, click Ready to begin creating and formatting the volume.
Unfortunately, not every user, when purchasing a new hard drive, imagines that after installing it in the system unit, it will be immediately impossible to work with the hard drive, believing that it is enough to insert the appropriate cables into it and secure it with screws, and the system itself will determine the device. First of all, after installing the equipment, the hard drive must be initialized. Windows systems will not do this automatically, so you will have to carry out all operations yourself.
Installing a new hard drive
Before directly dealing with the problem of how to initialize a hard drive, you should deal with its correct installation in a system unit with a connection, following some rules and precautions.
To do this, with the computer turned off and the power supply disconnected, you need to remove the side cover. Then, which is very important, before installing the hard drive into the slot, you should definitely remove the electrostatic charge from your body, in the simplest case - simply by touching the spout of a regular water tap or the chassis of a disconnected system unit with both hands. After this, the hard drive is secured with screws and connected to the motherboard with the appropriate cable and jumpers in compliance with the Master/Slave rule (main or dependent drive), after which the side cover of the case is installed in place.
Initializing the hard drive in BIOS settings
Now you can begin the initial setup of the installed hard drive. First, you will need to turn on the computer and go to the primary input/output system settings section of the BIOS. Typically, the keys Del, F2 or some combinations are used for this, which will be shown on the monitor screen at the time of start.

Here in the main section, where all devices currently connected to the motherboard are shown, find your hard drive, taking into account its or IDE). If the hard drive is detected, you can proceed with the basic setup using exit from the BIOS followed by an automatic reboot. Otherwise, if the device is not in the list or the Not Detected line is present, after exiting and turning off the PC, you need to recheck the correct connection.
How to Initialize a Hard Drive: Windows Basic Tool
We assume that the hard drive is defined in the BIOS. Now you need to initialize the disk. After a full boot, Windows will automatically recognize the new device and install the appropriate drivers for it (you can verify their presence by looking at the drivers folder in the System32 directory, where the disk.sys and partmgr.sys files will be present). At this stage, the disk itself is not visible in Explorer, although it is physically present in the system.

The disk is initialized using the system's own tool in the section. You can call this section from the “Control Panel” through the administration system by selecting the computer management menu or from the right-click menu on the computer icon, but it looks simpler and faster to use the “Run” console, in the line which the command diskmgmt.msc is prescribed.
and setting the boot entry type
The disk is now initializing. First, select your hard drive from the list of available devices (it can be marked as “Disk 1”, “Disk 2”, etc.), then right-click to call up the menu and use the initialization line in it.


If the hard drive has a capacity of more than 2 TB, you will need to set the GPT attribute (otherwise it will be impossible to use a larger capacity). If an error occurs during disk initialization, you will need to take appropriate measures to resolve it. This will be discussed separately.
Volume creation process
At the next stage, disk initialization involves creating a partition. This is done so that the computer system can “see” the disk.

On the selected disk, right-click again, and from the context menu, select the line to create a simple volume, after which the corresponding “Wizard” will open, in which the continue button is clicked.
Next, disk initialization involves indicating the size of the partition to be created in megabytes (recalculate immediately, since 1 GB contains not a thousand, but 1024 MB). Typically this is not necessary because the system specifies the volume size automatically.
At the next stage, you need to assign a letter to the section by which it will be identified by the system. Here you need to be very careful not to assign a disk ID that is already occupied, which may correspond to other removable media (CD/DVD-ROM, USB devices, etc.), since in the future they may seem inoperable due to the fact that the system simply does not recognize them.
Selecting a file system and formatting
Finally, disk initialization is approaching the final stage, at which it will be necessary to format the created partition.

Here, it is better to specify NTFS as the file system (it is considered more stable than FAT32, and can save files larger than 4 GB), leave it at the default value of 512 bytes (this will allow more economical distribution and use of the resources of the created partition), as a label The volume should be entered into a name that will be displayed in the system (file manager and context menus) and uncheck quick formatting (for the first time, it is strongly recommended to perform a full formatting, which will avoid problems in the future). You should not use directory compression, since this can only lead to a slowdown of the disk due to the speed of reading or writing information to it.

Next, go to the completion window and, if all parameters are set correctly, click the start formatting button (Finish). If some parameters need to be changed, the return to previous menu button is used. At the end of the process, the system will display a message on the screen in the form of an autorun window, if it is enabled. But sometimes a warning may appear that the disk is not initialized.
What to do if initialization errors occur?
Such problems usually do not happen with new hard drives. But if the system displays a message that the disk is not initialized, you can use the command line (cmd in the Run console) to fix it.

It first uses list disk to view and select the disk you need, and clean to clean the partition table. After this, you can format it manually using a sequence of commands create partition primary, select partition 1, active and format fs=ntfs, which are entered without punctuation and press the enter key after each of them.
In other cases, you can use specialized programs like Partition Magic, but if none of the tools help, you will have to recheck the connections or look for malfunctions in the hard drive itself (perhaps physical damage). For these cases, you can try to apply the program and then perform all the above operations again.
People often ask the question on the Internet: “I bought a new hard drive and connected it. Why can't I see the new disk in the system? The fact is that after physically installing the hard drive into a computer or laptop, it is necessary to programmatically initialize and mark it. So, how to set up a connected new hard drive in Windows 7? Nothing could be simpler.
Update 2016: Despite the fact that the illustrations were taken a long time ago from Windows 7, these instructions are also suitable for Windows 10 and 8.
Step 1. Right-click on the system shortcut "Computer" and select "Manage":
Step 2. In the window that opens on the left, select “ Disk management". After this, a dialog box should open on the right side “ Initializing the disk". Click “OK” in it:

_____________________________
Attention! If you click on " Disk management" dialog box does not open, right-click on the left side of the disk image in the area that says "No data" or " Not initialized" and select " Initialize disk". (See 2 pictures below.)


The task is to call the same window “ Initializing the disk". In it you must make sure that the checkbox next to “Disk n” is checked and click OK.
Step 3. Right-click on the right side of the new disk image and select " Create a simple volume»:

Step 4. Click "Next":

Step 5. Select the partition size. By default, the maximum partition size is set. Those. the partition will occupy the entire hard drive. If you want the new disk to have several partitions, then at this point select the size of the first partition. For example "10240". Then the new partition (aka “partition”) will occupy 10 GB of disk space.
If to create the first partition on a new hard drive you did not select all the available space (which was the default), then after the created partition there will be unallocated space on the disk. To create additional partitions in the unallocated area, repeat these instructions with steps 3 .
After selecting the partition size, click “Next”:

Step 6. Select a drive letter. Click "Next":

Step 6. In most cases, the file system type should be left “NTFS”. Select the volume label, such as "Games" or "Archive" and click "Next":

Step 7 Click "Finish" to exit the Disk Initialization Wizard:

After this, you will see that the disk has begun to format:

Wait until the caption “Good …” appears on the right side of the disk image instead of the word “Format”:

Now you can open “Computer” and check if a new section with the desired letter has appeared.
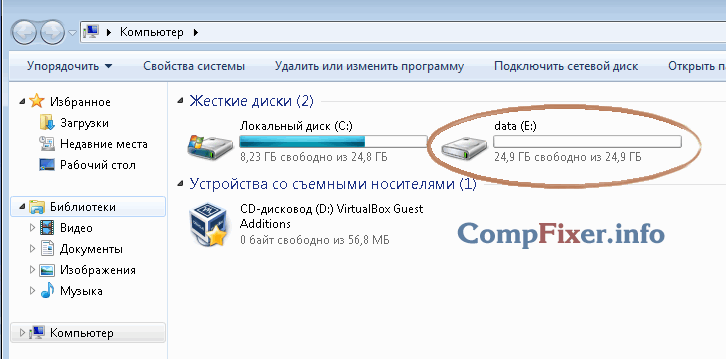
The marking is completed. You can use the drive!
One of the main command line utilities in Windows is Diskpart, which first appeared in Windows XP and replaced Fdisk. This software tool provides the ability to partition, format, initialize and resize disks, as well as create RAID arrays. Moreover, in Windows7 and Windows Server 2008 R2 it allows you to work with virtual disks. Let's see how to use Diskpart to prepare a hard drive, partition it, and format it.
At the command prompt, type diskpart and press Enter. We have our own command environment, Diskpart, a kind of command line interface within the system. Typing "help" (or any other invalid command) and pressing Enter results in about three dozen commands being displayed. It’s unlikely that anyone will explore 37 teams, which may “scare off” Diskpart; in fact, it only takes eight teams to leverage 99% of the product's capabilities.
If you've ever initialized a disk from the graphical Logical Disk Manager, you first need to click the physical disk icon, then partition and format those partitions and give them a name and letter. Diskpart follows the same pattern, requiring you to select a disk before you can partition it, before formatting it, etc. To select a specific disk, you need to type a command like this:
select disk
But what is the disk number you want to work with? Let's find out by typing the command:
List disk
which will produce the result shown in Screen 1. Diskpart numbers disks starting from zero, not one, and you can see that both disks store partition information in the Master Boot Record (MBR) rather than in the GUID Partition Table (GPT ), with both disks being basic and not dynamic (since there are no values in the Dyn and Gpt columns).
Now I will complicate the task by saying that the system has two 24 GB disks: one contains the operating system and applications, and the second is just an additional disk for storing data. Obviously, you don't want to accidentally wipe your operating system drive, so how do you know which drive is which? We use select disk together with detail disk. Let's start with disk 0 and see what's on it:
select disk 0
detail disk
The result is shown in Screen 2. Disk 0 turns out to be the data disk, so Disk 1 must be the operating system disk. So let's work with the correct disk (disk0).
/IMAGE/1284102770_79_1.jpg)
First, let's clear it by typing clean. This action does not clean up the disk by overwriting all of its data; wiping erases the MBR entry, which is actually the "table of contents" of the disk. The old data is still on the disk, but the operating system can no longer access it, so the data will be deleted through a slow rewrite as soon as we start creating a new disk structure on top of the old one and saving the data into this new structure.
Next, the newly created disk needs at least one partition. The simplest method is to create one large partition on the disk using the create partition primary command. However, if you want to create multiple partitions on the disk, you need to add the size= parameter followed by the size in megabytes. If I wanted to create two partitions—one 10 GB and one 14 GB—I would first create the first partition by typing:
create partition primary size=10240
Remember that there are 1024 MB in a gigabyte, not 1000. I would then create a second partition by simply typing create partition primary, since the create partition command without the size= parameter tells Diskpart to use all the remaining space on the hard drive. I can view the output by typing list partition.
So we have the partitions, but they still need drive letters and formatting. I will show how this is done in the next article.
Mark Minasi ([email protected]) - editor of Windows IT Pro, MCSE and author of the book Mastering Windows Server 2003 (Sybex Publishing)
Initializing a hard drive is its activation, preparation for operation, including formatting the disk and recording control information. After initialization, the disk is ready for use.
Open the Windows search bar.
Type diskmgmt.msc. Press Enter.

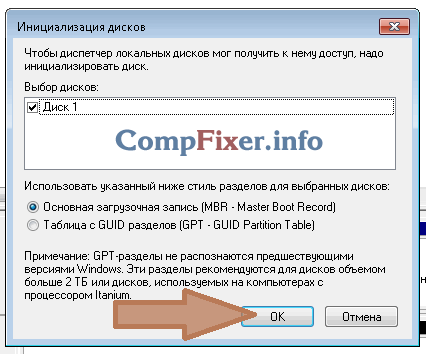
In the Disk Control Panel that opens, we see a message stating that in order to gain access to the disk, it must be initialized.
First, set the section style in the same window. There are two options, from which you choose the one that is most suitable for you.
GPT or MBR?
Master Boot Record (MBR) – translated into Russian as “Master Boot Record”. This is the first sector (the initial five hundred and twelve bytes of the memory area) of the information carrier - a hard drive or solid-state drive. Contains a bootloader (part of the code) for the installed operating system and information about logical disk partitions. For the first time, such technology began to be used in the eighties of the last century in the initial versions of DOS. Ensures the operation of drives with a capacity of up to 2.2 terabytes, and only four main partitions on the disk.
GUID Partition Table (GPT) is a new rule for the location of partition tables on an information storage medium, located in sector number two. It has almost no restrictions, disks can be larger, a huge, almost unlimited number of partitions are created. It is a piece of UEFI firmware from Intel, designed to replace the BIOS.
In our case, we settle on MBR. Check the box for this style.
Click Ok.

In the window that appears, right-click on the new disk (“not allocated”) (green arrow) and select “Create a simple volume.”

A wizard opens to create a new volume.
Click "Next".


Select a letter to name the drive. For us it is "R". Naturally, the letter must be assigned to one that is not currently used in the names of other volumes. Duplication is not allowed. Go ahead.

We select the file system, we have NTFS (they offer standard NTFS, FAT32, FAT). Specify the cluster size; in this case, it was left as default. A minimum of 512 bytes is often recommended, which allows the system to use disk space more economically.
Select the volume label - the name of the disk displayed in the Computer folder;
Check the box to format the disk faster.
To continue, click the “Next” button.