Connecting the TV to the computer via hdmi. Connecting to a computer in the TV settings
To do this, inspect the connectors available on the device. If you cannot determine the types of ports by eye, find their description in the documentation for your computer. Depending on the device model, you may see the following types of connectors:
- HDMI is a digital interface that is present on most modern computers. It transmits both audio and video, and therefore is optimal for outputting a multimedia signal to a TV.
- DVI is another digital port that is widely available on the market. It transmits only video, no sound.
- VGA is a popular analog connector. Like the previous type of port, it outputs only a video signal.
- Mini DisplayPort, Thunderbolt 2, USB-C and Thunderbolt 3 (USB-C) are digital interfaces that are present in Apple computers. They all transmit video and sound. In addition, the Mac may be equipped with a regular HDMI connector.
There are other types of connectors. But we have listed the most popular ones. Surely your device is equipped with one or more of them.
2. Determine which connectors for signal reception are on the TV
Inspect the TV ports. Most modern models have HDMI and VGA connectors. Older ones are equipped with RCA format ports, the plugs for which are called tulips:

3. Select a cable according to the available connectors
If you have an HDMI TV
If both the TV and the computer have HDMI connector, then everything is simple: you can connect devices with using HDMI-cable. This option will be optimal.
To connect a computer that does not have an HDMI port to an HDMI TV, you will also need a special signal converter along with an HDMI cable. Which one exactly depends on the connector available on the computer. This could be DVI → HDMI, VGA → HDMI or other adapters to HDMI.
In addition to the HDMI cable, such converters can often be connected to an additional audio cable, the other end of which is inserted into the computer. This allows audio to be transmitted bypassing the limitations of DVI and VGA. An audio cable is often sold complete with a converter.
 www.amazon.com
 To connect to a Mac HDMI TV with Thunderbolt 2 or Mini DisplayPort, you will need a Mini DisplayPort to HDMI adapter along with an HDMI cable. For it to transmit sound, ask the store for an adapter that supports audio.
If you have a VGA TV
For a VGA TV, the procedure will be similar. Only you will need an HDMI → VGA, DVI → VGA or other converter, depending on the computer port. The main thing is that it converts the signal to VGA.
If you have a TV with an RCA connector
If you have at your disposal old model TV with tulips, then converters like HDMI → RCA, VGA → RCA and others that provide an RCA signal at the output are suitable.
In order not to make a mistake when buying a cable or converter, you can tell the seller the types of connectors on your TV and computer: he will select the appropriate option for you or check the compatibility of your choice.
4. Connect devices via cable
Turn off your computer and TV first for safety reasons. Next, connect the devices using a cable (and, if necessary, a converter). Only then turn on the devices. If the TV does not automatically detect the computer as the signal source, then do it yourself in the TV settings.
5. Adjust the TV picture using your computer
If the image is blurry, open system settings on the computer and find the partition responsible for the monitor. Here you can set the resolution that matches your TV and change the video display mode if necessary.
How to connect a computer to a TV via Wi-Fi
Modern smart TVs can be connected to computers wirelessly via local Wi-Fi network. Technologies like DLNA and Wi-Fi Direct allow you to broadcast video, music and other content to a TV screen or completely duplicate the image from a computer on a TV, turning the latter into wireless monitor. Moreover, in the case of Wi-Fi Direct, you don’t even need a router for this.
For example, on LG devices there is a service for similar functions. And Samsung TVs offer similar capabilities as part of the AllShare service.
Settings wireless connection may vary depending on the manufacturer and model of the TV. Some devices establish a connection in semi-automatic mode. Others require installation of additional software on the connected computer.
Therefore, to formulate universal instructions, which will suit all users is difficult. If you want to connect your TV to your computer via Wi-Fi, necessary information you will find it in the paper manual or on the manufacturer’s official website along with the software necessary for this.

HDMI (High-Definition Multimedia Interface) output is required for transmission digital signal High Quality. It is used to broadcast video and sound. In this article we will tell you how to set up hdmi.
First of all it must be said that everyone is equipped with this output modern video cards For personal computers In addition, HDMI can be found on laptops, even on those models that use a built-in video card.
To begin with, it is recommended explore the capabilities of your video adapter. If your video card does not have an HDMI output, you can use the DVI channel using a special adapter, also called DVI-HDMI connector. A feature of such adapters is their ability to transmit sound signal.
In order to set up HDMI, you will need to study specifications TV to which you are connecting. You should definitely make sure that it HDMI input is for receiving audio signal. To connect you only need hdmi cable-HDMI, one end of which is inserted into the computer’s video card, and the other into the TV connector.
If you want the TV and monitor to work simultaneously, you need to set the option for these devices to work synchronously. To do this you need to open the menu "Start" and enter "Control Panel". Next you need to select "Screen" and click on the item "Screen Resolution Settings".
In the dialog box that appears, you must activate the function "Duplicate screen". Now the computer will transmit the same image to all devices. If you need both displays to work independently of each other, you should activate the "Expand screen". In this case, you will need to first designate the computer display as the primary device.
To set up HDMI, you also need adjust the sound signal transmission. To do this you need to open "Control Panel" and select item "Equipment and Sound". Next you need to click on. A dialog box will appear on the screen in which you should go to the tab "Control sound devices» . Here you need to note the equipment HDMI Output by clicking on its icon with the left mouse button, and then clicking on the button "Default".
Next you need to click on the button "Apply" and close the dialog box. Now, as a test, you can run a video and make sure that the HDMI output is working correctly. It is worth noting that when you disconnect the cable from the port, the standard audio port will turn on automatically.
As you can see, setting up the HDMI output is quite simple and does not require any special knowledge. Finally, it is worth talking about how to choose the right HDMI cable.
There are two types of such cables: to support high definition as well as to support HDTV resolution. As for the length of the wires, it can vary from 1 to 10 meters. However, it should be remembered that the longer the cable, the greater the likelihood of signal loss. Therefore, some manufacturers offer so-called active HDMI cables, which use various technologies to transmit data to long distances. When purchasing a cable, be sure to pay attention not only to the quality of the wire, but also to the connectors.
Connecting a computer or laptop to TV can occur in different ways:
- VGA or D-Sud cable. Almost all monitors, PCs and TVs have this connector. This is an analog connection and is not in the best possible way will convey all the nuances of video files.
- DVI. A more modern option. Can work with analog and digital devices. Has its own subclasses.
- S-Video. In addition, you will have to purchase an adapter.
- RCA or tulips. Connecting a laptop and TV using this method is rare.
- Scart. A popular method, since such a connector is available in modern models TV.
- HDMI cable. A good option to connect a computer.
Common Causes of Connection Failure
If the TV does not see the laptop, but the connection is complete, then the reasons may be the following:
- The cable is not connected correctly or is defective.
- Monitor settings error.
- Incorrect operation of the laptop or PC video card.
- The settings on the TV itself or any other brand are not configured.
Let's look in more detail at why the TV does not see HDMI and the second device through it.
Equipment testing steps
- First of all, you need to check the quality of the wire connections and the condition of the connectors.
- Next, you need to check that the computer settings are correct.
- Then it checks for driver updates and video card settings.
- Launch antivirus program to scan for malware.
- Checking the port. It is recommended to connect to another device.
Cable check
If the TV connected to the PC suddenly stops working, and until that moment everything was set up properly, it means that the cable has come loose or has been broken. The first option is more common, since you can hook the adapter simply by passing by. But the second one is less common, because optimal length The HDMI cable is not so big that it will lie on the floor and get under someone's heavy foot.
TV settings
When the TV does not see the laptop via HDMI immediately after connecting the equipment, most likely it is incorrect to select the signal source on the TV itself.
If there is no signal from the computer, then on the TV remote you should find the “input”, “source” or “Imput” button; it may be written “HDMI” right away on the LG TV. Go to the window that opens and there, in the list of active inputs, select the one you need. Confirm the action by clicking on “OK”.

If the equipment still does not connect after the operations performed, we carry out further diagnostics.
Monitor settings
After making sure that the signal from the TV is coming through the right way, let's move on to diagnosing the laptop or PC screen, or rather, to the settings. They can be carried out by any user with basic knowledge your computer:
- Hover your mouse over any free space screen and press the right button.
- In the list that appears, select “Screen resolution” or “Graphics characteristics” depending on the type of OS.
- Select the appropriate option for displaying the picture on TV. The device passport specifies the acceptable resolution, stick to it.

It's easier to do everything on a laptop. Press and hold the “Fm” and F4 buttons at the same time until best option. After this, the laptop will connect to the TV correctly and the error that there is no image will go away.
Video card error
Another reason why the connection of devices does not work is the incorrect functioning of the PC video card. In this case, the laptop does not see the other device or does not display an image on it.
To fix this, you need to try installing the new drivers that are included in global network for each device model. Sometimes it may be necessary complete reinstallation or replacing an element.
I decided to prepare a separate article in which I will tell in detail and show with an example how to connect a TV to a regular desktop computer using an HDMI cable. The topic is relevant, and I am often asked about it. In fact, it’s nothing complicated. But there are some nuances that we will try to understand in this article.
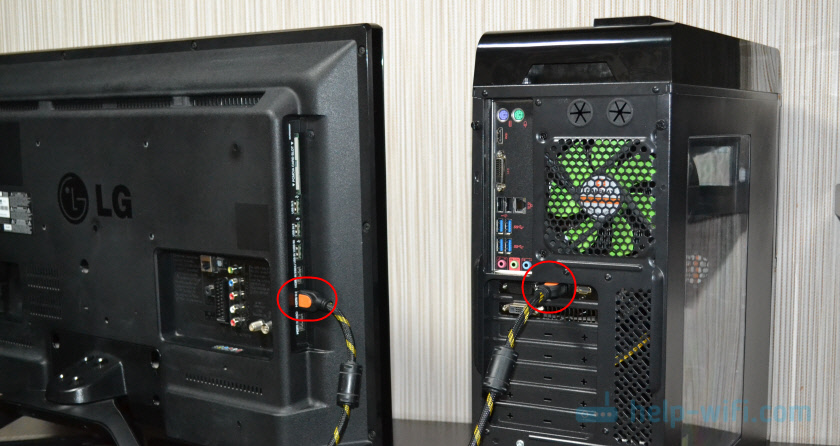
Almost every TV, even not the newest one, has at least one HDMI input. And in the computer, on the back panel of the system unit there is an HDMI output. This means that we can easily connect a PC to a TV using a regular HDMI cable, which can probably be bought in every store digital technology.
Why connect them? Everything is very simple. The TV can work as a monitor. That is, you can display images from a computer on a TV screen. The TV can be used as the main or second monitor. This means that the image from the PC will be displayed on the screen of a regular monitor and TV at the same time. Or only on TV. It depends on your tasks. It should be noted that HDMI outputs not only images, but also sound.
I myself, and other users, most often connect a PC to a TV to watch movies on big screen, or for play. You can also connect a gamepad to your computer and play on the big screen. Some people use TVs instead of monitors. They work with documents, surf the Internet, etc. But it seems to me that this is not very convenient. And your eyes get tired faster. For permanent job It is better to use a monitor when using a computer. And connect the TV to watch movies, photos, games, etc.
The connection process will be the same for TVs different manufacturers: LG, Samsung, Sony, Philips, Panasonic, Ergo, Hitachi, etc. In the same way, there will be no strong differences in Windows settings. Yes, the settings in Windows 10, Windows 8, Windows 7 are slightly different, but not critical. I'll show you everything.
If you have a laptop, you can do everything according to this article:.
Preparation: check the HDMI ports on the TV and computer, select a cable
First we need to check if our devices have the necessary ports. We also need an HDMI cable to connect. Let's look at everything in more detail. If you have everything, then you can proceed directly to connection and configuration.
If you have ports on both devices and have a cable, then you can connect.
We connect the TV to the computer using an HDMI cable
You just need to take a cable, connect it to the HDMI output on your computer and the HDMI input on your TV.
Important! Devices must be connected when they are turned off and the power is off. There is a risk of burning the ports. There are such cases.
If you connect the TV as a monitor, that is, a single screen, then the diagram will look something like this:
Let's also consider another case when a TV and monitor are connected at the same time.
TV as a second monitor for a PC
The monitor can also be connected via HDMI (like mine in the photo below), via DVI, or even via VGA. As a result, two screens will be connected to the PC.

We sorted out the connection. Most likely, in your case it will already be system unit with a monitor connected to it. And all you need to do is connect a TV to it.
Select HDMI input as signal source in TV settings
Most often, after connecting and turning on the devices, there is no image on the TV. A message like “No signal”, “No signal source selected” or something like that will appear. On the TV you need to select the signal source. The port where we connected the cable.
To do this, your TV remote must have separate button"SOURCES", or "INPUT".

After clicking on it, a menu should open in which you can select the signal source. You can see which port on your TV you connected the cable to (each port has its own number). Or simply select an active source. The process itself may vary depending on the TV. I have an old LG.

The image from the computer should appear on the TV. This will be either a copy of what is displayed on the monitor (if there is one), or a blank desktop (expand).
The main thing is that the picture from the computer appeared on the TV screen. Next, in the Windows settings we can change the image output mode. There are several of them there.
Setting up an HDMI-connected TV in Windows
The screen resolution is adjusted automatically in most cases. So in Windows settings we can only change the multi-display mode. This is only relevant when a monitor and TV are connected to the PC. If there is only one display, then these settings are not needed.
The easiest way to change mode in Windows 10, Windows 8 and Windows 7 is a keyboard shortcut Win+P.

After clicking on them, the "Project" menu will appear. In the top ten it looks like this:

In Windows 7 like this:

Let's look at each mode in more detail.

In most cases, these settings are quite sufficient.
Additional screen options
To open them, just click right click mouse onto an empty area of the desktop. In Windows 10 you need to select "Display Settings", and in Windows 7 - "Screen Resolution".

A settings window will open where you can see how many screens are connected to the computer.

You can also define them (by clicking on the "Define" button), change the resolution of each screen and operating mode (which I talked about above).

In Windows 7, the settings of a TV connected via HDMI look like this:

We figured out how to set up the image on the computer.
What to do if the sound from the computer does not go to the TV?
This happens very often. The picture appeared on the TV, but there was no sound. It’s not there at all, or it sounds when it’s connected to the computer. speaker system. If you want the sound to come through the TV, then first check that the sound on the TV is not muted or distorted.

Your TV should be in the list of devices. You need to right-click on it and set “Use as default”.
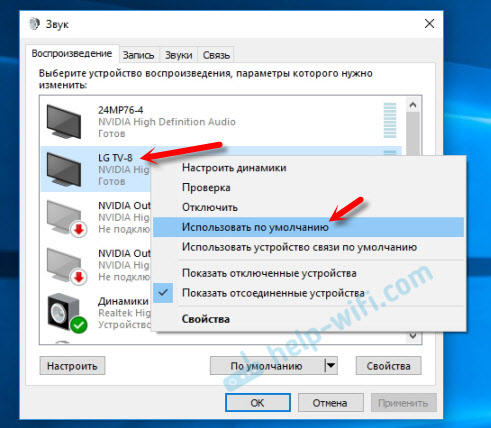
If the TV is not in the list, then right-click on the empty area and check the boxes next to two items: “Show disconnected devices” and “Show disconnected devices.”

If this does not help, and there is still no sound from the PC on the TV, then try reinstalling the video card driver. Just download it and start the installation. At this moment, let the HDMI cable be connected to the computer.
I showed how to check these settings in Windows 7 in the article. Be sure to watch it and read the comments. There is a lot of useful information there.
I have never encountered a problem with audio output via HDMI. No matter how many times I connected, everything worked immediately after connecting. But there is such a problem.
Connecting a 4k TV to a computer. Ultra HD over HDMI
If you have an Ultra HD TV (aka 4k) and a video card supports this resolution, then there is a chance to get a beautiful and clear image. I checked, everything works. I have a 4k TV from Philips. And the computer has a video card GeForce GTX 750Ti, which supports resolutions up to 4096x2160.
There are a lot of nuances there. I'm not a gamer, so I'll try to explain as best I can. The fact is that it is possible to output a 4k image via HDMI, and I succeeded. But most likely we will get a frame refresh rate of 30 Hz. Which is very little. To get 60 Hz, we need a video card with HDMI 2.0 and the same cable. This is why DVI cables are used to connect to 4k monitors. But I haven’t seen anything on DVI TVs.
I connected everything, started the computer, and saw that the image on the TV was somehow strange, the colors were wrong. Perhaps this is only in my case.

Everything is resolved very simply. First, I tried in the TV settings to disable UHD (Ultra HD) for the HDMI port to which the PC is connected. The image became normal, but the resolution turned out to be normal, 1920x1080. Therefore, this method is not very suitable for us.
To get a real 4k image with natural colors, you just need to change the screen resolution to the maximum 3840x2160 in the display properties in Windows 10.

The image immediately became normal. The scale was also automatically set to 300%. Otherwise everything would be very small. It can be changed if necessary. I haven't tried playing at this resolution. But I think that this is not realistic. Moreover, the video card on my computer is not the newest and not the most powerful.
I look forward to your comments. Ask questions and don’t forget to share tips. Best wishes!
“What progress has come…” I want to sing, looking at the shelves of modern supermarkets with digital equipment. The age of new technologies is constantly changing daily life, and today you can watch your favorite movie not with a nasal pirated translation, but in high quality HD or Blu-Ray. All you need is availability HDMI outputs at the TV and computer.
The first thing you will need is an HDMI cable. Often it comes bundled with the TV. If not, you can buy a cable at any audio-visual equipment store. Decide in advance what length of cable you need. On TVs last generations There are several HDMI ports on the back. Connect one end of the cable to HDMI 2 and the other to HDMI connector your computer or laptop. Don't worry if, instead of the desired image, you see a warning on the TV screen that the cable has not been connected or there is no signal. How to act in this case is shown in the example Samsung TVs. Find the Source button on your TV remote and select HDMI 2 from the list provided. Perhaps at this stage the issue will be resolved and the image will appear on the TV screen. If nothing has changed, go to the computer (laptop) settings - right-click on a free field of the desktop. A window will appear in which you need to select “Screen Resolution”. Pay attention to the line “Multiple screens”. If it is set to “Display desktop on 1 (2) monitor only”, change it to “Duplicate these screens”. In the “Screen” item, the inscription “Multiple monitors” should appear.