Connecting the printer to the network. USB connection
It is impossible to imagine a modern office without a printer. Every day dozens of documents pass through the organization, receiving“ life” thanks to this printing device. With a properly functioning printer, you can print up to 1,000 pages per day. The operation of a printer, like any other PC device, begins with its installation. It would seem that just connect the cables to the computer and you're done! However, the installation process is more involved than it seems at first glance. We will talk about how to set up a printer on a computer in this article.
Connection methods
Depending on the type of access to the printing device, the connection can be local or remote. At local connection The printer connects directly to the computer using USB cable . Network connection involves connecting the printer to a PC via network cables. At the same time, there is no direct connection between the computer and the printing device. This type of connection is used in large companies that have up to several dozen computers at their disposal. They are connected to one printer using network cables.
Advantage of this connection The point is that sharing a printing device eliminates the need for a company to purchase a printer for each PC. Local connection is intended for home use. It is faster and easier to set up and does not require the purchase of additional equipment.
Below we will describe the scheme for connecting a printer to a computer using the local option.
PC connection
First, connect the printer to the computer using USB cable and turn it on to the network. Next we press“ Start” and go to the section“
At this stage, the system prompts us to choose one of the two already mentioned methods of connecting the printing device to the PC. In our case it is local connection, so we choose“ Add a local printer."
The next step is choosing a port. A printer port is a type of connection that allows a computer to communicate with a printer. By default, the installation wizard will suggest using the existing LPT1 port. It fully meets the installation requirements, so we leave everything as it is and move on to the next stage.
The main component of setting up a printer is installing drivers.
Essentially, a driver is a program for connecting a printer to a computer, and at the same time acting as an intermediary between them. It is she who is responsible for ensuring that the set of iron and plastic turns into a stably operating printing machine.
An installation disk with a driver is always included with the printer. In order to install the driver, select “Install from disk” from the proposed list. If you do not have this disk, then you can download driver files from the Center Windows updates or the Internet.

After the drivers are installed, the setup wizard will prompt us to give a working name to the printer. This can be a standard option using its brand (for example, HP Laser Jet 1010) or any name of the user's taste(For example, " Artyom’s printer”) . Select a name and click" Further".
The next step is setting up access to the printer. In home use, this point loses its relevance, since there is no need for shared use of the printer. General access, as mentioned above, can be used where 2 or more computers operate on the network. Therefore, let’s activate the item“ This printer is not shared” and click" Further".
This completes the printer setup. The system will give you a window notifying you that the procedure has been successfully completed.
The final stage in setting up a printing device is checking its operation. Once the installation is complete, the wizard will prompt you to print a test page to verify that the printer is operating correctly or to obtain diagnostic information. Click on the “Print” button test page” and click “Done”.
We tell you how to set up a tp link router in this article. How to reset your computer to factory settings - .

Connecting and setting up a printer that is open to common use, held at 3-4 simple steps . According to the scheme already known to us, we open the menu“ Start” and go to the section“ Devices and Printers.” We install the printer, but this time select the item“ Add network, wireless or Bluetooth printer."
Thus we launch automatic search printing devices on our network. In less than a minute the system will open the list for us available printers. Select the one you want to connect to and click next. The printer is connected, drivers are installed.
Once the installation is complete, the system will notify you with a notification. Installed network printer will be selected as the default printer. To deactivate this option click on it right click mouse and uncheck the box“ Use as default."
Second way
If at the stage of searching for network printers the printing device you need was not found, then you can access it by entering it network address. In the search results window, click on the link“ The printer you need is not in the list." The setup wizard will open a window with a line where you will need to enter the printer address. It has the following format: "\network_computer_name\ printer_netname" When connecting the printer to Windows computer 7, you will need to find out the name of the PC to which the printer is connected. This is done in the menu properties" My computer".

Enter the format in the input field and click“ Further". The installation of the printer and drivers begins. Boththe above methodsare relevant for all types of devices running Windows OS, so if you are wondering how to set up a printer on a laptop, then the answer is simple: use the installation instructions for a PC. Thus, the process of setting up a network printer will take no more than 5 minutes.
It often happens that you have a computer and a printer, but no matter how you connect them, they do not want to work in pairs. There are several reasons for this. Let's look at them to know how to connect a printer to a computer.
The simplest case
Let's start with the simplest situation, when you have one computer and one printer. In this case, you connect them to each other via one cable without “intermediaries” in the form of network routers and other things. There is no need to tell you how to connect the printer to your computer via USB. You just need to take the cable that comes from the printer and has a plug at its end for connecting to the USB port of the computer, and plug it directly into the appropriate connector on the computer. Depending on what kind of computer you have and where it is located, the methods for connecting the printer may vary. If you have a large landline home computer, consisting of individual parts in the form of a system unit, monitor, keyboard, mouse and external acoustics, and you purchased a printer for home use in order to connect and leave it as is, it is more logical to connect the printer to system unit from the rear and forget. It doesn’t matter where the system unit itself is located - on the table or under it. If the printer's USB cable allows you to connect it without using additional extension cables, then it is best to connect it directly.

Universal connection
There is no need to wonder how to connect a printer to a computer if you have a different type of computer. Whether it is a monoblock (when the system unit and the monitor are one whole), a laptop or something else, the connection method does not change much. Simply plug the printer into the USB socket of your computer. Home printers today almost never use other types of ports in their kit. The USB bus is quite convenient and versatile for this - through it you can connect both data storage devices and input/output devices ( computer mice, keyboards, printers, scanners, MFPs, etc.). However, there are situations when the computer writes that the printer is not connected.

What to do
In those cases when you connect the printer to your computer for the first time, in order for the operating system to correctly recognize the printer and be able to use all its power, you may need a set of drivers for your printer. Most often it comes with a CD. To install them, you need to insert the storage medium into the computer's CD/DVD drive and run the program. While this program is transferring the necessary data to your computer, you may need to turn the printer on/off so that the operating system can determine its address in the device manager. Once the driver installation is complete, the printer can be used. Reboot your computer to correct operation today it is usually no longer required.
If there is no disk
It happens that the driver media is not at hand or it was not included in the package. Then the question arises of how to connect a printer without a disk. To do this, you will need an active Internet connection on your computer and the exact name of the printer, that is, not only its brand, but also its series. You can usually find this data on its body. Then just run a search in your Internet browser with the name of the printer series and an indication operating system your computer. Drivers can usually be found on the website of the manufacturer of your equipment.

If there is a problem
Sometimes the question arises: “Why doesn’t the computer see the printer even after installing the drivers?” There are usually several problems leading to this. The most banal and funny thing is that it can simply be turned off for you. Check to see if the lights are on, if the power plug is plugged in, and if the devices are connected to each other. If all these conditions are met, but the printer for the computer is still not detected, then try disconnecting them from each other, turning off the printer and restarting the computer. Then connect again, if nothing happens, then a technical breakdown is possible. There are two options: either there is a malfunction in the computer - the USB port may be broken; or there is a problem with the printer - the USB cable may be damaged. If in the first option you can connect the device to another PC port, then in the second it is better to contact a repairman so that he can identify and fix the problem. It may be necessary here easy replacement cable, or maybe needed good repair. In any case, it is necessary to resolve the issue of why the computer does not see the printer.

Multi-user approach
If you use several computers to access one device (you have more than one in your family at home, or you work in an office), then to do this you need to know how to connect a network printer. This may require using network router, because one USB cable is not enough for everyone. We already know how to connect a printer to a computer via a USB cable. But a network device requires a different sequence and slightly different tools.
Important points
First of all, we will consider the option when the printer is connected to one computer using the same USB cable. Next, we need a configured network (office or home) for free data transfer between several machines. We need to remember that the computer to which our desired printer is directly connected must always be turned on and not be heavily loaded, since other machines on the network will connect to the device through it. If it is heavily loaded, then any request for print access from third-party machines may not make it through the flow of processed data. If it is turned off, the printer will not be visible on the network at all, since the computer is in in this case will fulfill the role network access. The next step is to add the existing device on the first computer to the " local devices"by clicking the "add" button. After selecting the appropriate USB port into which you need to plug the cable from the printer, you need to specify the drivers for this model. If they are on the disk, you need to specify the disk. If they are on the Internet, then you need them download. Then select a name and name the printer, by this name you will find it on the network. Next, you can optionally indicate comments on the use of the printer by other machines or users and open it publicly in local network. After these operations, the printer should be detected by all computers on your local network (office or home). It happens that to access this device you may need the user login of the first machine. To resolve this issue on other computers, you need to follow simple procedures. First you need to own settings Network access enable discovery and file sharing. You may also need to disable the input from password protection. Then in the printer control panel, select “install a new device”. Next, select the desired printer that was previously added to the network environment. Allow installation of drivers for it. The system may ask you whether you trust this network device on the network. Click the "install driver" button. Next, the operating system will notify you that the network printer has been successfully connected and will offer to use it as the default. Having selected the option you need and completed the installation, you will add the device you are looking for to access on this computer. On other machines with a similar problem, the same procedure is performed.

Remote access
Sometimes a problem may arise that the printer cannot be placed next to any machine, and it is vital to open access to it. When it comes to the question of how to connect a printer to a computer over a network, a router with a USB port will save you. It is also very important to know whether the router you choose supports connecting a printer of this brand. If everything is fine, then we next need to connect the printer to the router via a USB port (they must be connected in the off state). Then, by logging into the router’s web interface via local computer On the main tab in the network map, you can find out whether this device was detected and successfully connected to the router. If the printer is supported by the router and everything is done in correct sequence, then the router must detect the device and connect it itself. Next, we need to open the “printer installation” window on the computer and select “add”. Then select the access type by specifying the port type by IP address. Then you need to enter the router address and disable the printer request for availability and automatic configuration of drivers. You will be redirected to the request window additional information about the port, in the devices tab, select Generic Network Card.

Location
Next you will see a window with a choice of drivers: install them from disk or via the Internet. You will then be asked to select a name for the printer. Since you won't be accessing it through this machine from other computers, you don't need to share it on the next page. Then specify its use as the default and complete the printer installation. After all operations, you can select a test print in the properties. Now you know how to connect a network printer.
For the modern man to print required document or a photo on a computer, it is not necessary to look for an Internet salon, and these salons themselves, where a person could rent a place to work on the Internet, are gradually becoming a thing of the past. Printers presented in modern centers electronic technology, are “friends” with absolutely any device, be it desktop computer, laptop or even phone. Each case has its own nuances.
There are two ways:
- network;
- local.
Usually, a connection via a cable is enough to work; then the device itself recognizes the printer. All that remains is to ask software, or download a driver or program that is usually included on a disk included with the printer itself. After installation necessary applications you can print.
However, this is not always the case, especially in Windows 7. The owner will have to configure the equipment himself and force his PC to recognize the connected device. Drivers are usually included with the printer.
Via network cable
Connecting the device via network cable includes several stages.
Stage 1
- One end of the wire is connected to the printer, and the other to the system unit.

We connect one end of the wire to the printer, and the other to the system unit
- Click the Printscreen button. The device will “spit out” the sheet with the IP address.

- On the PC, press the start button, the printing devices section, as in the picture.

- Click the “Add Printer” button located at the top.

- The installation wizard will ask you what type of device you are connecting to. Select the first item in the window. That is, a local device, with a note that its use is permissible only in the absence of a USB printer.

Stage 2

Stage 3
Now the lack of a driver separates the user from using the device as intended. To search, click the “Browse” button, update center. Windows itself will download what you need.

Attention! The Internet must be available for this!
Stage 4
All that remains is to designate who will have access to the device:

How to change a printer from a local network to a network one
To do this you need:
The system will try to find the designated device on the network. You can help her by assigning one yourself, selecting the appropriate function. You just need to click on the review button. A list of devices connected to the network will open - if one printer is connected, then it will be displayed alone there.
If the search is successful, no more requests from the system will follow and a notification will appear indicating the completion of the procedure.
Windows will recognize the printer and you can print from it.
How to Connect a Printer Wirelessly in Windows
To connect via Wi-Fi, it is necessary that the WPS connection function is available for your printer model. Almost all new printer models support it.
Almost, but still not absolutely everything. You can check whether the device can connect in this way by looking at its bottom. There is a PIN code and an icon next to it. Here it is.

This is the WPS logo. If it is there, it means that it is possible to connect the device through the router. True, the PC owner will still have to make some settings on his own.
For this:
Step 1. Open the web interface of the router. To do this, you need to open your browser and enter the IP address of the router into the address field: 192.168.0.1 or 192.168.1.1.

Step 2. Next, open the WPS settings menu. It is impossible to say exactly where it is for everyone. You can consider this using the example of a D-Link router. Actually, in order to get the device to print, only two steps are required:

Step 3. It remains to make sure that the network is protected by a WPA or WPA2 filter.
Important! Some printers have a button to activate WPS. If you press it and hold it for a long time, the computer itself will know who is connected to it.

- In the PC itself, in the start menu, open search bar Type “installation”, select the “Install printer” option.

- Further steps are the same - local or network, selecting a new port and IP.
Attention! The poll is unchecked!
- A window will then appear. There is no need to be afraid of the phrase that the device was not found; select the “Normal” option.

- When the system asks about the driver, select the disk as the source.

- Open “Browse” to select the driver disk, click “OK”.

All that remains is to come up with a name for the new device.
Via a router with a USB connection
This option is suitable for cases when it is not possible to determine whether the printer can work via Wi-Fi and the router has a suitable connector.
Algorithm:

Now you need to add the coordinates of the new device to the configuration. For this:
- Open the Start menu, then Devices and Printers.

- Click on the “Add a printer” option (“Install a printer”).

- The system will ask what we are adding - local or network device. Choose local option. Click “Next”.
- When asked about the port, they note the creation of a new one.
- Select “Standard TCP/IP Port” in the list and click “Next”.

- The connection settings window will appear. To complete the task you need to know local address router (the user read it on the computer screen, giving it a command in the appropriate mode) and the port name. For the latter, you can simply repeat the router address.

- The PC will find the port and install the software. Check the “Special” option and go to “Options”.

- Check the protocol “LRP”, click “OK”.

- Click Next.

- Enter a new printer name or leave it as default, click “Next”.

- Check the appropriate box and click “Next”.

- Try printing the sheet, click "Done".

Video - How to connect a printer to a laptop via Wi-Fi
Connecting equipment via cable in Mac OS X
Apple's rules for connecting equipment differ from Windows, but are also simple. All principles are initially carried out along the same path: click on the corresponding symbol on the panel and go to the desired subsection, and in it there is the desired option. The general algorithm looks like this:

The printer is set up for Windows but needs to be used on a Mac
Sometimes this happens: the printer is connected to a gadget running Windows, but you need to connect it to a Mac. To do this, you need to change the printer from a local one to a network one.

The printer will successfully appear on the desktop and you can print everything you need on it.
Connect the printer to your smartphone
All new generation printing devices have corresponding ports. When you connect it to a smartphone or tablet, Android recognizes it.
Not all smartphones have a place to connect equipment. In this case, you will have to spend money on an adapter. Be sure to download drivers from a reputable source and start printing.

Video - Printing from a mobile phone to a USB printer
How to connect a printing device to an Apple laptop?
A network device is considered to be a device connected via a print server, Wi-Fi or Ethernet and having its own IP. The connection rules here are also similar to previous options for connecting printing devices to a Mac.
The differences start from the moment you add a new device:

The action is confirmed.
If the PC does not see the equipment
It often happens that even after connecting, a device from a reputable company sits and shows no signs of life, and it is not possible to start printing from a computer for the simple reason that the PC or laptop does not see anything printing. You should not immediately make claims against the manufacturer or seller - most likely, this is not the case.
The answer to the question why the system does not see the device may lie in the following:

There are different methods for resolving these incidents. First of all, if the printer does not “come to life”, and the system does not read it at all, you should re-read the instructions again and make sure that your actions are correct. Or all the rules are followed, but the owner completely forgot about the driver. It is possible that the owner did not push the wire all the way through when connecting, and therefore the devices did not come into contact.
The driver problem is one of the most common reasons failure of the computer to recognize what is connected to it. “Native” software is most preferable. At a minimum, from a credible source. Many users choose it at random: they open the first site they come across, download it and consider the matter settled.
This is a fundamentally wrong approach. A foreign driver will not fix the problem and the device will remain “lifeless”.
If the problem is the wrong driver, the system will display the following message.

It happens that the driver itself does not work correctly - it should be removed and . Usually the issue is resolved at this stage.
If the user is convinced that all connection steps were carried out according to the rules, the connectors and wires should be checked and cleaned if necessary.
On some PCs the print service is deactivated. In order to fix:
- Open “Control Panel” in the “Start” menu.

- Next is the “Administration” tab.

- In it, select the “Services” subsection.

- You need to find “Print Manager” and double-click on it with the left mouse button.

- The service is activated by selecting a startup type or the appropriate command. In this case, set the “Automatic” option.

If this is the only problem, the printer will work. Sometimes something else happens: everything is connected correctly, but the system takes the user to the wrong printer, but to another device.
So, you can connect to any computer and configure the appropriate access options. It is important to follow the instructions and if something does not work, it most likely means that the user performed the wrong action. If there are no doubts about the correctness, you should ask a professional.
Video - How to install and connect a network printer to a computer
It is common practice in the office and at home to share various peripheral devices, such as scanners or printers, on the network. This is convenient - you can immediately print any document and do not need to drag files on a flash drive from computer to computer or buy for each workplace separate printer. How to properly configure the equipment for sharing we will tell you in this article.
Network printing
Printing over the network is a common thing, now you won’t surprise anyone with it. However, it is still often sharing to the printer is configured according to this scheme. The printer is connected to one of the computers and is accessible to other users who can directly print their documents. Everything is simple, you don’t need to be fancy with the settings. But, in fact, it is not always convenient. In the best way connecting a network printer is connecting through a router.
Advantage
The main inconvenience of the scheme described above is the binding of the printer to a specific computer. This computer must be turned on for network printing to work. What if the employee who works for him got sick and did not come to work, and access to the computer is password protected? Or has the computer failed?
Therefore, it is much more convenient when the printer is connected to the router and is always available. But there are nuances here.
Print server
In order for the printer to work independently on the network without connecting to a computer, a print server is needed. The print server can be software built into the router or printer. Routers equipped USB port, as a rule, have support for printing over a network. However, just in case, it is recommended to check technical documentation. If your router has a USB port, but does not have a print server, you will not be able to connect a printer to it.
The printer may have its own built-in print server. These printers are equipped with a LAN port for connecting a network cable or wireless Wi-Fi-module.
If your router does not have a built-in print server and you have an ordinary printer, you will need a hardware print server - separate device with a USB port for connecting a printer and a network connector, through which the device is connected to the LAN port of the router using a patch cord.
Types of connection
Before setting up a network printer via a router, let's deal with possible options connections. So, You can connect the printer to the router in the following ways:
- Via USB port. This connection is possible if your device supports network printing.
- Via LAN port. If your printer is equipped with a built-in print server with a network port, you can connect it to the router using a patch cord.
- Via Wi-Fi. Some modern printers are equipped Wi-Fi module and can communicate with the router over the air. You can also connect to them directly from a laptop equipped with a Wi-Fi module.
- Using a hardware print server. This is a separate device to which the printer is connected. The print server has a LAN port for connecting to the router.
USB connection
Connect your printer to the router's USB port using a cable. Both devices must be turned off. Then turn on the router and wait for it to boot. After this, you can turn on the printer. By default, the router does not need special setting, it should immediately recognize the printing device. You can check this by logging into the device’s web interface and opening the network map. Your printer model should be displayed there. If this does not happen, check the status of the print server. It must be online.
Wi-Fi connection
If your printer is equipped with a wireless Wi-Fi module, then you can connect it to the router over the air without any wires. You can do this in two ways:
- WPS. In the instructions for your printer we find how to activate the WPS function. Then click on the router. We wait until the connection is established (the indicator on the router stops blinking) and check whether your printer appears on the network map.
- WEP/WPA. Manual setting similar to setting up the first connection to wireless network any Wi-Fi devices. We find the network settings in the printer menu, select the network we need and enter the username and password.
Connection via LAN port
If you happen to be the happy owner of a printer with a network port, you can connect it to the router via LAN using a regular patch cord. The cable is usually included. If it is not there, you can use the patch cord from the router if you do not have one. Or buy a cable of suitable length in a store.
In the device menu you need to set it to a static IP address. It is advisable to do this even if your router is configured. The fact is that if the printer’s IP address constantly changes, this will complicate its search and it will periodically disappear from the list of available devices. Of course, there is an option to reserve an IP address in DHCP settings server by MAC address.
After this, the printer will reboot. After which it can be found in the list of network devices.
Install the printer drivers and print a test page.
Using a hardware print server
If your printer is not equipped network card or a Wi-Fi module, and the router has a USB port, you can purchase a hardware print server. As mentioned above, this is a separate device that acts as an intermediary between the router and the printer.
 Budget models have one USB port and network port. More expensive ones - several USB, and also, optionally, an LPT port. Also, the print server can have a built-in Wi-Fi module and connect to the router not via cable, but over the air.
First, we connect the print server to the router, and the printer to the print server.
The print server is configured using the supplied proprietary utility. It allows you to find a print server on the network and set an IP address for it. Further configuration is carried out via the web interface according to the instructions. You can enter it by entering address bar IP browser that was installed for the print server during initial configuration.
As you can see, there are several ways to connect your network printer to your router, depending on its hardware capabilities.
Computer settings
Regardless of which of the methods described above you choose, the settings on the computer are performed the same in all cases.
You can configure it through the “Control Panel” or through “Printers and Scanners”. The setup is similar.
"Printers and Scanners" appeared on latest versions Windows. This application is suitable for setting up a network printer on Windows 10.

We will configure it through the “Control Panel”, which is available on all Windows versions. In particular, it is suitable for setting up a network printer on Windows 7.
Search for “Control Panel” in your computer search. In the Control Panel we find the “Devices and Printers” section. Click on the “Add a printer” item.

The system will try to find the device connected to the computer, but, of course, it will not succeed. Therefore, we will use the item “The required printer is not in the list” at the bottom of the window.

On the next page, select the option to add by TCP/IP address or host name. Click “Next”.

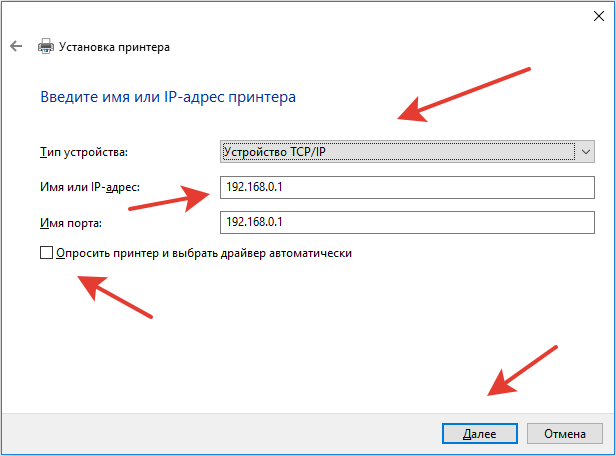
In the next window, in the “Device Type” drop-down list, select “TCP/IP Device”, and below in the “IP Address” and “Port Name” fields enter the address that we get as follows:
- When the printing device is connected via USB to the router, enter the IP address of your router, which you enter in the browser to enter the web interface. Typically this is 192.168.0.1 or 192.168.1.1. It is indicated on the label at the bottom of the device.
- When connecting via a LAN port with an address specified through the menu. In this case, enter this address.
- If the printing device is connected via LAN and receives an IP address from DHCP servers, look, .
It is better to uncheck the checkbox for asking and selecting a driver automatically.
In the next window, check the “Special” box and click the “Options” button next to it.

In the settings window that opens, select the LPR protocol, and in the “Queue name” field - in our example we wrote “naseti”, in fact, any name can be written. Click OK and return to the previous page.


You can give the printer a new name, or you can leave the default one.

We refuse the offer to allow shared access to the printer and click “Next” again.

A message should appear here stating that everything went well and the printer is ready for use. To verify this, print a test page.

Setting up a print server on the router
If you have any difficulties, you can use the utility to configure the print server on the router. You can download it from the manufacturer’s official website by selecting your router model in the “Downloads” section.
To configure the print server on TP-link routers the proprietary TP-Link UDS Printer Controller utility is used. After you have downloaded and installed the program on your computer, run it and it will automatically find all printers connected to the router. Select the one you want to use to connect automatically.
The utility works with Windows and Mac OS.
For D-Link routers use the proprietary SIUtility utility. If you have a router from another manufacturer, look for compatible software on the official website.
A computer local network consists of several PCs located close to each other. Such an association is built through wired and wireless technologies. Technical features vary depending on routing, administration type, and topology. The simplest local network is considered to be a direct (point-to-point) connection of two computers. For such a connection, standard topologies are used.
Users of PCs connected to the same local network can share equipment, in particular a printer. You need to connect your computer to the printer via a local network.
What will we talk about:
Connection via PC
The need for such a combination often arises in offices where, due to lack of finance or simply space, there is one printer for several computers. This mode of operation is fraught with some problems. After all, only the employee to whose PC the equipment is connected can fully use the printer, while everyone else is forced to wait their turn with flash cards in their hands.

Quick printing of required documents makes the work process as streamlined as possible. Today, there are several ways to connect a printer via a local network.
First you need to make some changes to the settings on the main PC. It is necessary to understand that the computer to which the printer will be connected must have the appropriate characteristics. This is due to the fact that he must be in working mode throughout the working day without freezing. Otherwise, you won't be able to print anything.
- First you need to set up your local network.
- We connect peripheral equipment to the PC using a USB cable.
- Installing drivers for the printer.
- Print out the page for testing.
We provide all PCs with shared access to the connected printer
Go to the “Control Panel”, open the “Network and Internet” tab, then “Network and Sharing Center”. The last step is to open the sharing options. A tab with this name is present in the list that appears.
In order to connect the printer locally Windows network 7 You also need to use the “Disable password protected sharing” function. The last step is to save the changed parameters.
Connecting “Sharing” on PC
Again, the “Control Panel” menu, the “Network and Internet” tab, “ Home group" You also need to go to the section dedicated to printers and devices, where we first select and then confirm “Sharing”.

Allowing access
To do this, go to the “Control Panel” menu, then you will need a tab called “Hardware and Sound”. In it, select “Devices and Printers”, on desired device Click to open the dialog box and click “Access”.
Then we confirm our permission and assign a new name to the printer. This will greatly facilitate subsequent setup. The equipment after these manipulations can be considered network.
The printer installation takes place in automatic mode, since all drivers are found by the OS (Windows 7, Windows XP, Windows 10), otherwise they are loaded from special disks. Fixing the "Default Device" setting makes the printing process easier because you only have to select a printer once.
If a mistake occurs and the new name does not appear, you should add it manually.
Opening:
- "Control Panel";
- "Equipment and Sound";
- "Devices and Printers"
At this stage, click on the “Add a Printer” tab.

To connect a printer via a Windows 10 local network, you can use search. The program will display its results, and if the device is detected, click “Next”. The same applies to the operating room Windows systems 8.
If Windows 7 (Windows XP) is installed on the PC, then the “Add a network printer” tab is used. In the case when manual search does not end with the desired result, you will have to select the link called “The printer you need is not in the list”, then “Select shared printer by name". All you have to do is click on “Review”.
Then you see a list of PCs connected to the local network. Of these, you must select the one to which the peripheral device is connected via a USB port. After discovering it, you just need to follow the recommendations of the wizard. Similar program Available in Windows 10, Windows 7, Windows XP and other OS.
Connection via router (router)
A router is a device for accessing the Internet, a kind of intermediary between the client and the provider. Example in the photo. Its use makes the process safer and more convenient. The router is used in networks various types, including segmented local ones. It also provides traffic management and uninterrupted communication. Used in this case network protocols expand and complicate the network. The router uses network paths to transmit information.

There are two types of devices: wired and wireless. The main criterion is the PC format. If the user has a laptop, then it will be much more convenient for him with a router that provides for the absence of wires.
The printer is connected via a router so that it is accessible to all PCs on the existing local network. The process does not require special adapters and is suitable for Windows 10, Windows 7, Windows XP and any other OS that will be needed USB interface. Every printer has it.
Therefore, you will need a router, a printer, and a cable to connect to the previous device. Also, we should not forget about the PCs that make up the local network.
You should make sure that the router has a USB port and supports a printer. You need to connect the printer to the router. Both must be disconnected from the power supply.
It is performed from each computer on the network by sequentially entering the following tabs:
- "Start";
- "Control Panel";
- "Devices and Printers";
- “Installing the printer”;
- "Add a local printer."

USB port is being configured
The last step of the previous paragraph ends with a click on “Next”. Then you need to select the “Create” tab new port' as this causes the list to appear. The defining line in it is “Standard TCP/IP Port”. And again “Next”.
Entering data
Here you will need to enter the IP address of the router, as well as the word indicating the router. You should not remove the check mark from the “Query the printer and select the driver automatically” line.

Finding connected printing equipment
If it turns out to be useless, then the next step is to sequentially enter:
- "Device type";
- "Special";
- "Options"
Those fields that were filled in earlier should remain unchanged, just like the “Protocol” line (its value is RAW) and Port No. (9100). After clicking on “Ok” and upon returning “Next”. The last step will be to write the brand of the manufacturer of the connected printer.
Completing setup
This is indicated by a notification that the installation has been successfully completed. Also becomes possible check operation of the printer through a router over the entire local network.
The setup, the process of which is described above, must occur on each computer included in the local network. This method of connecting the printer has several important advantages. It does not require PC operation, hence no expense a large number of electricity. Starting up the router does not take much time, and its operation is not accompanied by noise.